 →
→ Homemade Grandma-Style Pizza
This post may contain affiliate links. Please read my disclosure policy.
Grandma-style pizza is pan pizza with a light crust and crisp edges. The dough is nearly identical to focaccia and, as such, is just as easy to make. No mixer required. No fancy techniques. This style of pizza is perfect for feeding a crowd! Find step-by-step instructions below.
Grandma pizza is sheet pan pizza, similar to Sicilian-style pizza but thinner: you use the same size pan but half the amount of dough. Unlike Sicilian-style pizza, with grandma pizza, there’s no parbake, which makes the process simpler.
I love the various styles of pan pizzas for different reasons — Detroit-style for its irresistible frico crust, Sicilian for it’s pillowy airiness — but for me, grandma is the best: it’s the thinnest of the three styles, and I love the ratio of toppings to crust as well as its texture: light and airy, like focaccia, but with crisp edges, too.
As with Sicilian and Detroit-style pizza, grandma pizza is great for feeding a crowd. What’s more, so much of the process can be done ahead of time, from making the dough to stretching and topping it. A Lloyd steel pan makes for an especially crispy crust, but a standard half sheet pan works well, too. Find a how-to video and step-by-step instructions below.
How to Make Grandma-Style Pizza, Step by Step
First, make the dough. You’ll need bread flour, instant yeast (SAF is my preference), salt, and water:
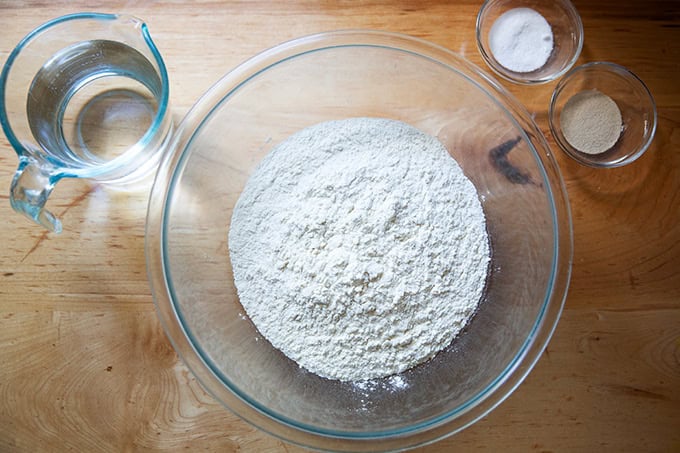
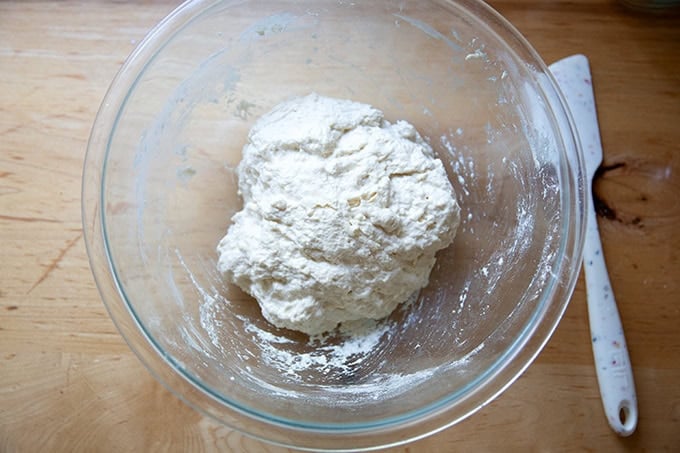
The process is the same as making focaccia: Combine the dry ingredients in a large bowl:
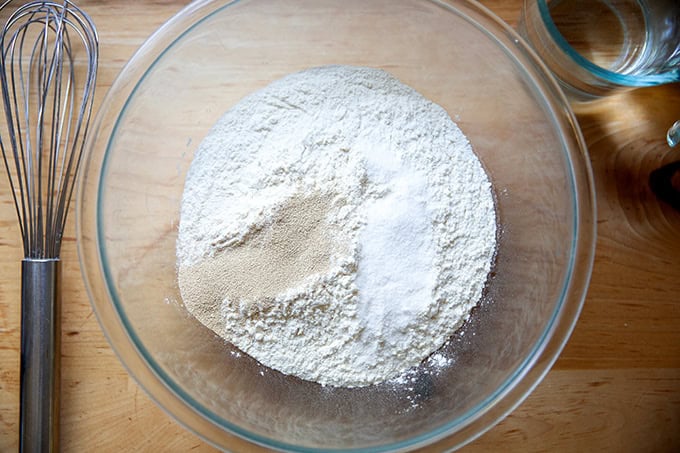
Whisk them together, then add the water:
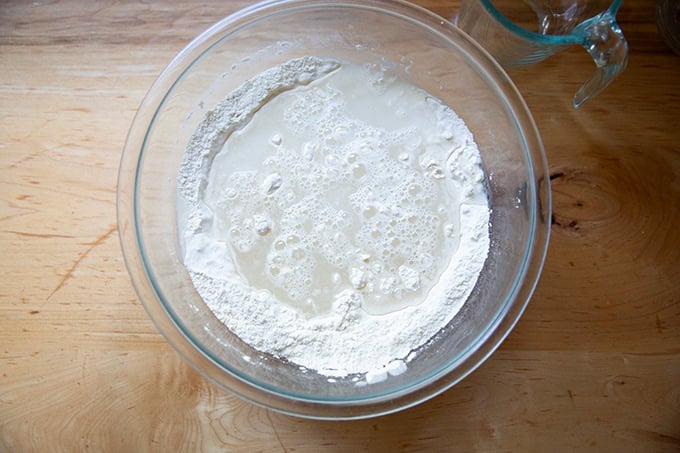
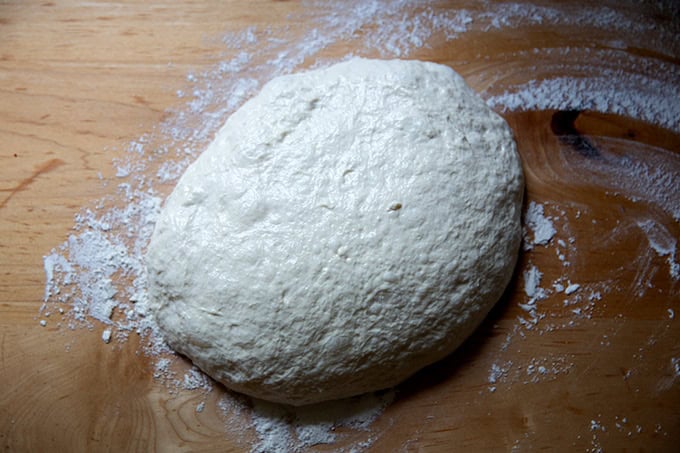
Mix until you have a sticky dough ball.
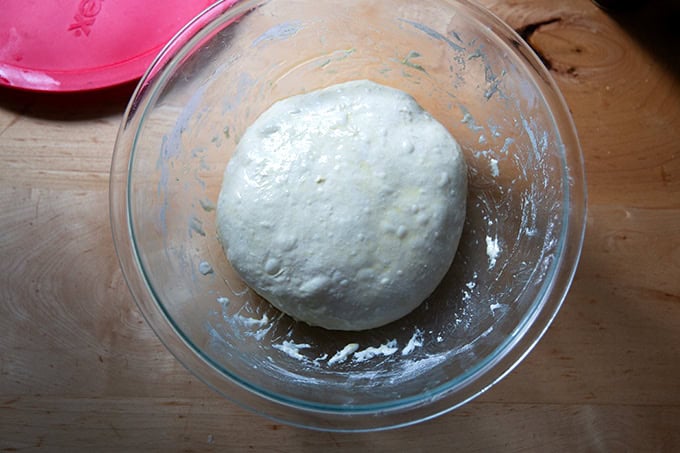
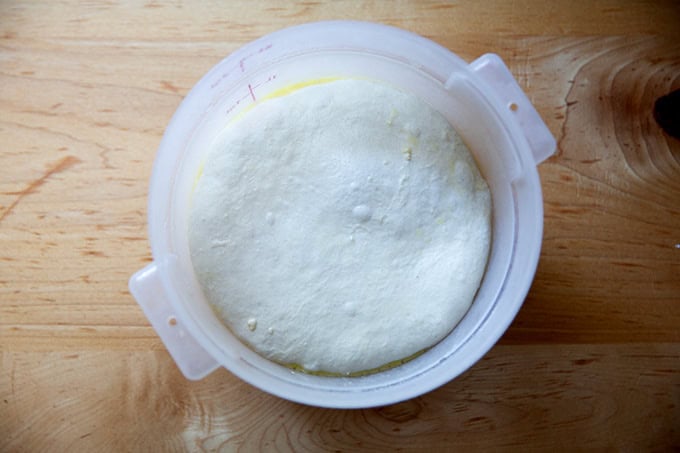
Let the dough rest for 30 minutes, then stretch and fold the dough. Video guidance is above (and in the recipe card.) After the stretches and folds, your dough will be a more cohesive ball. Slick it with olive oil, cover the bowl, and let it rest at room temperature for 6 to 10 hours.
Uncover the bowl…
… deflate it …
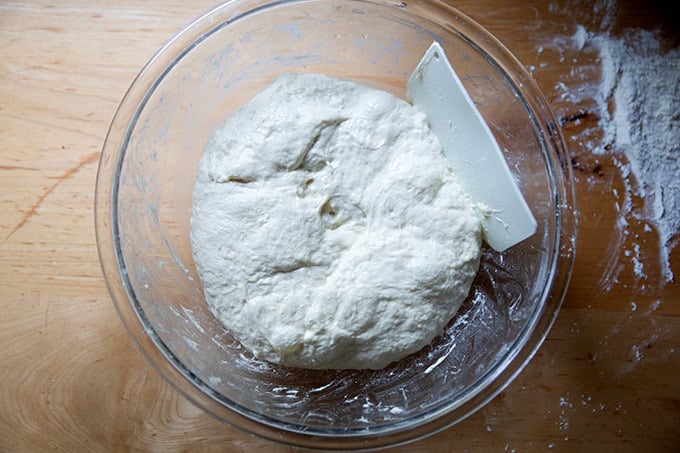
… and turn it out onto a floured work surface.
Divide the dough into two equal portions. Each portion should weigh roughly 525 grams.
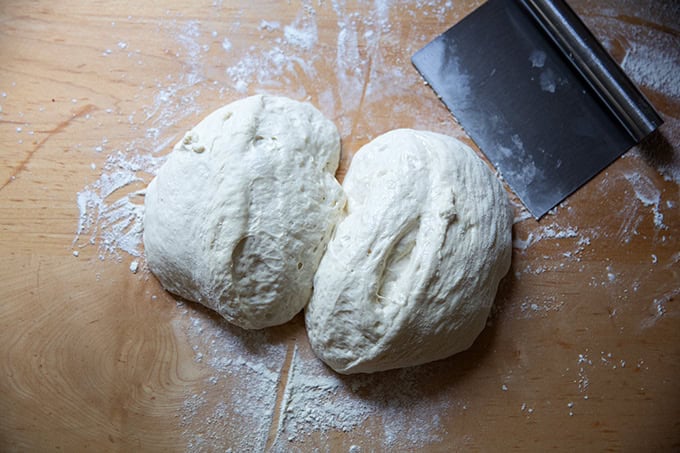
Ball up each portion. The dough will be very wet and sticky, so use flour as needed.
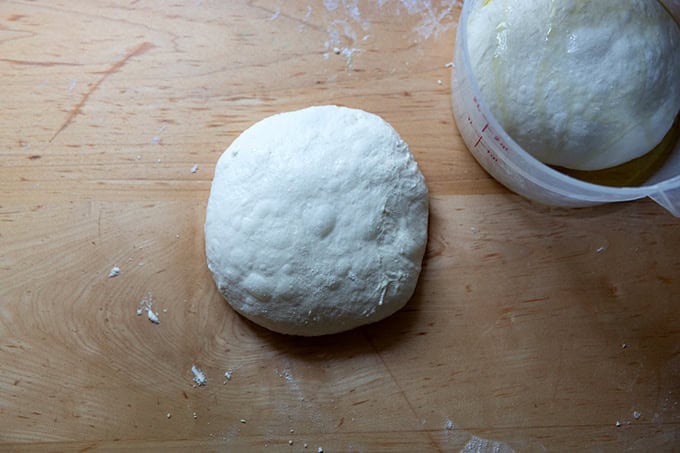
Transfer each portion to a lightly oiled vessel. I love this 2-quart vessel. (I have 4 of these! So handy for so many things.) Drizzle each ball lightly with oil and turn to coat. Cover the vessels and place them in the fridge for 1 to 3 days (or for as long as 5). See recipe box if you need to shorten this timeline.
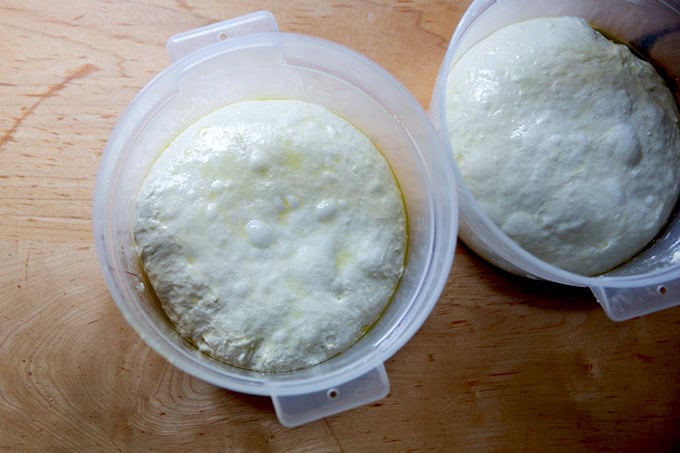
On baking day, remove one (or both if you are making two pizzas) of the vessels.
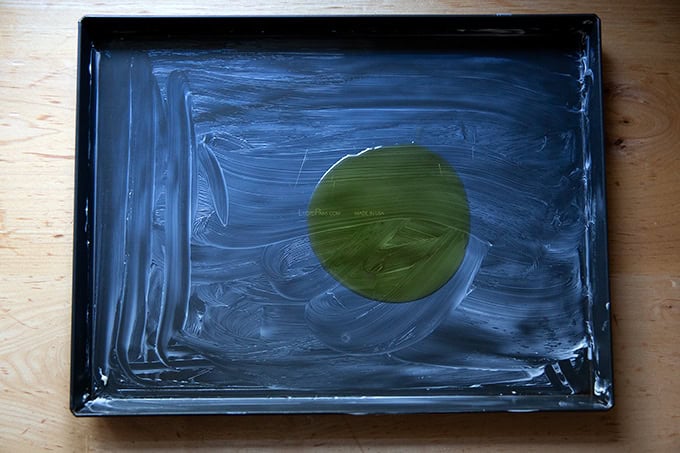
Prepare your pan. This is a Lloyd grandma-style pizza pan, and it makes an especially nice crust but you can use a standard sheet pan in its place. You want to butter the pan first — this provides flavor, promotes browning, and prevents sticking — before pouring in 1 tablespoon of olive oil.
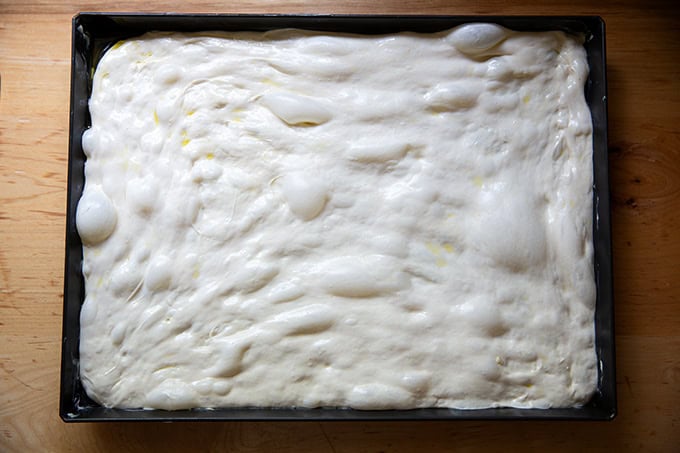
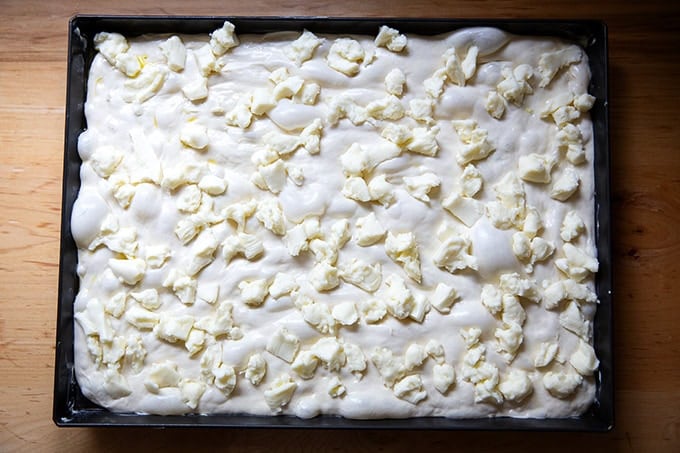
Turn the dough out into the pool of oil and turn it to coat.
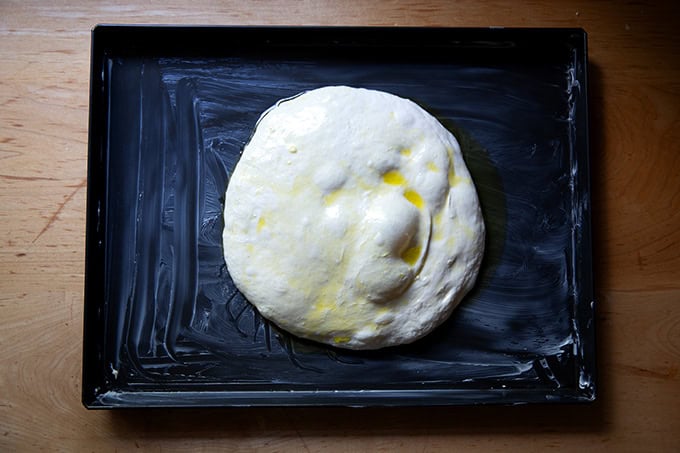
Let the dough rest at room temperature for 1 to 4 hours, depending on your timing needs.
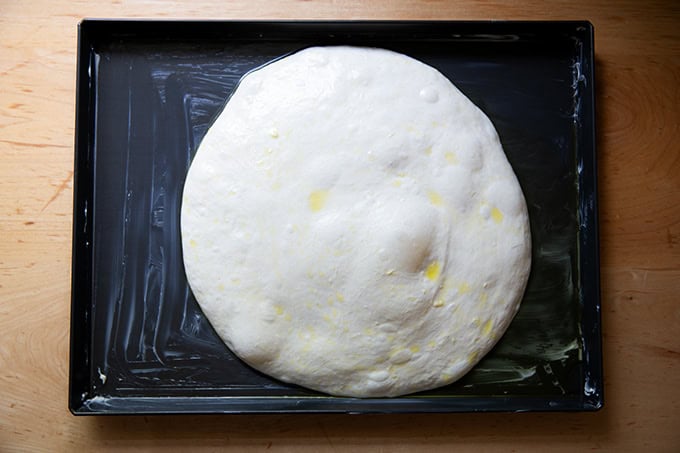
Using lightly oiled hands, stretch the dough to fit the pan.
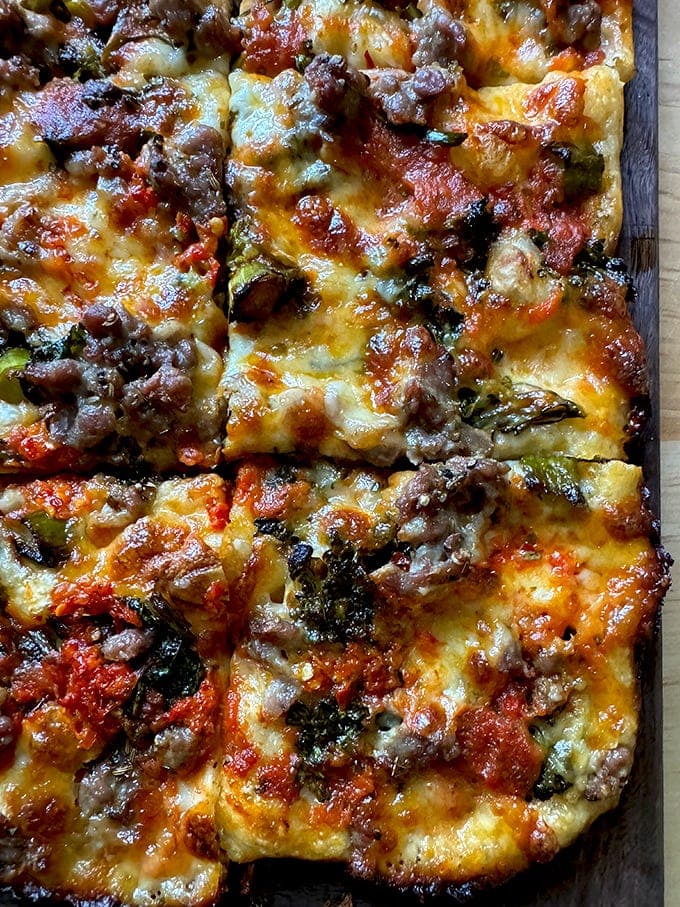
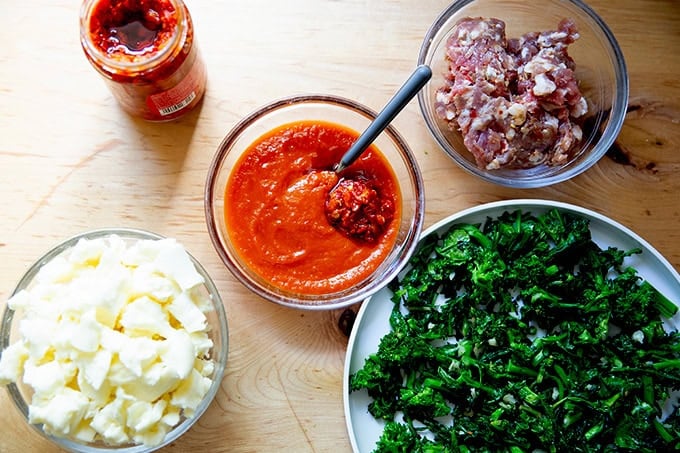
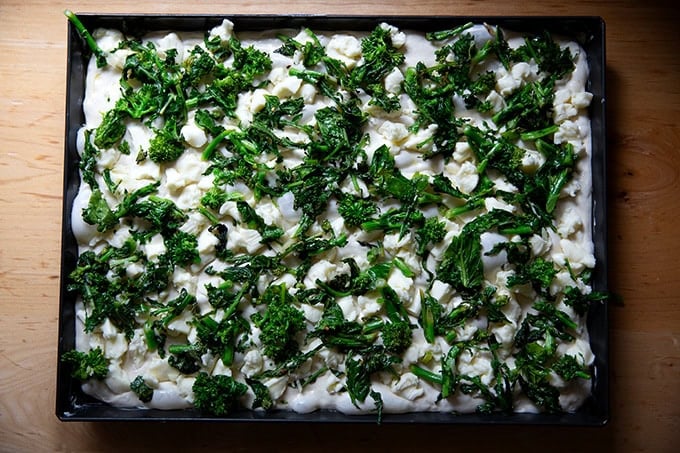
Meanwhile, gather your toppings. This is a favorite combination from Pizza Night: broccoli rabe, sausage, mozzarella, and spicy tomato sauce (sauce + Calabrian chili paste).
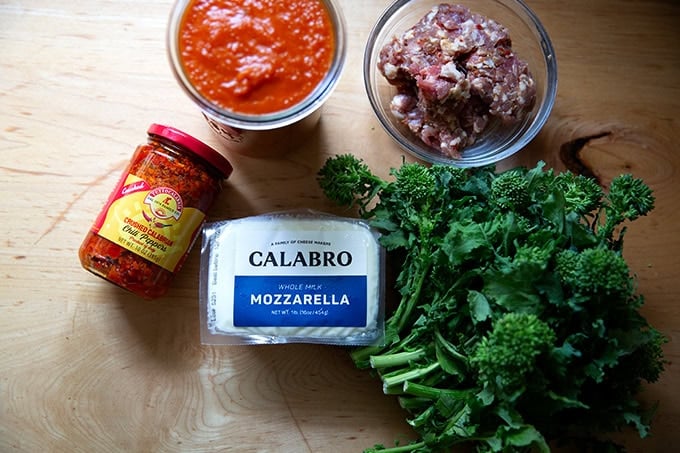
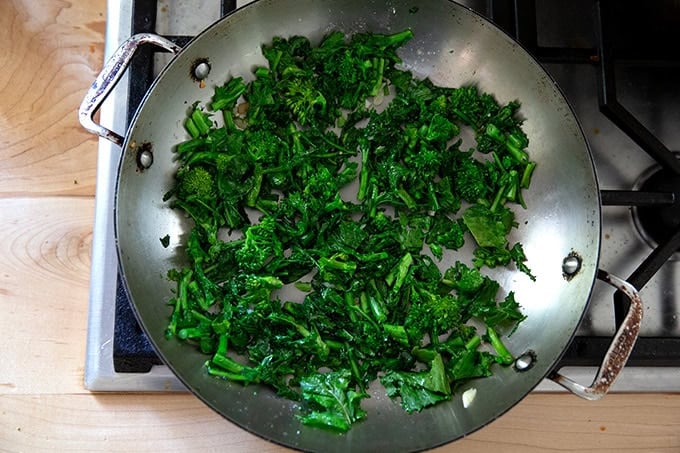
For this pizza, you’ll need to quickly sauté the broccoli rabe (or other green) with olive oil and garlic.
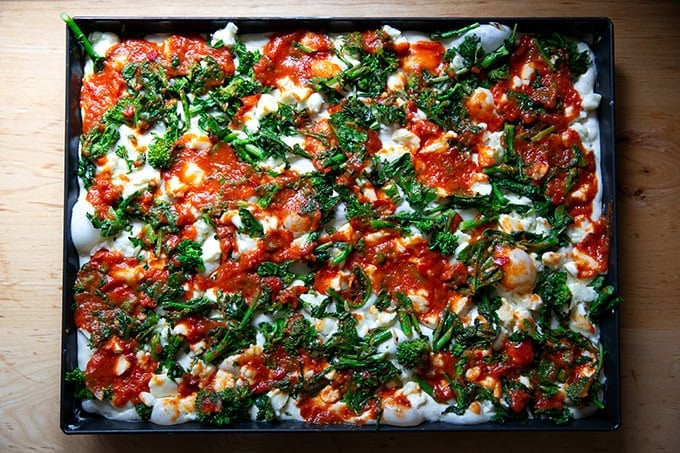
And you’ll need to stir 1 to 2 tablespoons of the Calabrian chili paste into the tomato sauce. Simply omit it if you don’t have it.
Top the pizza with the mozzarella first…
… followed by the broccoli rabe. I find placing the cheese and other toppings down before the sauce helps keep the crust crisper.
Drop spoonfuls of the sauce all around, then spread with the back of a spoon.
Top with the sausage, if using:
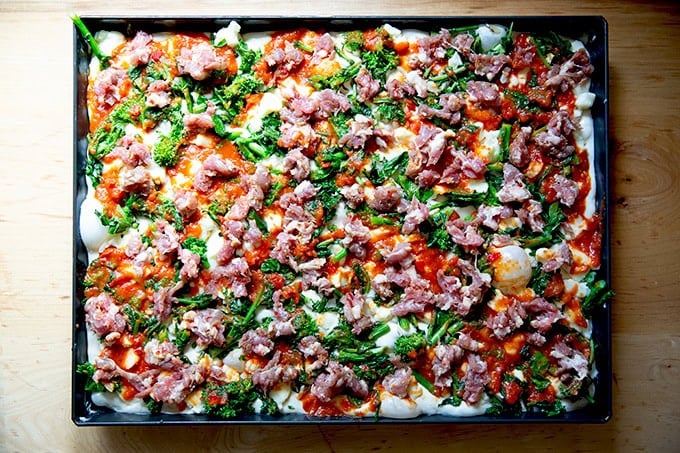
Bake @ 450ºF for 23-25 minutes on a preheated Baking Steel or pizza stone.
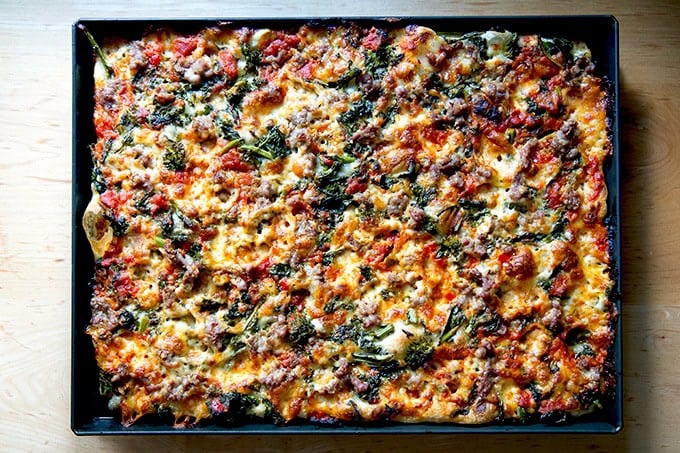
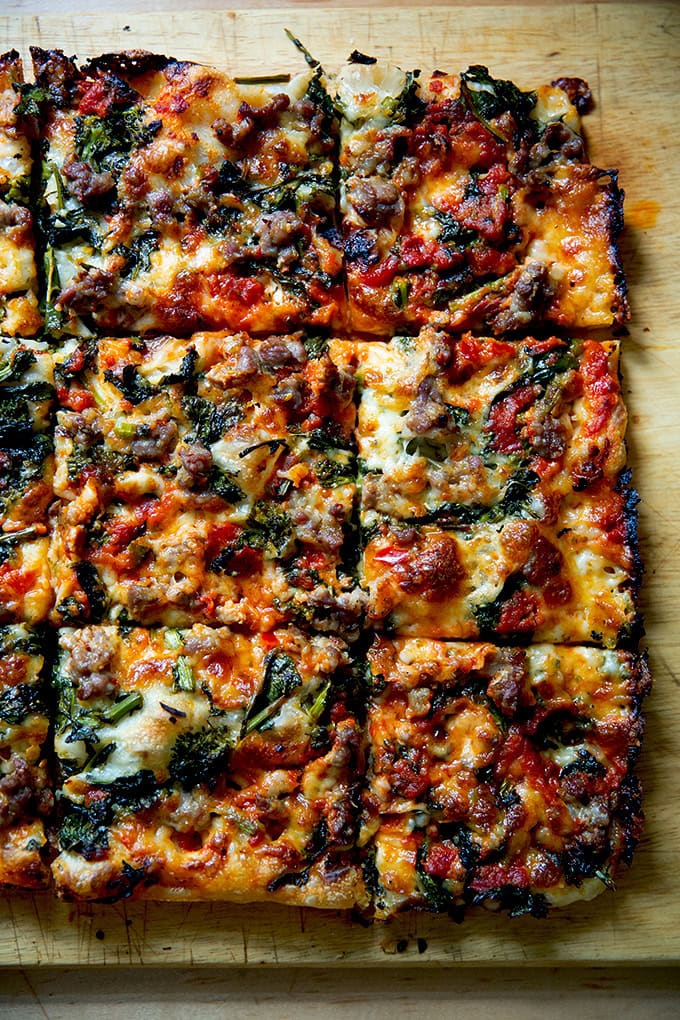
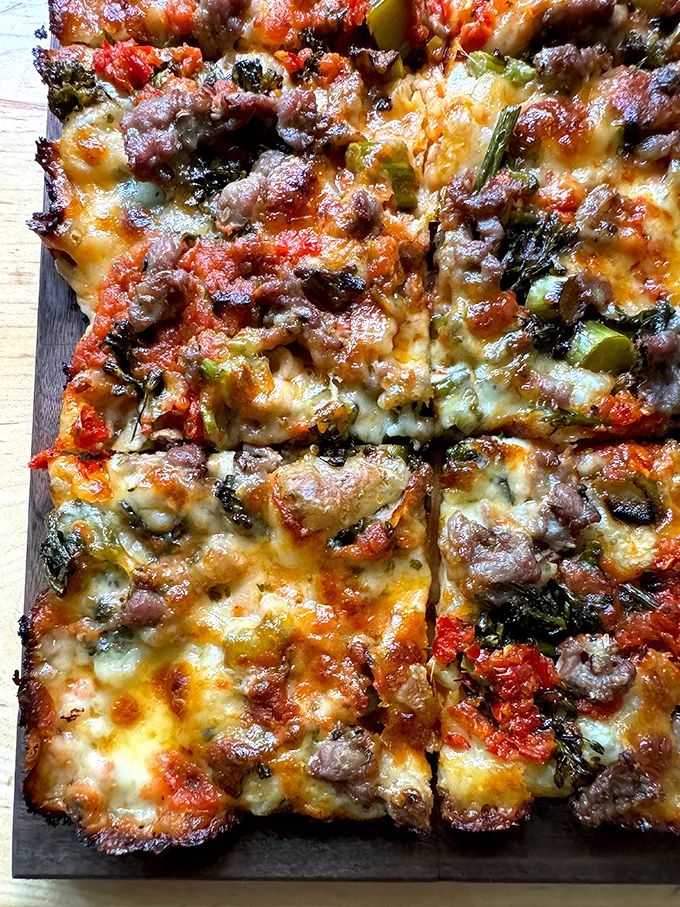
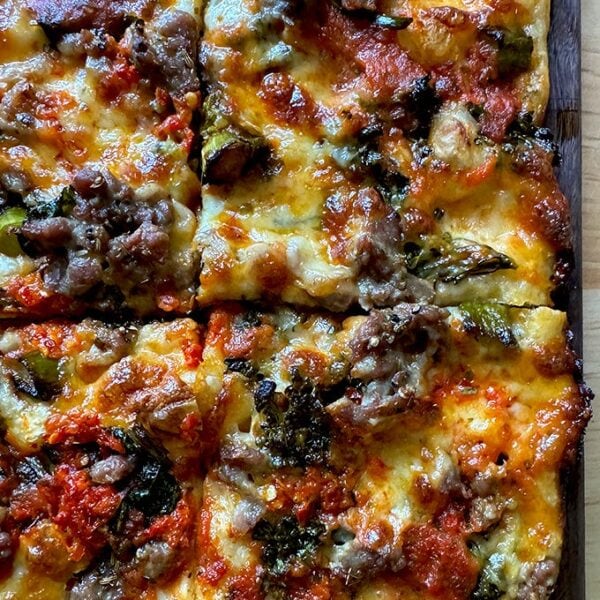
Transfer to a cutting board, and cut into squares:

Homemade Grandma-Style Pizza
- Total Time: 24 hours 25 minutes
- Yield: 2 pizzas 1x
Description
Grandma-style pizza is pan pizza, similar to Sicilian-style in that it’s baked on a sheet pan, but it’s thinner and crisper. It’s perfect for feeding a crowd!
Recipe from my cookbook, Pizza Night.
Notes:
- As always, for best results, use a digital scale to measure the flour and water.
- Flour/water: If you live in a humid environment, I would suggest using bread flour. If you are in Canada or the UK, also consider using bread flour or consider holding back some of the water — reference the video for how the texture of the bread should look; then add water as needed. In my recent experiments, I used King Arthur bread flour and Central Milling bread flour — the dough made with Central Milling flour was stiffer and easier to work with because it absorbed more water. This example is simply to show that it may take some trial and error to get the ratio of water to flour right. And do keep in mind: it is supposed to be a wet and sticky dough, and it takes practice handling these sorts of doughs.
- Salt: The rule of thumb with bread dough is that the weight of the salt should be 2 to 3% the weight of the flour. For this recipe, that is 10 to 15 grams. If you are sensitive to salt, use 1o grams. If you are not, use 12 to 15 grams salt. I use Diamond Crystal kosher salt.
- Yeast: I love SAF instant yeast. I buy it in bulk, transfer it to a quart storage container, and store it in my fridge for months. You can store it in the freezer also. If you are using active-dry yeast, simply sprinkle the yeast over the lukewarm water and let it stand for 15 minutes or until it gets foamy; then proceed with the recipe.
- Plan Ahead: The first rise takes 6-10 hours, and ideally, the balled-up dough should spend a day or two in the fridge. That said, if you want to shorten the timeline, you can skip the fridge rise and simply proceed with the recipe after the first rise, i.e. proofing the dough at room temperature in the pan. And if you need to shorten the first rise, use as much as 2 teaspoons of instant yeast and lukewarm water. Let the rough rise at room temperature for 1 to 3 hours; then proceed with the recipe.
Equipment:
- A Lloyd grandma pan makes for an especially nice crust.
- A Baking Steel or pizza stone further promotes a crisp crust.
- Two 2-quart dough storage vessels are handy for storing the grandma-style dough balls in the fridge for a few days.
Ingredients
For the pan pizza dough (which yields enough for 2 Grandma pizzas):
- 550 grams (about 4¼ cups) bread flour or all-purpose flour, plus more for dusting, see notes above
- 15 grams salt, see notes above
- 2 grams (about ½ teaspoon) instant yeast
- 485 grams (a heaping 2 cups) cold (about 60°F) water
- Extra-virgin olive oil
For one pizza:
- 2 tablespoons unsalted butter, at room temperature
- 2 tablespoons extra-virgin olive oil, divided, plus more as needed
- One 525-gram ball of pan pizza dough (from above)
- 8 ounces broccoli rabe, ends trimmed
- 1 clove of garlic, minced
- squeeze of lemon
- 12 ounces (about 3 cups) shredded low-moisture whole-milk mozzarella cheese, I love Calabro
- ¾ cup tomato sauce, such as this one or your favorite jarred sauce
- 1 to 2 tablespoons Calabrian chili paste, optional
- 8 ounces bulk hot or sweet Italian sausage
Instructions
For the dough:
- Mix the dough: In a large bowl, whisk together the flour, salt, and yeast. Add the water and use a spatula to mix until the water is absorbed and the ingredients form a wet, sticky dough ball. Cover the bowl with a towel and let rest for at least 15 minutes and up to 30 minutes.
- Stretch and fold: Fill a small bowl with water. Dip one hand into the bowl of water, then use the dry hand to stabilize the bowl while you grab an edge of the dough with your wet hand, pull up, and fold the dough toward the center. Repeat this stretching and folding motion 8 to 10 times, turning the bowl 90 degrees after each set. By the end, the dough should be smoother and more cohesive, though still very wet. Do not worry if you do not execute this step perfectly — in addition to creating some strength in the dough, the purpose of this step is to ensure any dry patches of dough have been fully hydrated and incorporated into the dough.
- Let it rise: Pour about 1 teaspoon of olive oil over the dough and use your hands to rub it all over. Cover the bowl tightly and let the dough rise at room temperature until it has nearly doubled in volume, 6 to 10 hours. The time will vary depending on the time of year and the temperature of your kitchen.
- Portion the dough: Using lightly oiled hands, release the dough from the sides of the bowl. Turn the dough out onto a lightly floured work surface and use a bench scraper to divide the dough into 2 equal portions roughly 525 grams each.
- Ball up the dough: Using flour as needed, form each portion into a ball by grabbing the edges of the dough and pulling them toward the center to create a rough ball. Then flip the ball over, cup your hands around the dough, and drag it toward you, creating tension as you pull. Repeat this cupping and dragging until you have a tight ball. The dough will be wet and sticky! Do not worry if you do not create a perfect ball… it is forgiving.
- Store the dough: Place the dough balls in individual airtight containers and transfer to the fridge for 1 to 3 days.
For the pizza:
- Proof the dough: Grease a 12 × 16-inch grandma-style pan or a 13 × 18-inch sheet pan with the softened butter. Pour one tablespoon of the olive oil into the center of the pan. Place the dough ball in the oil and turn to coat. Let rest uncovered for 1 to 4 hours, depending on your time constraints.
- Stretch the dough: Lightly oil your hands and use your fingertips to dimple and stretch the dough to fit the pan. When the dough resists, let it rest for 30 minutes, then stretch it again using the same technique. Repeat this stretching and resting until the dough fits the pan.
- Prepare the oven: If you have a baking steel, place it on a rack in the middle or lower third of the oven and preheat the oven to 450ºF.
- Prepare the broccoli rabe: Cut the broccoli rabe into 1-inch segments. In a large skillet, heat the remaining tablespoon of oil and garlic over medium-high heat just until the garlic begins to shimmer and take on the slightest amount of color, 1 to 2 minutes. Add the broccoli rabe, season with a pinch of kosher salt, and cook, stirring and rearranging frequently with tongs until wilted, about 2 minutes. Add 2 tablespoons water, cover, and cook for 2 minutes more. Remove the cover, squeeze the lemon over the top, stir, taste, and adjust with salt or more lemon to taste.
- Season the tomato sauce: In a small bowl, stir together the tomato sauce and 1 to 2 tablespoons of Calabrian chili paste, depending on your heat tolerance.
- Assemble the pizza: Using lightly oiled hands, stretch the dough one final time to fit the pan. Sprinkle the mozzarella evenly over the pizza, spreading it all the way to the edges. Spread the broccoli rabe evenly over the top. Drop spoonfuls of the tomato sauce evenly over the top, then smooth with the back of a spoon to spread. Finally, pinch the sausage into small pieces and scatter them evenly over the top.
- Bake the pizza: Bake until the edges look very caramelized, 23 to 25 minutes.
- Remove the pan from the oven. Run a paring knife or spatula around the pan’s edges. Use an offset spatula to carefully transfer the pizza from the pan to a cutting board. Cut into 12 to 16 squares.
- Prep Time: 24 hours
- Cook Time: 25 minutes
- Category: Pizza
- Method: oven
- Cuisine: Amerian
This post may contain affiliate links. Please read my disclosure policy.


45 Comments on “Homemade Grandma-Style Pizza”
HOLA ALI.
Grandiosas tus recetas.
te mando una receta de chimichurri que usamos en argentina.
PEREJIL SIN TALLO 100 grs.
ALBAHACA 30 grs.
DIENTES DE AJO 4 unidades.
AJI MOLIDO 5 grs.
ACEITE DE GIRASOL o MAIZ 300grs.
Contame que tal si lo usas en las pizzas.
SALUDOS.
¡Mmm, y gracias! Qué rico. Lo probaré pronto y les cuento.
Can I freeze this dough?
Yes! After you ball it up 🙂
I have made the Grandma-Style Pizza at least a dozen times, and each has been unique and great.
So nice to hear, Anne! I always forget how much I love grandma pizza because I take such a long break from it as soon as the weather gets nice out. Thanks so much for writing 🙂
Can the dough be frozen?
Is it possible to use sourdough starter instead of dry yeast
Love love your recipes (I’m in Australia)
Thank you
Diane
Yes! Freeze it after you ball it up. I don’t recommend freezing, however, if you use a sourdough starter… sourdough dough doesn’t freeze well. If you want to use a sourdough starter, use … 50 grams of starter in place of the yeast. No need to make any other adjustments.
Thank you!
Would 00 flour work here? I prefer using the double zero pizza flour. Thank you!
Not without adjusting the water. If you use 00 flour here as written, you will have a soupy mess. 00 flour is known for its extensible gluten structure, which makes it great for Neapolitan-style pizzas or thin-crust pizzas. For pan pizzas like this one, Sicilian, and Detroit, I really recommend using bread flour — it will support a higher hydration and will yield better results for this style of pizza overall.
Your videos are always so helpful thank you for taking the time to make them.
I have a question about your focaccia recipe. I recently saw a recipe where they made a focaccia dough, but cooked it in a muffin tin to make a sort of roll. Your focaccia recipe is simpler and a sure thing for me. Could I divide it and bake in a muffin tin? Any suggestions?
Yes, absolutely! I basically do this with these muffin tin dinner rolls — it’s the peasant bread recipe divided up and baked in a muffin tin. The focaccia recipe is essentially the same recipe but without the sugar. So, I’m guessing you’d be able to portion the focaccia dough into 12 to 14 portions.
Can grandma pie be made gluten free? Is there a different recipe if it can? Thank you
You’d need a gluten-free pan pizza dough recipe or essentially a gluten-free focaccia recipe. Subbing gluten-free four here won’t work perfectly as all gf flours absorb water a little differently.
I’ve made this pie several times and it is fantastic! I also have a 12×12 square Lloyd pan and am wondering how much dough would be good to still get that thin delicious crust. I do follow your instructions for 525g dough for Lloyd 12×16 pan and the crust is so good! Thanks
Hi! And great to hear 🙂 If my math is correct, you’ll use roughly 394 grams of dough for the 12×12 square pan.
Hi! I’ve made this recipe as a base for other toppings many times. It’s excellent! Was wondering—before I test—if you’ve ever used the recipe solely for the dough (not pizza, or toppings) to make schiacciata—the Florentine version of focaccia? Thank for your help!
Made this grandma pizza last night after the dough had rested in the refrigerator for 2 days and it was amazing! I followed your directions exactly, except for putting our favorite toppings on it and briefly worried that my toppings (lots of fresh vegetables from the garden) might be too heavy for the dough to rise up in the oven. Nope! It was light and airy and full of air pockets and crispy! Just a great pizza! Thank you for this fabulous pizza recipe as it will definitely be on rotation!
I’m so happy to hear this, Celia! Thanks so much for writing and sharing your experience. I love the sound of your garden veggie grandma pie 🙂
This was my first time making pan pizza and it did not disappoint. I couldn’t find the chilies so used harissa instead. Planning on making the puttanesca recipe from Pizza Night with the second ball of dough.
Great to hear, Louisa! Thanks so much for writing and sharing your notes. Harissa sounds delicious. Hope you love the puttanesca pizza!!
And the puttanesca was fantastic too! The only problem is that none of the pizzas seems to last very long 😉
I’m so happy to hear this, Louisa! Thanks for circling back 🙂
Hi – have you done a sourdough version? I’m guessing just follow a focaccia recipe (I’ve made Leo’s) and follow with a cold retard for extra flavor?
Hi! And yes, I should add this note to the recipe box … it’s in my book. If you want to use a sourdough starter, use 50 grams of starter in place of the yeast. No need to make any other adjustments.
Excellent! I used this recipe for the crust and topped it with traditional sauce and toppings. It was fun to make and the dough was very forgiving. My dough balls were more like blobs than nice round balls but it still baked up to a delicious and crispy crust. No leftovers at our pizza party!
Great to hear, Krissy! Blobs are fine! I’m so glad you found the dough to be forgiving and the pizza crispy and delicious 🙂
How do I substitute yeast for sourdough starter?
Hi! Use 50 grams of starter and omit the yeast. The bulk fermentation will take much longer so just be patient and rely on the visual cues: use a straight-sided vessel for the bulk fermentation, and end it when the dough has increased in volume by 50-75%.
If you freeze the dough, do you defrost in the refrigerator and leave in there for 1-3 days?
Yes! 24 hours in the fridge should suffice, but longer is fine, too.
Further freezer question: If you only need to make one pizza at a time, would you suggest halving the dough recipe to start? Or is the second dough ball ok to hang out in the freezer for a while?
And unrelated, might you have any thoughts about using whey to replace some or all of the water in this recipe and/or other bread recipes? I always save the whey when I make yogurt, and can’t use it up fast enough!
I would not use whey in this recipe, because it will change the texture/flavor. You can use whey in the peasant bread recipe: My Mother’s Peasant Bread: The Best Easiest Bread You Will Ever Make Use it in place of the water. Keep in mind, it will make the bread brown more quickly, so I’d consider baking at 375ºF for the entire time. It also potentially could be salty, but before you adjust the salt, make the recipe once as written, then adjust with less salt the next time around if desired. Finally, the whey should not be hot or it could kill the yeast.
You can do either! Halving works great. The dough can stay frozen for as long as 3 months.
For some odd reason my dough did not rise. I notice from the beginning is wasn’t as bubbly as your pictures. Will try again but wondering besides the yeast could it be the room temperature of 68 degrees?
Hi! What kind of yeast are you using as in instant or active dry? And is it expired? A cooler room temperature will definitely affect the rise, but after 10 hours, you should definitely see some rise.
Red star instant exp 1/27
I think I knead to do the pull over better. Starting again today. Thanks
Welcome to Canada.
I just received your book and you and your team did a fantastic job with content and illustrations.
When making your pan pizza are you putting cold dough in pan ?
And when you let it rest for few hours I’m curious why the dough is not covered ?
Third….I thought rounds were much lower hydration.
First it’s Ken Forkish
Then Peter Reinhart
Tony G
And now you..
THE A TEAM
Thank you
Michael
CANADIAN PIZZA LOVER
Awww, Michael, thank you! And apologies for the delay here. Questions answered below:
When making your pan pizza are you putting cold dough in pan? Yes. Ideally, when time permits, I’ll cold ferment the dough for 1 to 2 days in the fridge, then when I’m ready to bake, I turn the cold dough out into the prepared pan and turn it to coat in the oil.
And when you let it rest for few hours I’m curious why the dough is not covered? I find that the it’s unnecessary if the dough is coated in olive oil. If your kitchen is very cold, however, and if you are at all worried about the dough drying out during the long room temperature proof, then you can absolutely cover it. Sometimes I turn my x-large sheet pan over the pan to keep the dough a little more protected.
Third….I thought rounds were much lower hydration. When you say rounds, what are you referring to? Neapolitan rounds? If you are referring to Neapolitan rounds, then yes: classic Neapolitan dough is much lower hydration than pan pizza dough. Here’s a more in depth explanation (which I include in this blog post):
Understand this relationship, understand everything: The lower the oven temperature, the higher the dough hydration. And conversely: The higher the oven temperature, the lower the dough hydration.
A great way to understand this concept is to look at the makeup of a classic Neapolitan-style pizza dough. Neapolitan-style pizza is characterized by a blistered and ballooned outer edge with a soft, thin (and sometimes wet) center. Contrary to what you might expect, Neapolitan-style pizza dough is on the lower end of the hydration spectrum: 60 to 65%.
The reason Neapolitan pizzas emerge light and airy with nearly wet centers is because they cook in 60 to 90 seconds in 900ºF ovens. In this short period of time, very little water evaporates from the dough, which allows it to retain its moisture.
When you bake pizza in a home oven, which can only get up to 550ºF, the baking time is longer, during which time a lot of water will evaporate. If you were to bake a 65% hydration Neapolitan pizza dough in your home oven, you will be left with a dry, tough crust due to all of the moisture loss during the long bake.
So, in sum: to prevent your crust from being dry and tough in a home oven, it needs more water from the start.
Pan pizza dough is much higher hydration because it is baked at a lower temperature for a longer period of time.
Let me know if this clarifies! And Happy New Year!
I divided the dough into 2 balls after the first rise and they rested in refrigerator for 2 days. Made the first pizza (traditional pizza toppings) in the Lloyd’s pizza pan and it was fabulous! I ended up freezing the second dough ball after it was in refrigerator for 2 days. Do I defrost this in the refrigerator for 24 hours and then follow the directions for putting in buttered and oiled pan for a few hours before stretching, topping and baking? I was not sure if refrigerating the dough and then freezing it would affect how my pizza crust crisps up.
Great to hear, Deb! Yes, 24 hours in the fridge is great; then proceed with the recipe as usual. Thanks for writing!
This pizza is fantastic and so much easier to handle than thin crust pizza recipes. So very delicious, meat lovers, vegetarian, Quattro fromaggio, pepperoni.
I’d like to prepare the Grandma-style pizza at home and transport it unbaked to a friend’s for lunch. Then bake it in her oven.
Do you think it will work? Any tips for success?
Yes, absolutely! I have assembled these grandma pies hours in advance. I do this every Halloween with 4 different grandma pies. I cover the surface with plastic wrap, and I press down to kind of embed the toppings into the dough. When the oven is preheating, you can remove the plastic wrap.