 →
→ Rosemary-Olive Sourdough Bread (+ A Better Way to Add Inclusions to Your Sourdough Bread)
This post may contain affiliate links. Please read my disclosure policy.
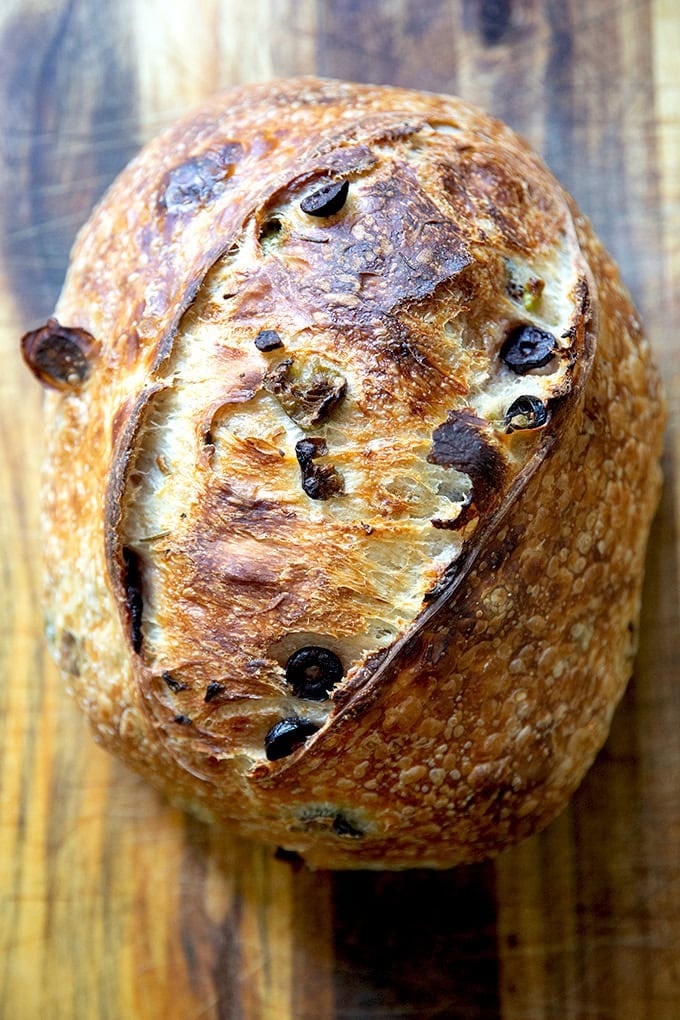
Loaded with olives, scented with rosemary, this sourdough loaf is so flavorful and fragrant, perfect for serving with good olive oil or, of course, with dinner. This recipe employs a lamination method to incorporate the olives and rosemary into the dough, which helps them disperse evenly throughout the baked loaf.
One of the most frequently asked questions I receive is how to add X, Y, or Z ingredients to my loaf of sourdough bread. I have always added inclusions during the stretch and fold phase of the sourdough bread baking process, and as such, I have advised doing so upon being asked.
Recently, I saw a recipe for an olive sourdough bread recipe that employs a different technique: lamination. Lamination calls for spreading the dough into a thin rectangle, scattering the inclusions over the top, then folding the dough envelope-style from right to left, then top to bottom.
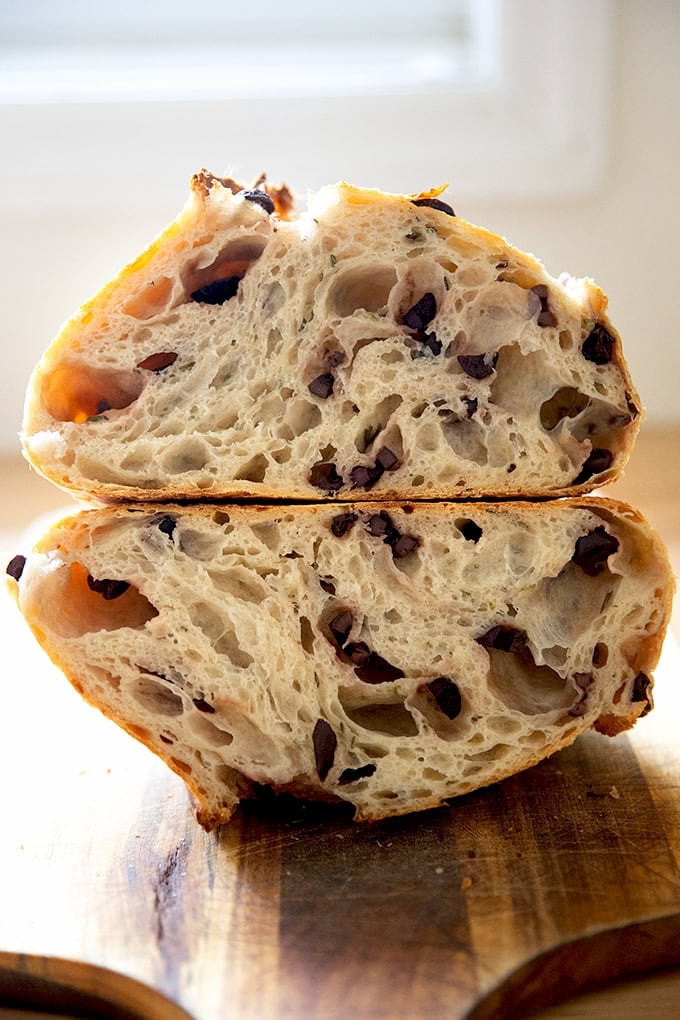
I tried the method using this simple sourdough recipe and was astonished to find the method not only to be easier than it looked but also easier than stretching and folding. Moreover, it was more effective than the stretch-and-fold method: it more evenly dispersed the olives through the crumb of my baked loaf of bread.
Find a recipe for a rosemary-olive loaf below, but use the method as you wish and laminate away with jalapeños and cheddar, dried cranberries and walnuts, or any combination your heart desires. Step-by-step instructions and video guidance follow 🫒🍞
How to Make Rosemary-Olive Sourdough Bread, Step by Step
The base of this recipe is this simple sourdough bread recipe, which requires four ingredients: water, salt, sourdough starter, and bread flour:
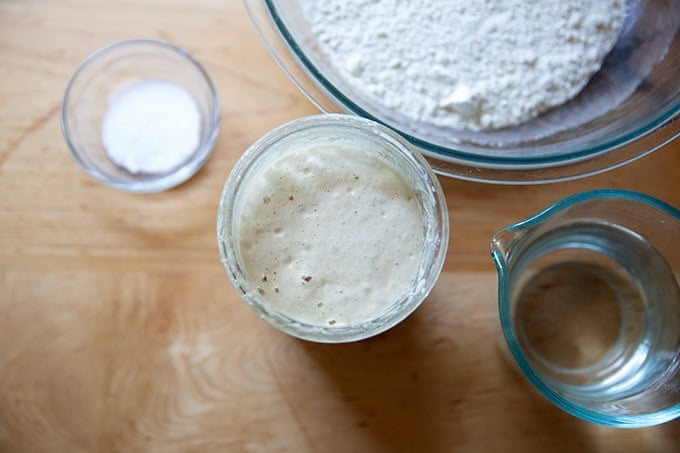
Start by stirring the salt and sourdough starter into the water in a large bowl:

Then add the flour and…
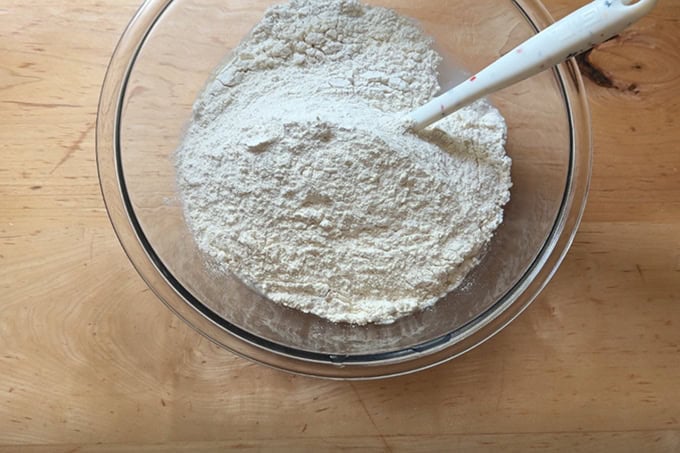
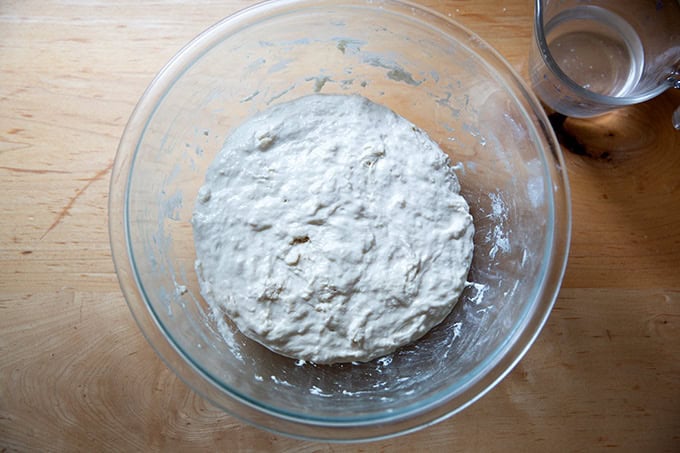
… stir until you have a sticky dough ball:

Let the dough rest for 30 minutes…
… then stretch and fold it:

Let it rest for one hour…

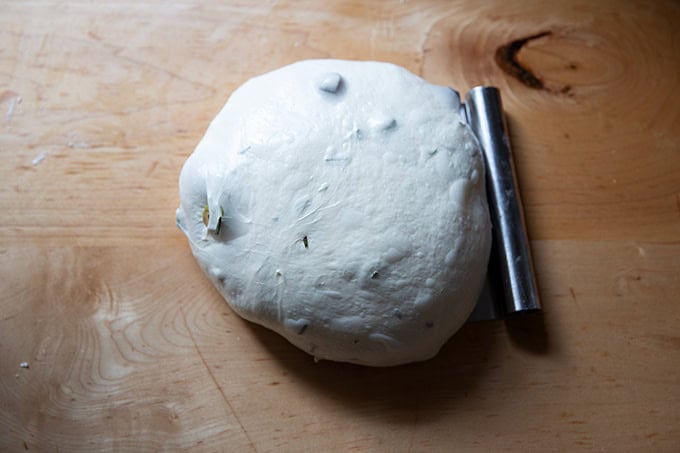
… then turn it out onto a lightly oiled work surface:
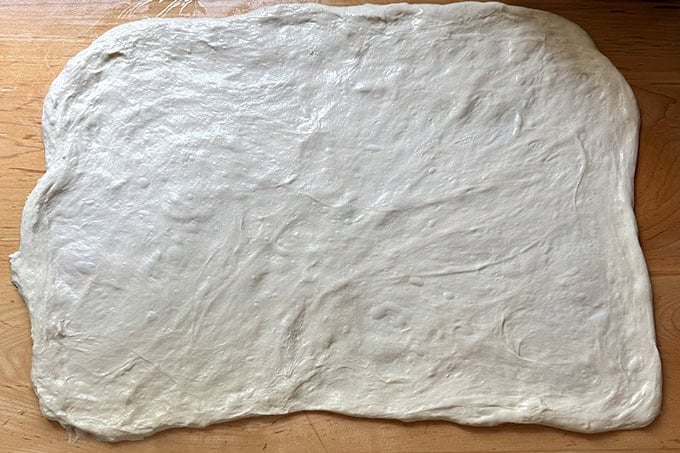
Sprinkle olives and rosemary over the dough, reserving a small portion of them for the next step…

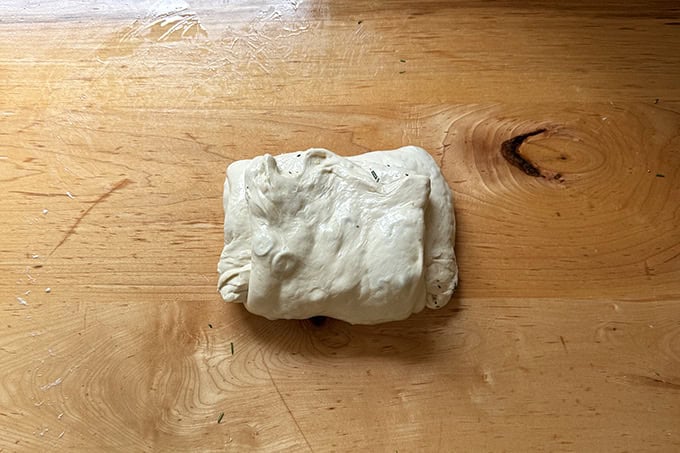
Fold the dough envelope style, starting at one of the short ends:
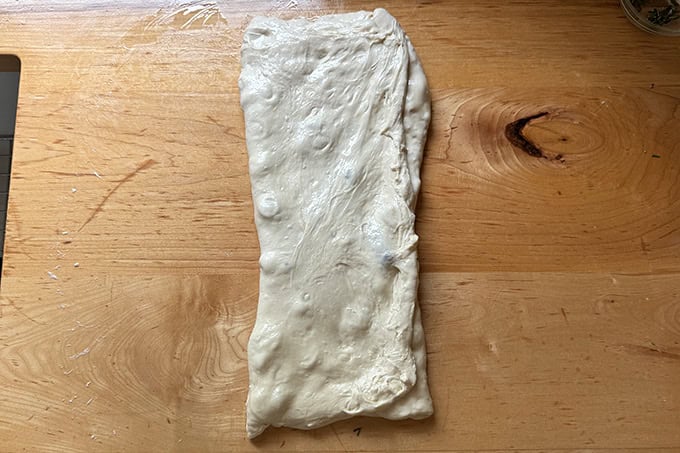
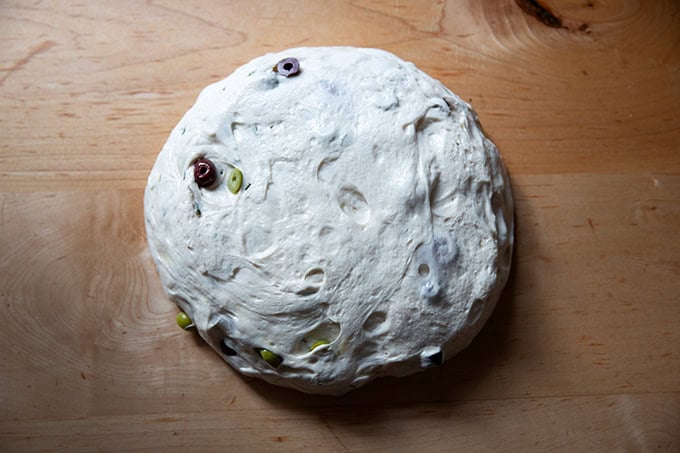
Sprinkle the remaining olives over the bottom two-thirds of the dough, then…
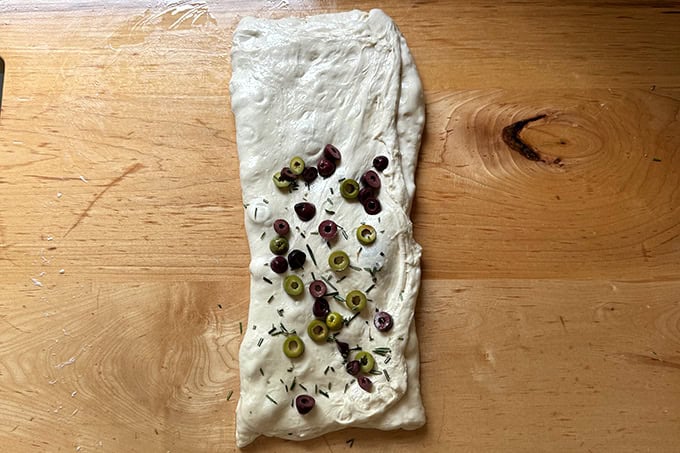
…fold the dough envelope-style again, starting from the top.
Return your folded bundle to your bowl, cover it, and let it rest …

… for one hour:

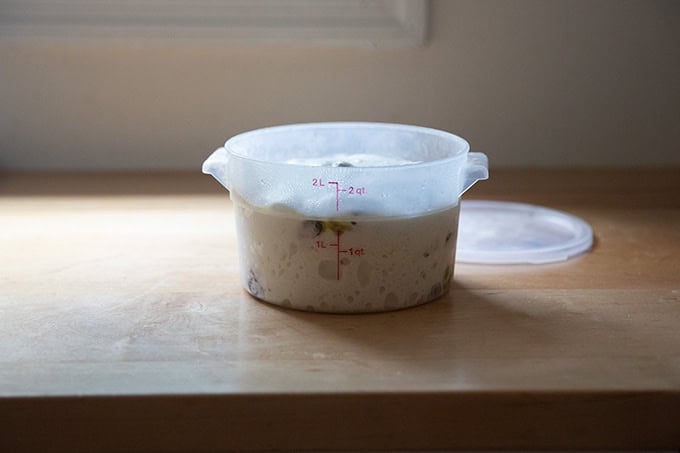
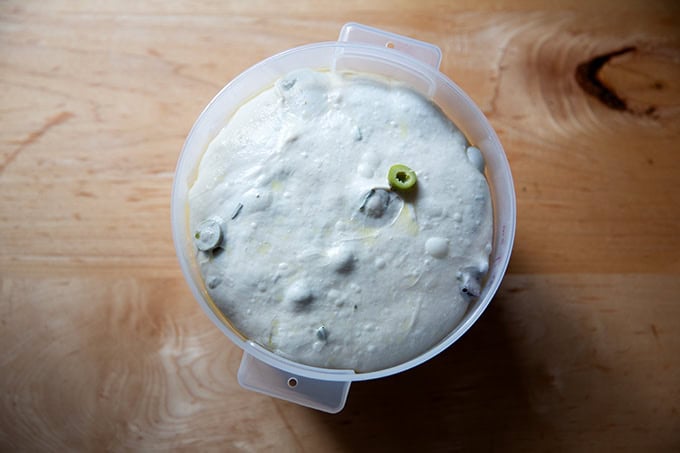
Transfer the dough to a straight-sided vessel and let it rise until…
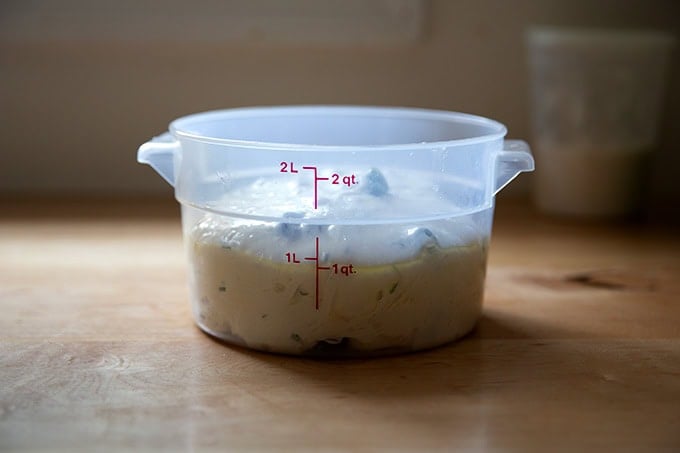
… it has increased in volume by 50-75%.
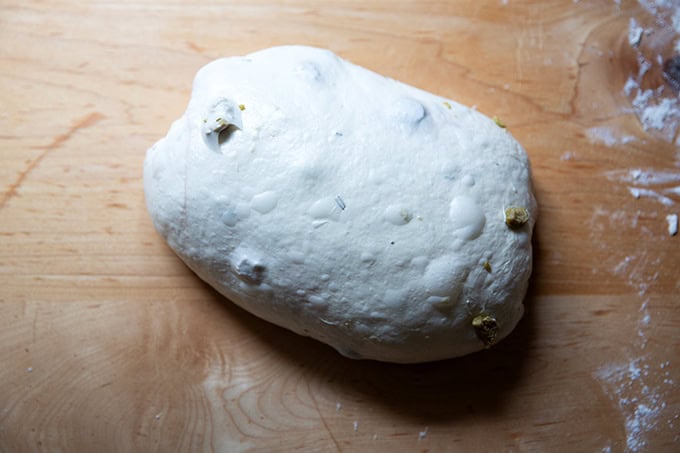
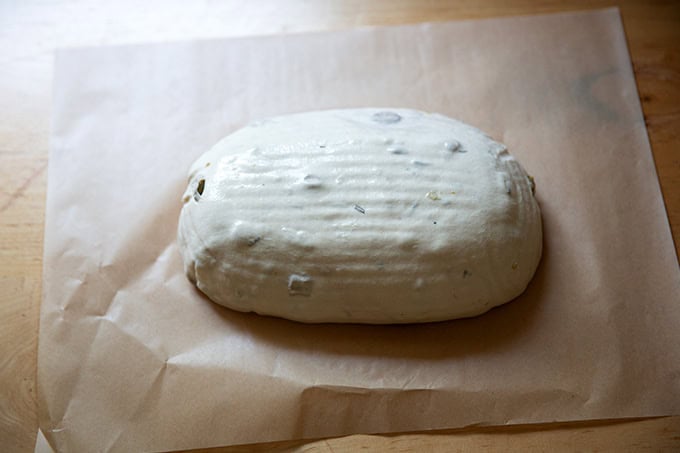
Turn the dough out onto a work surface, and shape it into a ball.
Let it rest seam-side up for 30 to 60 minutes.
Then shape it into a ball or a batard. I find I get a much more open crumb when I shape my sourdough loaves into a batard. Watch this video for guidance:
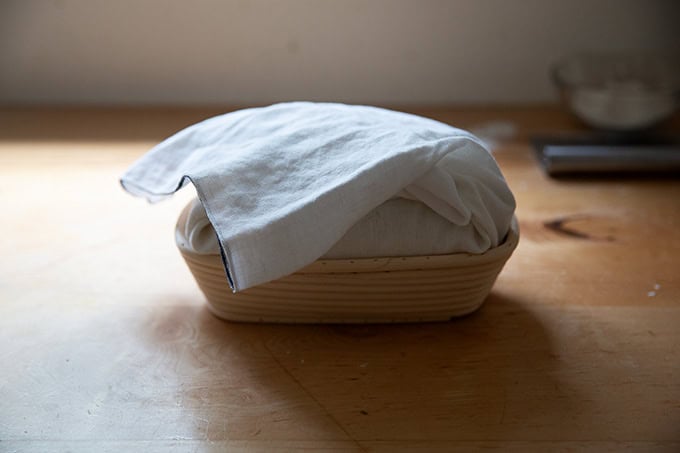
Place your shaped loaf, seam-side up into a flour sack lined banneton. Pinch the seam closed…
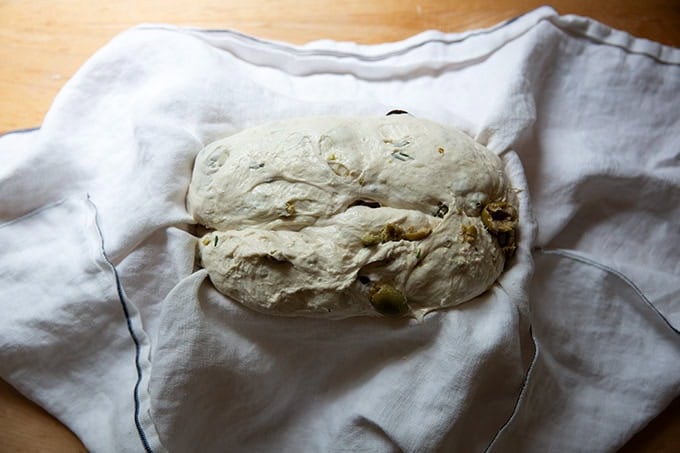
… then fold the towel over the dough to cover it:
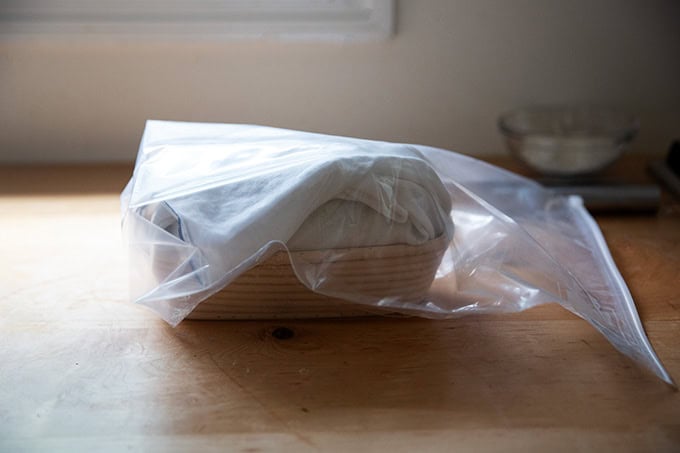
Tuck the whole bundle into an airtight bag and transfer to the fridge for 24-48 hours.
Remove the loaf from the fridge…
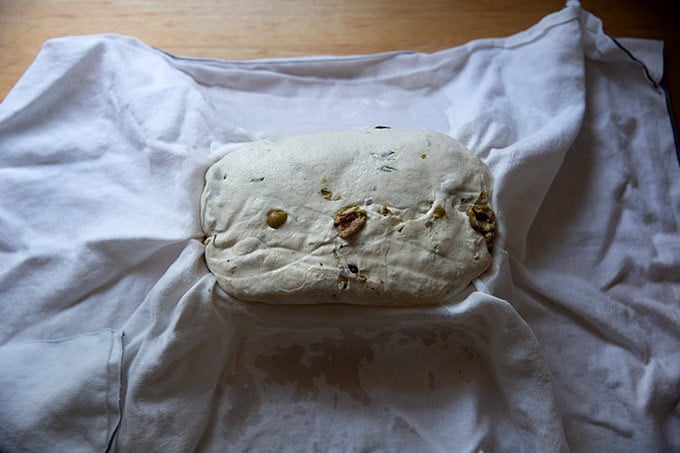
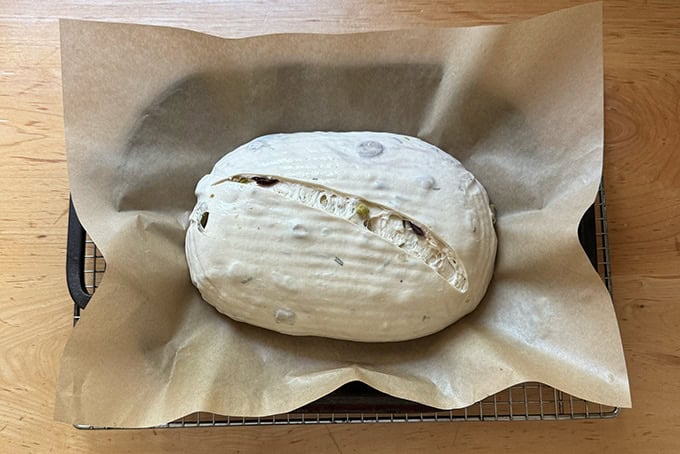
…. and turn it out onto a sheet of parchment paper.
Score it and transfer it to a preheated Dutch Oven:
Bake it as directed in the recipe below, covered for 30 minutes, then…
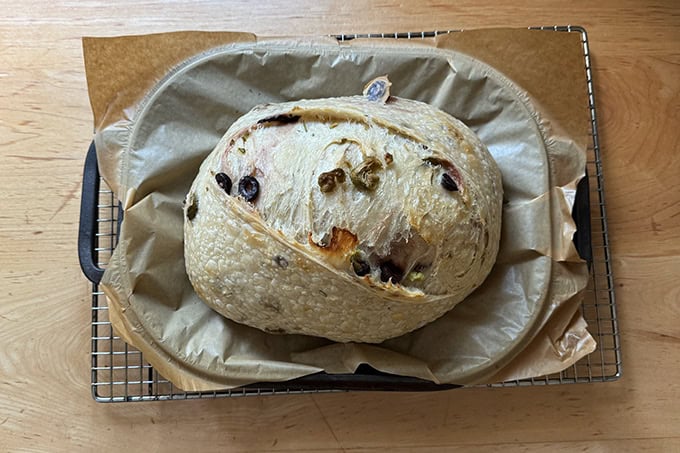
… uncovered for 15 minutes more or until browned to your liking.
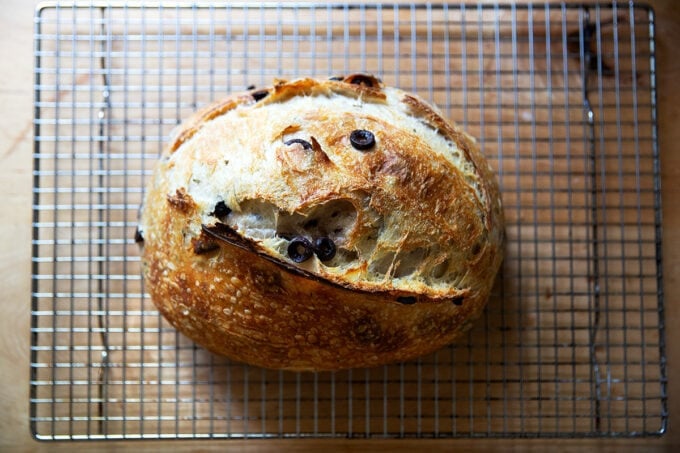
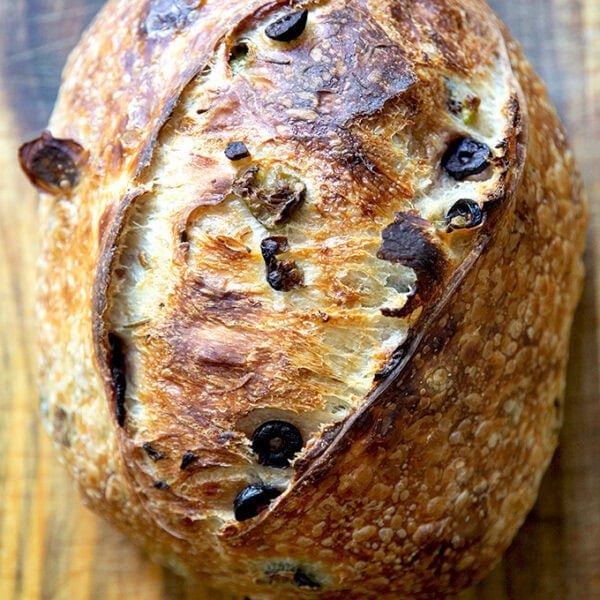
Nice ear:
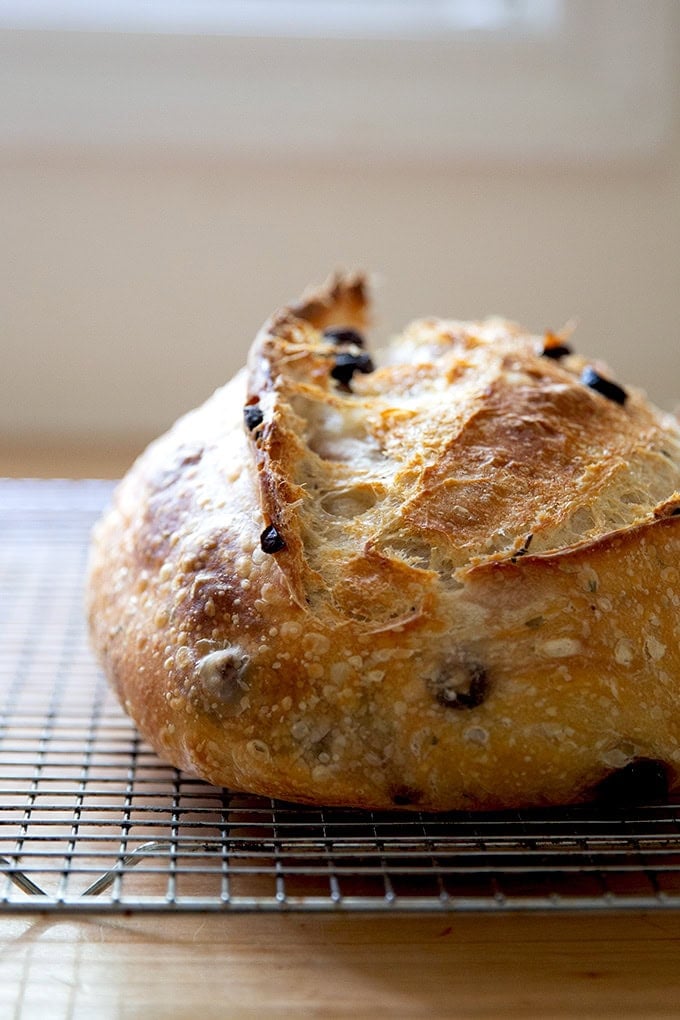
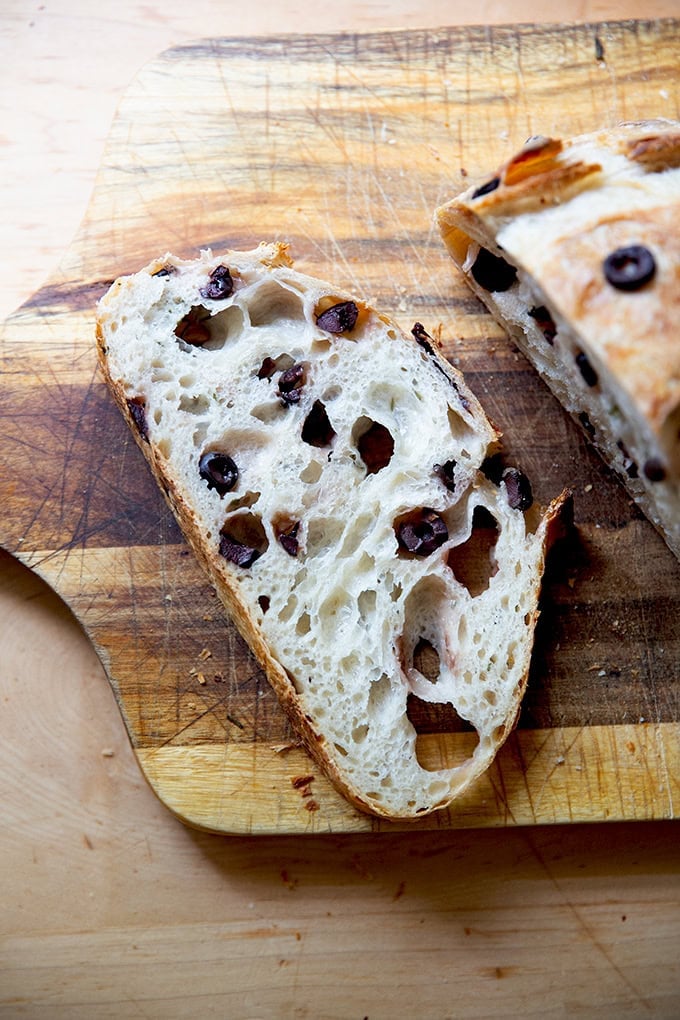
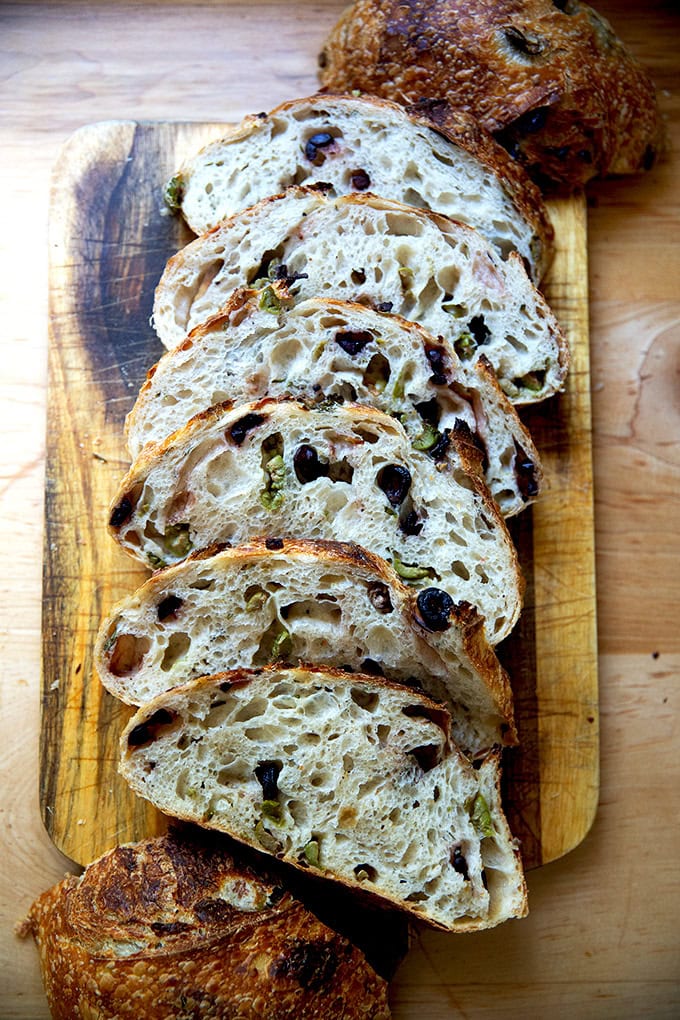
Nice open crumb, with olive dispersed throughout:
Rosemary-Olive Sourdough Bread
- Total Time: 48 hours 45 minutes
- Yield: 1 loaf 1x
- Diet: Vegan
Description
Loaded with olives, scented with rosemary, this sourdough loaf is so flavorful and fragrant, perfect for serving as an appetizer alongside good olive oil or, of course, with dinner. This recipe employs a lamination method to incorporate the olives and rosemary into the dough, which helps them disperse evenly.
Method adapted from What’s Stephanie Baking?
Notes:
- For best results, please use a scale to measure.
- Salt: The rule of thumb with bread is that the weight of the salt should be 2 to 3% the weight of the flour. For this recipe, the amount is 10 to 15 grams. I find 12 grams of salt here to be perfect, given that the olives lend a bit of saltiness to the loaf. Finally, I always use Diamond Crystal kosher salt, but you can use fine sea salt or whatever salt you like.
- Sourdough Starter: You need an active sourdough starter. You can make one from scratch or you can buy one. I have had success activating starters from:
- I loved these two-quart vessels for the bulk fermentation.
- This is the Dutch Oven I use for sourdough bread. I used this Dutch oven for years, and it’s a great one, too.
- I love these Flour Sack Towels.
- For proofing, I use an oval banneton. You need something roughly 10 inches in length. You can use a circle one, too, if you are shaping your loaf into a round.
- Sharp knife: This one is reasonably priced.
Ingredients
- 375 g (about 1 1/2 cups) room temperature water
- 12 g (2.5 teaspoons) salt, see notes above
- 100 g (1/2 cup) bubbly, active starter, see notes above
- 500 g (4 cups plus 2 tbsp) bread flour
- extra-virgin olive oil, for drizzling
- 5 ounces pitted olives, any variety (I use a mix of Castelvetrano and Kalamata), sliced
- 2 tablespoons fresh rosemary
Instructions
- Make the dough: Place the water in a large bowl. Stir in the salt followed by the sourdough starter, using a spatula to incorporate — it’s OK if the starter is not fully incorporated. Add the flour and mix with a spatula until you have a sticky dough ball. Cover the bowl and let the dough rest for 30 minutes.
- Stretch and fold: Using a wet hand, grab a corner of the dough and pull it up and into the center. Repeat until you’ve performed this series of folds 8 to 10 times with the dough. As you stretch and fold, you should feel the dough transform from shaggy and rough to smooth and elastic. Slapping and folding the dough helps here, too. (Watch the video for guidance.) Cover the bowl and let the dough rest for one hour.
- Laminate the dough: Lightly oil a large area of a work surface. Uncover the bowl and drizzle oil around the edge of the dough. Use a flexible bench scraper, if you have one, to release the dough from the sides of the bowl, turning it out onto your prepared work surface, reserving the bowl. (Use your hands if you do not have a scraper.) Spread the dough, using lightly oiled hands if necessary to prevent sticking, into a large thin rectangle, roughly 15×20 inches. Spread 4 ounces of the olives over the surface of the dough, followed by 1.5 tablespoons of the rosemary. Gently press the rosemary and olives into the dough, then fold the dough envelope-style style starting from the right shorter edge: fold the right edge of the dough toward the left to cover two-thirds of the dough; then fold the left edge of the dough to the right to cover it completely. Sprinkle the remaining olives and rosemary over the bottom two-thirds of the dough, then fold it again envelope-style, starting from the top edge: fold it down to cover two-thirds of the dough, then fold the bottom edge over to completely cover the top. Lift up your folded bundle and return it to the bowl. Cover the bowl and let the dough rest for one more hour.
- Stretch and Fold one last time: Using two wet hands, gently lift the dough up from the center stretching it long, allowing the edges to fold underneath it. (See video for guidance.) Fold the dough in half once or twice more, again see video for guidance, ultimately forming the dough into a rough ball.
- Bulk Fermentation (first rise): Transfer the dough to a straight-sided vessel to rise. Cover the vessel and let the dough rise at room temperature until it has increased by 50% to 75% in volume, has a few bubbles on the surface, and jiggles when you move the bowl from side to side. Depending on the time of year and the temperature of your kitchen, this will take more or less time (anywhere from 5 to 10 hours). Rely on the visual cues as opposed to the hours it has risen.
- Shape and Rest: Coax the dough onto a clean work surface — I prefer to do this without flour, but lightly flour the work surface if the dough is sticking to it or your hands. Gently shape the dough into a round: fold the top down to the center, turn the dough, fold the top down to the center, turn the dough; repeat until you’ve come full circle. If you have a bench scraper, use it to push and pull the dough to create tension. Lightly flour part of your work surface, if you haven’t already, and let the dough rest seam side up for 30 to 60 minutes.
- Proof the dough: Line a 10-inch banneton, see notes above, with a flour sack towel. If you are not using a flour sack towel and are worried the dough might stick, lightly dust it with flour or rice flour. If you are shaping your dough into a round, using a bench scraper or your hands, shape it again as described in step 6. Place the round into your lined bowl, seam side up. If you are shaping it into a batard, please watch this video. Once your shaped loaf is in your banneton with the seam side up, using lightly floured hands, pinch the seam closed as best you can, then fold the towel over the dough to cover it. Place the whole bundle into an airtight bag (such as a produce bag or a 2-gallon ziptop bag), and transfer it to the fridge, ideally for at least 24 hours or for as long as 48 hours. You can get away with less time in the fridge if necessary.
- Prepare the oven: Forty-five minutes before you plan on baking, place a Dutch oven in your oven, and preheat it to 450°F. Cut a piece of parchment to fit the size of your loaf/baking pot.
- Score: Remove your bundle from the fridge, unwrap the towel, and place the parchment paper over the dough, securing it with your hand. Invert the banneton to release the dough onto the parchment paper and onto your countertop. Using the tip of a small knife or a razor blade, score the dough however you wish — a simple slash is always nice. Use the parchment to carefully transfer the dough into the preheated baking pot.
- Bake: Bake the loaf for 30 minutes, covered. Remove the lid, lower the temperature to 400ºF, and continue to bake for 10 – 15 minutes more or until the loaf is browned to your liking. Cool on a wire rack for 30 minutes before slicing.
- Store the bread: This loaf will stay fresh up to 3 days stored at room temperature in an airtight plastic bag or container. It freezes beautifully, too.
- Prep Time: 2 days
- Cook Time: 45 minutes
- Category: Bread
- Method: Sourdough/Natural Leavening
- Cuisine: American
This post may contain affiliate links. Please read my disclosure policy.


42 Comments on “Rosemary-Olive Sourdough Bread (+ A Better Way to Add Inclusions to Your Sourdough Bread)”
This is one of my favorite sourdough breads. Thanks for the tutorial. I also have pretty good luck adding 1/4 of the olives and 1/4 rosemary with each stretch and fold. I haven’t tried adding olive oil pre-bake so look forward to trying that.
Smart to add the olives one quarter at a time! Love that idea. Hope you love this one, Mary 🙂
I’m interested in making this but work long hours and can’t seem keep sourdough starter alive long enough to use in a recipe.
Is there a poolish or a biga or ? alternative for sourdough that I can ferment overnight (or over a couple of nights) that would be a reasonable substitute?
Thank you!
Hi Bob! And yes, I think you could do something like this:
In a large bowl, whisk together 50 grams flour and 1 gram (1/4 teaspoon) instant yeast. Add 50 grams water and stir with a spatula until combined. Cover the bowl with a tea towel or cloth bowl cover and set aside for 4 to 6 hours or until the dough’s surface is dimpled with holes, then proceed with the recipe.
There’s lots of flexibility here: you can make that mixture and stick it in the fridge immediately or after the 6 hours. Just stir it up, store it in a lidded vessel in the fridge, and use it when you are ready to mix a loaf of bread.
Wonderful! I will try it tonight!
Thank you,
Bob Martin
Eagle River, Alaska
Hola ALEJANDRA…gracias por las recetas, algunas elaboro y disfruto,
las de panificados y pizzas son magnificas.
JUANQUI from argentina.
YOUR VERY TRULY
So nice to read this! Thanks you for writing 🙂
Delicious! I have also tried laminating with chunks of cheese or laminating with shredded butter for a delicious, crunchy loaf.
Yum!! Cheese will be next, and I love your butter idea, too 🙂
Mmmm very nice recipe , I one maker the recipe thanks
Hi Ali,
I made this recipe two days ago following the directions precisely. It was beautiful when it came out of the oven and tasted even better. One of the best bread recipes I have ever made. The crust is perfect and the crumb is incredibly moist. Used 400 gr of Cairnspring bread flour and 100 gr of Chimicum Valley Grainery Salish Blue flour. The rosemary and olives compliment each other perfectly, especially when I use it to make a tuna fish sandwich.
Also, I notice you use a smooth wooden board as a work surface when you knead and shape your dough. May I as what kind it is and where you got it? Thanks.
And thanks for all of the great recipes!
Chris
So nice to read all of this, Chris! Great to hear the Cairnspring Mills flour as well as the other (which I’ll have to try!) worked well here. Thanks for writing and sharing your notes.
The wooden board you are noticing is actually my countertop. They are maple butcher block countertops. I love them… wish I had a cutting board that was similar to recommend!
Terrific recipe…super easy..I take a temp reading now to make sure it’s at 206 and then don’t cut it for a while..having listened to seemingly hundreds of videos this is by far the easiest and the best!
Great to hear, Diana! Thanks so much for writing. Temping the baked bread is so smart and a great way to ensure the baked bread is fully cooked…a long rest helps, too 🙂
Delicious – the flavors are sublime! I got ready to try it with olive oil or butter and after one bite decided it didn’t need either one. My first try with inclusions and everything went according to plan. Only change I made was to use 25% golden whole wheat flour.
My crumb is a little tighter than the pictures, but still light and moist. I made it the same day as the soft sourdough sandwich bread and they have a similar crumb. Crust is not shiny, but good texture. I started out with a batard, but it ended up being a boule because my 5qt Dutch oven is too small for this larger loaf.
Will definitely try this recipe again with other inclusions.
Great to hear, Mary Ann! Thanks so much for writing and sharing your results. It’s possible the 25% golden whole wheat flour is affecting the crumb structure, but as long as it is still light, I think a tighter crumb is fine 🙂
I’ve had good success with your simple sourdough, so I’m giving this a try. For bulk fermentation is your suggestion of 5-10 hours starting from when mixing is complete or after all the stretch and folds? My kitchen is on the warm side (77 degrees) and bulk seems to be ready at about 5 hours after mixing based on rise and visual factors.
Great to hear, Stella! Yes, 5-10 hours after the initial mix, but do rely on the visual cues: rising to between 50-75% in volume.
We already love your Ciabatta and Peasant bread recipe. I made the Rosemary Olive Sourdough bread today and it is absolutely delicious.
Great to hear, Anette! Thanks so much for writing and sharing this 🙂
I am having great success with your sourdough recipes so thank you. I don’t see a link for the knife you are using.
Hi Cindy! It’s this one: Bread Knife
I so LOVE this recipe. I have used your dough recipe to make jalapeno and cheese, walnut and cranberry, rosemary and olive and I have apricot and pecan dough fermenting for an hour. I have been so successful with the method you employ – and explain and show. The bread is so delicious and people given loaves are so pleased. I cut my bread in half, freezing half and using half as there are two of us. Thank you so much for this recipe.
I’m so happy to hear this, Sandie! Thanks so much for writing and sharing all of this. Your flavor combinations sound divine!! I must try apricot-pecan soon 🙂
If i want to make 2 separate loaves, should I do it separately or just double to amounts and split it? When and how would I split it into 2?
You can definitely make one batch with double the quantities of everything. You’ll split the dough after the bulk fermentation.
Hi there, can you make this with just the olives? Leave out the rosemary?
Thanks
Definitely 🙂
Hello, I am new to baking sourdough bread and a friend gave me some of her starter, and recommended your recipe. The regular sourdough bread came out perfectly! Our local store sells a rosemary olive oil and sea salt bread so I was going to add in the fresh rosemary, but no olives,
and wanted to know if you can brush some olive oil and then put the sea salt on after the first part of baking when you remove the lid? Would appreciate your thoughts. Thank you!
Hi Christine! I’ve never tried this but I love the idea. I don’t think there’s any risk in terms of burning bc it only bakes for 15 minutes uncovered. That said, I would keep an eye on it bc if it starts browning too quickly, you may want to lower the oven temp.
I LOVED! this recipe, but I did modify it. I have found using all
(or mostly) bread flour the texture for me is to chewy. I used 200g bread flour and 300g Sunrise High Extraction Wheat flour. The dough was a little more sticky than the video shows but I still got great results!!
Great to hear, Bob! Thanks for writing and sharing your notes. I will try that flour!
thanks for the recipe, which I am making as I type! I don’t see the link for the bread knife? Thanks for your precious work!
Hi Holly! Here’s a link to it: Bread Knife. I’ll add it to the post now, too 🙂 Thanks for catching that.
Thank you, Ali.
OK, the bread was beautiful–good rise, blistering, color, good brown color on the bottom. But when I cut into it the dough was moist, as clearly didn’t finish rising/baking before browning. But, I’m not giving up 🙂
Any suggestions would be greatly appreciated.
Thanks for being so responsive about the knife. It looks great.
Great to hear! It’s possible that the olives are adding too much moisture. You could try holding back 50 grams of water next time around and see if that helps with the wetness of the crumb.
Absolutely fantastic!
Can be doubled?
Yes! Great to hear 🙂
Hi what would you recommend the minimum or refrigeration of the dough? Could I put in in fridge in the morning and bake in the evening!? Thanks!
Yes, you could. I do think you will get more of an open crumb with a longer cold proof, but it will still turn out fine with that shorter proof.
We are newbies to the sourdough world with 4 breads completed and this recipe turned out the best so far. We used what we call “Turkish olives” that are dry brined and they were fantastic in this bread. Thank you so much for sharing this recipe!
Wonderful to read this, Keith! Those olives sound lovely and perfect in that you likely don’t add more moisture to an already moist bread. Thanks for writing and sharing your notes 🙂