 →
→ How to Build a Sourdough Starter from Scratch
This post may contain affiliate links. Please read my disclosure policy.
This post outlines how to build a sourdough starter from scratch simply and quickly. In less than a week, with minimal effort, you will have a bubbly, active starter on your hands to use in all your favorite sourdough recipes.
A sourdough starter is a fermented mixture of flour and water that contains wild yeast and bacteria. It both leavens and flavors sourdough bread.
How? It’s time for a science lesson.
Wild yeasts and bacteria exist everywhere, namely in flour, but also in the air and on your hands. When we mix flour and water and let it sit, wild yeasts begin searching for food, which they find in the flour: they convert the starch in the flour into sugar. As they digest this sugar, they produce two things: carbon dioxide, which makes the starter rise, and alcohol, which the wild bacteria drink up and in turn produce various types of lactic and acetic acids — these acids are what give the bread the sour flavor.
Cool, right? The wild yeasts and bacteria work symbiotically to both leaven and flavor our starter and ultimately our bread.
3 Tips For Success
Because wild yeast and bacteria are the backbone of a sourdough starter, it is crucial that these microbes are happy for your starter to thrive: the happier they are, the more they multiply, the more powerful the starter you create.
Building up a colony of happy microbes takes time and care. Here are three tips for success:
Tip #1: Use Pineapple Juice: Using pineapple juice in place of water initially can shorten the overall timeline for building a sourdough starter from scratch. This is because wild yeast cells prefer a somewhat acidic pH (which pineapple juice is) in which to grow.
Tip #2: Keep Your Starter Cozy: Ideally, you’ll attempt this project while it’s hot outside — I find 80ºF (26ºC) to be ideal. If you’re building your starter when it’s cold outside, find a place to keep it warm. See recipe box for some ideas.
Tip #3: Use Good Flour: Use freshly milled, stone-milled flour because the added minerals and nutrients provide better food for the microbes (yeast and bacteria) to thrive. If you have a local source, use it! Health food markets, co-ops, and stores like Whole Foods often carry freshly milled flour. See recipe box for a few online sources I love.
How to Build a Sourdough Starter From Scratch, Step by Step
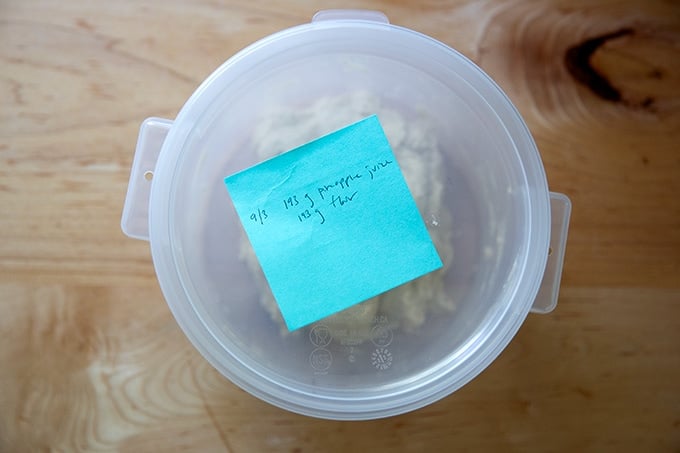
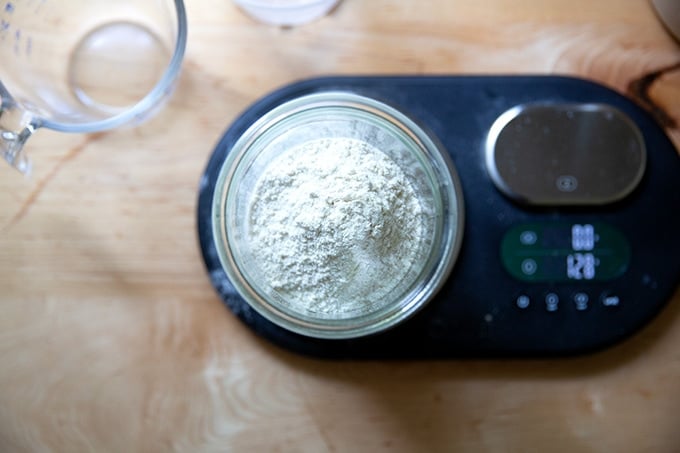
Day 1: Gather your materials: flour and pineapple juice. (If possible, pick up a bag of freshly milled stone-milled flour; see the recipe box for sources.)

Pour the can of juice into a large bowl or ideally a straight-sided vessel on a tared scale.
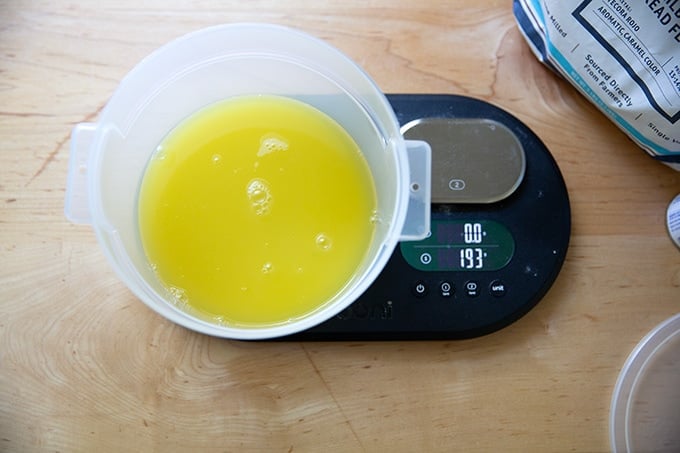
Add an equal amount of flour by weight. It should be about 192-193 grams of juice and flour each.
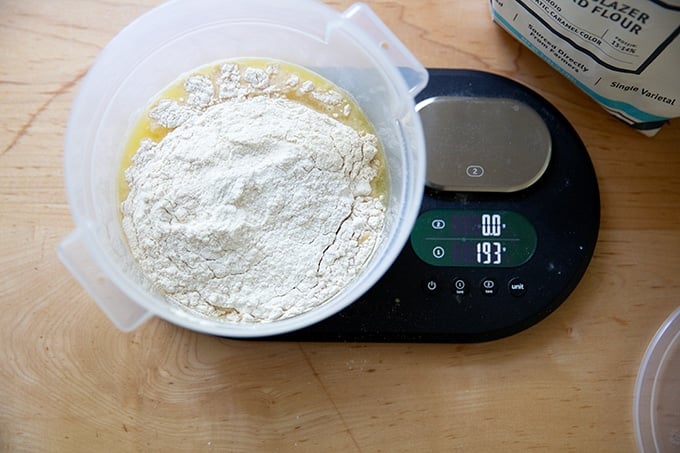
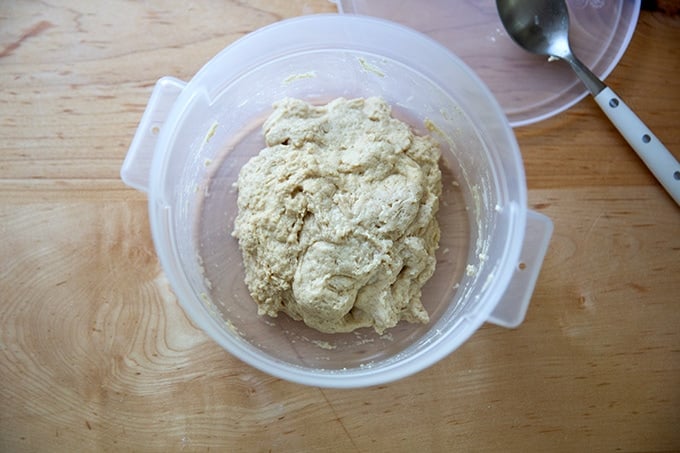
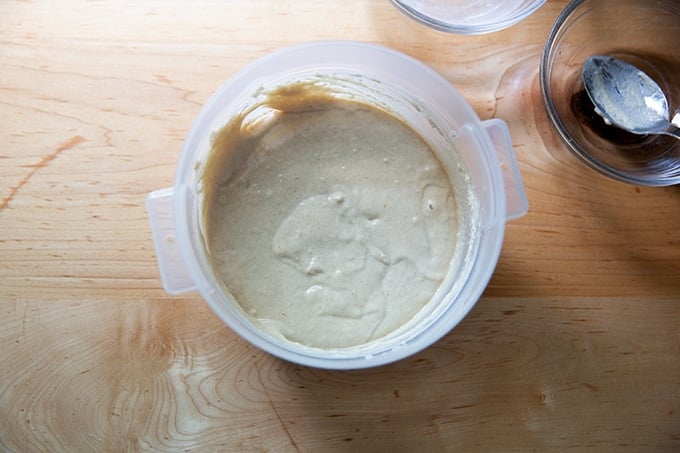
Stir the flour and juice together until the flour is absorbed.
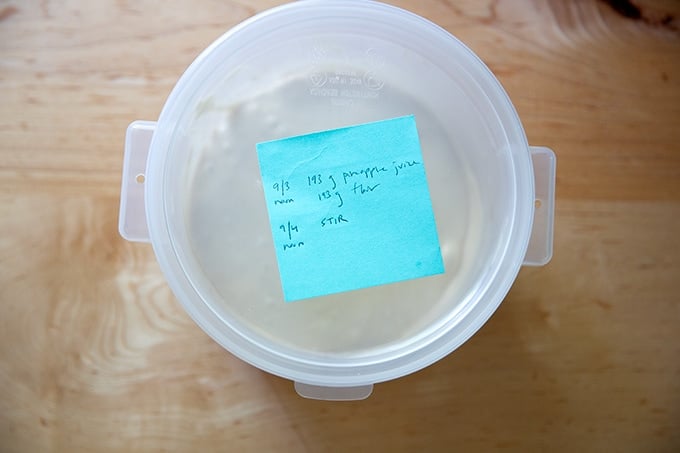
Cover the vessel. Record the date, time, and measurements — you will forget which day you started if you don’t. Let it sit at room temperature for 24 hours.
Day 2: Uncover the vessel and…
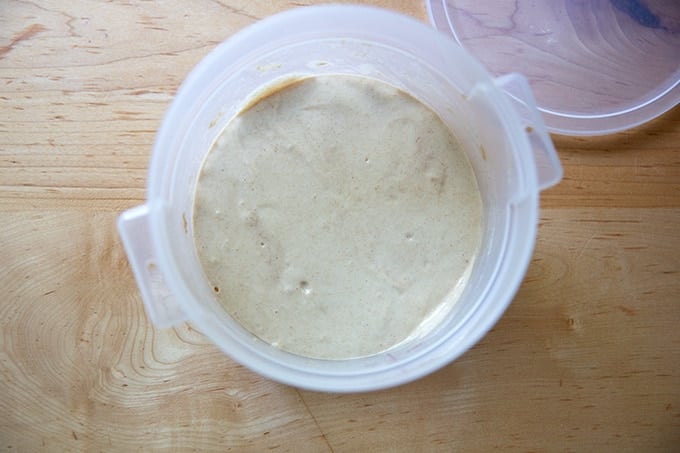
… give it a stir.
Re-cover the vessel, and record your work. Let it sit at room temperature for another 24 hours.
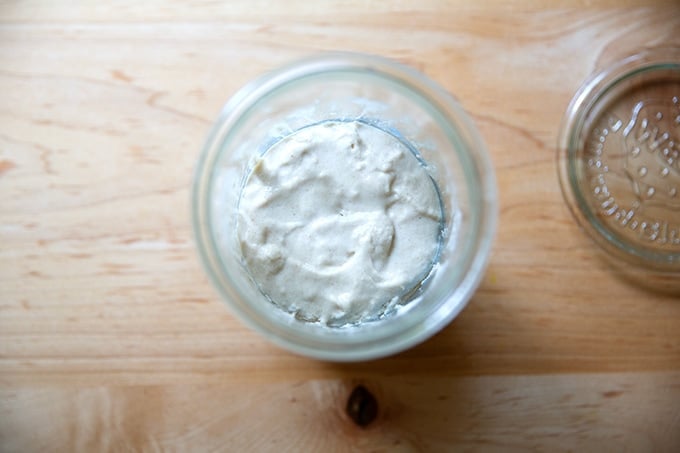
Day 3: Uncover the vessel.
Measure out 128 grams (about 1 cup) of flour and 128 grams (about 1/2 cup) of water:

Add them to the vessel.
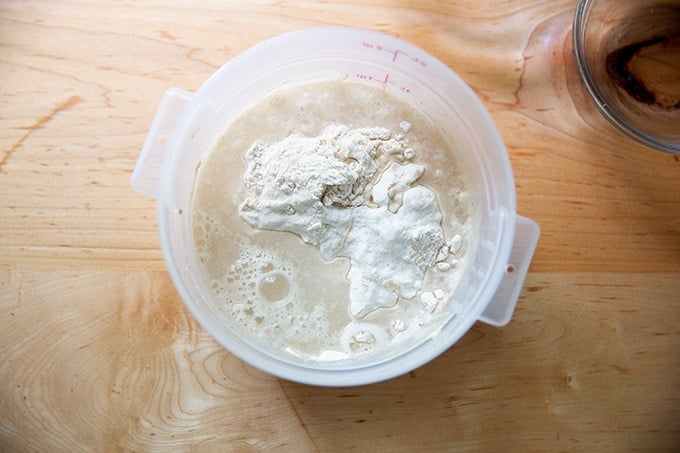
Stir to combine.
Cover the vessel and record your work again. Let it sit at room temperature for 24 hours, stirring once or twice.
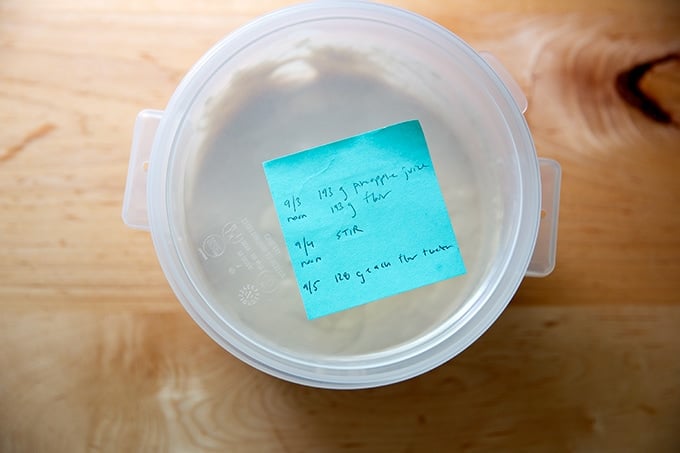
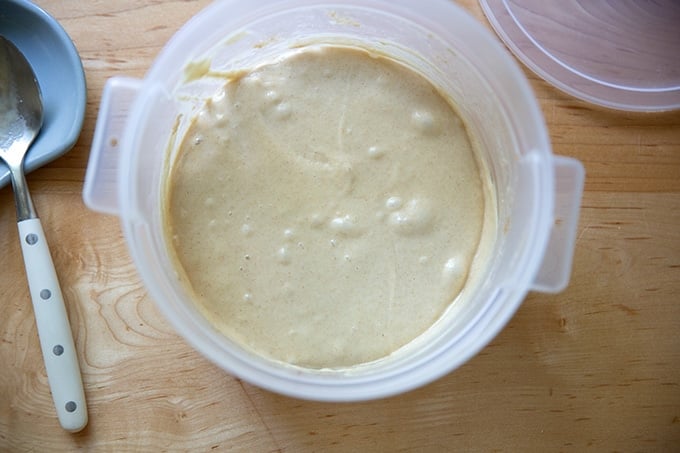
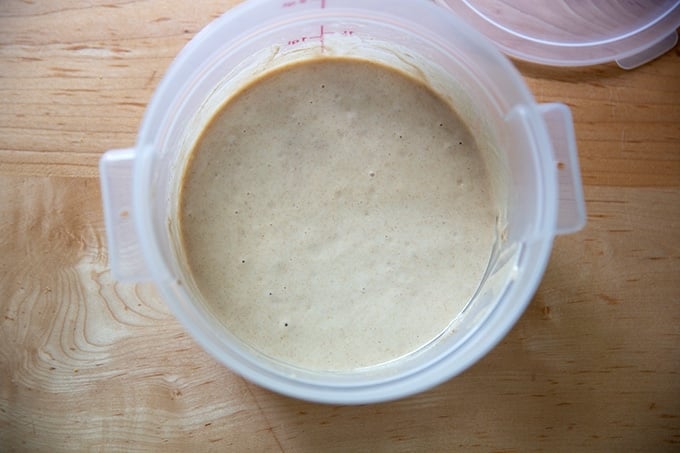
Day 4: Uncover the vessel. You should see a little action (bubbles). Measure out 128 grams (about 1 cup) of flour and 128 grams (about 1/2 cup) of water:
Add them to the container.
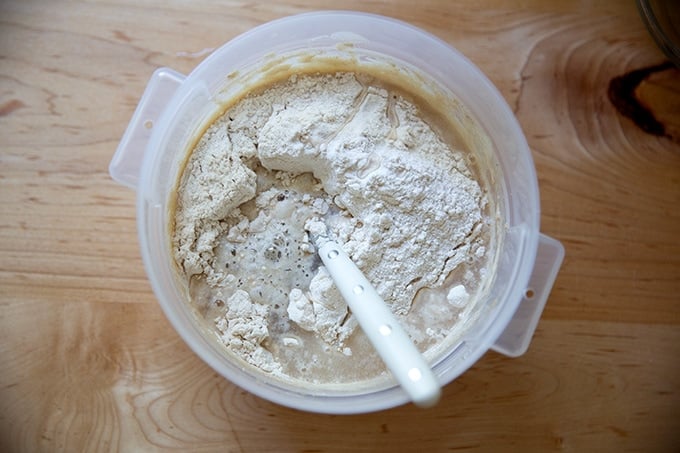
Stir to combine.
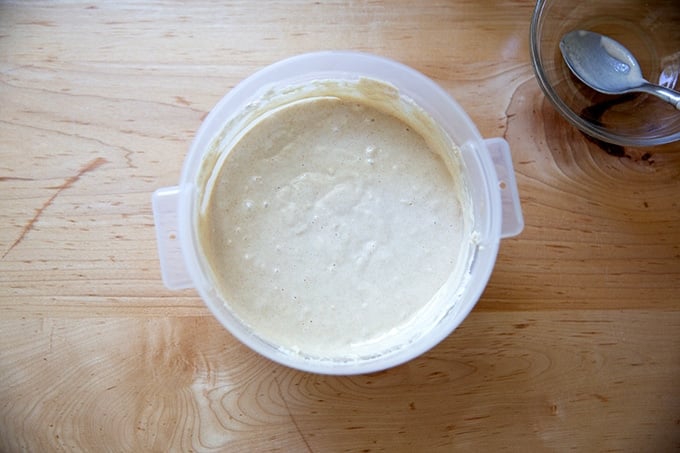
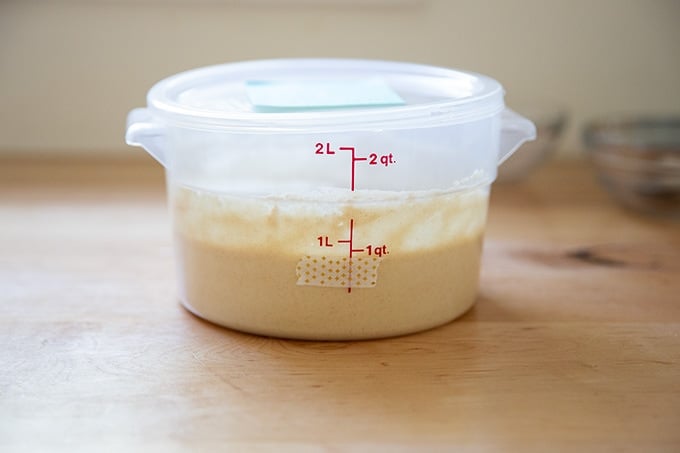
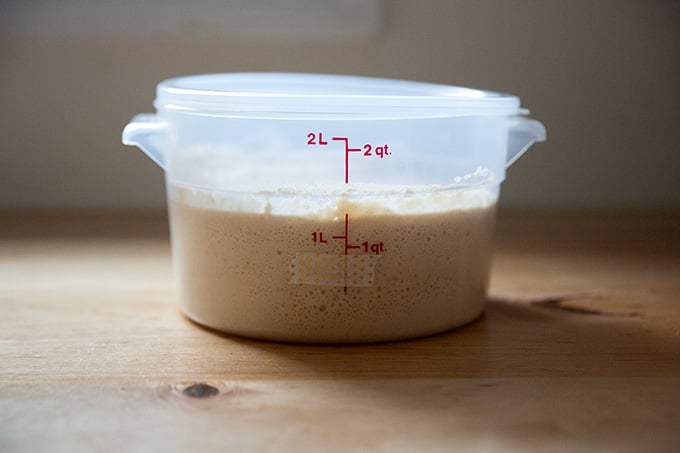
On this day, record your work again, and mark the height of your mixture with tape on the side of your vessel. Let it sit at room temperature for 24 hours, keeping a closer watch this time around.
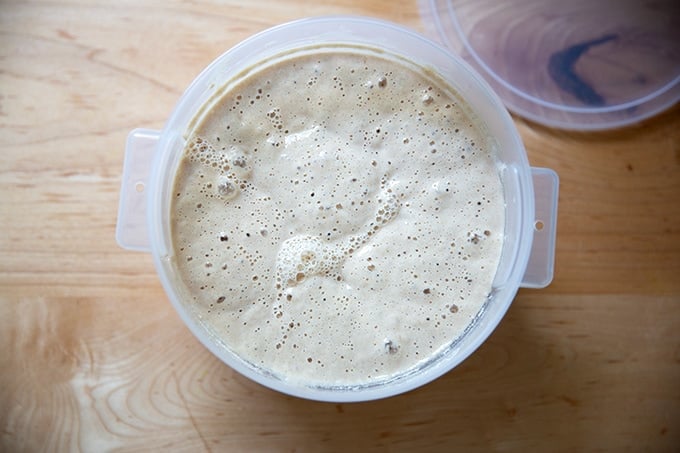
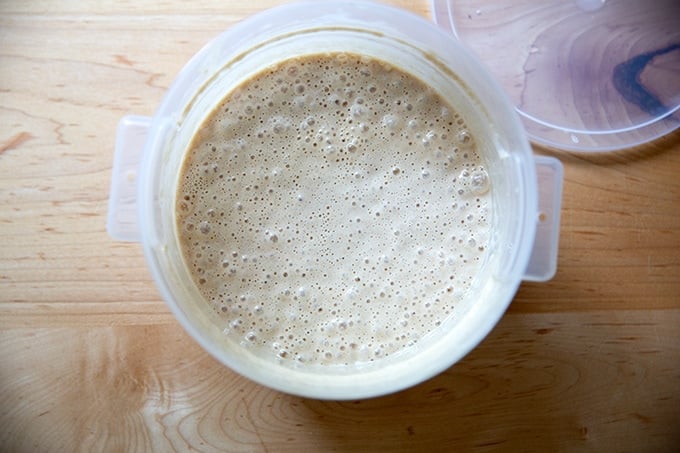
You will likely see some action…

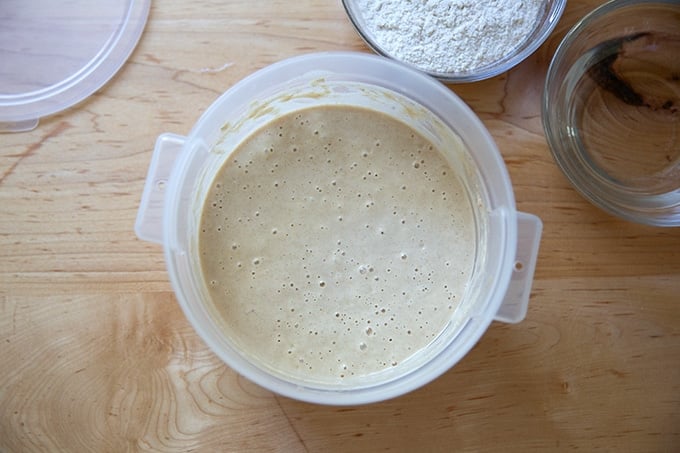
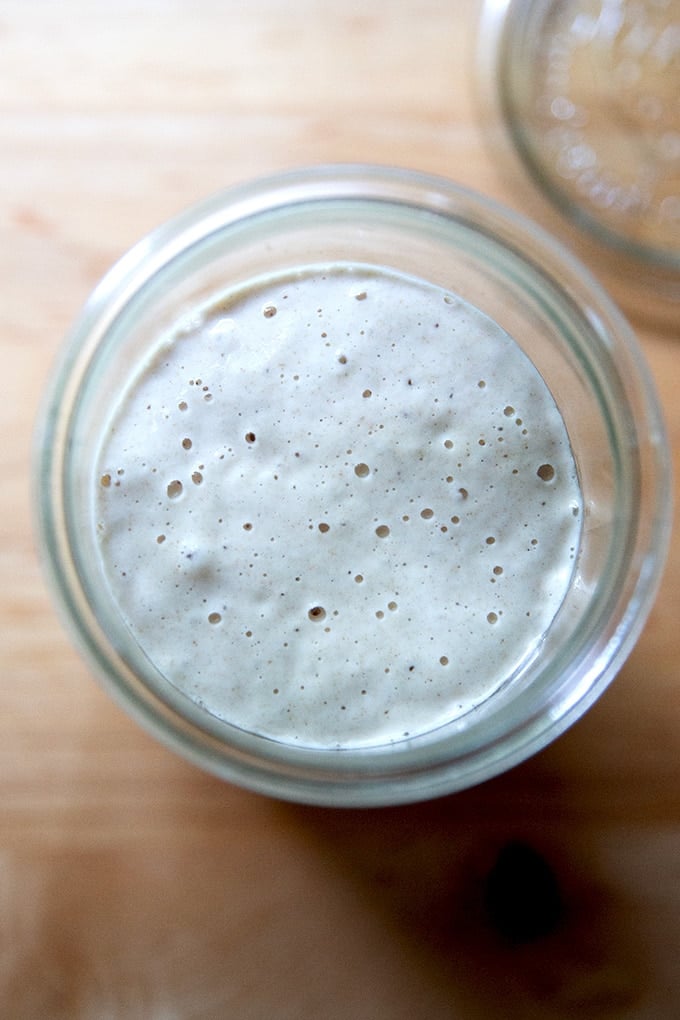
The mixture might even double in volume.
And you should see lots of bubbles on the surface.
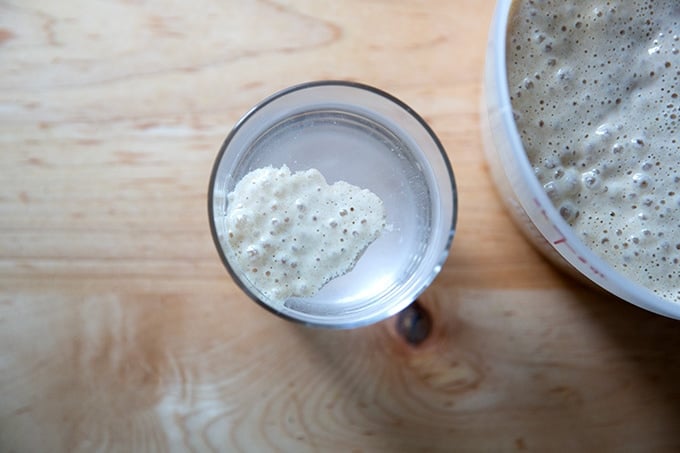
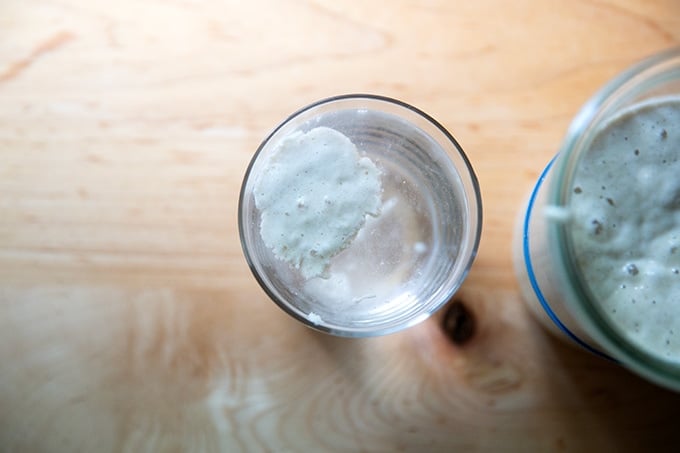
If your mixture is in fact rising, let it rise until it nearly doubles in volume; then drop a spoonful of it in water. If it floats, you’re in business. Note: Your starter might rise (and maybe fall) while you are sleeping — don’t worry if you don’t “catch” it at its peak. Continue on with the process that follows.
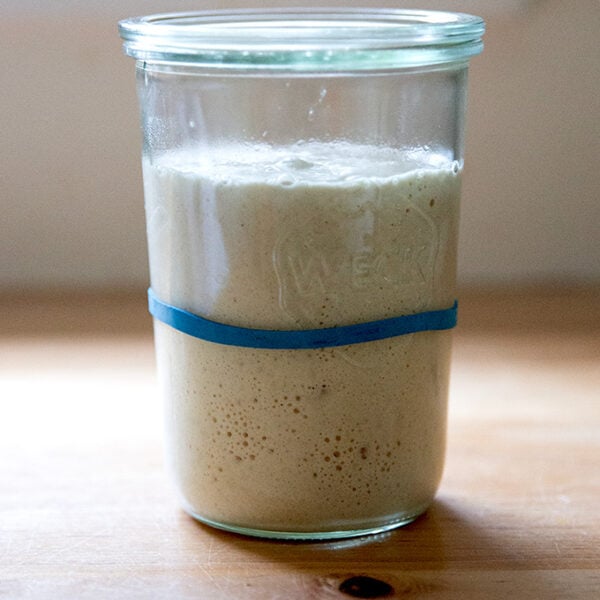
Spoon 128 grams of the starter into a new vessel.

Measure another 128 grams of flour and water each.
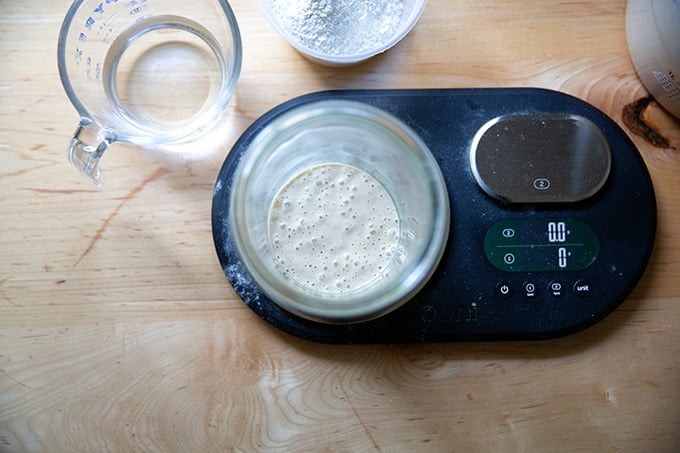
Add the flour and water to the starter.
Stir to combine.
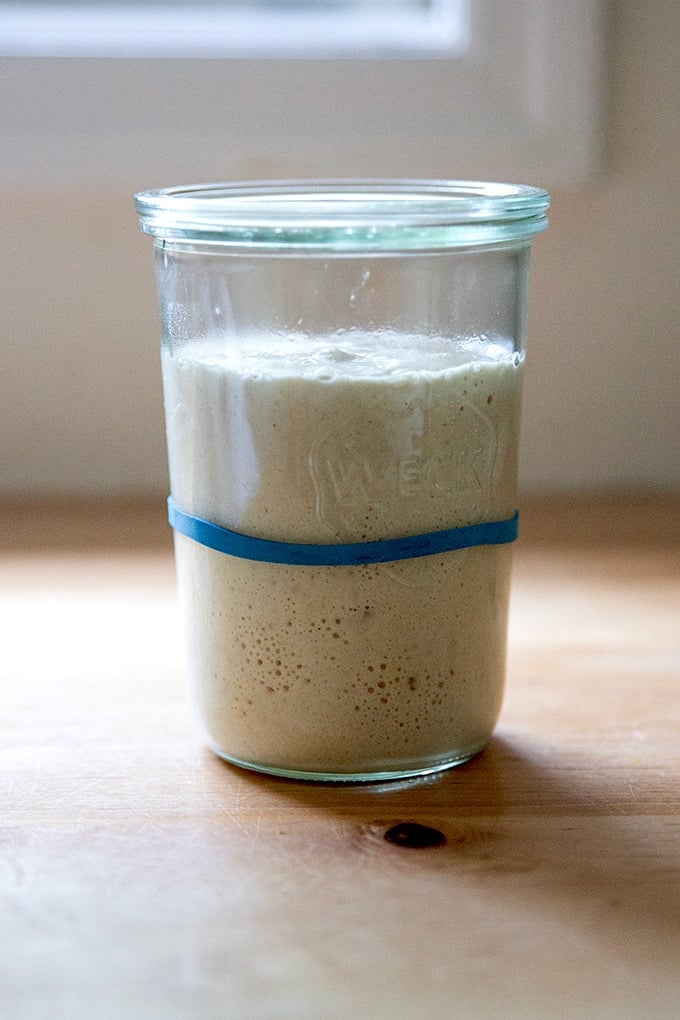
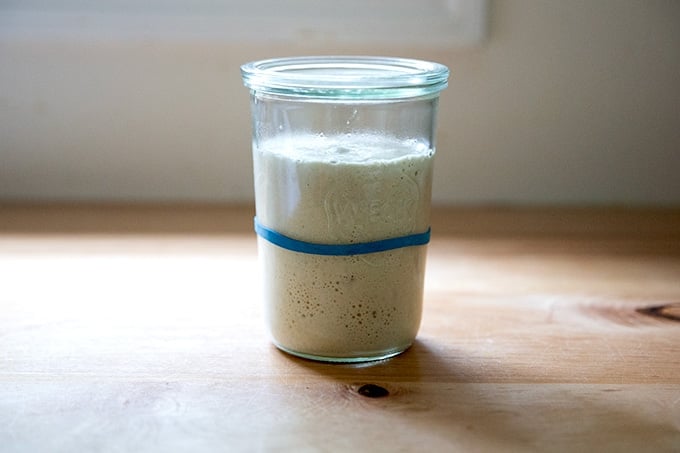
Mark the height with a rubber band.
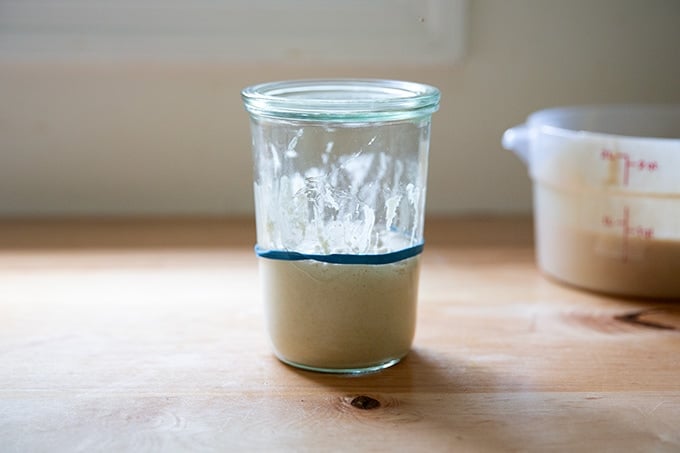
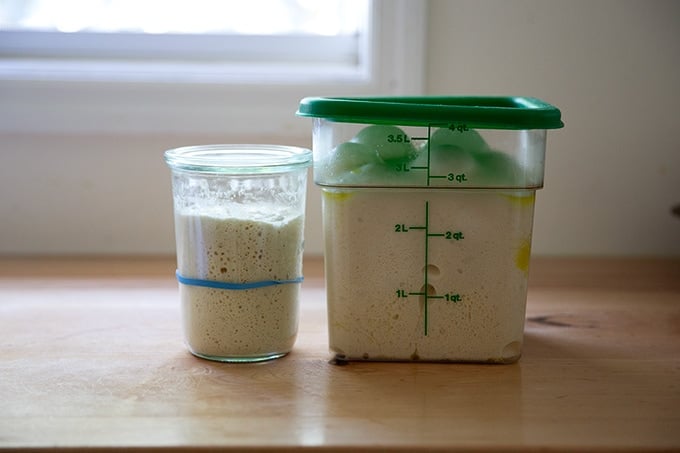
This original vat of sourdough starter is now your discard bucket. Transfer it to the fridge or use it in one of your favorite sourdough discard recipes: tortillas, crackers, pancakes, soda bread.
Day 5: When your starter doubles…
… and floats…
…you can do one of three things:
- Repeat this process: spoon 128 grams of starter into a new vessel and add 128 grams each flour and water. (Transfer the remaining starter to your bucket of discard.) Let the new starter rise until it doubles. Your starter will get stronger with every feeding.
- Transfer it to the fridge if you need to take a break from the process. You can pick up where you let off when you are ready.
- Test it out…
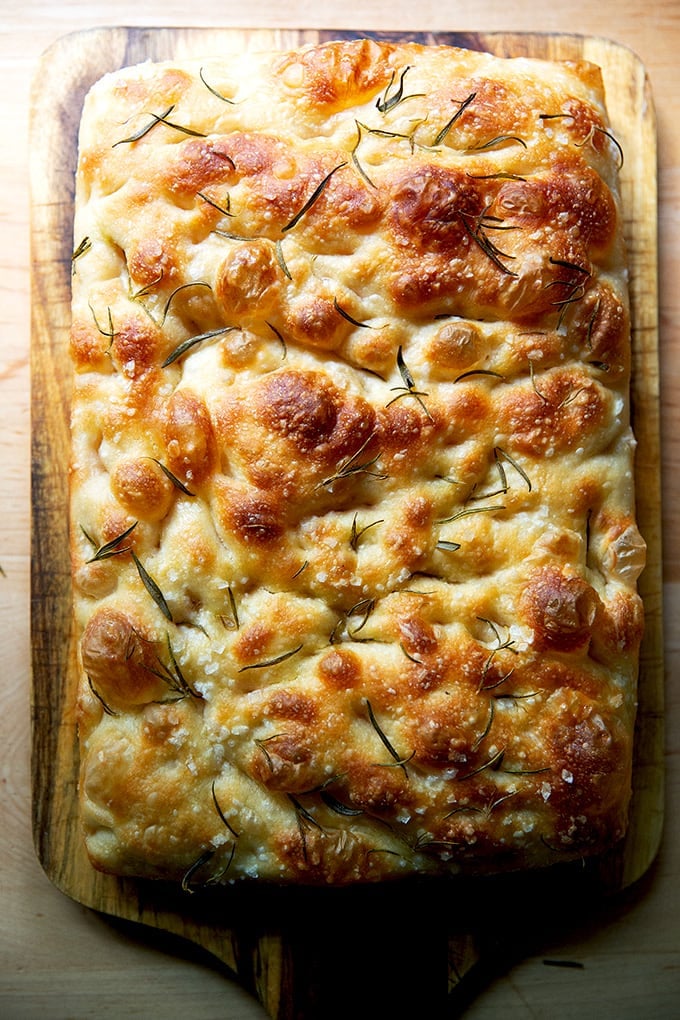
… in a sourdough bread recipe. I recommend starting with…
… focaccia, one of the easiest breads to make.
How to Build a Sourdough Starter from Scratch
- Total Time: 5 days
- Yield: 3 cups 1x
Description
This post outlines how to build a sourdough starter from scratch simply and quickly. In less than a week, with minimal effort, you will have a bubbly, active starter on your hands to use in all your favorite sourdough recipes.
Notes:
Adapted from Peter Reinhart’s method, outlined in Perfect Pan Pizza (and many of his other books as well).
If you are looking for guidance on how to feed, maintain, and store your already strong starter, see this post: How to Feed, Maintain, and Store a Sourdough Starter.
5 Tips for Success
- Use a scale to measure. It is the only way to measure accurately.
- Use a straight-sided vessel, which will help you more accurately see how much your starter is growing.
- Attempt this project while it’s hot outside or create a cozy place for your starter to rise:
- Find a warm place in your kitchen (like on top of your refrigerator) to let it rest.
- Invest in the Brod and Taylor Sourdough Home: I do not own this, but it gets good reviews should you have the space for it
- Build your own “sourdough home“: one of you ingeniously made a homemade proofing box by placing a seed heating pad in a box and covering it with a towel.
- Try the warm oven trick: turn your oven on for 1 minute (at any temperature) and then turn it off. It likely won’t get above 100ºF — it will just create a cozy spot for your dough to rise. Consider sticking a post-it note to the oven to remind you that you have a starter in there so that you don’t accidentally preheat your oven and kill your starter. (Note: I do not recommend using the oven with the oven light on, because I discovered the hard way that the oven light can actually be too hot and cause your starter or sourdough bread to overferment.)
- Start with pineapple juice.
- Use freshly milled stone-milled flour. If you have a source local to you, use it! Health food markets, co-ops, or markets such as Whole Foods often carry freshly milled flour. Here are a few mail-order options:
Pineapple Juice: My small cans of pineapple juice are labeled as 6 ounces (177 ml), but when I actually weigh the juice inside, it always weighs around 192 grams. The important thing is to use an equal amount by weight of flour and pineapple juice.
Pineapple Juice Alternatives: Orange Juice or Water
Water: I have no trouble using tap water when building a sourdough starter or when making a sourdough bread recipe. If you have concerns about your water, you can:
- Use water that you’ve left out overnight to ensure any chlorine has evaporated.
- Buy spring water. In some places, letting water sit out overnight will not be effective, and your tap water may kill your starter.
Discard: At the end of the first four days of the process, you’ll be left with a decent amount of sourdough discard, which you can use in countless recipes. Here are a few of my favorites:
Ingredients
- 1 small can (192 grams) pineapple juice, see notes above for alternatives
- stone-milled flour, see notes above
- Room temperature water, see notes above
Instructions
- Day 1: Pour the can of juice (roughly 192 grams) into a large bowl or ideally a straight-sided vessel on a tared scale. (A straight-sided vessel allows you to truly see how much your starter is growing. I’m using this Cambro.) Add an equal amount of flour (roughly 192 grams) by weight. Stir the flour and juice together until the flour is absorbed. Cover the vessel. Record the date, time, and measurements — you will forget which day you started if you don’t. Let it sit at room temperature for 24 hours.
- Day 2: Uncover the vessel. Stir the mixture. Re-cover the vessel, and record your work. Let it sit at room temperature for another 24 hours.
- Day 3: Uncover the vessel. Add 128 grams (1 cup) flour and 128 grams (about 1/2 cup) water. Stir to combine. Cover the vessel and record your work again. Let it sit at room temperature for 24 hours, stirring once or twice.
- Day 4: Uncover the vessel. You should see a little action (bubbles) and it should smell pleasant, not unlike a fruity yogurt. Measure out 128 grams (about 1 cup) of flour and 128 grams (about 1/2 cup) of water. Add them to the container. Stir to combine. Cover the vessel. On this day, record your work again, and mark the height of your mixture with tape on the side of your vessel. Let it sit at room temperature for 24 hours, keeping a closer watch this time around. You may see action — rising and bubble formation — within a few hours. If your mixture is in fact rising, let it rise until it nearly doubles in volume; then drop a spoonful of it in water. If it floats, you’re in business. Note: Your starter might rise (and possibly fall) while you are sleeping — don’t worry if you don’t “catch” it at its peak. Continue on with the process.
- Day 5: At this point, you should be observing some activity in your starter, meaning the starter should have risen slightly (perhaps doubled but perhaps not) and fallen with bubbles transforming from big to small. You’ll now take a small portion of this mixture and build a new starter: Transfer 128 grams of the starter to a new jar or vessel, and add 128 grams (about 1 cup) of flour and 128 grams (about 1/2 cup) of water. Stir well to combine, then cover the jar. Mark the height with a rubber band. Let sit at room temperature. Transfer the remaining starter to the fridge — this original mixture is now your sourdough discard and can be used in all sorts of recipes, see notes above. When your new starter doubles in volume, you can do one of three things:
- Repeat this process: spoon 128 grams of starter into a new vessel and add 128 grams each flour and water. (Transfer the remaining starter to your bucket of discard.) Let the new starter rise until it doubles. Your starter will get stronger with every feeding.
- Transfer it to the fridge if you need to take a break from the process. You can pick up where you let off when you are ready.
- Test it out in a sourdough bread recipe.
- Maintaining your starter: Once you have a strong, active starter on your hands, follow the steps in this post: How to Feed, Store, and Maintain a Sourdough Starter.
- Category: Bread
- Method: Stir
- Cuisine: American
This post may contain affiliate links. Please read my disclosure policy.


446 Comments on “How to Build a Sourdough Starter from Scratch”
Hi Alexandra! I have started my starter (😂) and I’m on Day 5 – things are moving along great!
Question regarding the pineapple juice and temperature… Apologies for the long explanation.
I got my pineapple juice at Whole Foods and because they didn’t have small cans, I got a small glass jar of 100% pure pineapple juice that was on the shelf (non-refrigerated). I used the gram measurement from video 1 for my current starter and put the remainder in the fridge – do you think I would be able to start a second starter with the refrigerated portion today, even though it requires leaving it out in the warmth after the juice has been refrigerated? I just worry about bacteria, unless.. that’s all part of it?? Any thoughts? Thank you!
Hi! You can definitely start a second starter with refrigerated juice… it will be fine!
For Day 5 you mention using a glass vessel for the offshoot. What size do you suggest? Also, is plastic acceptable or should it definitely be glass? Thank you.
Plastic is fine! It’s just nice if it’s see-through. A quart-size vessel or similar (the one I use is slightly smaller) is great. Straight-sided is also helpful 🙂
I will be on day 5 of my starter and have to go out of town for 5 days. Anyway to pause it ? Can I just leave it in the fridge and come back and start day 6? I’ll just be going to a family members house so I can always bring it w me if needed. Only a 3 hr car ride. Will changes in elevation throughout the trip affect it ? Love this challenge. You have made it so simple and it’s so satisfying
Yes! Just stick it in the fridge. When you are ready to pick it up again, remove it from the fridge, discard most of it down to a tablespoon or two, then feed with 100 grams each flour and water. So glad you’ve enjoyed the challenge 🙂
Hi, my starter turned moldy on Day #3. It has been VERY hot and humid lately, here in Vermont. Any suggestions?
Shoot! That it is such a bummer. A few thoughts, if you were using a plastic vessel for the initial mix (which is what I use), consider using a glass jar if you have one that is large enough. Second, you could try wiping down the insides of the vessel with a damp paper towel or cloth…be sure your hands are very clean when you do this. I’m so sorry to hear this… mold unfortunately means you have to start over.
I have just started the sourdough challenge. My question is do I feed my starter at the same time in the coming days?
That’s the ideal! But do know that the timing can be flexible so don’t stress if you’re not consistent every day.
Hi I’m on day 2 I just stirred it just like indicated but mine looks more looser than your mixture in your video. I live in south Florida high humidity could that be it?
Absolutely! Just push on. If it necessary, you can add a pinch more flour to make the consistency more similar to how it appears in the video.
Hi, I’m getting prepped to start… is it ok to use Einkorn flour? Thank you 😊
Yes! You might ultimately want to switch to a bread flour (after day 5 or so), but einkorn is great to start with.
Hi Alexandra! I am day 5 of the sourdough starter and yesterday my starter saw HUGE progress – it more than tripled in 24 hours and overflowed from its 4qt container. I followed the instructions for today (put 128g of starter/flour/water into clean glass weck jar, and refridgerated the remaining discard), but I have a feeling my starter is going to grow very quickly again today. Do I feed it as soon as it doubles, even if thats only like 4 hours? And does the fact that its growing so quickly mean that its ready to go, or should I hold off longer until attempting to bake with it? Thank you as always!!
Wow, fantastic to read all of this! Yes, feed it as soon as it doubles… or you can wait till it nearly triples as long as your vessel is large enough. You can definitely try it in a recipe if it’s checking all the boxes: doubling in a timely manner (which it is) and passing the float test… not sure if you’ve gotten that email yet. You may find that a few more days will strengthen it further, which will then increase your chances for success with your first loaf, but if you are anxious to get going, go for it!!
Should the water be a certain temperature?
Room temp is fine! Cold from the tap is fine, too.
Hi! Going to start the challenge but waiting to get some supplies. I have a few questions – sorry…
1. Is it safe to use the discard while your starter is getting established? I read elsewhere to trash it until starter is stale and thriving.
2. On day 6, you said you switched to bread flour. What kind of flour where you using initially?
3. Approximately how many grams of starter are you keeping in the weck jar during your feedings?
4. Your links to for the bannetons were for items no longer available. I have no idea what size to get. Can you share suggestions? Do you feel they are necessary?
I hope I am not over complicating this. Thank you for helping.
Great!
1. Is it safe to use the discard while your starter is getting established? I read elsewhere to trash it until starter is stale and thriving. Yes! I’ve read that too and it makes zero sense to me… it’s just flour and water mixed together? Perfectly suitable for any of the discard recipes I’ve suggested.
2. On day 6, you said you switched to bread flour. What kind of flour where you using initially? I was using Trailblazer bread flour from Cairnspring Mills
3. Approximately how many grams of starter are you keeping in the weck jar during your feedings? I’d guess 50 grams.
4. Your links to for the bannetons were for items no longer available. I have no idea what size to get. Can you share suggestions? Do you feel they are necessary?
Bummer! Do I link to those in this post? Let me know where you saw those links… bannetons are for the actual bread making part. You won’t need them while building your starter. And no, they are not necessary even at the bread-making phase.
Thank you for the quick response! I jumped ahead to look at the Homemade Sourdough Bread Recipe Step by Step and saw the bannetons there.
Phew! Grea to hear 🙂
How long does it need a warm environment if I’m just starting? Is storing it in the oven a temporary thing? How many times do I turn the oven on etc?
Is it warm where you live? You don’t need to do the warm oven trick if you are in the middle of a heat wave or if your kitchen is on the warm side. If it is cool, you can do it just once. I hesitate to recommend doing it more than once because I worry people will walk away from the oven as it’s preheating and then kill their starters in the process. If you trust yourself to NOT walk away, you can do it twice during the 10 hours after you feed it 🙂
Day 6 – second feeding/float test: So far so good with my starter, however, while doing my second feeding on day 6, I did the float test, and failed (it sunk to the bottom). Can I assume there’s a chance it may float eventually? Or do I give up hope at this point, and try again from day 1?
Do not start over!! First of all, it may take as long as two weeks for your starter to really thrive/double quickly/float. Second: when you did the float test, did you stir your starter together and deflate it first? Or did you take a spoon from the top once it had doubled?
Wasn’t sure how to reply to your questions, so I’m submitting as another comment… 🙂
Noted on how long it might take for a starter to double quickly/float! That makes me feel better!
And when I did the float test, I stirred/discarded some of my starter, then did the test with a little of the starter that was left, before feeding it again. Next time, should do the test BEFORE stirring?
Hi! And yes — don’t stir/discard before doing the float test: after your starter has doubled and is looking bubbly and light, spoon some off the top and drop it in water. Then proceed with discarding/feeding.
I got to day 4 and everything looked good. We went away for the weekend and so I took my starter and everything along to continue. Day 5 it hadn’t risen above the tape at all. So I let go another day, thinking the place we were staying was too cool and it just needed time. Also warmed the oven and tried that. Didn’t work. The top was very watery and it was very soupy and not bubbly at all. I went ahead with day five instructions. Is it dead?
Not dead! Good work continuing on with the instructions: “very watery and it was very soupy” is a sign that it needs to be fed, meaning: it needs to be mostly discarded then mixed with fresh flour and water. Are you using a scale to measure? What type of flour are you using? Do you live in a humid environment?
I am on day 7 of the challenge and am excited to make the Focaccia. However, because I started my starter in the afternoon, I opted to discard and feed today as I did not want to start the Focaccia until tomorrow morning but am afraid my starter will reach its peak before then. Should I refrigerate it before I go to bed or leave it out on the counter ?We live in a warm climate and our house is about 75 with the AC . Thank you!
Hi Darlene! I’m likely too late here. It’s really hard to know without seeing your starter… it’s possible your starter will peak and fall in the middle of the night, in which case it might not be ideal to use in the morning. I would suggest this: make the dough for the focaccia whenever your starter is ready… it’s hard to predict with these young starters. If at any time you need to stop your bread-making process due to having to step out or go to be, just stick the vessel in the fridge and pick up where you left off the following day when you have time. Let me know if you have more questions or if you need me to clarify.
Hi I’m on day 4 of the sourdough from scratch challenge and my starter has already increased by at least 25% today. Should I follow the day 4 guidelines and just stir before bed or discard and feed because it’s so active?
Thanks!
That’s awesome! Yes, just stir it, and continue on with the process tomorrow. If, however, by the time you are seeing this, it has doubled in volume, you can proceed to the next step.
Just know this: the process is very forgiving. If you don’t see this message and if you do nothing, it’s possible your starter will rise and then collapse, and might look a little thin/watery… this is fine! It’s just a sign that it needs to be fed 🙂
My starter seems alive, but day 7 and not floating. Do I just continue feeding it twice a day until it floats before using? Also, I am using King Arthur bread flour. I did freeze it first. I am using a scale & warm oven trick. It has never doubled in size, but just rises barely above the rubber band.
Yes, keep at it with the 2x a day feedings! It may take as long as 2 weeks to double in volume. The pineapple juice is meant to shorten that timeline, but other factors can thwart that effort.
Great! Thank you! Is the discard usable at this point? My 2quart bucket is almost full.
Yes! Absolutely, go for it. I link to a bunch of recipes in the post above. Here they are, too:
Sourdough Discard Toasting Bread
Sourdough Discard Waffles
Sourdough Discard Crackers
Sourdough Discard Tortillas
Sourdough Discard Pancakes
Irish Soda Bread
Hi! My starter is VERY active and overflowed the container on Day 4. I lost about half the starter. What should I do at this point? Thanks.
Oh boy, well it sounds as though you have a very active starter, which is great news. I would discard any of the starter that overflowed out of the container and onto your countertop or wherever. Sorry about that. And I would just proceed with the process at this point. You’ll use what you have left in your vessel. You’re going to discard most of it down to just a tablespoon or two, and then you’ll re-feed it with fresh flour and water. About a hundred grams of each. And ideally from day 5 and 6 on you’ll be doing that twice a day until you are ready to bake a loaf of bread.
I’m doing the sourdough starter challenge. There is no day seven it goes from 6 to 8. I’m on day seven this morning. I don’t know what to do. Help.!
I’ll email you right now!
Hi, I’m on day 6 and my starter hast doubled. When I removed from the starter and fed it yesterday, 2 hours later I saw it starting to rise. But then it stopped. Zero progress over night. Do I remove a cup from it and stick with adding the 1c flour 1/2c water or do I move to a different ratio?
Thanks!
Hi! Apologies for the delay here! Yes, at this point, you want to be feeding it twice a day: discard most of it, then feed it with equal parts by weight flour and water (100 grams each or so). How is it progressing now?
I completed day 7. Now day 8. I was planning to make the focaccia bread.
Yesterday, my started (in the morning) floated. I was so happy. But decided to wait until today to make the focaccia (day 8). The started had doubled last night. (13 hours after feeding it) So I measured out the starter into the bowl. Then I thought, I should make sure it floats. Well it sunk straight to the bottom.
I was reading more of your posts and it seems there is an ideal time to use the starter? So maybe, even thought it had doubled and a bit more, it was in the “down” time? This is so confusing. So I ended up, not wanting to waste flour, just adding 100g each of water and flour to the starter, like I have done before. And will try again later.
So I guess my question is, the starter is not always ready to make the bread?
thank you
Hi Kassie!
It sounds as though your starter is doing really well: doubling overnight is a great sign. I wouldn’t worry as much about the sinking. Next time do the float test before you pull any starter out of your jar for a recipe: in other words, spoon some off the top to test if it floats.
Regarding when to use the starter, you do want to use it at its peak: so when it doubles or triples in size after a feeding. That said, there is a window and there is a lot of flexibility: you can use it before it gets to its peak or you can use it slightly after its peak when it has begun to collapse a bit. You will begin learning the signs more as you bake more. For instance, if you wait too long after you feed your starter, to the point where the starter has doubled, but has really collapsed and has lots of tiny almost foamy bubbles on its surface, that’s too long — those signs indicate that it needs to be fed again: discard most of it, re-feed it, let it rise, etc.
Hope that helps!
Can I wait 36 hours instead of 24 between days 4 and 5? I’m trying to get back to feeding my starter etc in the morning. Thank you?
Yes! Your starter will likely get very liquidy, but that is fine… it will just be very hungry when you are ready to feed it: discard most of it; then feed it with equal parts by weight flour and water.
Hello from Athens!
I am on day 2 and the starter has already doubled in size and it floats in water, amazingly enough! Since I am waiting for the videos for day 3,4, etc is there something I should do or just wait and follow the instructions?
Hi Mahi! I would just wait for the videos/instructions for days 3/4/etc. But great to hear that you are already seeing great results! This is promising 🙂
Ok, so my first started ended up being killed in the oven when someone made something without realizing it was in there. I took a break and started over recently. I’m well past day 7 and i understand the factors that can affect my outcome. My question is, why does my starter sometimes pass the float test and somwtimes doean’t? I think when i don’t stir it as much before doing the float test it passes but if i give it a really good stir it sinks. My starter on a couple occassions has more than doubled in a few hpurs. I stirred it down and it doubled again. But still will fail the float test. Is my starter ready to use?
Hi Jessica! Great questions:
My question is, why does my starter sometimes pass the float test and somwtimes doean’t? I think when i don’t stir it as much before doing the float test it passes but if i give it a really good stir it sinks.
This makes sense! I always do the float test by simply spooning some of the doubled/tripled starter off the top and dropping it into water. If you stir it first, it likely will not float.
My starter on a couple occassions has more than doubled in a few hpurs. I stirred it down and it doubled again. That’s great! Doubling again after being stirred down is a great sign that your starter is strong.
But still will fail the float test.
Are you measuring after you stir here or when the starter has doubled?
Regardless, it sounds as though your starter is close to being ready. It will get stronger with regular feedings, and do keep in mind it might take 2 weeks to be really strong and vigorous. I think you could attempt a loaf of focaccia with your current starter, however, and see how it goes 🙂
My starter isn’t rising and failed the hero test..now what?
Hi Mary! What day are you on? And you are using a scale to measure, correct? What type of flour? And finally, is it warm in your kitchen at the moment?
Hi can you tell me what size jar is the weck jar you are using?
Hi! It’s 3/4 liter.
I’m on day 5 and I’m checking back after the first 12 hours. It has only increased a tiny amount. Should I continue with the second feeding?
Yes! Apologies for the delay here, Kim. At this point you should be feeding twice a day.
Are you seeing any more progress? What type of flour are you using? And are you concerned at all about your water source?
I stuck with it and I’m doing great now!! Making your discard crackers now. Thank you. I switched to filtered water and wheat flour.
Great to hear, Kim! Thanks so much for circling back 🙂
Hi, I started the challenge and am on day 4. I wanted to know, what is the size of the container you use? I’ve been using a plastic jar and after following the steps for day 4, the amount of starter in my jar has almost reached the top. I was wondering if I’ve done something wrong (I had to use whole wheat flour, which I checked online was fine as it’s difficult to get bread flour where I live), or if my container is just small. It seems to be behaving like you said it should though. Thanks!
Hi! First the first 4 days, I’m using a 2-quart vessel (this one). Once I make the offshoot, I use a smaller vessel, roughly 1 quart (this one). Glad your starter is behaving!!
Hi, I’m on Day 7 of the challenge now. I switched to bread flour yesterday and my starter doubled in about 5 hours, so I fed it again before sleeping. It had doubled by the morning. I did the float test to see if it was ready, but it just sunk to the bottom. I was wondering what the issue is. Did I check at the wrong time? I’ve discarded most of it and added 100g each of bread flour and water for now. Thanks!
Great to hear! When you did the float test, did you stir the starter beforehand? Or did you scoop from the top of the risen starter?
I discarded how much I needed to and then dropped a spoonful into a glass of water
OK, next time, spoon the starter off the top, test to see if it floats, then remove however much you need.
Oh okay, I’ll do that today. Thank you!
Hi, I just checked and it did float! I fed my starter about 2 hours ago and its already more than doubled. I don’t plan on baking with it right now, so can I store it in the fridge as it is or should I discard most of it, feed it again, and then store it in the fridge? Thanks so much! (I’m sorry about the number of questions 😅)
Great! Yes, stick it in the fridge — you want to store it when it’s strong and vigorous, at its peak or nearly there. So if it just floated, no need to feed it before storing it. When you are ready to use it, you’ll need to feed it again: discard most it it, add flour and water by weight, let it rise, then use it at its peak. No worries at all about the questions 🙂
Oh no, I thought your article about how to maintain a sourdough starter said to feed and store it if you don’t plan to use it immediately, so I did that. Will it be a problem?
No, you did it right! You stored it when it had doubled. I’m saying that when you are ready to use it again, you’ll want to feed it before using it.
bread flour or wheat?
Hi! Can you clarify? Do you mean bread or whole wheat? Ideally to start, you’re using some good stone-milled, freshly milled flours (see the recipe box for ideas). Otherwise, organic bread or all-purpose flour is a good alternative. The surplus of micronutrients in those stone-milled flours are especially good for building a starter. Commercial whole wheat flour isn’t all that nutritious, but again, the organic bread and ap flours will perform well, too.
Thank you! I previously started my starter with whole wheat and followed with KA organic bread flower feedings.
I have not done SD bread in over a year and just tried again… Darn, Flunked!
Have to be gone for the w/e but will start again with a new starter next week. Thank you!