 →
→ How to Build a Sourdough Starter from Scratch
This post may contain affiliate links. Please read my disclosure policy.
This post outlines how to build a sourdough starter from scratch simply and quickly. In less than a week, with minimal effort, you will have a bubbly, active starter on your hands to use in all your favorite sourdough recipes.
A sourdough starter is a fermented mixture of flour and water that contains wild yeast and bacteria. It both leavens and flavors sourdough bread.
How? It’s time for a science lesson.
Wild yeasts and bacteria exist everywhere, namely in flour, but also in the air and on your hands. When we mix flour and water and let it sit, wild yeasts begin searching for food, which they find in the flour: they convert the starch in the flour into sugar. As they digest this sugar, they produce two things: carbon dioxide, which makes the starter rise, and alcohol, which the wild bacteria drink up and in turn produce various types of lactic and acetic acids — these acids are what give the bread the sour flavor.
Cool, right? The wild yeasts and bacteria work symbiotically to both leaven and flavor our starter and ultimately our bread.
3 Tips For Success
Because wild yeast and bacteria are the backbone of a sourdough starter, it is crucial that these microbes are happy for your starter to thrive: the happier they are, the more they multiply, the more powerful the starter you create.
Building up a colony of happy microbes takes time and care. Here are three tips for success:
Tip #1: Use Pineapple Juice: Using pineapple juice in place of water initially can shorten the overall timeline for building a sourdough starter from scratch. This is because wild yeast cells prefer a somewhat acidic pH (which pineapple juice is) in which to grow.
Tip #2: Keep Your Starter Cozy: Ideally, you’ll attempt this project while it’s hot outside — I find 80ºF (26ºC) to be ideal. If you’re building your starter when it’s cold outside, find a place to keep it warm. See recipe box for some ideas.
Tip #3: Use Good Flour: Use freshly milled, stone-milled flour because the added minerals and nutrients provide better food for the microbes (yeast and bacteria) to thrive. If you have a local source, use it! Health food markets, co-ops, and stores like Whole Foods often carry freshly milled flour. See recipe box for a few online sources I love.
How to Build a Sourdough Starter From Scratch, Step by Step
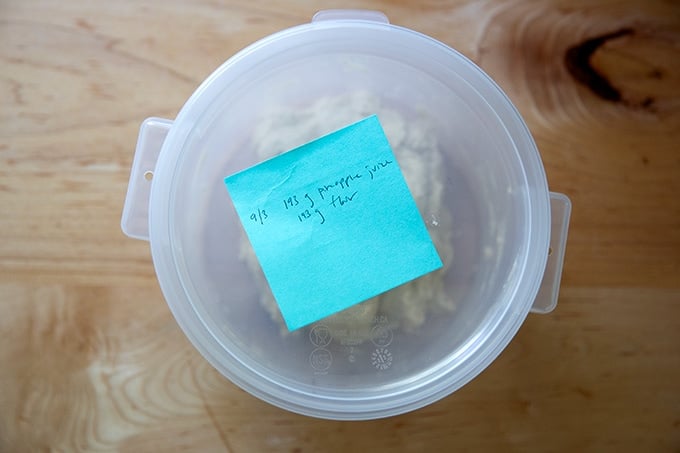
Day 1: Gather your materials: flour and pineapple juice. (If possible, pick up a bag of freshly milled stone-milled flour; see the recipe box for sources.)

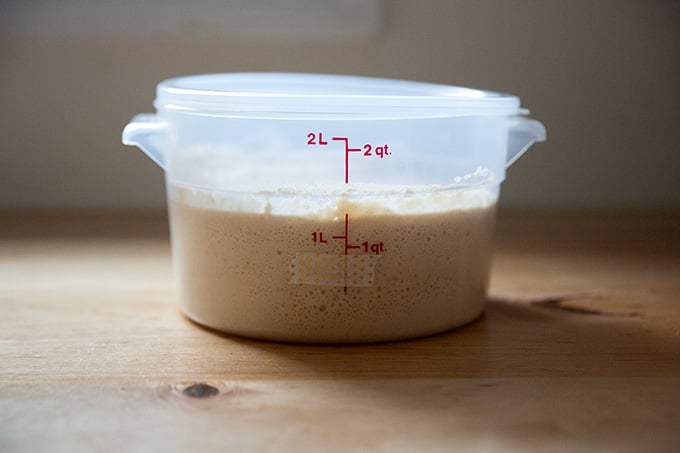
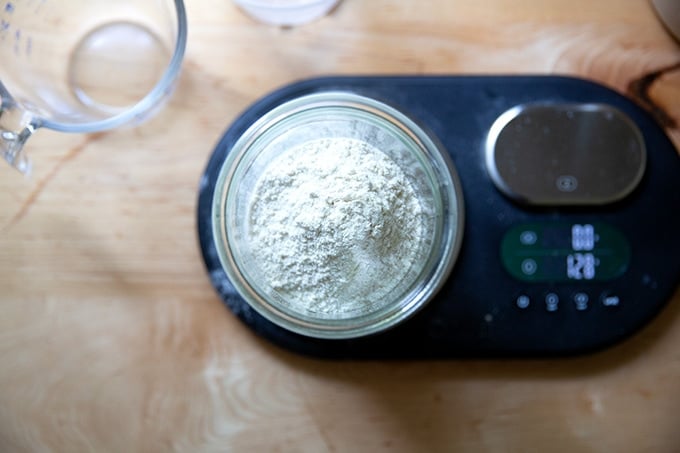
Pour the can of juice into a large bowl or ideally a straight-sided vessel on a tared scale.
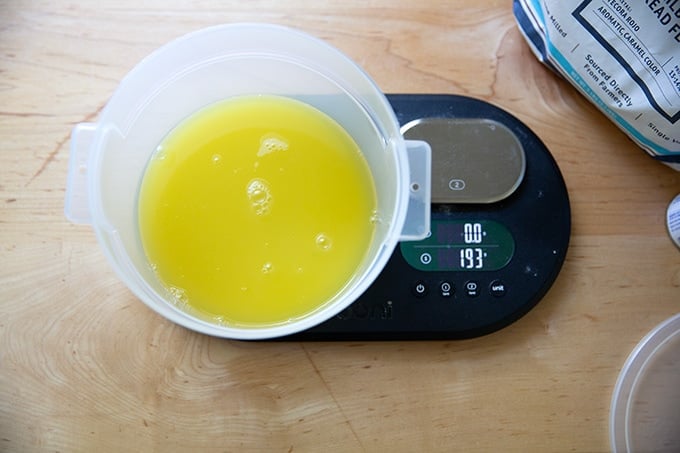
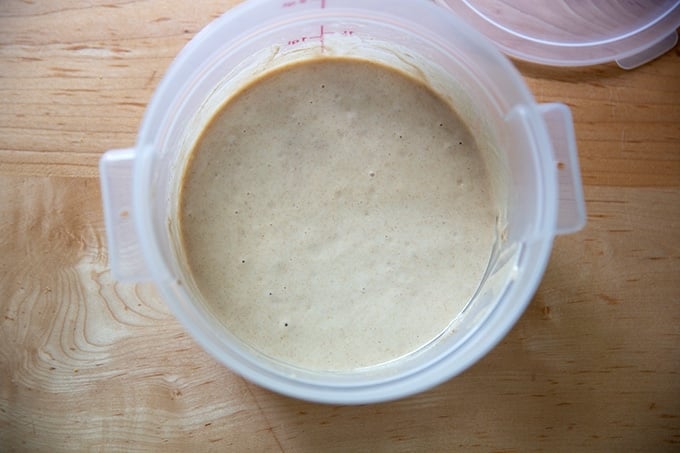
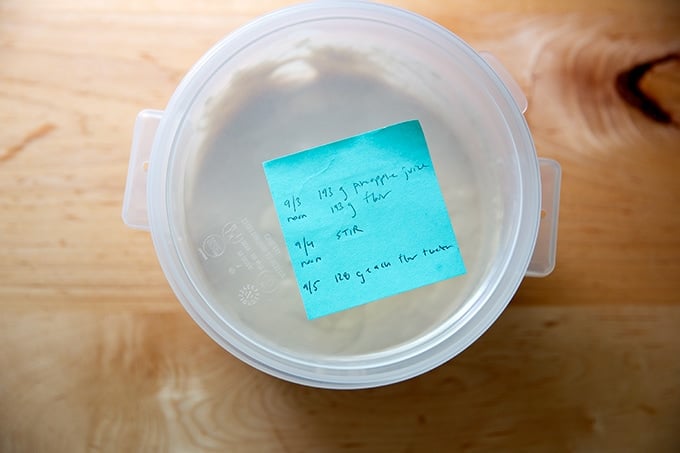
Add an equal amount of flour by weight. It should be about 192-193 grams of juice and flour each.
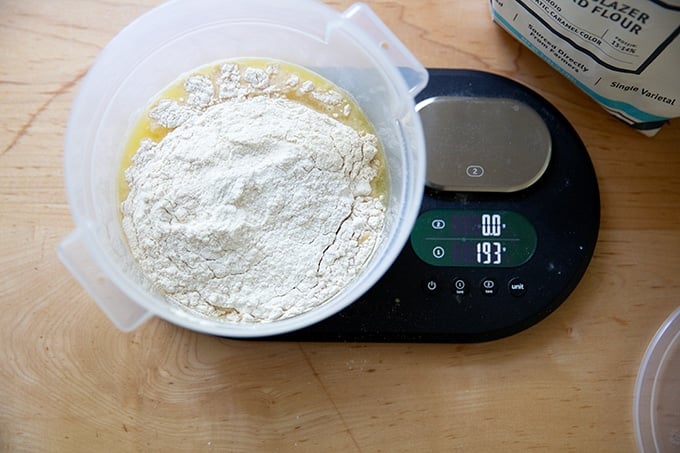
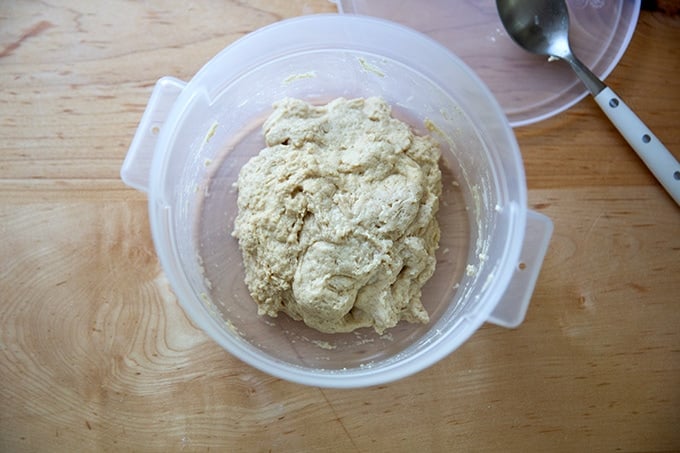
Stir the flour and juice together until the flour is absorbed.
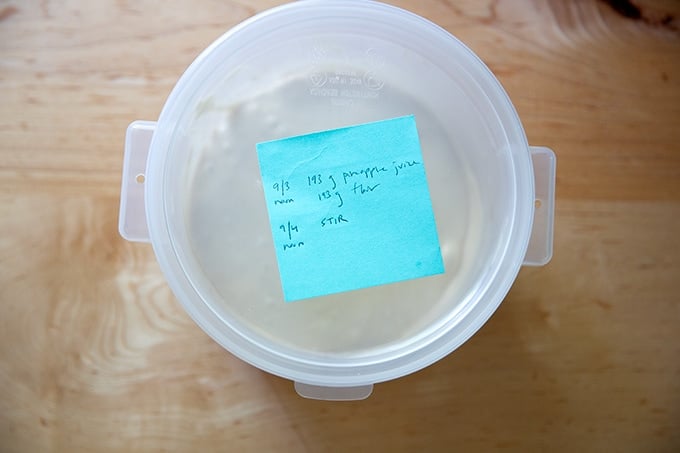
Cover the vessel. Record the date, time, and measurements — you will forget which day you started if you don’t. Let it sit at room temperature for 24 hours.
Day 2: Uncover the vessel and…
… give it a stir.
Re-cover the vessel, and record your work. Let it sit at room temperature for another 24 hours.
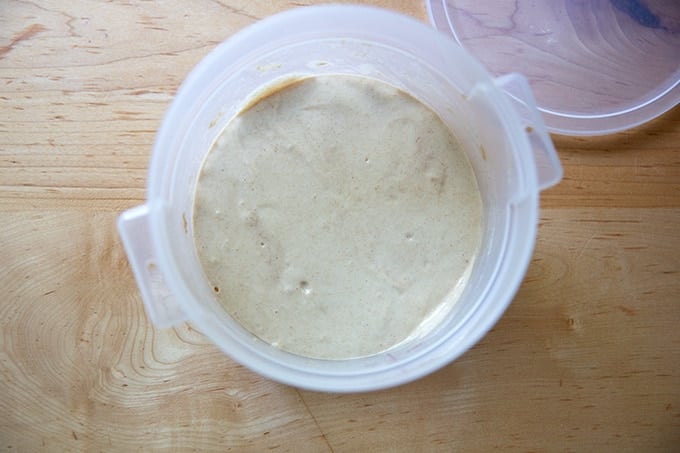
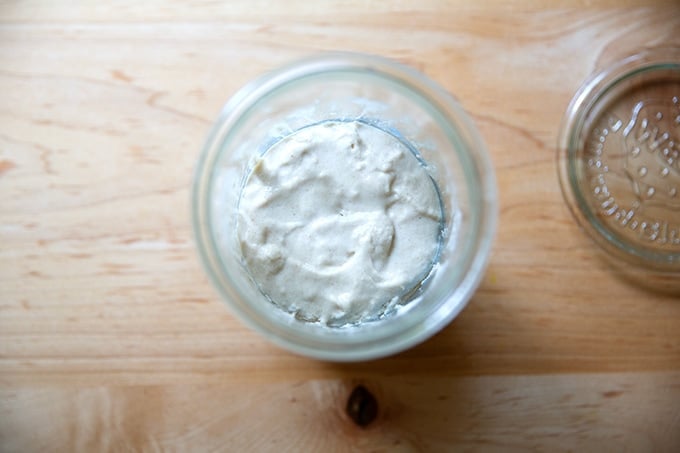
Day 3: Uncover the vessel.
Measure out 128 grams (about 1 cup) of flour and 128 grams (about 1/2 cup) of water:

Add them to the vessel.
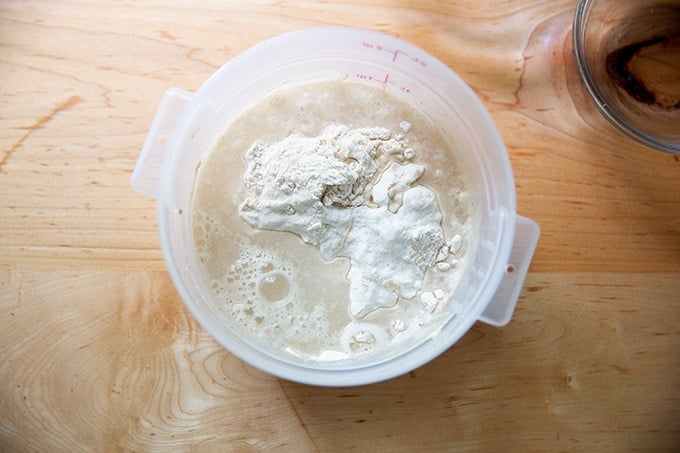
Stir to combine.
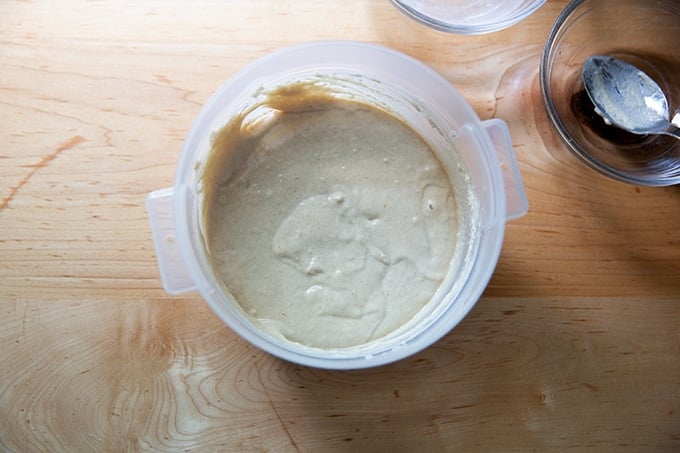
Cover the vessel and record your work again. Let it sit at room temperature for 24 hours, stirring once or twice.
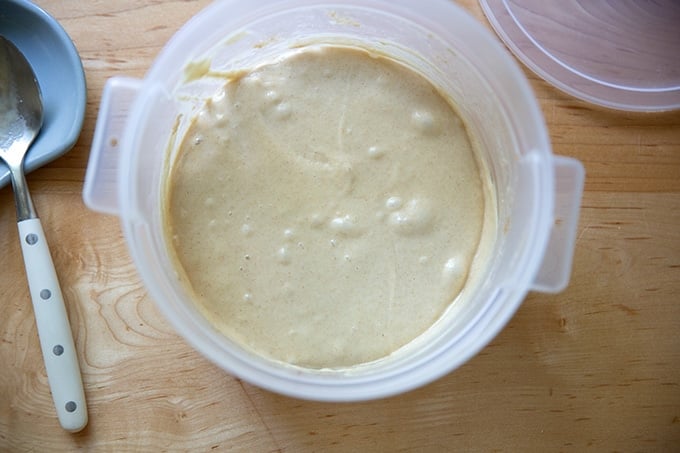
Day 4: Uncover the vessel. You should see a little action (bubbles). Measure out 128 grams (about 1 cup) of flour and 128 grams (about 1/2 cup) of water:
Add them to the container.
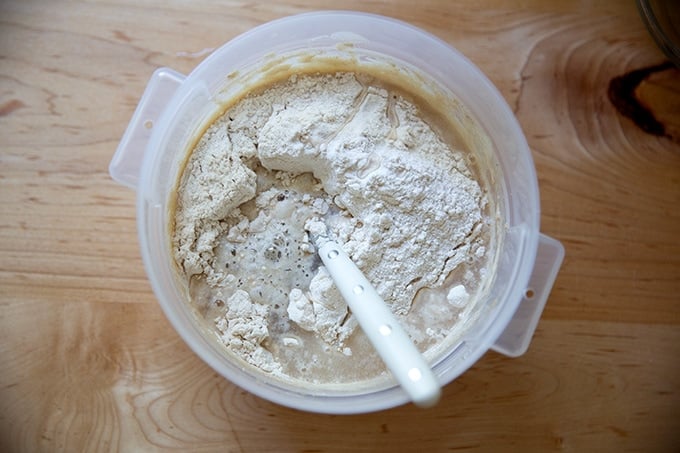
Stir to combine.
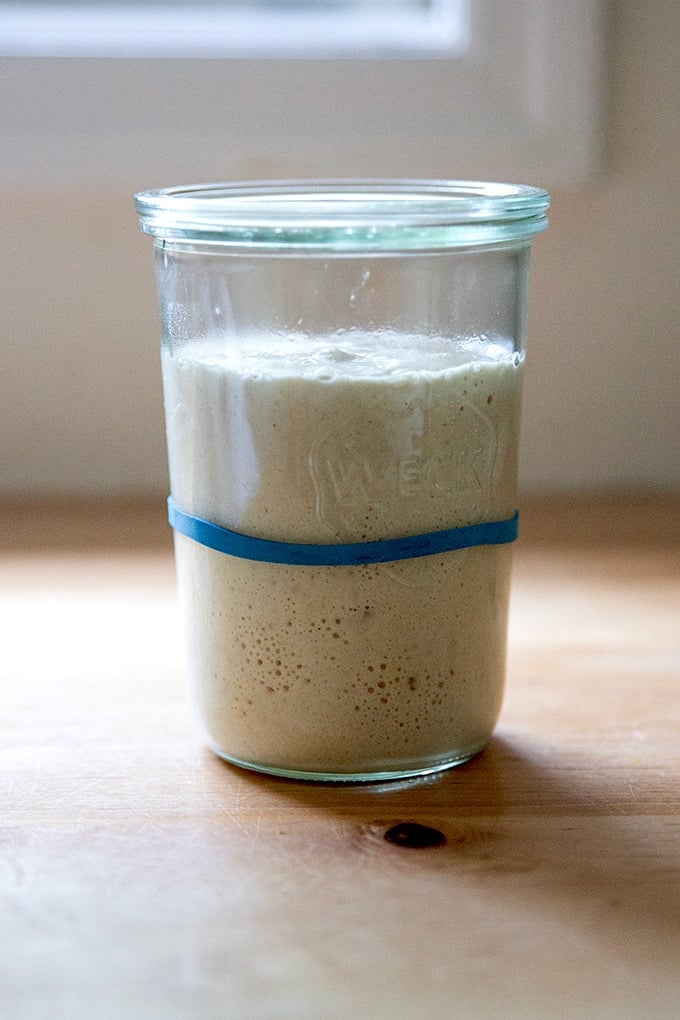
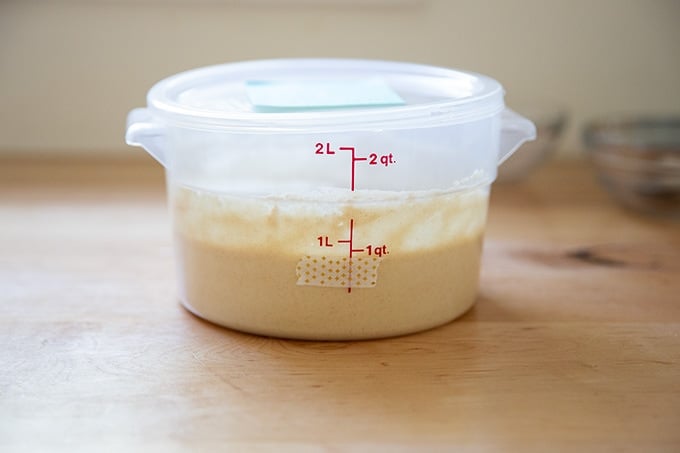
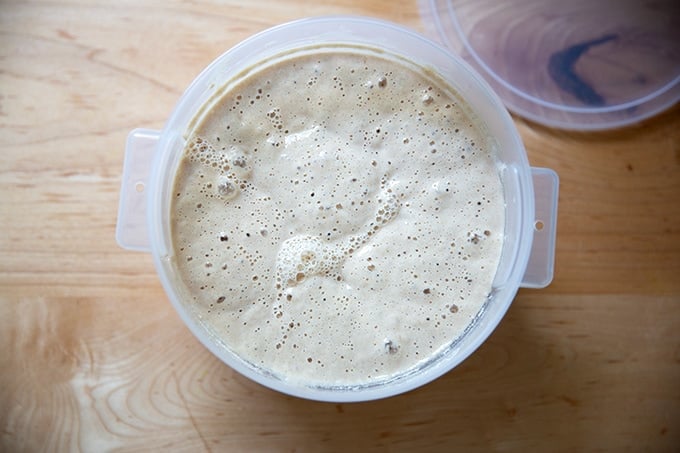
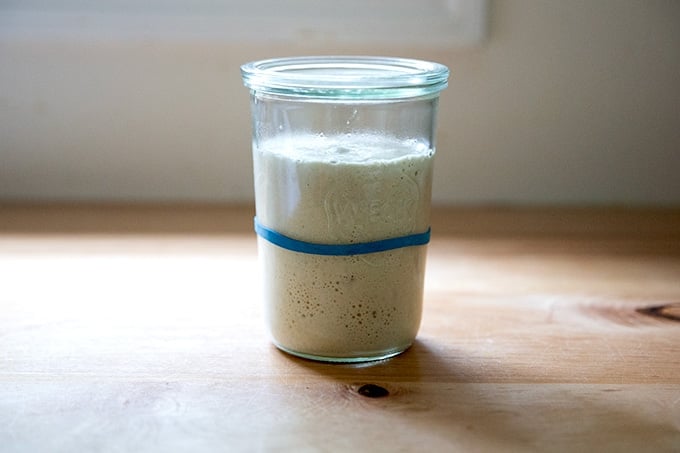
On this day, record your work again, and mark the height of your mixture with tape on the side of your vessel. Let it sit at room temperature for 24 hours, keeping a closer watch this time around.
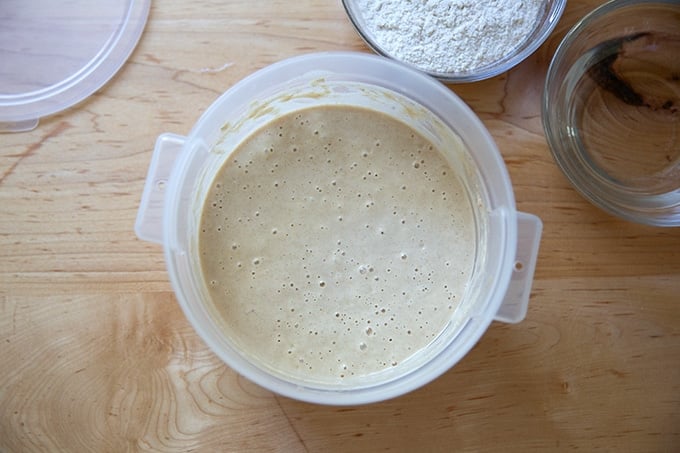
You will likely see some action…

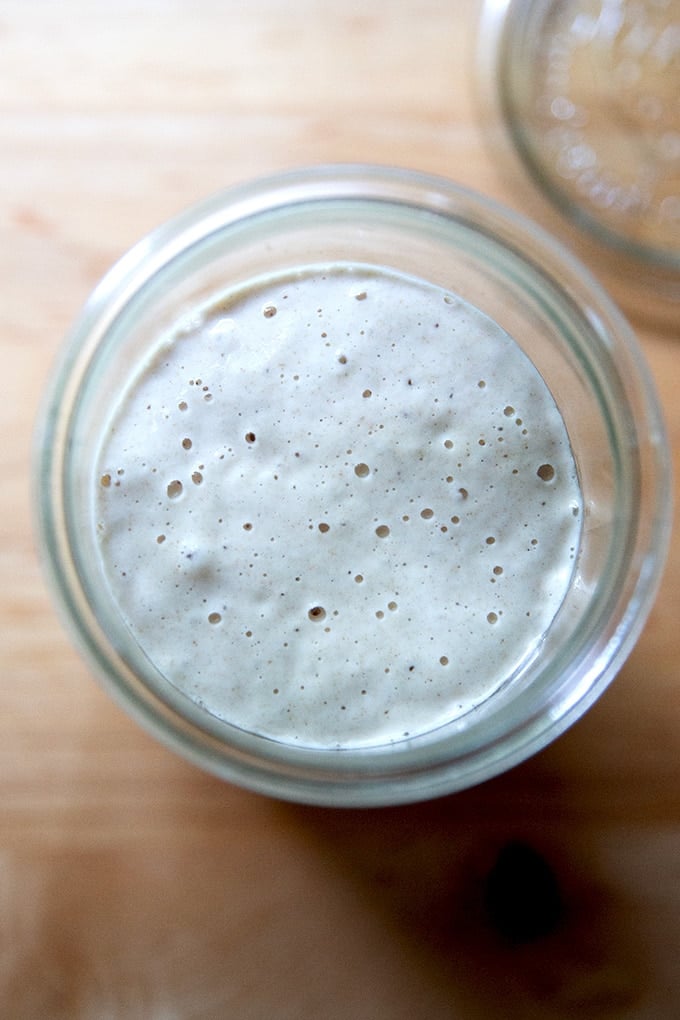
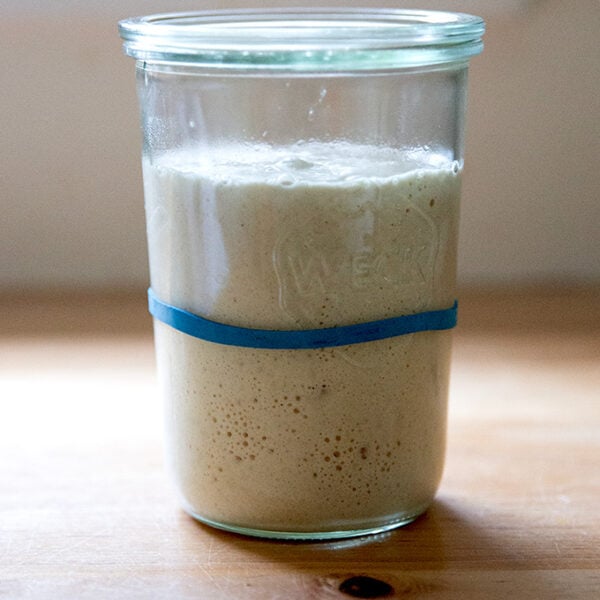
The mixture might even double in volume.
And you should see lots of bubbles on the surface.
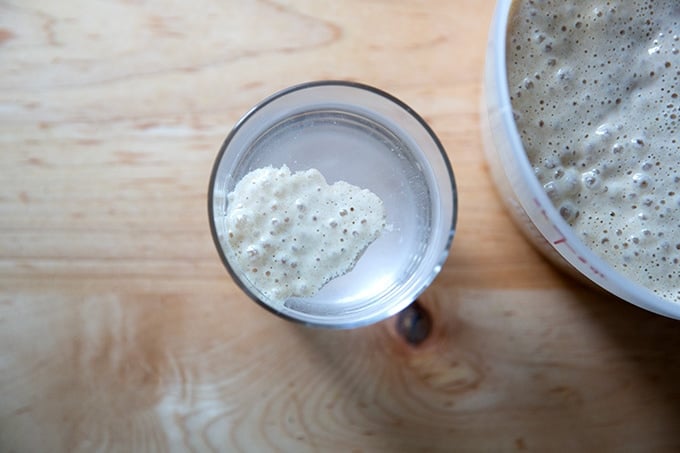
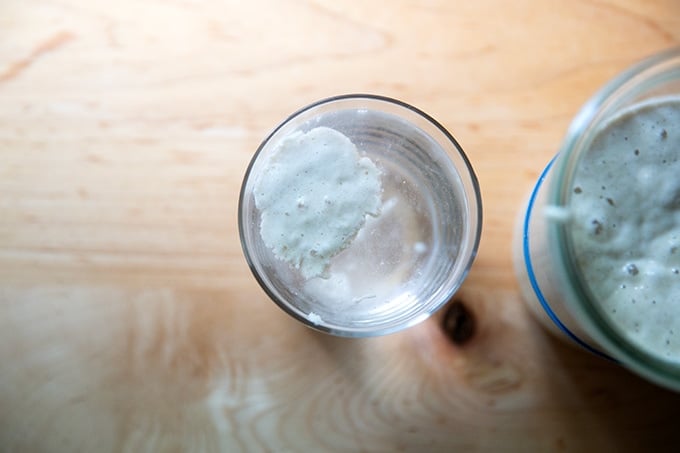
If your mixture is in fact rising, let it rise until it nearly doubles in volume; then drop a spoonful of it in water. If it floats, you’re in business. Note: Your starter might rise (and maybe fall) while you are sleeping — don’t worry if you don’t “catch” it at its peak. Continue on with the process that follows.
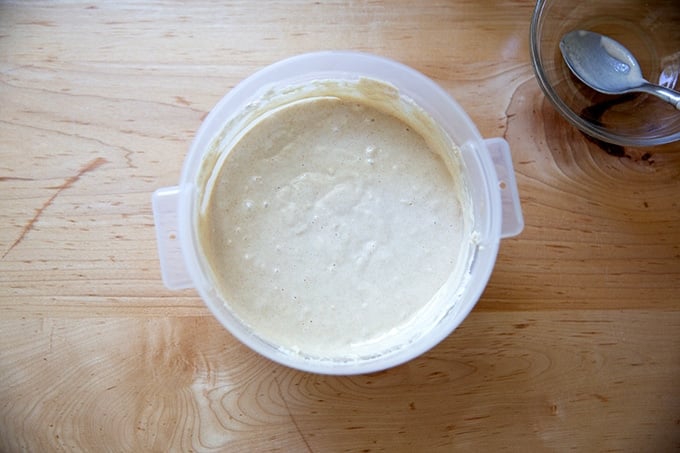
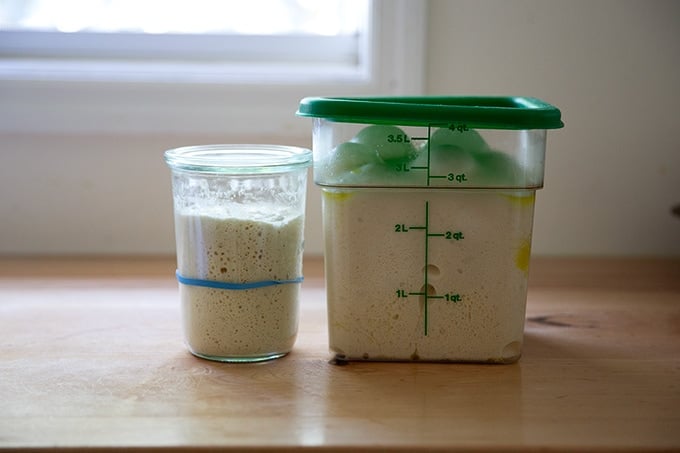
Spoon 128 grams of the starter into a new vessel.

Measure another 128 grams of flour and water each.
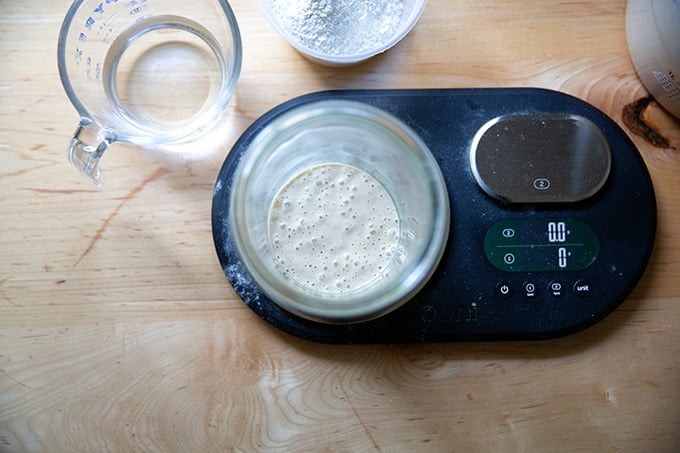
Add the flour and water to the starter.
Stir to combine.
Mark the height with a rubber band.
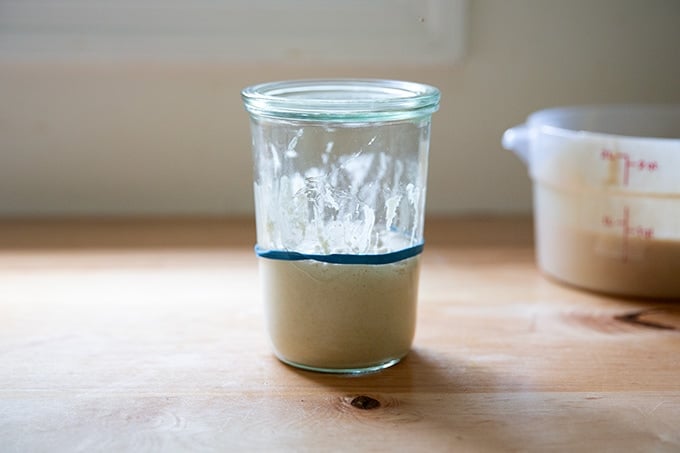
This original vat of sourdough starter is now your discard bucket. Transfer it to the fridge or use it in one of your favorite sourdough discard recipes: tortillas, crackers, pancakes, soda bread.
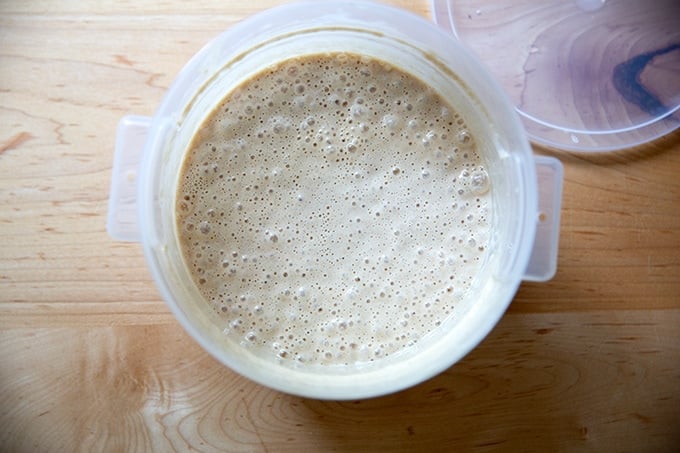
Day 5: When your starter doubles…
… and floats…
…you can do one of three things:
- Repeat this process: spoon 128 grams of starter into a new vessel and add 128 grams each flour and water. (Transfer the remaining starter to your bucket of discard.) Let the new starter rise until it doubles. Your starter will get stronger with every feeding.
- Transfer it to the fridge if you need to take a break from the process. You can pick up where you let off when you are ready.
- Test it out…
… in a sourdough bread recipe. I recommend starting with…
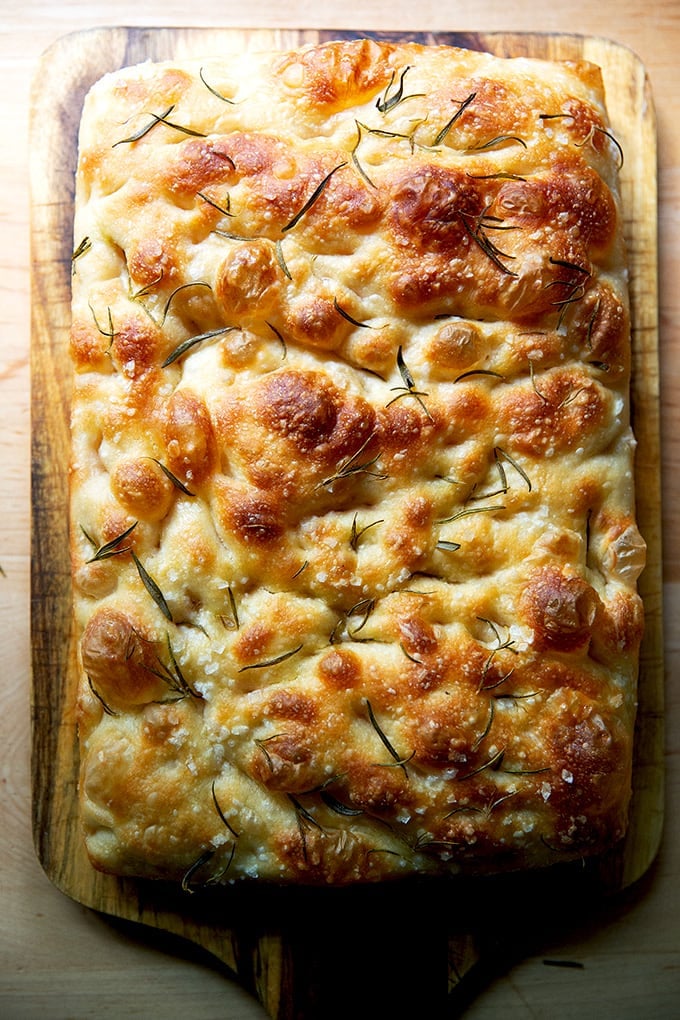
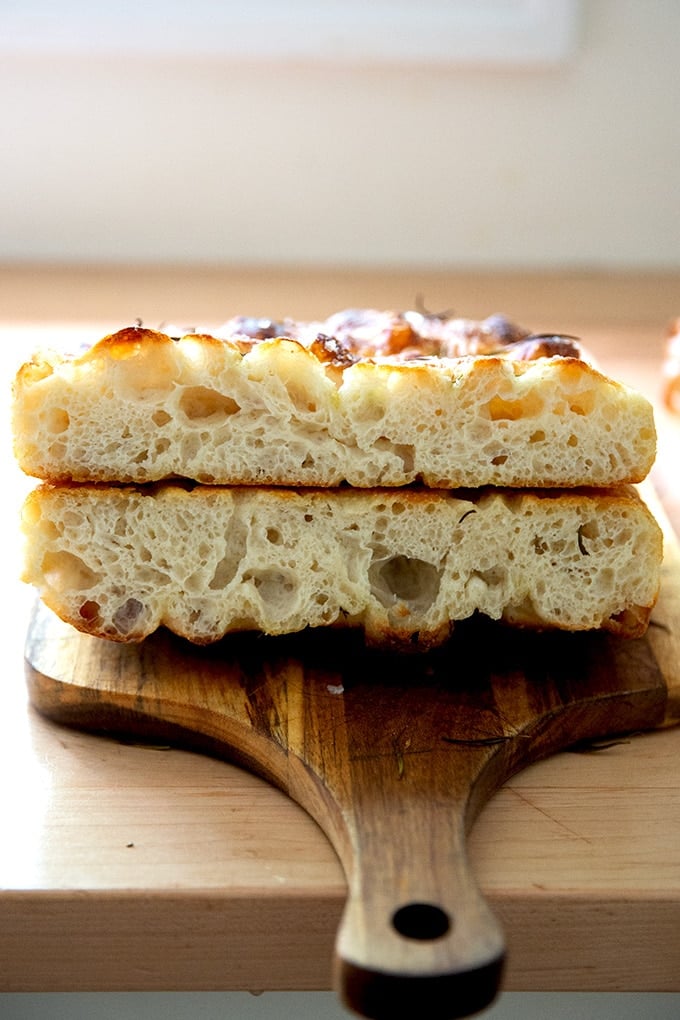
… focaccia, one of the easiest breads to make.
How to Build a Sourdough Starter from Scratch
- Total Time: 5 days
- Yield: 3 cups 1x
Description
This post outlines how to build a sourdough starter from scratch simply and quickly. In less than a week, with minimal effort, you will have a bubbly, active starter on your hands to use in all your favorite sourdough recipes.
Notes:
Adapted from Peter Reinhart’s method, outlined in Perfect Pan Pizza (and many of his other books as well).
If you are looking for guidance on how to feed, maintain, and store your already strong starter, see this post: How to Feed, Maintain, and Store a Sourdough Starter.
5 Tips for Success
- Use a scale to measure. It is the only way to measure accurately.
- Use a straight-sided vessel, which will help you more accurately see how much your starter is growing.
- Attempt this project while it’s hot outside or create a cozy place for your starter to rise:
- Find a warm place in your kitchen (like on top of your refrigerator) to let it rest.
- Invest in the Brod and Taylor Sourdough Home: I do not own this, but it gets good reviews should you have the space for it
- Build your own “sourdough home“: one of you ingeniously made a homemade proofing box by placing a seed heating pad in a box and covering it with a towel.
- Try the warm oven trick: turn your oven on for 1 minute (at any temperature) and then turn it off. It likely won’t get above 100ºF — it will just create a cozy spot for your dough to rise. Consider sticking a post-it note to the oven to remind you that you have a starter in there so that you don’t accidentally preheat your oven and kill your starter. (Note: I do not recommend using the oven with the oven light on, because I discovered the hard way that the oven light can actually be too hot and cause your starter or sourdough bread to overferment.)
- Start with pineapple juice.
- Use freshly milled stone-milled flour. If you have a source local to you, use it! Health food markets, co-ops, or markets such as Whole Foods often carry freshly milled flour. Here are a few mail-order options:
Pineapple Juice: My small cans of pineapple juice are labeled as 6 ounces (177 ml), but when I actually weigh the juice inside, it always weighs around 192 grams. The important thing is to use an equal amount by weight of flour and pineapple juice.
Pineapple Juice Alternatives: Orange Juice or Water
Water: I have no trouble using tap water when building a sourdough starter or when making a sourdough bread recipe. If you have concerns about your water, you can:
- Use water that you’ve left out overnight to ensure any chlorine has evaporated.
- Buy spring water. In some places, letting water sit out overnight will not be effective, and your tap water may kill your starter.
Discard: At the end of the first four days of the process, you’ll be left with a decent amount of sourdough discard, which you can use in countless recipes. Here are a few of my favorites:
Ingredients
- 1 small can (192 grams) pineapple juice, see notes above for alternatives
- stone-milled flour, see notes above
- Room temperature water, see notes above
Instructions
- Day 1: Pour the can of juice (roughly 192 grams) into a large bowl or ideally a straight-sided vessel on a tared scale. (A straight-sided vessel allows you to truly see how much your starter is growing. I’m using this Cambro.) Add an equal amount of flour (roughly 192 grams) by weight. Stir the flour and juice together until the flour is absorbed. Cover the vessel. Record the date, time, and measurements — you will forget which day you started if you don’t. Let it sit at room temperature for 24 hours.
- Day 2: Uncover the vessel. Stir the mixture. Re-cover the vessel, and record your work. Let it sit at room temperature for another 24 hours.
- Day 3: Uncover the vessel. Add 128 grams (1 cup) flour and 128 grams (about 1/2 cup) water. Stir to combine. Cover the vessel and record your work again. Let it sit at room temperature for 24 hours, stirring once or twice.
- Day 4: Uncover the vessel. You should see a little action (bubbles) and it should smell pleasant, not unlike a fruity yogurt. Measure out 128 grams (about 1 cup) of flour and 128 grams (about 1/2 cup) of water. Add them to the container. Stir to combine. Cover the vessel. On this day, record your work again, and mark the height of your mixture with tape on the side of your vessel. Let it sit at room temperature for 24 hours, keeping a closer watch this time around. You may see action — rising and bubble formation — within a few hours. If your mixture is in fact rising, let it rise until it nearly doubles in volume; then drop a spoonful of it in water. If it floats, you’re in business. Note: Your starter might rise (and possibly fall) while you are sleeping — don’t worry if you don’t “catch” it at its peak. Continue on with the process.
- Day 5: At this point, you should be observing some activity in your starter, meaning the starter should have risen slightly (perhaps doubled but perhaps not) and fallen with bubbles transforming from big to small. You’ll now take a small portion of this mixture and build a new starter: Transfer 128 grams of the starter to a new jar or vessel, and add 128 grams (about 1 cup) of flour and 128 grams (about 1/2 cup) of water. Stir well to combine, then cover the jar. Mark the height with a rubber band. Let sit at room temperature. Transfer the remaining starter to the fridge — this original mixture is now your sourdough discard and can be used in all sorts of recipes, see notes above. When your new starter doubles in volume, you can do one of three things:
- Repeat this process: spoon 128 grams of starter into a new vessel and add 128 grams each flour and water. (Transfer the remaining starter to your bucket of discard.) Let the new starter rise until it doubles. Your starter will get stronger with every feeding.
- Transfer it to the fridge if you need to take a break from the process. You can pick up where you let off when you are ready.
- Test it out in a sourdough bread recipe.
- Maintaining your starter: Once you have a strong, active starter on your hands, follow the steps in this post: How to Feed, Store, and Maintain a Sourdough Starter.
- Category: Bread
- Method: Stir
- Cuisine: American
This post may contain affiliate links. Please read my disclosure policy.


446 Comments on “How to Build a Sourdough Starter from Scratch”
I am using the 2-quart vessel that you recommended. Yesterday was Day 4 of the challenge. This morning, I discovered that my sourdough starter rose so much overnight that it completely filled the vessel and dripped down the side. Is my starter in progress still good?
Wow! That is insane but also great news. Progress is definitely good. Today you are creating a smaller offshoot, so just wipe down the sides of your old vessel and give that mixture a stir. It will be headed to the fridge soon, once you complete day 5 tasks.
Oh, dear. Something is wrong. I have been exactly following your instructions. I am using CM flour. I have a the same container as you. I have been using your oven trick. On Day 3, it was very bubbly and had a strong aroma and I was very hopeful. Yesterday it seemed to have less bubbles and today there are none and it hasn’t risen at all…. 😟 Please help. Thanks. I am hesitant to put in more precious flour if this batch is a lost cause….??
Push on, Jane! It’s OK to see variances in the amount of bubbles. And, I am going to send you recipes for your discard soon… I have already used up all of my discard from this most recent homemade starter project in various breads and waffles. If you want to switch to bread flour at this phase, however, and save your CM flour, that is fine, too.
Ok, good to know! Thanks so much for your reply! Is there anything else I can do differently? I am afraid it may not be warm enough here. It’s been in the 60’s this week, which is cool, for this time of year here in GA.
Hi Ali, I appreciate you holding this challenge. This is my third time trying to make my own starter. I’m keeping up and on Day 5. My starter is bubbly but didn’t rise at all. I did try setting the oven at 100 degrees for a minute but still have no rise. My oven has a proofing mode that sets the oven temperature at 95 degrees. Should I use that to get it warmer? I live in Key West and do have the a/c running year round. Any suggestions?
Thanks, Elisa
Hi Elisa! Don’t worry about the rise… I would continue on with creating the smaller offshoot and seeing how that goes. If you are using AC year round, I do think the proofing mode might be a good idea. If possible, don’t let it go above 84ºF. Make the offshoot, store it in your oven, and let me know if you see any rise today. My fingers are crossed!
Hi Ali, I missed your Zoom session on Friday but will try to join next week. My starter is only rising about an inch. I’m going to do Day 7 feeding right now. Is the oven trick. Since my oven doesn’t have a 100degree setting I just used the bread proofing 95 degree setting and left it there for about 5 minutes then turned it off and put the jar in it. My Weck jars came with clips which I’ve been using. Should I not be using them? Should I just put the glass lid with the rubber gasket on top? Also I’m using the King Arthur All Purpose flour as I can’t get the fresh ground locally. Thoughts? Thank you, Elisa
Hi Elisa! Glad you can join this Friday, and I’m glad your starter is rising! An inch is good 🙂 Do not use the clips or the gasket with the Weck jar — the airtight seal could potentially cause your jar to explode.
Keep up with the daily feedings or even twice a day feedings: discard most of it; then feed it with fresh flour and water. I think it just needs a little more time.
Hi, there! I am late to the game in getting my starter off the ground, but I am planning to start this weekend! The main question I had (which may have already been asked, so I apologize) was is there an alternative to using pineapple juice? Or is that the best option? Thank you!
Peter Reinhart, the renowned baker I learned this method from, says you can use orange juice (which has a similar ph to pineapple juice), or water (but the process will take much longer).
Can it be juice from concentrate, or should it really be fresh? I’ve not been able to find fresh pineapple juice but concentrate is available. Fresh orange juice is of course much easier 🙂
Thanks in advance!
I think you could use pineapple juice from concentrate with success!
Sorry for so many questions, Ali, but mine is not rising at all again today. If it hasn’t risen at all after 12 hours, then what should I do? I assume I should not follow the instructions on today’s second video, correct? So what should I do instead?
Hi! Because you had so many bubbles on one day, my feeling is that you actually could push on. I would suggest giving your starter a good stir and making the smaller offshoot as suggested in the video. Mark the height of it, and do the warm oven trick so that it has a cozy place to rise tonight. Transfer your original starter to the fridge… this will now become your discard vessel.
Ok, will do! Thanks so much for your reply and help, Ali!
So..,.my starter seems to be separating, it’s bubbly though, but not rising. It’s 11 hours since I created the new container…I did just realize I’ve used low sugar pineapple juice tin. Could that be why? Start again or stick with it ?
I would stick with it. The low sugar pineapple juice likely isn’t quite as acidic as regular, but I don’t think that would cause any adverse affects apart from not giving your starter the jumpstart that regular pineapple juice might. I would give your new starter a stir, mark its height, and place it in a cozy place to rise; then reassess in the morning.
What kind of flour are you using?
Organic King Arthur bread flour…
Great re flour. Are you seeing any action?
On Day 5 and on, do we do the feeding every 10 hours or still 24? Also do we keep transferring to a new vessel each time? That part is a little confusing.
Hi! On day 5, you first make the offshoot. Then, if you see activity, you can feed it again — this might be 10 to 12 hours after you create the offshoot. When you make this feeding, you’ll discard most of it, and feed it with fresh flour and water. Use the same jar — no need to use a new one.
What size vesssel did you use on day 5? I’m a day behind. When I made the transfer and added the water and flour to my new vessel it was at the top. It looked as big as yours but clearly isn’t. I need to run out and buy something this morning or I suspect it will bubble over soon.
It’s roughly a 1-quart jar. Anything about that size will work.
Hi! So once it starts going up by 25-50%, you start feeding it every 12 hours instead of 24, until you’re ready to put it away or use it?
Yes, that is what I like to do… feeding it more often builds its strength. That said, if you are seeing no activity at all, you do not want to feed it twice a day… it needs more time to develop a strong colony of yeasts and bacteria.
The zoom is today at noon! Just click on the link you received.
So, tell me where you are: you transferred 128 grams of it to a new vessel, added 128 grams each flour and water, correct? And you let it rise?
Yes, I removed 128g of starter yesterday into the measuring cup and fed it. It rose a bit and had a few bubbles last night when I scooped out most of it, leaving just a 1-2 tablespoons and fed it with 100g of water/flour.
This morning, nothing much had happened and very few bubbles. I scooped it out again, leaving only a bit and fed it with the 100g water/flour. That’s when I tried the preheated oven trick.
I’ll join the Zoom. Thank you for your quick reply.
I’m sorry Ali, but the Zoom call isn’t working for me. It says you’ve joined and Zoom has let you know that I’m here but then nothing happens.
I’m going to sign off and hope that the heat in the oven will help spur my starter along.
Thank you again for doing this challenge.
I’m so bummed about this… so sorry.
Did you get the email with the recording? And can you join next Friday?
Hi Ali, Thanks again for hosting the sourdough zoom this afternoon. It was terrific. Of course, after we got off, I thought of a few more questions.
-What is the best way to cover your starter when we are doing the 7-day challenge and then when you put it in the fridge to store – the screw on cover of a mason jar, the plastic lid of a plastic container, a cloth cover or something else? It might be different for on the counter and in the fridge.
–
Thank you, Lisa! And thanks for all of your great questions.
If you are using a glass jar, it is important not to screw it tightly because it potentially could explode/shatter. So just rest the lid on top and do not screw tightly. You do, however, want the jar to be covered because otherwise, the starter will dry out and form a layer of crust on top, which isn’t the worst thing, but it’s not ideal either. Deli quart containers can be sealed with their lids, because those vessels are not completely airtight — my understanding is that the plastic is slightly porous, so come gas will escape.
So in sum, regardless if you are storing your starter at room temperature when you are feeding it regularly or when you are storing it in the fridge, you ideally want to rest your lid on top of your vessel creating a sealed but not completely sealed environment 🙂
Hi, i am currently out of town but have been watching your daily videos and saving them to follow when i am ready to start making my starter.
it would help greatly ( to me ) if you could give a timeline on the time you started and what time your discard/ feeding was etc. This was a problem i had when i was starting one and i gave up because i was getting up at night to feed etc 😂.
Thank you .
Hi Athena!
I started in the morning, like 7 or 8 am. I figured this would give me the most opportunities for monitoring it. That said, depending on the temperature of your kitchen and the other elements (how your starter behaves), your timeline might shift once you get started.
Good luck!
I have been following each day’s steps, measuring carefully on my digital scale and keeping the starter in my oven overnight. Things are bubbling and doubling… it looks and smells as it should, but it seems to be a bit thicker than yours. It flunked the float test. Sank like a stone. Help?
I’m using King Arthur bread flour mixed with a bit of KA artisan flour. Is this the problem?
Great to hear you are seeing action! I think your flour choices are great. I think your starter just needs a little bit more time. I would continue to feed it: discard most of it; then feed with 75 to 100 grams of flour and water each.
I accidentally left my light on for 4 hours with the day 6 starter!! I fed it that night again but there was no movement today. A few bubbles but definitely only a few. Do I have to start over??
Shoot, did the oven feel very warm when you opened it? Do you have an oven thermometer that would let you know how hot it got? You could try for one more feeding: discarding most of it; then feeding with fresh flour and water and seeing if that revives it.
Hi Alexandra
I have been following your daily sourdough starter tutorial this past week. My starter did not ‘start’. I did have some bubbles, but never any increase in the volume. I did keep going thinking that today will be the day my starter will grow. That did not happen. Then I tried the float test and my concoction sunk to the bottom. I used KingArthur Bread flour and tap water. The water in this area is considered very hard; could this be an issue. Also, the temprature has been typical spring – warm one day cold the next.
Any thoughts of what might have happened?
Bummer to hear this, Susan!
Questions:
Are you using a scale to measure? I’m assuming you did if you are following along with the email series.
Have you been employing the warm oven trick on cool days? I do think that a cozy environment is a key to success.
Several people have used KA bread flour with success, so I don’t think that is the issue, but if you wanted to try an organic or stone-milled flour, that might help.
Finally, given your water, I’m wondering if you night need to use bottled spring water or filtered water (not distilled).
I have had very little action. I bought locally milled unbleached white flour but wonder if I should have used red fife or whole wheat instead? I want to start over, so please advise me.
Thanks
Hi Connie! Bummer to hear this.
Questions:
Are you using a scale to measure?
Is your house on the cool side? Have you been employing the warm oven trick if so? Finally, do you think your water could be an issue?
I think your flour choice is great! I’m wondering if you night need to use bottled spring water or filtered water (not distilled).
I had a great start. My starter more than doubled on day 4 and 5. It floated, too. As soon as I discarded most of it and added flour and water, it stopped. It only rose an inch or so even though I kept feeding it twice per day.
I made focaccia dough and instead of rising, it liquified.
Where did I go wrong? Do I have to throw it all out and start again?
Roni, hi! I am still catching up with my emails and will get back to you by the end of the day… I was gone all day yesterday so I’m a bit behind.
Great to hear re doubling on day 4/5. Bummer to hear about the focaccia… if it liquified, it means it over fermented. How long did it rise for? And was it in a potentially too-warm spot when it was rising?
Regardless, your starter should still be in good shape: I would discard most of it, leaving just a few tablespoons behind, and feed it with fresh flour and water. Place it in a cozy spot, and let it rise. Let me know if you start seeing action again.
Happy Mother’s Day! Whenever you get to your emails is fine, just enjoy your day.
I had the focaccia dough on the 70-degree pad but the room might’ve been warmer than usual even with air conditioning because it was 100 degrees outside—a sudden heat wave! I’ll keep plugging along with the sluggish starter and keep you posted. Thanks so much!
Thank you, Roni! A 70-degree pad is not too warm, but it does sound as though the dough over-fermented a bit…a young starter is unpredictable. Keep feeding your starter. It can take up to 2 weeks to get going.
Ali,
Thank you so much for this advice. I’ll keep feeding my sluggish starter twice a day and see what happens. I’m just wondering what caused it to slow down so dramatically since it was going like gangbusters from days 1 to 5. It was when I started discarding most and adding new flour and water. I’m using KA organic bread flour, which from what you’ve written seems okay, right?
Yes, keep up with the feedings, and store your starter in some place cozy.
The sudden change you are seeing is normal… some people call it a starter “fake out”. It is common for a starter to go gangbusters in the beginning due to the rush of activity as the wild yeasts and bacteria feed like crazy on all of the “food” (the flour/water). As your starter matures/ripens, it becomes more acidic, and some of these microbes can’t survive… as they die off, the starter looks inactive, but it just needs time: more consistent feedings with fresh food and water and a warm place to rise.
Does that make sense?
Yes, that makes sense and is so helpful to hear, as I thought I had to throw it out and start over. Interestingly, my discard still has nice bubbles—as does the starter. It just isn’t rising much anymore. But I’ll keep feeding it and be patient. It’s still on the 70-degree proofing pad. Stay tuned—and thanks again for the invaluable support!
Happy Mother’s Day, Ali!
Thank you for your inspiration and expertise!
Regarding the sourdough discard, how long will it keep in the fridge and should I be doing anything to maintain it?
Best Regards,
Dave
I would try to use it up within the next 2 weeks or 3 weeks at most. You don’t need to do anything to maintain it. I stir it up before I use it, but apart from that, I am ignoring it 🙂
Thank you for your kind words 💕
Hi, Ali, thanks for all the tips/recipes about what to do with the discard.dough–because I’ve got lots! 😊 Today is Day 8 and it’s still not rising. I assume I should pitch it and try again., yes? Just not sure what to do differently a second time…? I had stone milled flour, I used the small tin of pineapple juice, I exactly measured everything, I used “the oven trick” for warming it. Maybe spring water vs, tap water would make the difference?? Any other warning suggestions?? A glass pan in the bottom of the oven into which I pour just boiled water? (That always does the trick for my stollen making at Christmas.)
Jane, I am a little stumped too! I do think it is worth trying spring water or filtered water or water you simply leave out overnight in a pitcher at room temperature. I do also think that warm temperatures make all the difference, so perhaps warming your oven doing the warm oven trick a few times a day might help. I love your glass pan with boiling water idea, and I love that you make stollen… amazing!! Such a festive treat.
I also don’t think you should necessarily give up as starters are known to take as long as two weeks to get going. The pineapple juice is used to shorten that timeline considerably, but depending on other factors, it might not always work as well as it should. If you are willing to push on with a few more feedings, I think it is worth a shot. But I also understand if you want to start over or wait till warmer days are here to try again.
Thanks so much, Ali, for your helpful reply. I will make notes of all your comments to help me next time. For now, I will try to make something every day this week to hopefully use up the contents of my discard bucket. I made your Crispy Sourdough Discard Crackers yesterday and they were a smashing success!! My husband and I both love them and can’t stop eating them! 😄 Am looking forward to trying some breads too.
I will try making starter again in the heat of July. Thanks for all your support and encouragement. I hope you had a very Happy Mother’s Day.
I’m so happy to hear the crackers were a hit! We love those around here 🙂 Good luck with your next efforts in July, Jane, and thank you for your kind words 💕
I loved your challenge week- Your knack for concise instructions and excellent no nonsense daily videos were real confidence boosters for my 5th time attempting to do this seemingly facile chore. I had the scales, pineapple juice, and flour and happily followed along. Sadly, the results did not change my track record. I did have signs of some bubbles on Day 3 but by day 5 it was a blob, and is no more. Disappointed but not defeated, I plan to follow the videos (I wisely kept your daily emails) starting in a couple of weeks, as I will have access to well water, warmer temperatures and perhaps more patience to await the success I know is just around the corner. Thank you for taking the time and thoughtfully providing the daily guidance. bev
Bev, you are too kind. Thank you so much for your positivity. I am happy you are going to try again. I do think warm temperatures are a big key to the success puzzle. The transformation from bubbles to a blob is normal… it means the yeasts and bacteria have gone through their food source and need fresh food. Did you make the offshoot on Day 5?
It too looked dead- no bubble action. but in retrospect and having read others’ comments, it was probably dormant.
Hi Ali! Thanks for this starter week challenge, I was so happy to participate!! My starter was doing so so well, doubled, I have tons of discard in the fridge now. Then my loving husband was making me breakfast and accidentally turned on the oven, forgetting my starter was in there! So it is now dead and cooked, I am so so sad. Do you think if I take a bit from the discard and feed it, I might be able to revive it?
Thanks!
Toni
Oh no! The same thing happened to poor Julie, too (see below). I do think you can work from your discard supply. I’m going to advise the same as I did to Julie: scoop a quarter cup or so into a new jar and add 100 grams each flour and water. Let me know if it works… even a small rise is a good sign, and a sign that you can continue to strengthen your new starter.
Thank you!!! I’ll keep you updated
Also hahaha Julie I’m so glad we have thoughtful cooking husbands who make mistakes but feed us 😜
Right?! You’ve won the husband lottery!
I was following along with your sourdough starter challenge (a couple days behind because my husband cooked my first one accidentally while I had it stored in the oven) and it was going so great! Such a fun thing to do this past week, I’ve never done it before.
However, my husband just cooked it on accident again – I had again been keeping it in the oven (and I was on day 6!). Can I somehow restart it from my discard bucket I’ve been keeping in the fridge?
Oh nooooo 🤣🤣🤣 This is both hilarious and frustrating… I’m sorry. But go Brent for being so active in the kitchen! Yes, try from discard: scoop a quarter cup or so into a new jar and add 100 grams each flour and water. My fingers are crossed for you 🤞🤞🤞
I am on day 7. Everything seemed to be going according to plan through the morning of day 6, but it only rose a bit during day 6 and did not pass the float test. I discarded all but 1 Tbsp as per instructions both am and pm day 6. Same for morning of day 7. But NOTHING happened today. I switched from stone ground to bread flour on day 6. I also used water from my filter starting on day 6, rather than directly from the tap. But I don’t think these two factors could have been the cause. Should I quit, or keep on going?
I would keep going with the feedings. I don’t think the filtered water or flour switch is causing the issue. Are you placing your starter in a warm place after you feed it?
I am behind on day 6 and don’t know what I should do today.
Hi! Did you get the email for Day 6?
I can’t find it. I’ve received days 1-5
I sent it manually… hope you received it!
Beyond impressed with my starter! I’ve made several starters in the past and your easy follow along instructions was perfect! I’ve never heard of using pineapple juice to start which intrigued me to try it! My house is cool this time of year and I got amazing results with
putting the vessel on a towel and setting on heated floor in hallway. Many thanks!!!
Great to hear, Sharon! Thanks for writing and sharing these notes. I love a heated floor!
Hi Ali. I had a few more questions related to storage and freezing. I was telling my sister all about this and she was so interested. She asked me how long can you store the discard in the frig if you don’t use it right away? Also, once the dough is ready to make a loaf, could you freeze it, like they do with pizza dough that we buy in the supermarket? I would imagine it would need to thaw and maybe rise a little before baking. Thanks!
Hi Lisa! I would try to use the discard within 2-3 weeks, ideally 2 if possible. With sourdough breads, I don’t find that they freeze that well: they loose their oomph and never rise as well. You can do this with yeasted bread doughs, but I never have the same luck with sourdough bread doughs.
Thanks Ali, that helps tremendously. I’m on day 3, have bubbles and am waiting to see if it will raise. I’ve been following the questions and your answer will help me with whatever ends up happening. Thank you for all your dedication and help!! Hope you had a wonderful Mother’s Day.
My pleasure Lisa! Great to hear about the bubbles. Good luck with it and thank you for your kind words and wishes 🙂
Hi, can you use fresh pineapple juice?
Yes!
My starter started out pretty well but then he became really sluggish. Day 7 I fed it twice but it only rose once, definitely not by half. So I fed it 12 hours later. It did not rise at all. The whole time I left on the counter under the counter lights. This morning I fed it again and put it over my fireplace which was on early this morning.g It has rose about an inch. What should I do? Perhaps my house is not warm enough. Live in Canada and spring is trying to arrive.
Spring is trying hard to arrive in Upstate New York as well… I hear you!
Great to hear that it rose about an inch. If it has been 12 hours since the last feeding, I would feed it again: discard most of it, feed it with fresh flour and water.
The sudden change in activity you’ve seen is normal… some bakers call it a starter “fake out”. Your starter might show lots of signs of activity in the beginning due to the rush of the wild yeasts and bacteria feeding like crazy on all of the “food” (the flour/water). As your starter matures/ripens, it becomes more acidic, and some of these microbes can’t survive… as they die off, the starter looks inactive, but it just needs time: more consistent feedings with fresh food and water and a warm place to rise.
Hope that helps/makes sense 🙂
I followed all the steps for the sourdough starter and my starter did not rise. It has bubbles and that is all. Not sure what went wrong. The instructions were very good!
Ann DeVries
Hi! What day are you on? And is your kitchen very cool? What type of flour are you using?
Know that it may take as long as 2 weeks to start doubling consistently. The pineapple juice is meant to shorten that timeline, but other elements (cool temps) can counter that effort.
I am using bread flour. I used the oven multiple times because my kitchen was a little cool.
Great to hear re oven.
What day are you on?
I think you should push on with the feedings. If you are worried about your water, you could try using spring water.