 →
→ How to Build a Sourdough Starter from Scratch
This post may contain affiliate links. Please read my disclosure policy.
This post outlines how to build a sourdough starter from scratch simply and quickly. In less than a week, with minimal effort, you will have a bubbly, active starter on your hands to use in all your favorite sourdough recipes.
A sourdough starter is a fermented mixture of flour and water that contains wild yeast and bacteria. It both leavens and flavors sourdough bread.
How? It’s time for a science lesson.
Wild yeasts and bacteria exist everywhere, namely in flour, but also in the air and on your hands. When we mix flour and water and let it sit, wild yeasts begin searching for food, which they find in the flour: they convert the starch in the flour into sugar. As they digest this sugar, they produce two things: carbon dioxide, which makes the starter rise, and alcohol, which the wild bacteria drink up and in turn produce various types of lactic and acetic acids — these acids are what give the bread the sour flavor.
Cool, right? The wild yeasts and bacteria work symbiotically to both leaven and flavor our starter and ultimately our bread.
3 Tips For Success
Because wild yeast and bacteria are the backbone of a sourdough starter, it is crucial that these microbes are happy for your starter to thrive: the happier they are, the more they multiply, the more powerful the starter you create.
Building up a colony of happy microbes takes time and care. Here are three tips for success:
Tip #1: Use Pineapple Juice: Using pineapple juice in place of water initially can shorten the overall timeline for building a sourdough starter from scratch. This is because wild yeast cells prefer a somewhat acidic pH (which pineapple juice is) in which to grow.
Tip #2: Keep Your Starter Cozy: Ideally, you’ll attempt this project while it’s hot outside — I find 80ºF (26ºC) to be ideal. If you’re building your starter when it’s cold outside, find a place to keep it warm. See recipe box for some ideas.
Tip #3: Use Good Flour: Use freshly milled, stone-milled flour because the added minerals and nutrients provide better food for the microbes (yeast and bacteria) to thrive. If you have a local source, use it! Health food markets, co-ops, and stores like Whole Foods often carry freshly milled flour. See recipe box for a few online sources I love.
How to Build a Sourdough Starter From Scratch, Step by Step
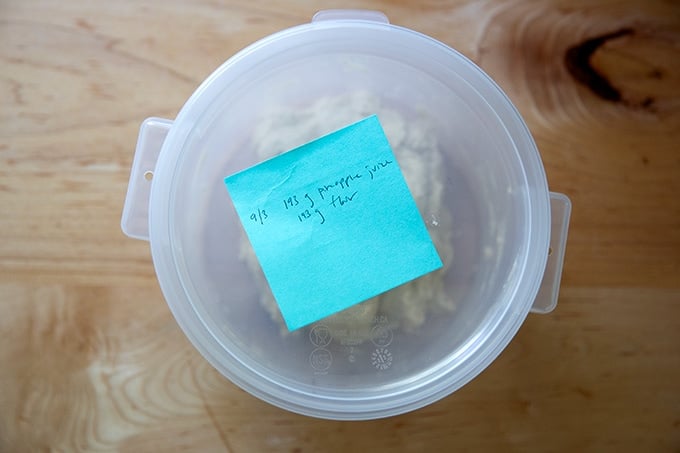
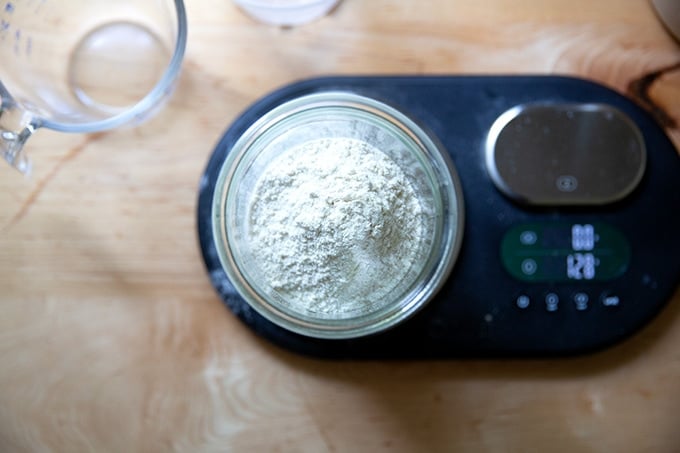
Day 1: Gather your materials: flour and pineapple juice. (If possible, pick up a bag of freshly milled stone-milled flour; see the recipe box for sources.)

Pour the can of juice into a large bowl or ideally a straight-sided vessel on a tared scale.
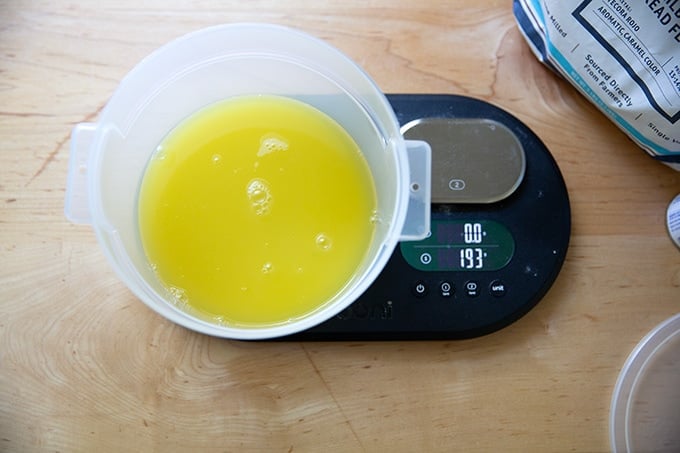
Add an equal amount of flour by weight. It should be about 192-193 grams of juice and flour each.
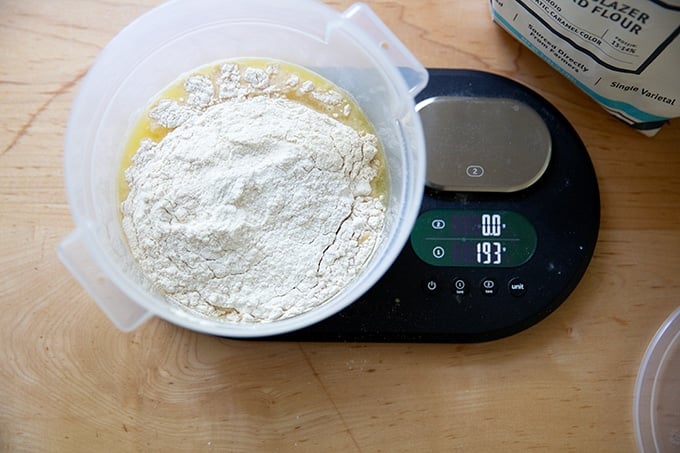
Stir the flour and juice together until the flour is absorbed.
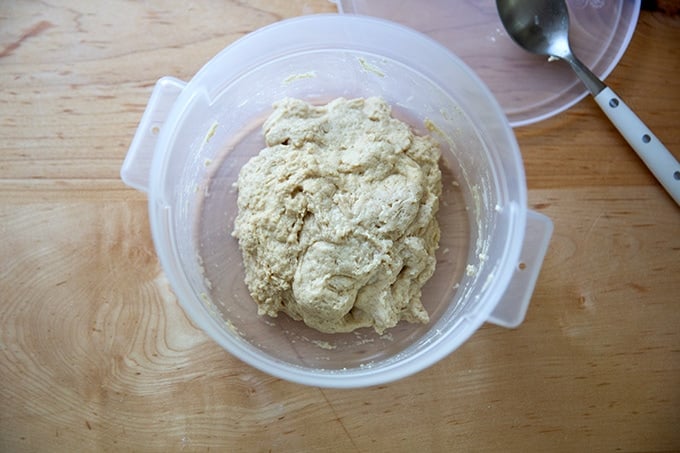
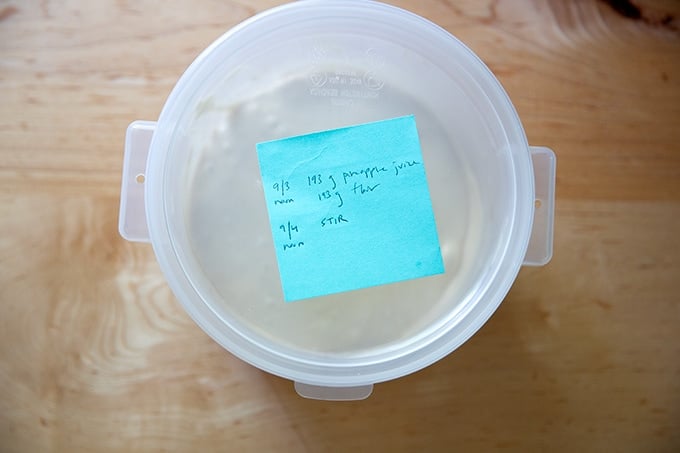
Cover the vessel. Record the date, time, and measurements — you will forget which day you started if you don’t. Let it sit at room temperature for 24 hours.
Day 2: Uncover the vessel and…
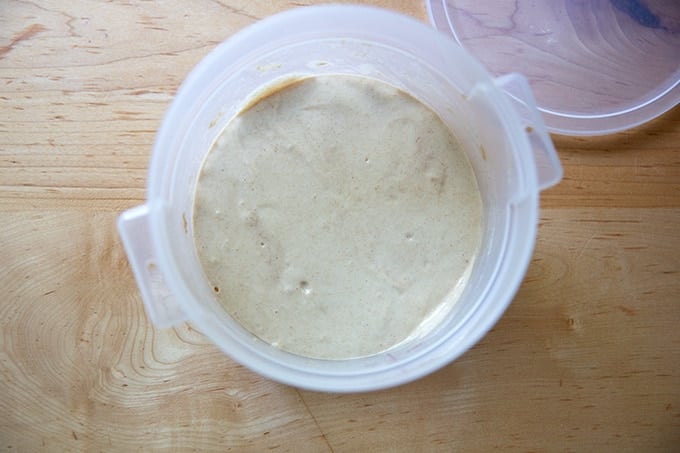
… give it a stir.
Re-cover the vessel, and record your work. Let it sit at room temperature for another 24 hours.
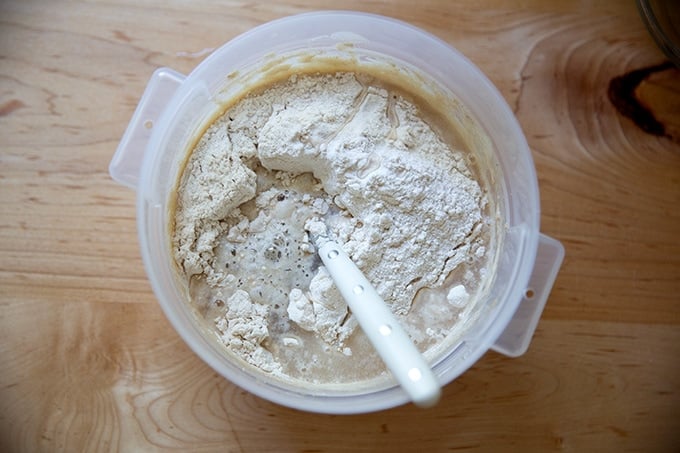
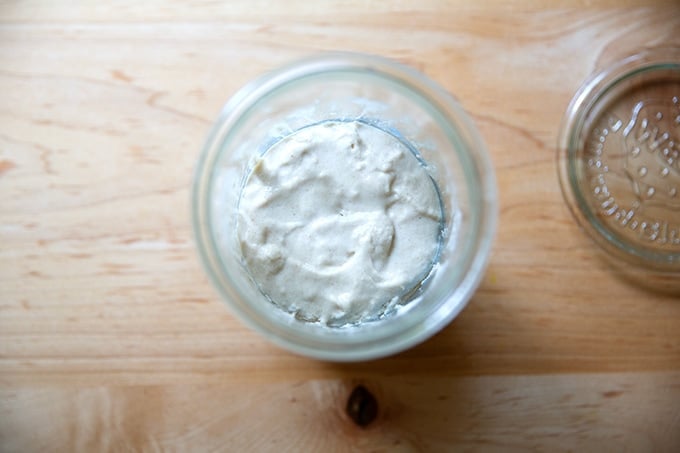
Day 3: Uncover the vessel.
Measure out 128 grams (about 1 cup) of flour and 128 grams (about 1/2 cup) of water:

Add them to the vessel.
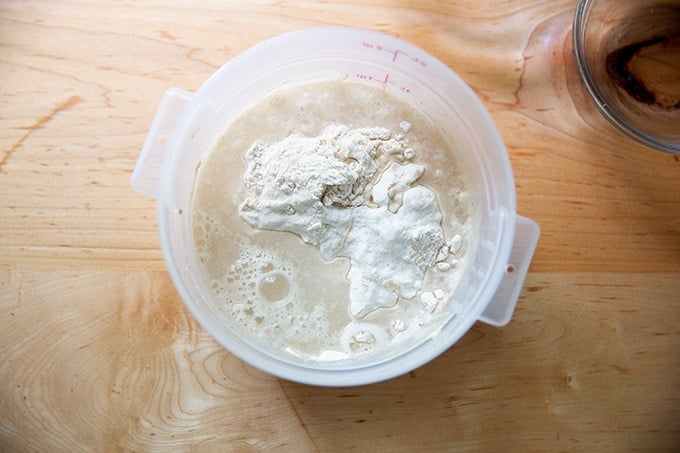
Stir to combine.
Cover the vessel and record your work again. Let it sit at room temperature for 24 hours, stirring once or twice.
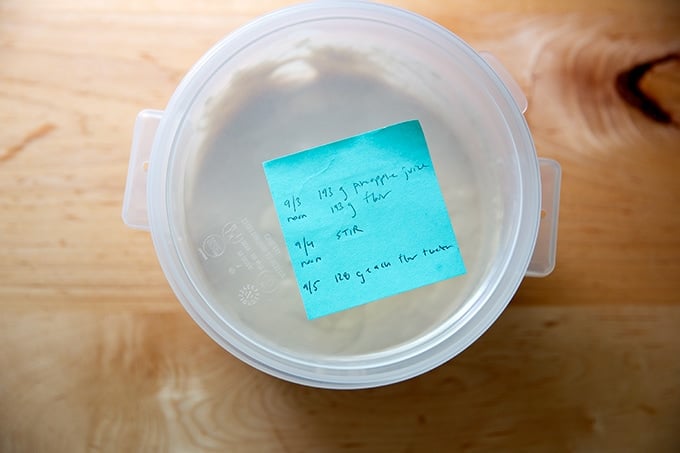
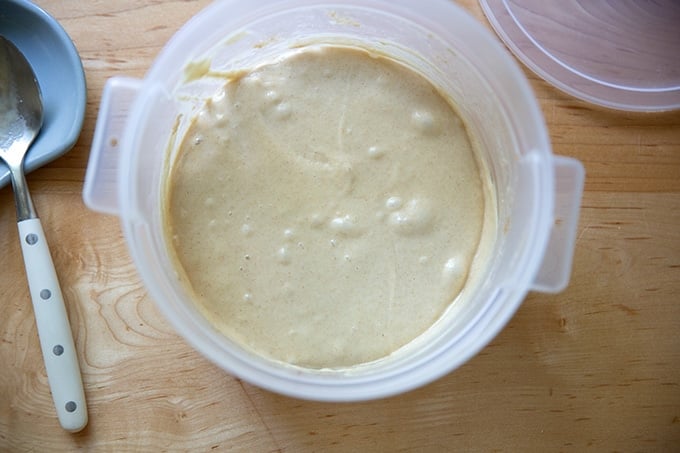
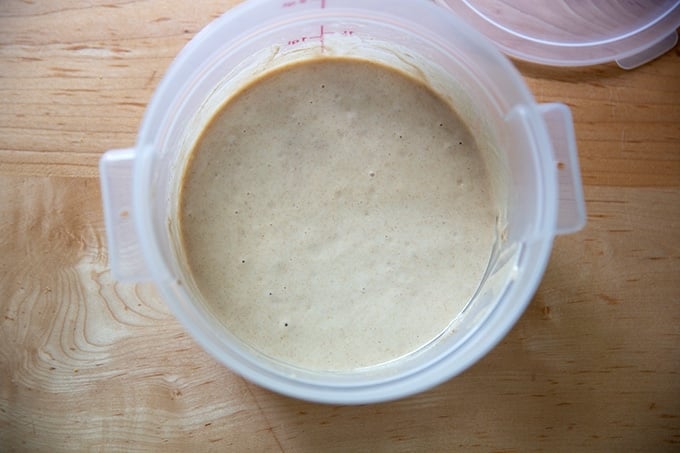
Day 4: Uncover the vessel. You should see a little action (bubbles). Measure out 128 grams (about 1 cup) of flour and 128 grams (about 1/2 cup) of water:
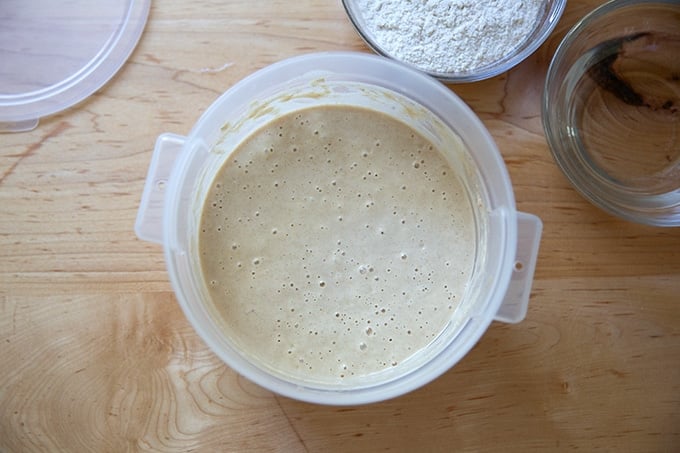
Add them to the container.
Stir to combine.
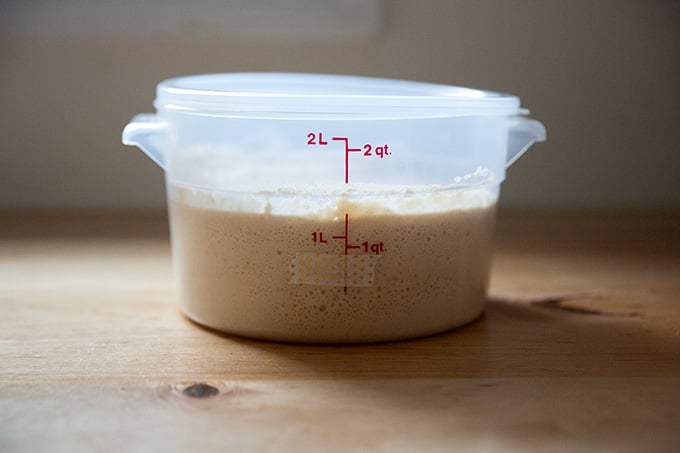
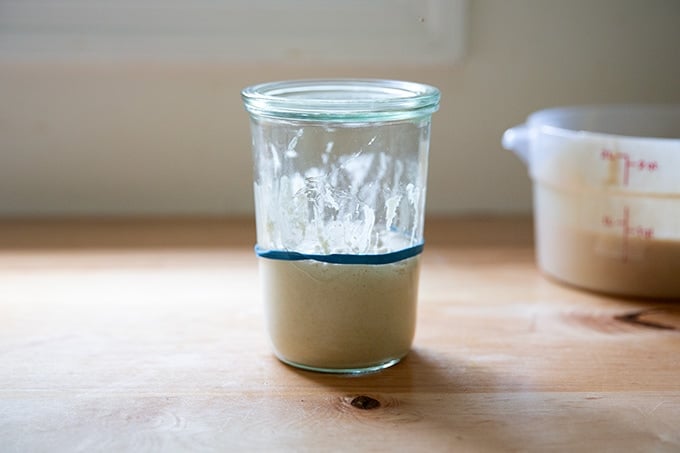
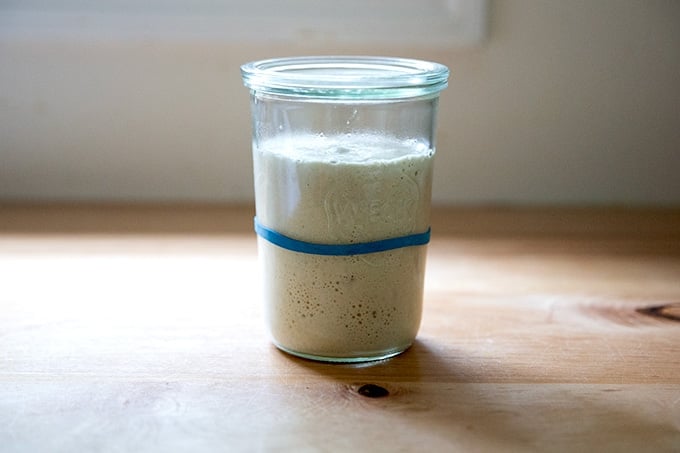
On this day, record your work again, and mark the height of your mixture with tape on the side of your vessel. Let it sit at room temperature for 24 hours, keeping a closer watch this time around.
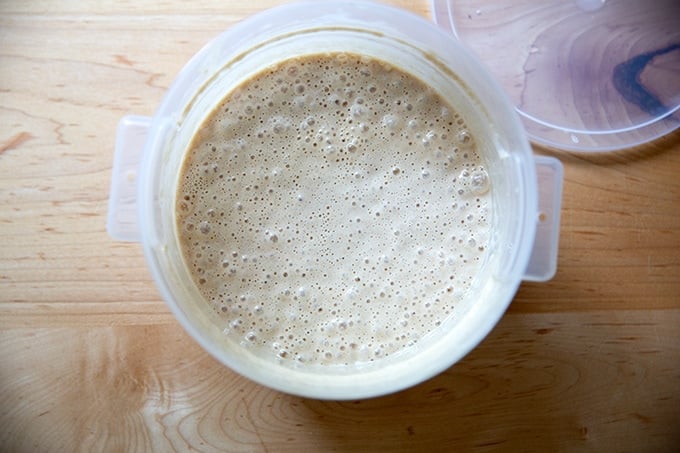
You will likely see some action…

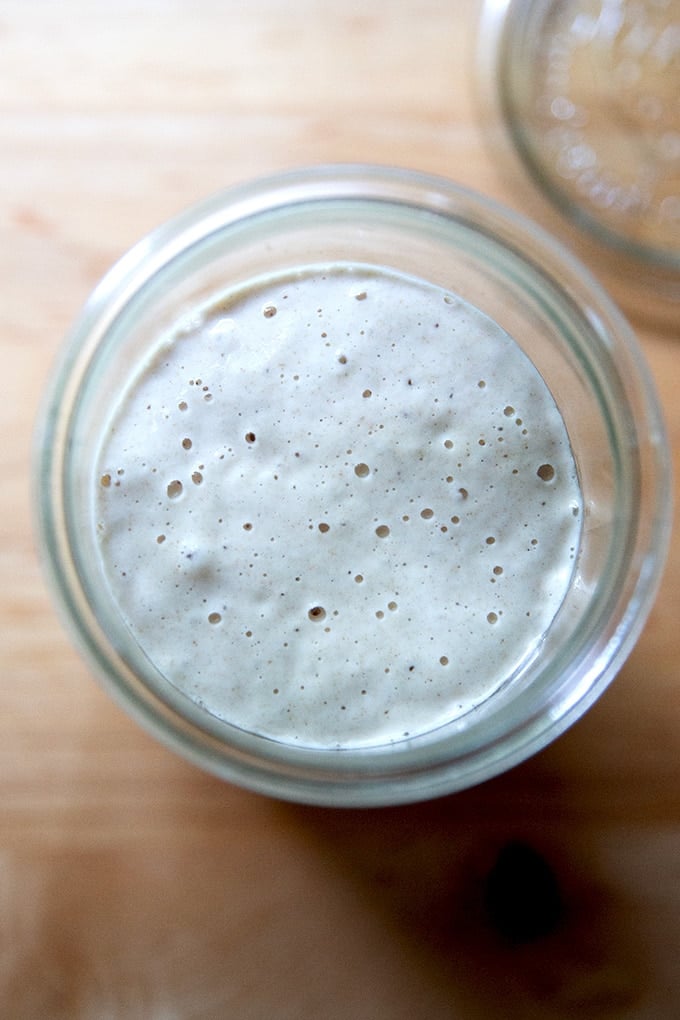
The mixture might even double in volume.
And you should see lots of bubbles on the surface.
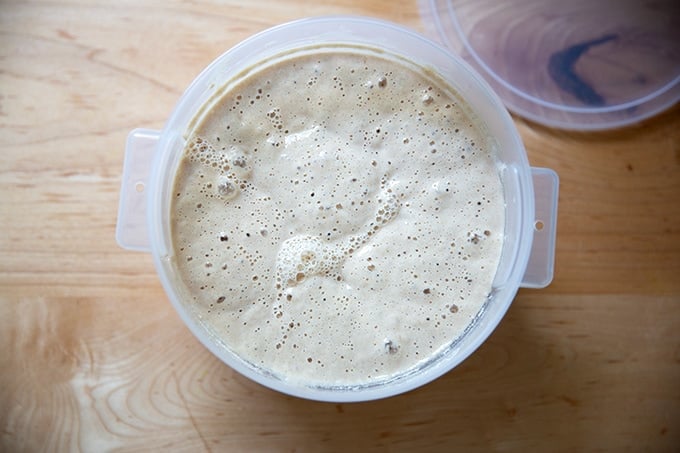
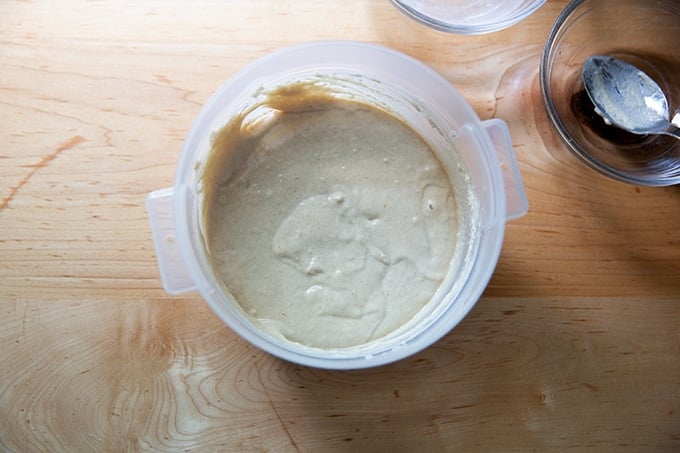
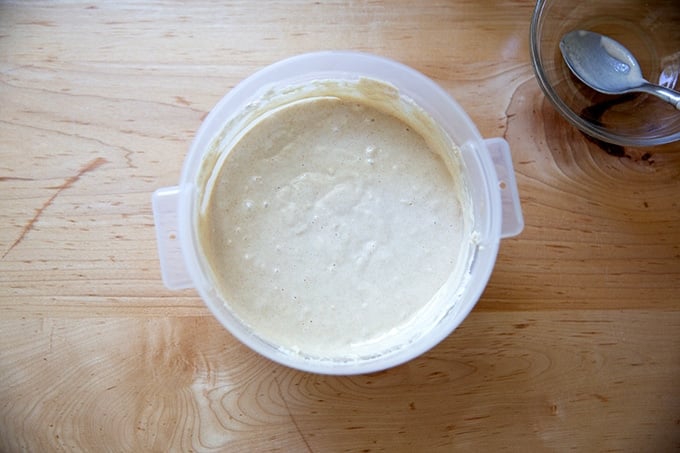
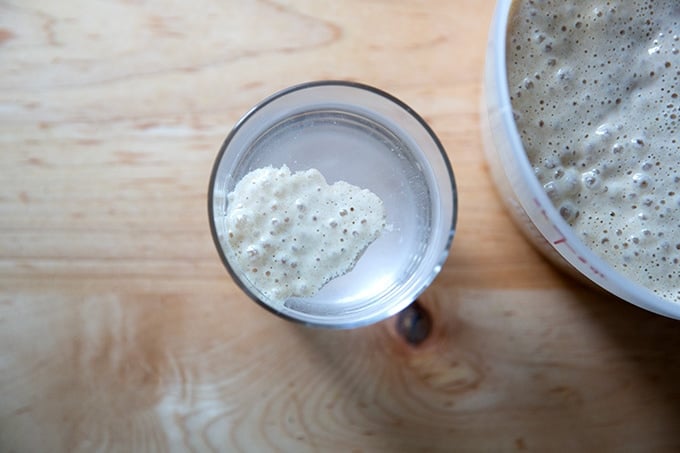
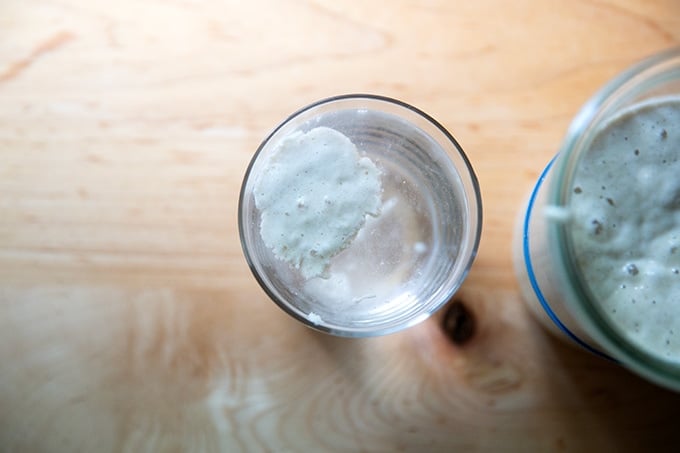
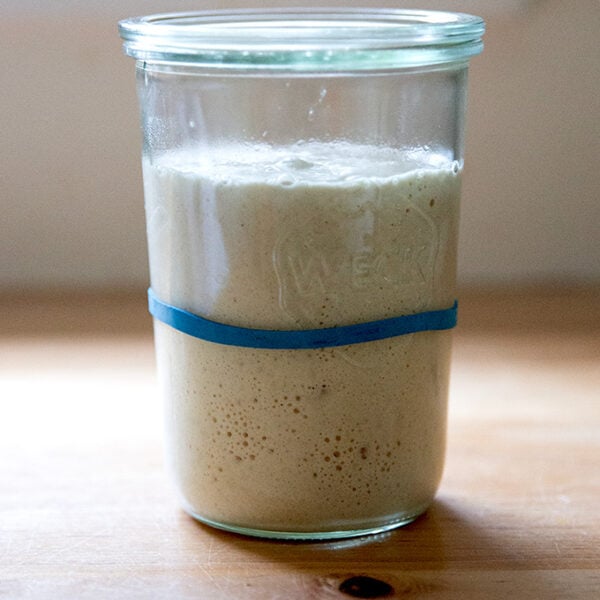
If your mixture is in fact rising, let it rise until it nearly doubles in volume; then drop a spoonful of it in water. If it floats, you’re in business. Note: Your starter might rise (and maybe fall) while you are sleeping — don’t worry if you don’t “catch” it at its peak. Continue on with the process that follows.
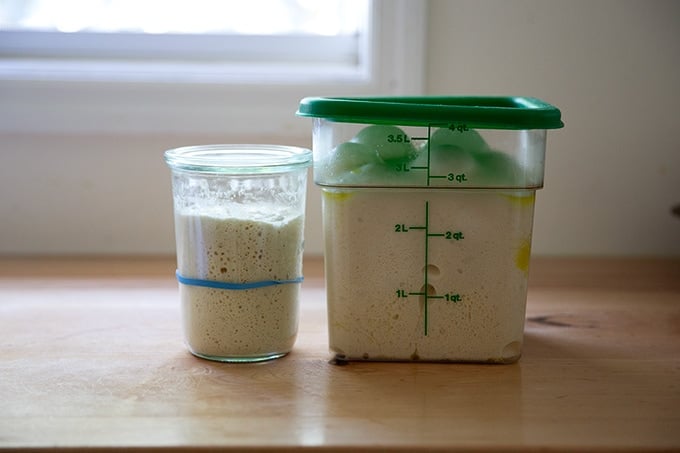
Spoon 128 grams of the starter into a new vessel.

Measure another 128 grams of flour and water each.
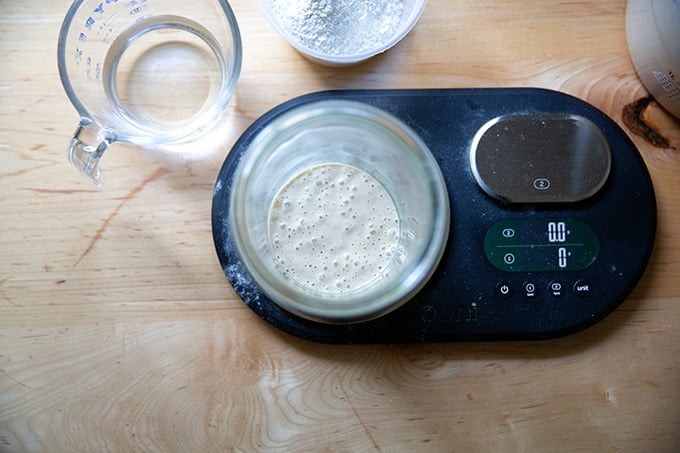
Add the flour and water to the starter.
Stir to combine.
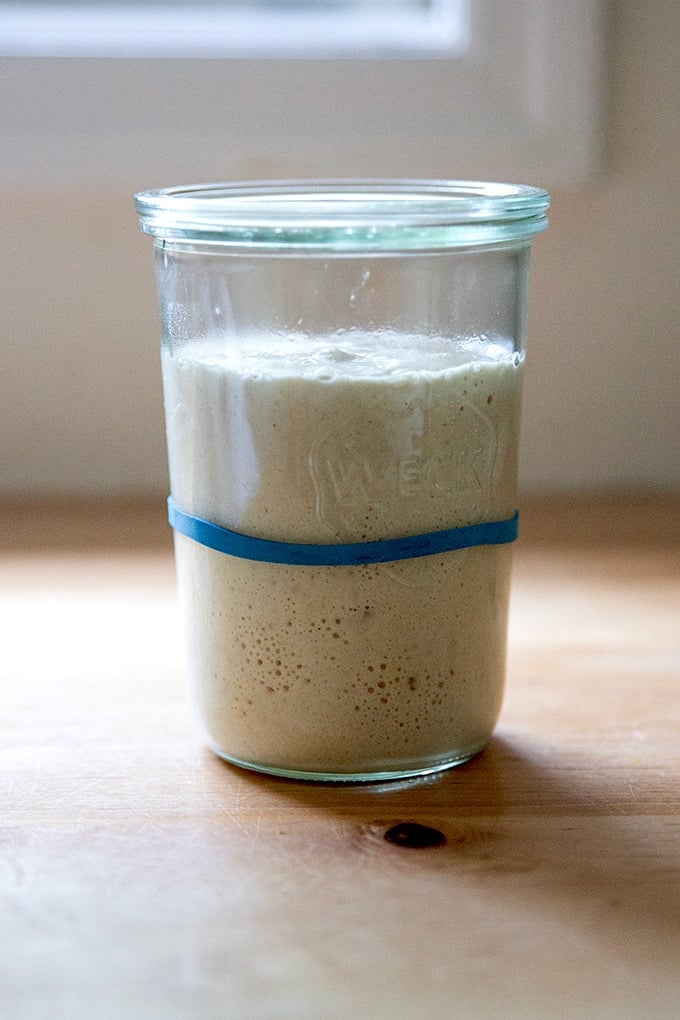
Mark the height with a rubber band.
This original vat of sourdough starter is now your discard bucket. Transfer it to the fridge or use it in one of your favorite sourdough discard recipes: tortillas, crackers, pancakes, soda bread.
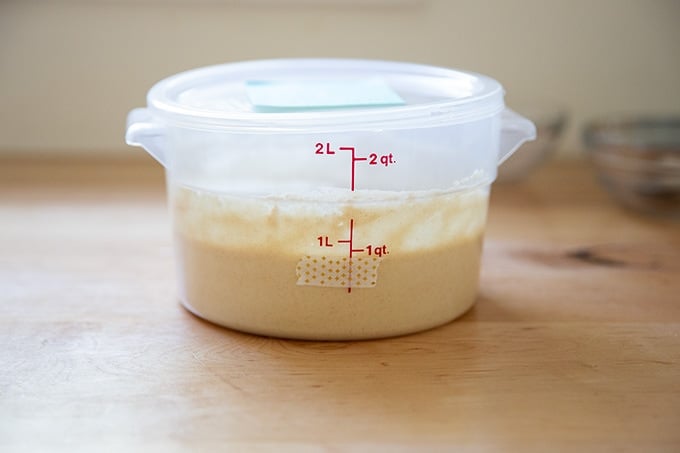
Day 5: When your starter doubles…
… and floats…
…you can do one of three things:
- Repeat this process: spoon 128 grams of starter into a new vessel and add 128 grams each flour and water. (Transfer the remaining starter to your bucket of discard.) Let the new starter rise until it doubles. Your starter will get stronger with every feeding.
- Transfer it to the fridge if you need to take a break from the process. You can pick up where you let off when you are ready.
- Test it out…
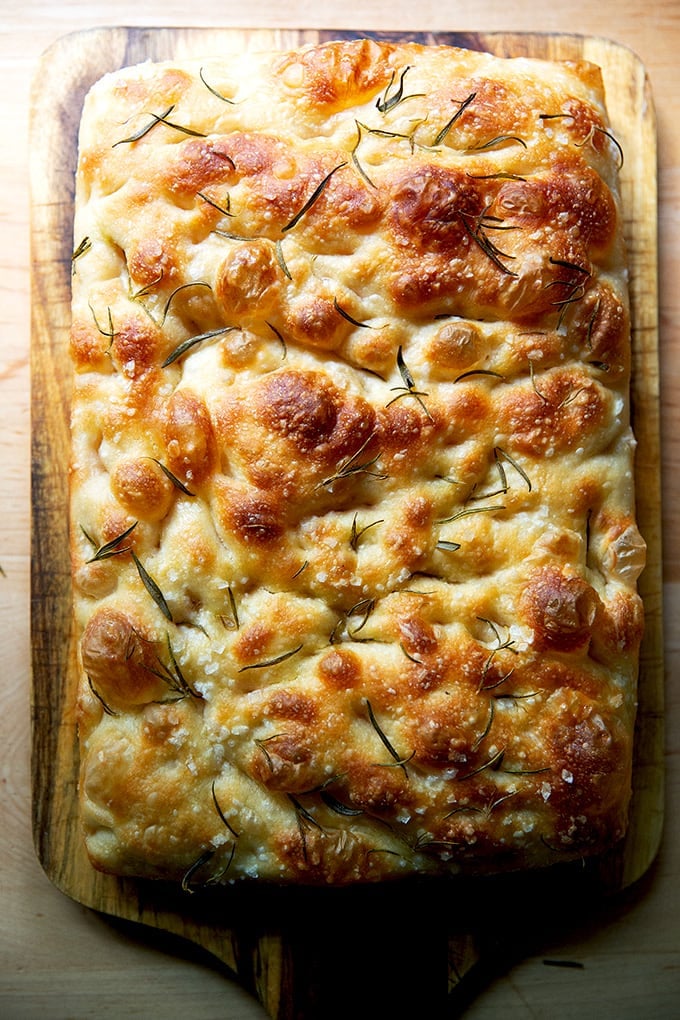
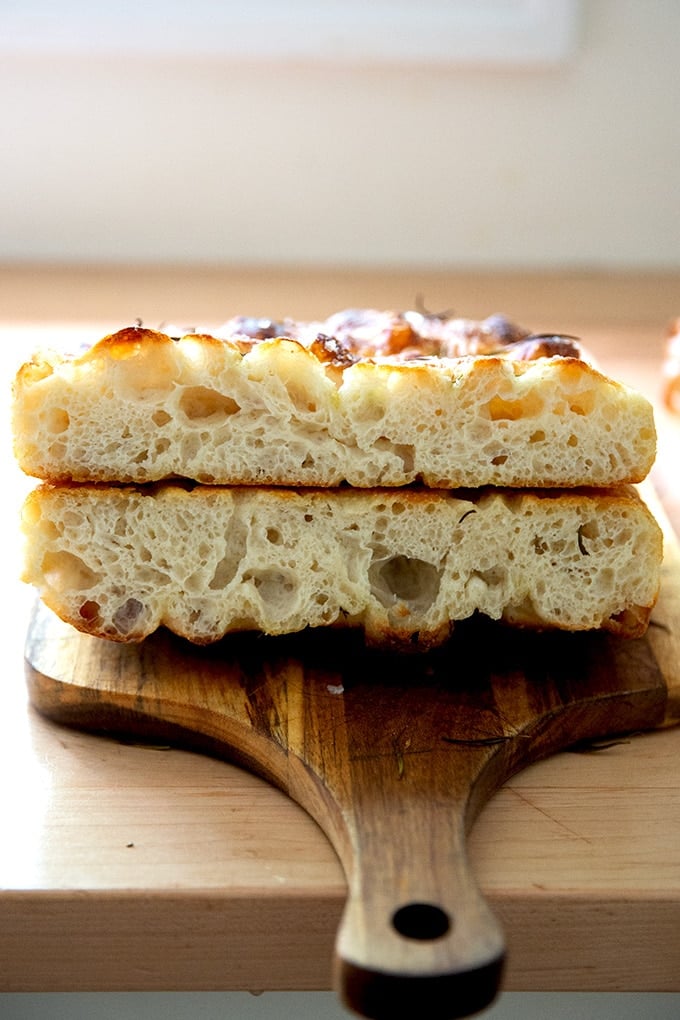
… in a sourdough bread recipe. I recommend starting with…
… focaccia, one of the easiest breads to make.
How to Build a Sourdough Starter from Scratch
- Total Time: 5 days
- Yield: 3 cups 1x
Description
This post outlines how to build a sourdough starter from scratch simply and quickly. In less than a week, with minimal effort, you will have a bubbly, active starter on your hands to use in all your favorite sourdough recipes.
Notes:
Adapted from Peter Reinhart’s method, outlined in Perfect Pan Pizza (and many of his other books as well).
If you are looking for guidance on how to feed, maintain, and store your already strong starter, see this post: How to Feed, Maintain, and Store a Sourdough Starter.
5 Tips for Success
- Use a scale to measure. It is the only way to measure accurately.
- Use a straight-sided vessel, which will help you more accurately see how much your starter is growing.
- Attempt this project while it’s hot outside or create a cozy place for your starter to rise:
- Find a warm place in your kitchen (like on top of your refrigerator) to let it rest.
- Invest in the Brod and Taylor Sourdough Home: I do not own this, but it gets good reviews should you have the space for it
- Build your own “sourdough home“: one of you ingeniously made a homemade proofing box by placing a seed heating pad in a box and covering it with a towel.
- Try the warm oven trick: turn your oven on for 1 minute (at any temperature) and then turn it off. It likely won’t get above 100ºF — it will just create a cozy spot for your dough to rise. Consider sticking a post-it note to the oven to remind you that you have a starter in there so that you don’t accidentally preheat your oven and kill your starter. (Note: I do not recommend using the oven with the oven light on, because I discovered the hard way that the oven light can actually be too hot and cause your starter or sourdough bread to overferment.)
- Start with pineapple juice.
- Use freshly milled stone-milled flour. If you have a source local to you, use it! Health food markets, co-ops, or markets such as Whole Foods often carry freshly milled flour. Here are a few mail-order options:
Pineapple Juice: My small cans of pineapple juice are labeled as 6 ounces (177 ml), but when I actually weigh the juice inside, it always weighs around 192 grams. The important thing is to use an equal amount by weight of flour and pineapple juice.
Pineapple Juice Alternatives: Orange Juice or Water
Water: I have no trouble using tap water when building a sourdough starter or when making a sourdough bread recipe. If you have concerns about your water, you can:
- Use water that you’ve left out overnight to ensure any chlorine has evaporated.
- Buy spring water. In some places, letting water sit out overnight will not be effective, and your tap water may kill your starter.
Discard: At the end of the first four days of the process, you’ll be left with a decent amount of sourdough discard, which you can use in countless recipes. Here are a few of my favorites:
Ingredients
- 1 small can (192 grams) pineapple juice, see notes above for alternatives
- stone-milled flour, see notes above
- Room temperature water, see notes above
Instructions
- Day 1: Pour the can of juice (roughly 192 grams) into a large bowl or ideally a straight-sided vessel on a tared scale. (A straight-sided vessel allows you to truly see how much your starter is growing. I’m using this Cambro.) Add an equal amount of flour (roughly 192 grams) by weight. Stir the flour and juice together until the flour is absorbed. Cover the vessel. Record the date, time, and measurements — you will forget which day you started if you don’t. Let it sit at room temperature for 24 hours.
- Day 2: Uncover the vessel. Stir the mixture. Re-cover the vessel, and record your work. Let it sit at room temperature for another 24 hours.
- Day 3: Uncover the vessel. Add 128 grams (1 cup) flour and 128 grams (about 1/2 cup) water. Stir to combine. Cover the vessel and record your work again. Let it sit at room temperature for 24 hours, stirring once or twice.
- Day 4: Uncover the vessel. You should see a little action (bubbles) and it should smell pleasant, not unlike a fruity yogurt. Measure out 128 grams (about 1 cup) of flour and 128 grams (about 1/2 cup) of water. Add them to the container. Stir to combine. Cover the vessel. On this day, record your work again, and mark the height of your mixture with tape on the side of your vessel. Let it sit at room temperature for 24 hours, keeping a closer watch this time around. You may see action — rising and bubble formation — within a few hours. If your mixture is in fact rising, let it rise until it nearly doubles in volume; then drop a spoonful of it in water. If it floats, you’re in business. Note: Your starter might rise (and possibly fall) while you are sleeping — don’t worry if you don’t “catch” it at its peak. Continue on with the process.
- Day 5: At this point, you should be observing some activity in your starter, meaning the starter should have risen slightly (perhaps doubled but perhaps not) and fallen with bubbles transforming from big to small. You’ll now take a small portion of this mixture and build a new starter: Transfer 128 grams of the starter to a new jar or vessel, and add 128 grams (about 1 cup) of flour and 128 grams (about 1/2 cup) of water. Stir well to combine, then cover the jar. Mark the height with a rubber band. Let sit at room temperature. Transfer the remaining starter to the fridge — this original mixture is now your sourdough discard and can be used in all sorts of recipes, see notes above. When your new starter doubles in volume, you can do one of three things:
- Repeat this process: spoon 128 grams of starter into a new vessel and add 128 grams each flour and water. (Transfer the remaining starter to your bucket of discard.) Let the new starter rise until it doubles. Your starter will get stronger with every feeding.
- Transfer it to the fridge if you need to take a break from the process. You can pick up where you let off when you are ready.
- Test it out in a sourdough bread recipe.
- Maintaining your starter: Once you have a strong, active starter on your hands, follow the steps in this post: How to Feed, Store, and Maintain a Sourdough Starter.
- Category: Bread
- Method: Stir
- Cuisine: American
This post may contain affiliate links. Please read my disclosure policy.


446 Comments on “How to Build a Sourdough Starter from Scratch”
Hi! I’m on day 8 my starter had been successfully doubling, and yesterday even passed the float test. But I wanted to see it again to get it stronger as suggested, but yesterday after discarding most of it, adding my 100g of water and flour each as I have been doing it hasn’t risen at all. I’ve been keeping it at a fairly consistent temperate the whole time. I have no idea what happened?! 😢 is I discard too much? Thanks in advance
Hi Megan! You are doing the right thing: discarding most of it and feeding it fresh flour and water is the right thing to do at this phase of your starter’s progress. You should be doing this 2x a day now.
Know that it is OK that your starter had been doing “well” and somehow now appears to not be doing so well… some people call it a starter “fake out”. It is common for a starter to go gangbusters in the beginning due to the rush of activity as the wild yeasts and bacteria feed like crazy on all of the “food” (the flour/water). As your starter matures/ripens, it becomes more acidic, and some of these microbes can’t survive… as they die off, the starter looks inactive, but it just needs time: more consistent feedings with fresh food and water and a warm place to rise.
Just keep at it with the feedings… it becomes a tedious process and, again, may take as long as 2 weeks to double consistently.
Hi, I started with pineapple juice instead of water. Tomorrow is day 3 for me. When I add more flour and water, should I use pineapple juice at this step as well? or do you only recommend that on day 1?
Hi! The pineapple juice is just for day 1.
Hi Ali, I am on day 4 of the challenge but I had to make a modification. I am using a warmer that only fit a 1-quart weck jar, so I started the challenge in a 1 quart jar (as opposed to the larger plastic container you show in this post/your videos). Because it’s a smaller vessel, I had to make some modifications and I skipped the second feeding before transferring to a new vessel. Here’s what I did:
– Day 1: 193g pineapple juice + 193 g flour
– Day 2: stir
– Day 3: add 100g each water & flour
– Day 4 (today): transferred 128g of the starter to a new jar, + 128g each water & flour
Before I transferred it to the new vessel, I saw lots of bubbles and it was a thinner batter-like consistency, but I don’t think it rose at all. It’s now been about 10 hours since I completed the last step (transferring to a new jar and adding 128g each of water & flour). I’m seeing bubbles again but it has not risen above my rubber band at all yet.
Did I ruin it by skipping the second feeding before transferring to the new vessel? At this point, should I do a second feeding today per your videos or should I wait until I see it rise 25-50%?
Any guidance is greatly appreciated! Thank you!
Hi Amy. No, you did not ruin it… you potentially missed an opportunity to feed a flury of microbes more food and therefore produce a larger pool of happy microbes to then create an offshoot from, but just know that there is no right way to do this. Also, this time of year, patience is the name of the game… it may take 2 weeks to get your starter to a place where it doubles in volume consistently.
At this point, I do think twice-a-day feedings, roughly 10-12 hours apart (if your schedule allows) will help produce a strong starter. Keep in mind if you miss a feeding, it’s no big deal… again there is no correct way to do this. If you skip a feeding, just pick up with the same process: discard most of it, feed it with equal parts flour and water by weight.
Thank you so much for your response! I have a question for the future – when I’m finally ready to use my starter and feed/store what’s left in the fridge, I am likely going to be storing it in a weck jar. Should I seal the jar with either the rubber seal or the metal clips while it’s in the fridge? Or should I just set the glass lid on top?
My pleasure 🙂
I would not use the clips. The rubber gasket might help provide a little more of a seal, so I would use that.
Hi there – I’m on Day 7, have followed the steps to a T, and all is going well except yesterday, my spoonful sunk to the bottom of the glass of water immediately. So quickly my heart went with it :(. My home is at an elevation of about 5500 ft, so I wonder if that has something to do with this.
Hi Rebecca! Apologies for the delay here. When you dropped the spoonful of starter into the water, did you spoon from the top of the risen starter? Or did you stir it together first, then spoon and test in the water? I don’t think elevation is affecting the process, but cold temperatures can. Is your kitchen on the cool side? Had you noticed your starter doubling in volume yet? Or had it only risen slightly?
Do keep in mind it can take as long as 2 weeks to develop a thriving starter that will reliably double in volume within 6-8 hours of a feeding.
Hello! I’m on day 7 and we have not doubled yet. It’s been growing about an inch by morning the past few days. I just switched containers as the other one was hard to stir so I put it in more of a bowl this time. I live in central Canada which can get -30 Celsius regularly. I’ve been leaving it on my counter with a dish towel overtop to hopefully keep in some of the warmth. I’m going to try the oven trick today but I don’t know if I’m able to keep up with that daily. Any other tips or just to keep at it, feeding it twice a day (morning and night, about 12 ish hours apart?). Thanks!
Hi Carmelle! Growing an inch each morning at this phase is really good, especially in these cooler months. Apart from the warm oven trick and feeding 2x a day, there isn’t much you can do. Other commenters have gotten creative using heating pads or making a homemade proofing box by placing a seed heating pad in a box and covering it with a towel.
Hi Ali,
Am about to start my first batch of starter – however my daughter has an allergy to pineapple. Is there another thing I can use? I’ve heard of people using grapes or grape juice, but I’m not sure it has the same anti-bacterial properties. I know I could use plain water – but tbh I’m a little afraid of sourdough fearing that if it doesn’t whine, complain or bark, I’ll forget to feed it and so would like it to be as antibacterial as possible. What do you think?
Hi Kath! Apologies for the delay here. You can use orange juice in place of the pineapple juice or water.
Hi! We have a local mill and I’d like to use their flour. Will any type work, or does it need to be AP or bread flour. I really like their einkorn flour. Thank you! I’m excited to give this a go.
Hi Cate. Einkorn has a slightly weaker gluten-structure, so while it will be a great food source for building a starter initially, I might consider switching to bread flour after a few days — if for instance you aren’t seeing any rise, it could be bc the gluten structure is too weak. Switching to bread flour when you make the offshoot (Day 5) might help. Alternatively, you could use a mix of bread flour and the einkorn flour.
Hello, Ali,
I will be starting my starter today. I was only able to find pineapple juice with added ingredients such as, concentrated apple juice, citric acid, and natural flavours. Do you think this would work, or should I just stick with water?
Thank you
Hi Donna! Sorry for the delay here. I think that pineapple juice you have on hand will be fine. If you are concerned, you can use orange juice or water.
It is day 2, when I opened up my container- it was dark looking, but when I mixed it up it went back to original color. Do I need to start over? I am using a rectangle large container from Baking Steel Pizza Guy.
Maybe there is too much air in my container?
Maybe my starter is not cozy and too cold?
Thanks for your assistance.
How larger is the container? Mine is 7 inches across if that helps as a reference point. You definitely want to try to find a cozy-ish spot in these winter months.
My plastic container is 14 inches long. Today I transferred it to a glass jar. I will see how it goes and maybe I will start over. It is parked in my oven.
Got it 👍
I’m on day 8 of the sour dough challenge. Mine has not risen since day 5 and does not pass the float test. Also have started finding moldy growth in my starter vessel. Do I need to start over?
Ugh, bummer, Michael. I’m really sorry to hear this. Mold unfortunately means you do need to start over.
Recipe for starter
Hi! It’s in the recipe box above.
I am on day 5 of building a sourdough starter. My starter has barely gone above the rubber band at all. I did uses King Arthur bread flour from day one. My kitchen is cold especially at night but I am using a sourdough hearter from Amazon set at 80 degrees. Any suggestions?
Thanks
Hi! It is possible that given the time of year, it may just take as long as 2 weeks. Question: you don’t have RO water in your house do you? Or are you concerned about your water source for any reason?
I do have RO water and have been using it. Is that bad?
Unfortunately RO water is not ideal because the purification process removes essential minerals (like calcium and magnesium) and microbes that yeast and bacteria need to thrive. If you are open to buying a jug of spring water that will help. And if you are also open to finding either organic KA flour or, better, if you have a whole foods or co-op near you that sells stone-milled flour, I think you’ll see results faster — there are more microbes in those sorts of flours that the yeasts and bacteria will thrive on.
Hi! I am on day four, and I don’t think that there will be enough room in my jar (it’s a larger mason jar) for it to double. Should I transfer it to a different container , and how big should said container be?
Yes! I use a 2-quart container, so anything roughly that size will work.
ok thank you!
I love the emails and the step by step instructions. But I had a few questions. I started the process at night as opposed to morning. Will that make a difference? And second, my starter almost double yesterday when we first removed more of it into discard. But from this morning to now it hasn’t risen much? Should I be concerned?