 →
→ Homemade Sicilian-Style Pizza
This post may contain affiliate links. Please read my disclosure policy.
If you can make focaccia — and you know you can! — you can make excellent Sicilian-style pizza at home. It’s shockingly easy. Read on to learn the game-changing secret that allows the focaccia-like crust to stabilize and ensures the toppings do not overcook. 🍕🍕🍕

While the definition of Sicilian-style pizza as we know it today is debatable, the indisputable original Sicilian pizza is something called sfincione, a focaccia-like dough topped with onions, bread crumbs, and caciocavallo cheese. In Sicily, it’s traditionally served on New Year’s Eve.
If you go to a Sicilian-style pizzeria today, you’ll find slices that resemble sfincione with their focaccia-like foundation, but the toppings will vary as much as they would in any slice shop.
Unlike other styles of pan pizzas — I’m looking at you, Detroit — Sicilian-style pizza is incredibly easy to make at home: if you can make focaccia, either yeasted or sourdough, you can make excellent Sicilian-style pizza at home.
Find step-by-step instructions below but before you proceed, read these game-changing tips for success:
4 Tips for Sicilian-Style Pizza Success
- Butter your baking pan before adding the olive oil. With some pans, using butter in addition to olive oil is imperative to prevent sticking. Moreover, butter adds flavor and promotes browning.
- Take care with your final dimpling. Dimple throughout the center of the dough not the perimeter to ensure an even parbake. I learned this from Peter Reinhart’s Perfect Pan Pizza.
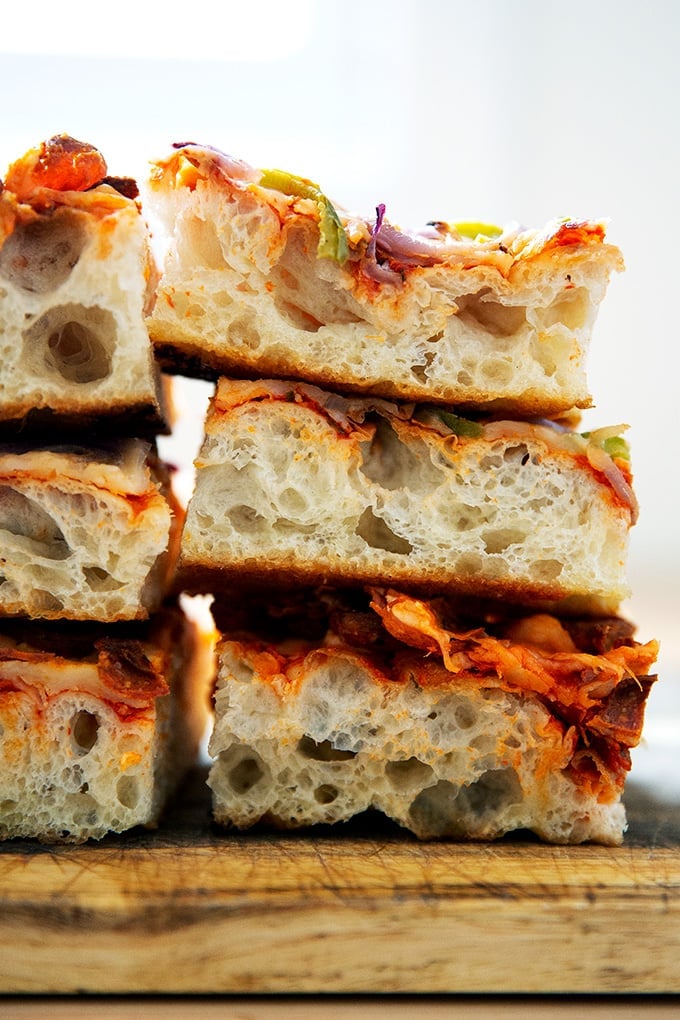
- Parbake your crust: This is game-changing! Parbaking allows the focaccia-like crust to stabilize, which will ensure the crust does not taste doughy or gummy. Furthermore, it will prevent the toppings from overcooking.
- Invest in a Lloyd pan: Lloyd pans conduct heat better than standard half sheet pans and, as a result, produce a superior, crisper crust. I love the 16×12-inch Lloyd “Grandma” pan.
How to make Sicilian Pizza, Step by Step
Gather your ingredients: bread flour, salt, instant yeast (SAF is my preference), and lukewarm water:
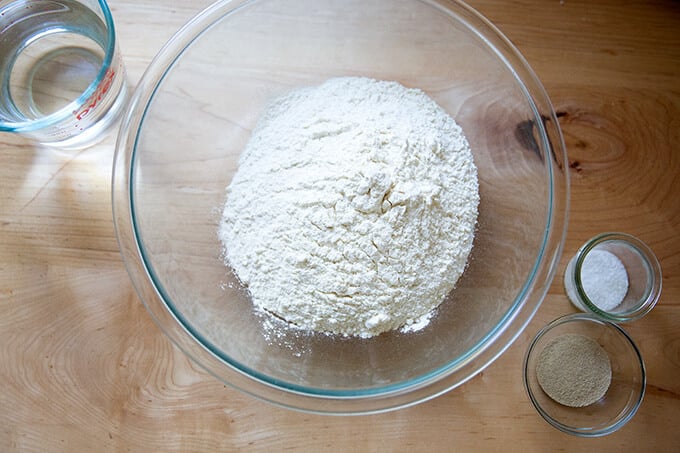
Whisk together the flour, salt, and yeast first:
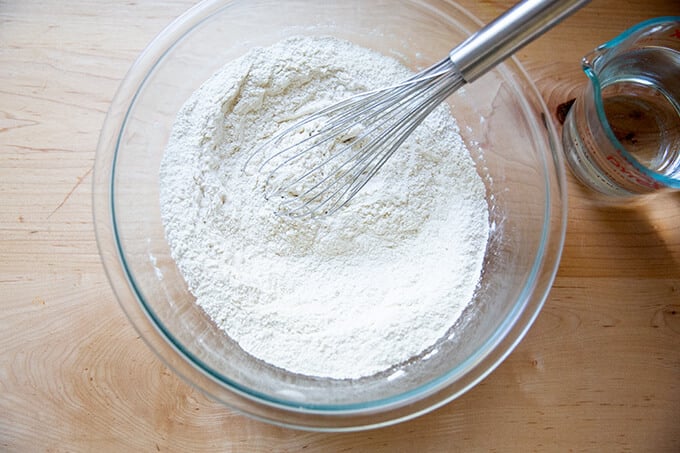
Add the water:
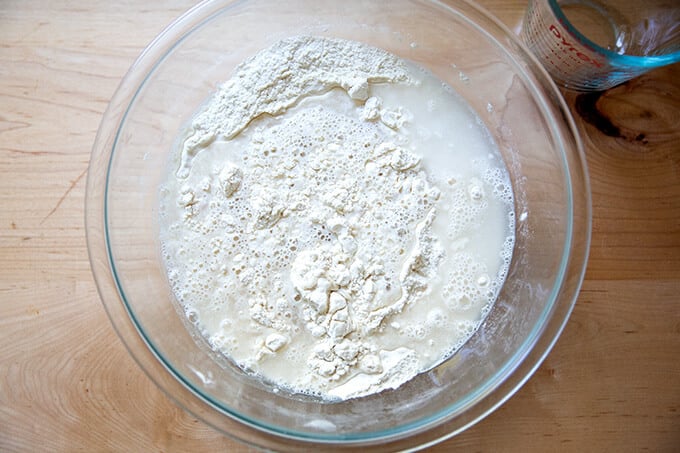
Use a spatula to stir the two together.
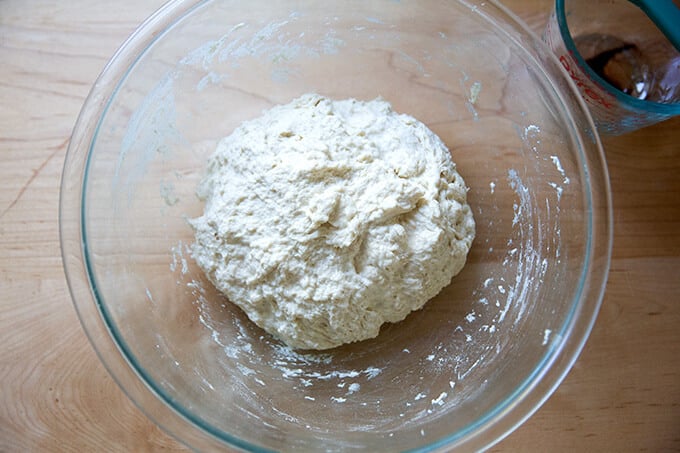
Slick the dough with olive oil:
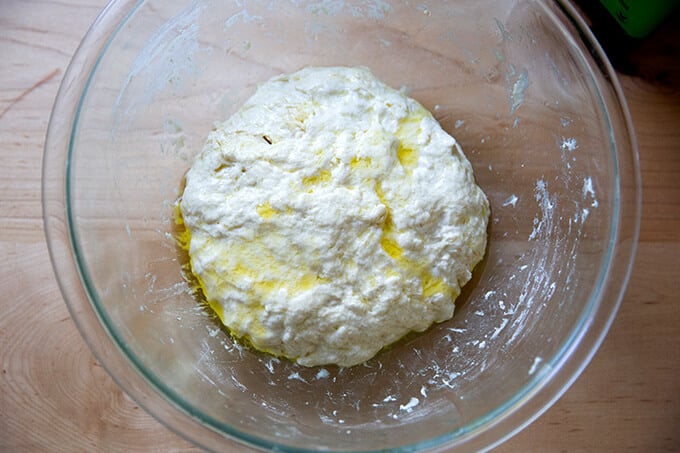
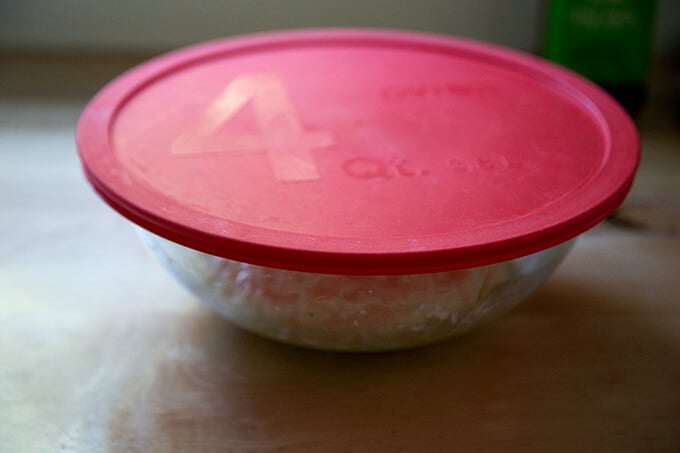
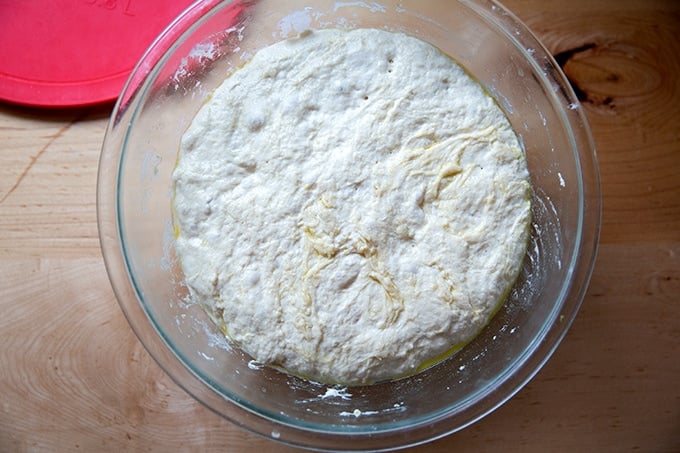
Then cover the bowl (with a lid or plastic wrap or something to make it airtight). Stick the bowl in the fridge immediately; leave it there to rise for 18 hours or longer—two to three days will give you an even lighter crust.
Uncover the bowl, then…
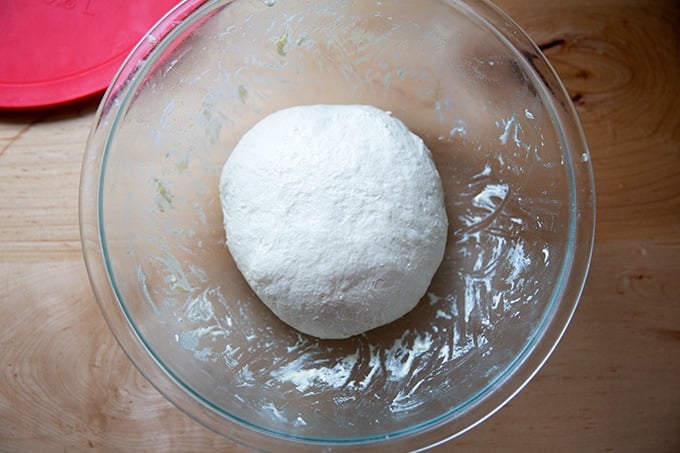
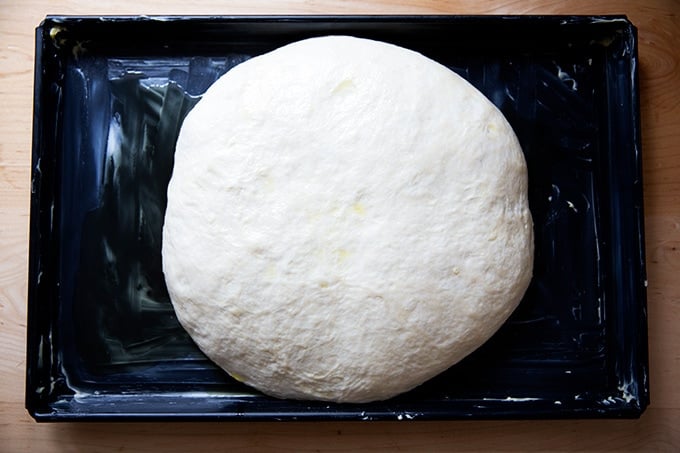
… deflate the dough. Using oiled hands grab a portion of the dough and stretch it up and toward the center. Turn the bowl slightly and repeat until you have created a rough ball.
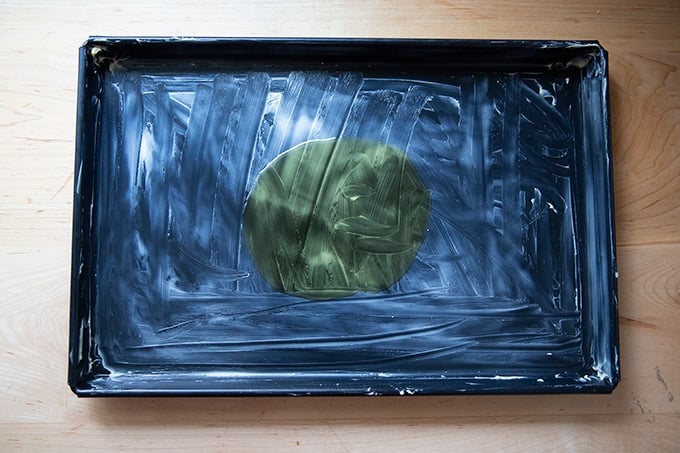
Prepare your pan for baking with both butter and olive oil. I love this Lloyd Sicilian-Style Pizza Pan.
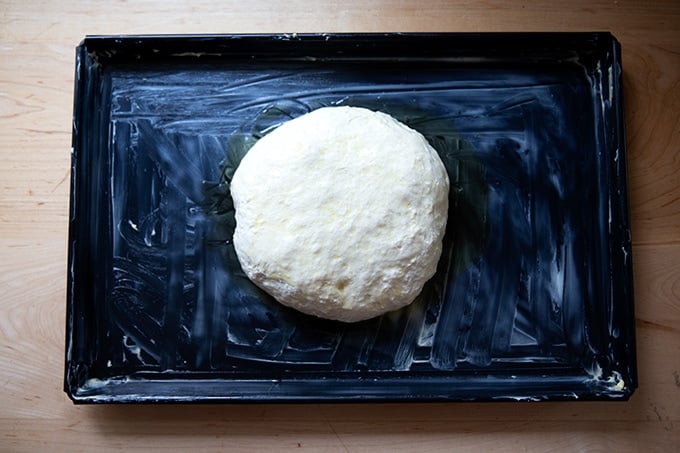
Transfer your dough ball to the pool of olive oil and turn it to coat.
Let sit for 2.5 to 3 hours or until it has poofed considerably.
Dimple and stretch the dough to fit the pan. As soon as the dough resists, stop and let it rest for another 30 minutes.
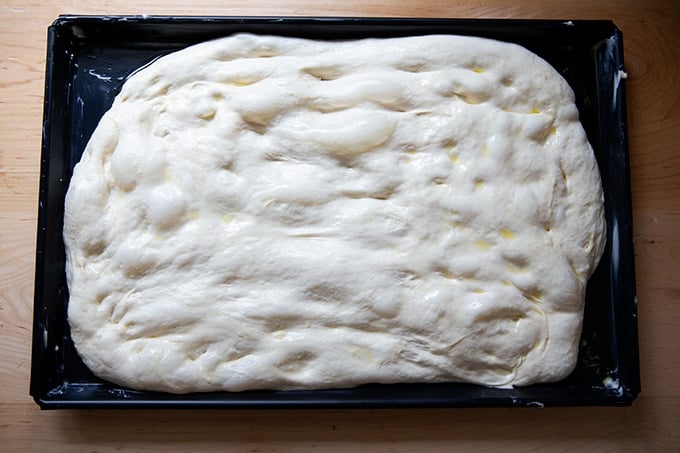
Then stretch it again to fit the pan. At this point, the dough can hang out in the pan for several hours. Cover it with plastic wrap to ensure the dough does not dry out if you plan on doing so. Dimple one last time throughout the center of the dough before transferring it to the oven to parbake it.
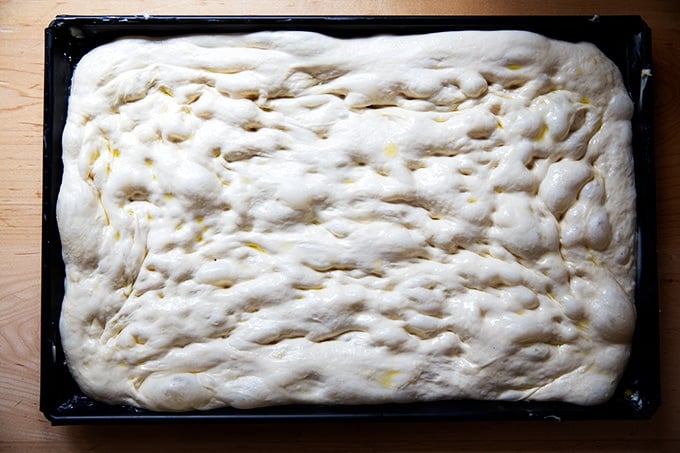
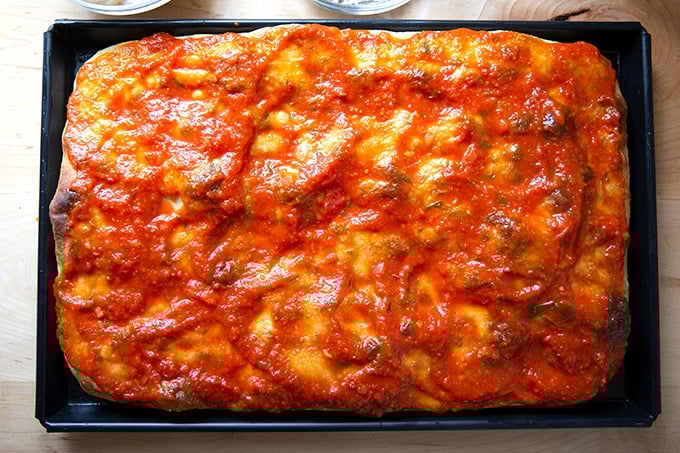
Parbake the dough for 11-12 minutes at 500ºF on a preheated Baking steel or pizza stone.
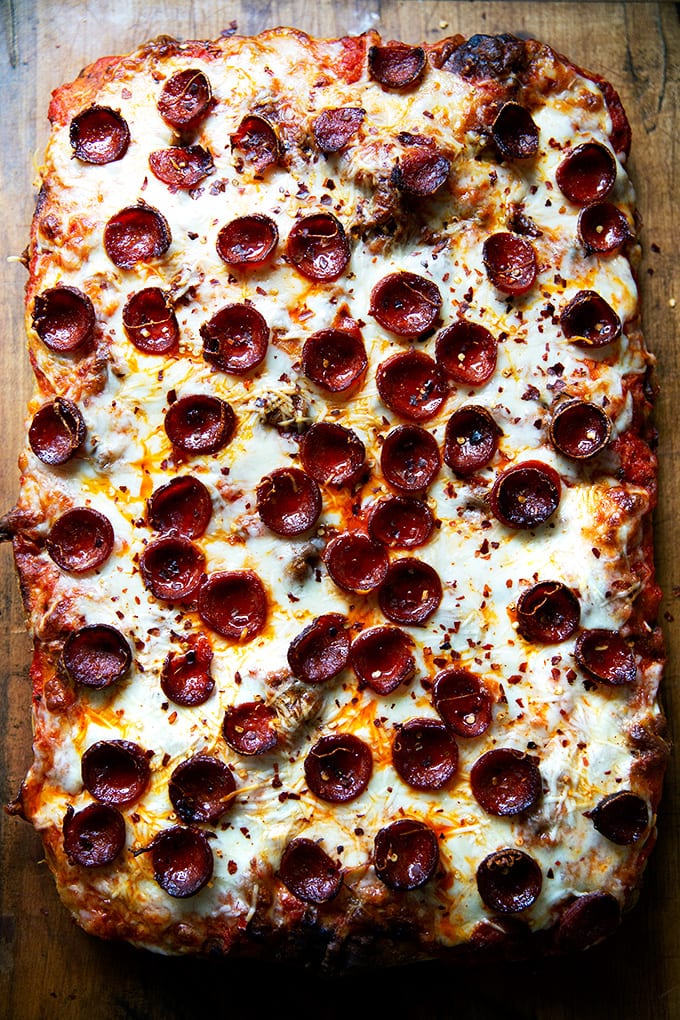
Then, top as you wish. I’m using my go-to homemade tomato sauce here.
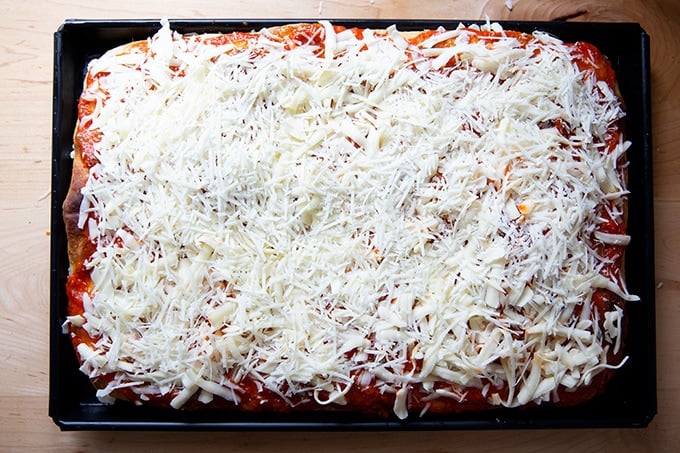
Top with cheese:
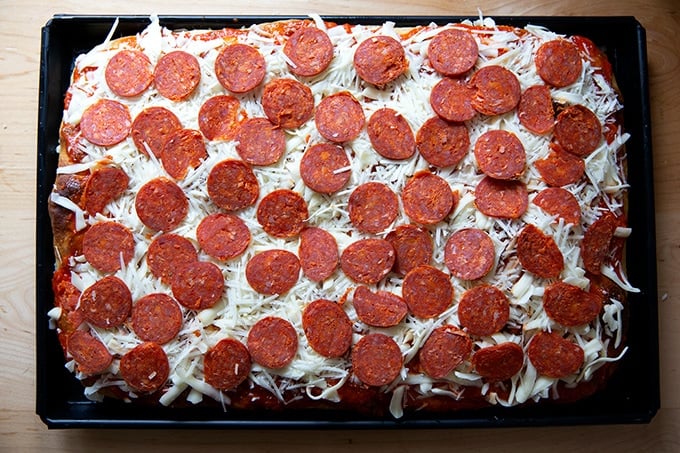
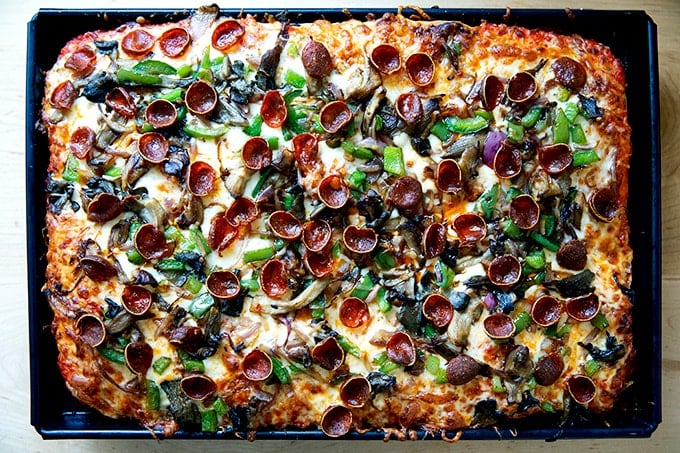
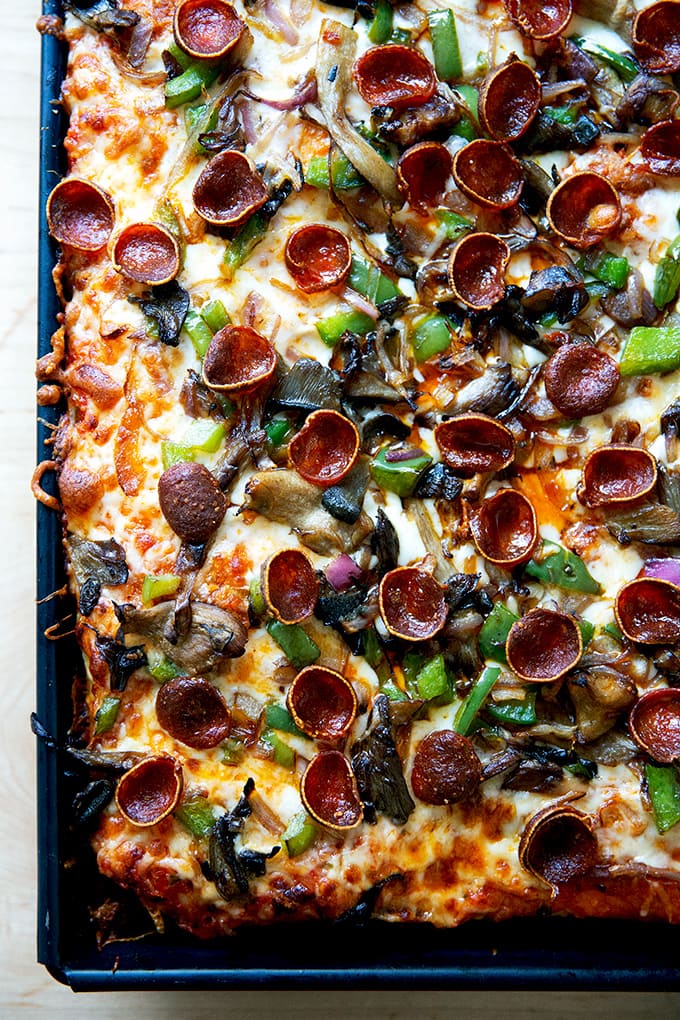
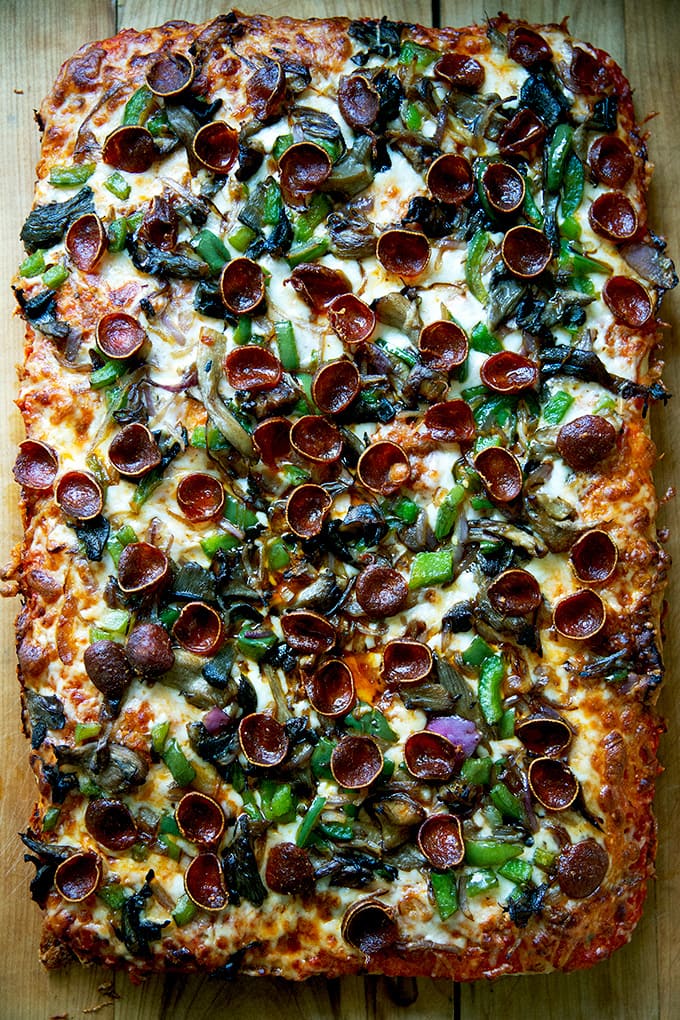
Then add pepperoni or sautéed vegetables or sausage or whatever you wish:
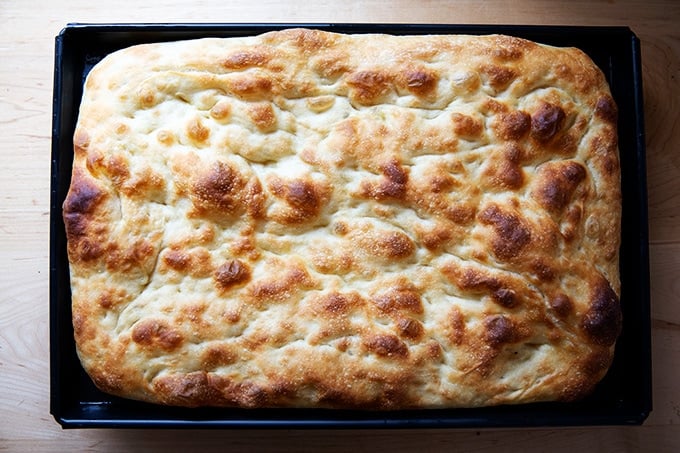
Transfer to the oven for another 10 minutes. Remove from oven and let rest in the pan for another 5 minutes before transferring the pizza to a board to rest.
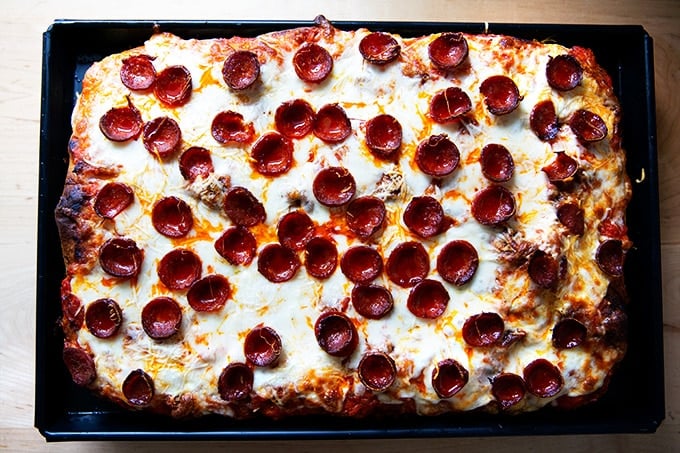
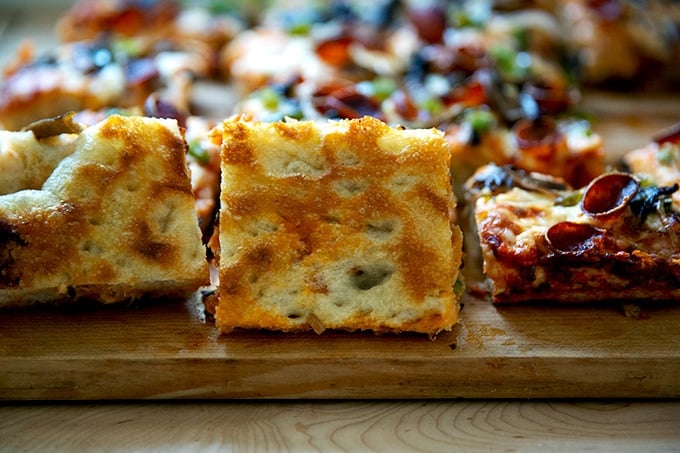
Shower with pepper flakes, if you wish.
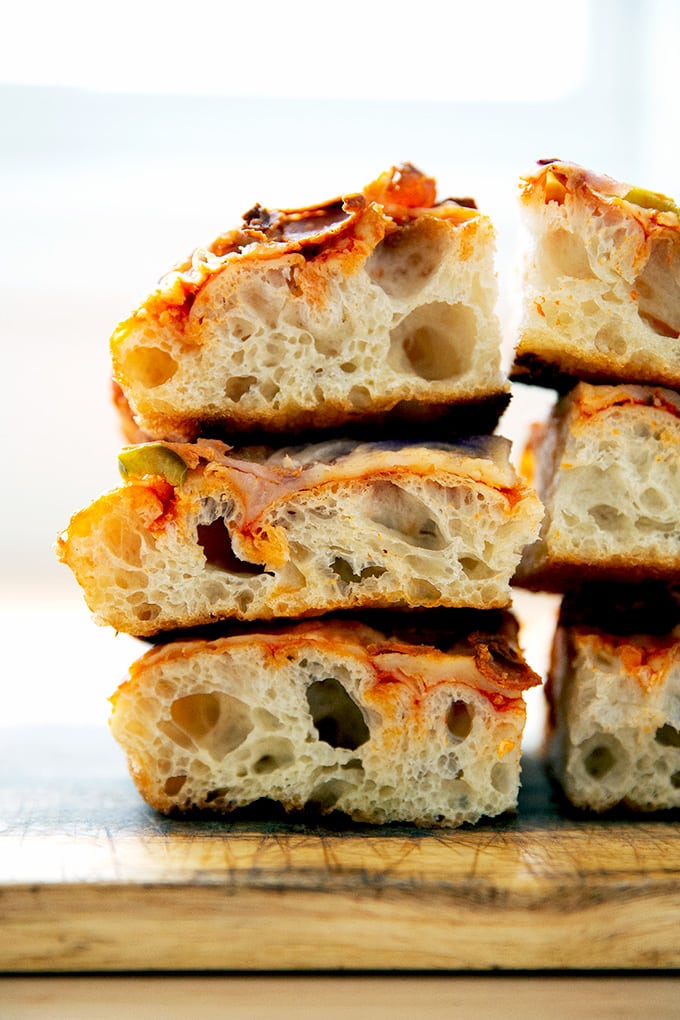
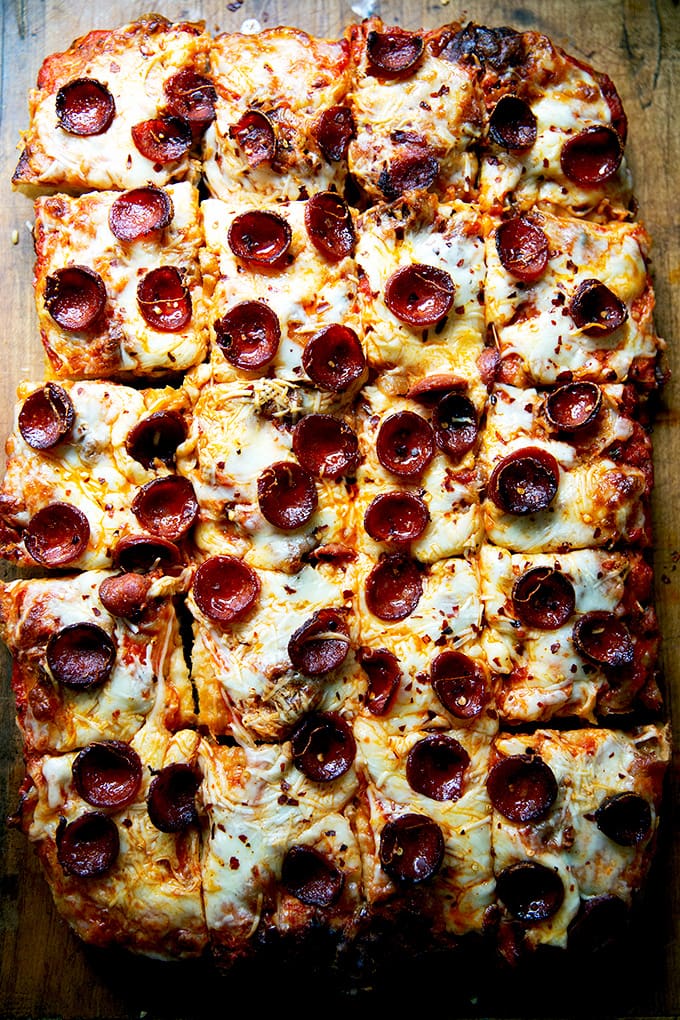
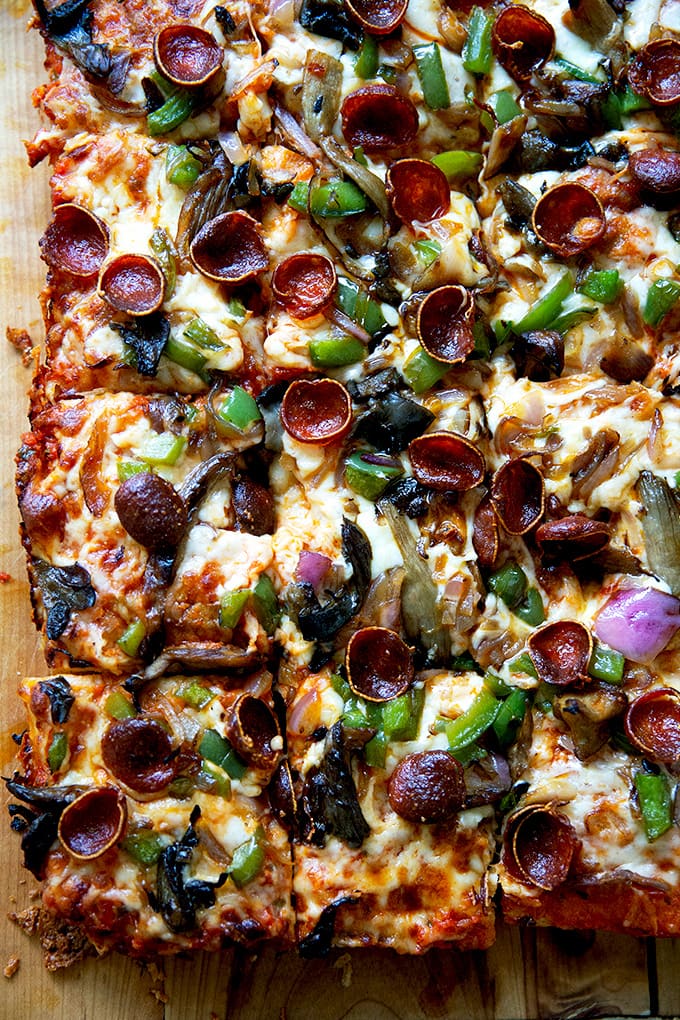
Cut into squares and serve.
Here’s the sautéed vegetable + pepperoni one:

Homemade Sicilian-Style Pizza
- Total Time: 24 hours 20 minutes
- Yield: Serves 10–12 1x
Description
If you can make focaccia — and you know you can! — you can make excellent Sicilian-style pizza at home. It’s shockingly easy. The key to success is to parbake the crust. Below you will find a yeasted dough recipe but if would like to make a sourdough version, follow the recipe for this simple sourdough focaccia bread recipe through step 5; then proceed with the recipe.
**Attention Pizza Fans**: My pizza cookbook, Pizza Night, is here!
Notes:
- As always, for best results, use a digital scale to measure the flour and water.
- As with the focaccia recipe, a long ferment is best. I often let the dough sit in the fridge for 2 days before proceeding.
- You’ll need a 12″ x 18″ sheet pan for this recipe.
- Lloyd makes a Sicilian-style pizza pan, which I love — it’s 12×16 inches, but it works great here.
- If you have a Lloyd Detroit-style pan and would prefer to use that here, see the notes below the recipe for scaling the dough recipe to fit that size pan.
- I love SAF instant yeast. I buy it in bulk, transfer it to a quart storage container, and store it in my fridge for months. You can store it in the freezer also.
- If you are using active-dry yeast, simply sprinkle the yeast over the lukewarm water and let it stand for 15 minutes or until it gets foamy; then proceed with the recipe.
- Flour: You can use all-purpose or bread flour here with great results. If you live in a humid environment, I would suggest using bread flour. If you are in Canada or the UK, also consider using bread flour or consider holding back some of the water. Reference the video for how the texture of the bread should look; then add water back as needed.
- Cheese: I know the idea of using grated cheese for some of you may be off-putting, but there are a few brands I like, and it saves some time using them: Trader Joe’s sells a Quattro Formaggi blend that’s great, and Tillamook sells a large-grate mozzarella that I also really love.
Ingredients
For the dough:
- 4 cups (512 g) bread flour, see notes above
- 2 teaspoons (12 g) kosher salt
- 2 teaspoons (8 g) instant yeast, see notes above if using active dry
- 2 cups (455 g) lukewarm water, made by combining 1/2 cup boiling water with 1 1/2 cups cold water
- olive oil
For the pizza:
- butter
- 2 tablespoons olive oil
- 12 ounces of grated cheese, such as whole milk mozzarella or a mix of Monterey Jack, Cheddar, and Mozzarella, see notes above
- 1 cup (+ a few spoonfuls) tomato sauce, such as this one or this one, or your favorite jarred sauce
For a veggie pizza:
- 3 tablespoons olive oil, divided
- 8 ounces mushrooms, sliced
- 1 green (or other) bell pepper, diced
- 1/2 red onion, thinly sliced
For a pepperoni pizza:
- 6 ounces pepperoni, I love Vermont Smoke & Cure, sliced as thinly as possible — if you want the pizza to be really loaded with pepperoni, you’ll need more like 12 ounces
- crushed red pepper flakes
For a pickled jalapeño & pepperoni pizza:
- 1 cup pickled jalapeños
- 6 ounces pepperoni, thinly sliced
- hot honey, optional
Instructions
To make the dough:
- Make the dough: In a large bowl, whisk together the flour, salt, and instant yeast. Add the water. Using a rubber spatula, mix until the liquid is absorbed and the ingredients form a sticky dough ball. Rub the surface of the dough lightly with olive oil. If your bowl has a lid, cover the bowl. Alternatively, transfer the dough to a vessel with a lid or cover the bowl tightly with plastic wrap to ensure the dough doesn’t dry out in the fridge.
- Transfer dough to the fridge for at least 18 hours but ideally longer: 24 to 48 hours. Longer is fine, too: I’ve kept the dough in the fridge for 3 days before proceeding.
Prepare the pan for baking:
- Grease a 12″ x 18″ sheet pan with butter. Pour 2 tablespoons of olive oil into the center of the pan. (Note: This greasing step may seem excessive, but with some pans, it is imperative to do so to prevent sticking. Moreover, it adds flavor and helps brown the bottom crust perfectly.)
Prepare the pizza for baking:
- Remove the dough from the fridge and use lightly oiled hands to release it from the sides of the bowl. Then, again with oiled hands, grab an edge of dough and pull up and to the center. Turn the bowl slightly and repeat until you’ve shaped the dough into a rough ball.
- Place the dough ball in the pan and turn to coat. (Note: You do not need to cover the dough here. The coating of oil should be sufficient to prevent the dough from drying out.) Let rest for 3 hours. With lightly oiled hands, stretch the dough to fit the pan — tent your hands, and use your fingers to dimple and stretch. You will likely not be able to get the dough to stretch all the way to the edges. When the dough resists, let it rest again for 30 minutes; then stretch it again using the same technique.
- At this point, the dough can hang out in the pan for a couple of hours (if your kitchen is on the cool side). I’ve baked it 30 minutes after this point, and I’ve baked it two hours later. If the dough is going to hang out for a while, cover it with a sheet of plastic wrap.
Bake and Top the Pizza:
- If you have a Baking Steel or pizza stone, place it on a rack in the middle or lower third of your oven, and heat your oven to 500ºF.
- Using oiled hand, dimple the dough one last time with the exception of the perimeter — this is important. It will help the dough bake more evenly.
- Transfer pan to the oven and place on heated Baking Steel or pizza stone for about 10 to 11 minutes or until evenly golden.
- Remove pan from oven and lower the oven to 475ºF. (Note: my oven doesn’t change temperature so quickly, so I actually turn the oven off during this period. Just before I return the pan to the oven, I turn the oven back on to 475ºF. Also: You can do this parbake hours ahead of time or even a day ahead of time.)
- Spread the sauce evenly over the dough. Top with the grated cheese. Then top as you wish:
- For the veggie pizza: In a large skillet over high heat, heat 2 tablespoons of the olive oil. When it shimmers, add the mushrooms and let cook undisturbed for about a minute. Season with salt; then stir. Cook for 3 to 5 minutes or until the mushrooms are beginning to brown. Transfer to a bowl. Add the remaining tablespoon of oil to the skillet; then add the peppers and mushrooms. Cook for 1 to 3 minutes, or until slightly softened. Season with salt; then transfer to the bowl with the mushrooms. Toss to combine. Taste and adjust with salt as needed. Spread this mixture over the cheese. Add some sliced pepperoni if you wish.
- For the pepperoni pizza: Arrange the sliced pepperoni over the cheese.
- For the pepperoni + pickled jalapeño pizza: Arrange the sliced pepperoni and pickled jalapeños over the cheese.
- Transfer pan to the oven and bake for 10 to 12 minutes or until the cheese is melted and just beginning to brown in spots.
- Remove the pan from the oven and let the pizza rest for 5 minutes in the pan. If you are making a pepperoni pizza and are using the crushed red pepper flakes, sprinkle some of the pepper flakes over the top. If you are using the hot honey for the pickled jalapeño pizza, drizzle some over the top.
- Run a knife or spatula around the pan’s edges. Then, carefully remove the entire pizza from the pan, transferring it to a cutting board. I like to use a serrated knife to cut this pizza. You can cut the pizza into however many pieces you wish. I’ve been doing 20 squares.
Notes
To Scale the Dough for a Lloyd Detroit-Style Pan, Use These Proportions (and please use a scale!):
- 277 g flour (2 cups + 2 tablespoons)
- 8 g salt (1.5 teaspoons)
- 6 g yeast (1.5 teaspoons)
- 245 g water (1 cup + 1 tablespoon)
- Note: My calculations lead me to think that a Detroit-style pan needs about 532 grams of dough. So another way to do it would be to make the recipe as written, use 532 grams of it for the Detroit-Style pan and use the remainder for something else — pizza, mini rolls, etc.
To Scale the Dough for a Lloyd Sicilian-Style Pan, Use These Proportions (and please use a scale!):
- 488 g (3 3/4 cups) flour
- 11 g (2 teaspoons) salt
- 8 g (2 teaspoons) yeast
- 432 g (1.75 cups + 2 tablespoons) water
- Prep Time: 24 hours
- Cook Time: 20 minutes
- Category: Pizza
- Method: Oven
- Cuisine: American, Sicilian
This post may contain affiliate links. Please read my disclosure policy.


238 Comments on “Homemade Sicilian-Style Pizza”
Have you ever frozen the parbaked crusts and then used later?
This recipe is perfection. My husband says it’s the best pizza crust he’s ever eaten. It’s divine.
Hi Suzanne! Apologies for the delay here. I have not, but I think you could definitely do so with great success. There is a famous restaurant (Metro Pizza, I think) whose owner freezes all of his parbaked Sicilian pizza crusts — it’s built into the workflow because the freezing causes some of the water to evaporate, making for an even lighter crust. So, I say go for it! I think the owner’s name is John Arena… there was a Pizza City USA podcast about it, and it was fascinating to listen to.
I was also curious about freezing. I tried and it worked wonderfully. I parbaked the dough and then let it cool. I wrapped in saran wrap and then foil just to make sure it didn’t get any freezer burn. To use the frozen crust, I just thawed it for about half an hour, added toppings and then baked directly on the stone. This makes for a super quick easy meal.
So nice to hear this, Susan!! Thanks so much for writing and sharing these notes. So helpful for others.
Alex, Just saw this sight and am going to try this one out. Looks good. By the way, I went to school with John Arena and went to the store they had in Franklin Square many years ago, the Centurion. If you see John Say hello for me.
So cool, Jerry! I’ve never met John but would love to and would love to try his pizza 🙂
Wondering if 00 Caputo flour could be used in this recipe.
Thank you
I think you could but I don’t think you’ll get quite the same hole/crumb structure. I do prefer bread and ap flour for pan pizza recipes. That said, if it’s all you have, go for it!
Worked perfectly for me. The family really enjoyed the change from the usual thin crust. Definitely added to the ‘repertoire!’
Great to hear, Jim!
For an 8×10 Detroit style pan, would you just half the dough from the scaled 10×14 above?
Hi! I would use this Detroit recipe: How to Make Homemade Detroit-Style Pizza
I was wondering if the 00 flour for pizza would be to soft of a flour for this recipe?
Love your recipes.
Irene
I do recommend bread flour for this sort of recipe… 00 flour is known for it’s extensibility, and here, you want more oven spring/poof. That said, if you are wanting to use up your 00 flour, go for it. You may need to reduce the water by 25 grams or more.
Can I use your Sourdough Pizza Crust in this recipe?
Hi! I think a higher hydration dough will work a little better… the dough should almost be like focaccia for Sicilian-style pizza.
That said, it’s worth a shot!
Hi. I just made the dough with bread flour and it was not possible to ball. It looks like way more than 85 percent hydration. I used a scale so any tips would be helpful
Hi David!
Bummer to hear this but do know that it is a very wet dough and it should be just fine. Do you live in a humid environment? I would continue on with the recipe.
Yes it’s humid and right now raining so very much so
OK, that will definitely affect the dough. Holding back some of the water next time around will help, too.
This is the recipe my family requests whenever I offer to bring a dish to a party. From the first time I made this recipe until now everyone has loved it. Having said that is there a way to scale this up for an 18×26 sheet pan? I feel kind of guilty when I make this at large family gatherings and not everyone gets a chance to have some because it gets eaten so quickly. Thank you for all your great recipes!
Hi! I think it would be as simple as doubling the recipe. So glad to hear this one has been a success 🙂
Thank you! I will give it a try and hopefully post a successful results!
Hi Ali,
Do you have a recommendation for pizza cutter for Sicilian style pizzas?
Looking forward to your book release. 😊
Bruce, I don’t! I used to use a large serrated knife, but now I use my pizza rocker, which works pretty well:
Thank you for the information.
This was fantastic! And so so so easy. I’ve actually been making this type of pizza for awhile but I’ve just always called it “focaccia pizza”. Haha! I didn’t know there was an official name to it, Sicilian. I make mine with crumbled sausage. Yum
Great to hear, Renee! Sausage is delicious. Thanks for writing 🙂
Hi Ali,
How fast should the dough double in the fridge? Mine has doubled+ in about four hours. Will it be overproofed when I par bake it Saturday (~48 hours) ? Do I need to remake dough using cool vs lukewarm water?
Thanks in advance for your help.
Bruce! So sorry just seeing this. Next time I would deflate it just so that it doesn’t bust open your lid. But it should be fine regardless! No need to re-make. Hope it turns out well!
Hi Ali,
I used your sauce and the pizza was truly incredible. We made it to take to our neighbors for a night of playing cards. They kept going back for more and raved about it and wanted to know if I would show them how to make it.
Another “five star classic” from your collection.
Oh this is so nice to hear, Bruce! Thanks so much for reporting back 🙂 Have a great rest of your weekend.
Hi Ali! So glad to have found you and I can’t wait to try. I don’t own a steel pan nor a pizza stone, can I put the sheet pan directly on the oven rack? If so, which rack? Thank you!!!
Yes! Middle rack. The sheet pan you have will work great 🙂
Hello Ali, I am also Alexandra and Ali for short and I food blogged under A Moderate Life in the early 2000’s. I love your website but I especially love this Pizza recipe! I’ve made it as Foccocia as well and it is simply a heavenly pillow of divine! I used a bakers ratio to increase the recipe by half because my parents want a small pizza as well after my daughter bragged to them that Mommy makes the best pizza! So glad to have found you and your amazing collection of delicious recipes with very exacting instructions so even a beginner can have success!
Awww, it’s so nice to read all of this, Ali! Thanks so much for writing and sharing it. Love that your daughter approves and brags about your work. Thank you for the kind words 💕💕💕
Just to follow up. My parents just called me to say that this was the BEST pizza they EVER had. So thanks to you for the recipe!!! It will be in the rotation regularly. Can’t wait to try my hand at your Calzones for next Friday.
Oh yay!! So nice to read this. I have to confess I have not made those calzones in ages, and I have become a much more precise recipe writer in recent years, so I hope the recipe is fine… not to deter you!! Thanks for reporting back 🙂 🙂 : )
Hi Ali, you mention both the Lloyd pan and the WinCo pan. If you had to choose which one would pick? I don’t have room for both.
Lloyd! It’s a beautiful pan.
So so good! I did 60% for the dough as I was using a 9×13 (winco dark pan), used a mix of bread and 00 flour, about 70/30. I like it extra saucy so did about 18 oz tomato sauce, added ricotta dollops throughout (mixed with pinch of salt, red pepper flakes, and oregano) and loaded on the mozzarella and pepperoni. I don’t know where I put my pizza stone so for the first round, I just put the pan on the oven floor, it’s a double oven with the broiler below. And then finished on the lowest rack. Crunchy brown bottom and just perfectly cooked. I actually tried another recipe before this one that I found scrolling insta and that one disappointed but I knew to come here for the real deal. Thanks for another win and I plan on making this regularly. It is SO good.
Oh yay! So nice to read all of this, Tina! Thanks so much for writing and sharing these notes — so helpful for others. I find the crust of this recipe to be such a treat — it’s light and airy, but crisp on the bottom and sturdy enough to hold lots of toppings. It’s all about that parbake!!
Hi Ali! I don’t have a dark steel pan but do have your recommended USA pan for your regular focaccia, plus plain old baking sheets. Which do you think would work best in a pinch? Thank you!
Sorry just seeing this! I would use a plain old baking sheet for this one — it’s a better size than the USA Pan.
Wonderful pizza—thank you!!
We made a vegan version and it worked great. 👍🏼👍🏼
Wondering: Do you leave your baking steel in the oven or haul it in and out?
Thinking of getting one but understand they’re quite heavy!
❤️
Great to hear, Lucy! Yes, I almost always leave it in my oven because it is so heavy … I have two ovens so I do always have one oven that is free of it. I know this is a luxory… I don’t think you’ll regret having a Steel — it truly is game changing for round Neapolitan-style and thin-crust pizzas — but I do understand weighing (no pun intended!) the pros and cons.
Hi! I’m a huge fan of your peasant bread and make it all the time! I use a scale to weigh everything and it’s perfect EVERY time! And, I LOVE your Bread, Toast Crumbs cookbook! I want to make a deep dish pizza without investing in a new pan (for now at least). If using a Pyrex 9×13 dish, which scaled version of this recipe do you recommend I use? TYIA!
So nice to read all of this, Trina 🙂 Thank you for your kind words. I would use the 277 gram flour version (in the notes below the recipe). Good luck!
What is the difference between the Detroit pizza and the Sicilian pizza?
Detroit is a very specific style and has a fair amount of rule: upside-down layering of toppings (toppings, cheese, sauce last); specific pan; cheese frico crust; Wisconsin Brick cheese; etc. You can read more about it here: How to Make Homemade Detroit-Style Pizza
Sicilian style is basically just a larger pan pizza but it doesn’t have the cheese frico crust and there aren’t really any rules when it comes to topping it.
How much fresh yeast would you use for that recipe?
I feel like using fresh yeast gives the dough a better taste so I was wondering about using it here.
Yes, go for it!
I went with 21gr of fresh yeast, activated in 450gr of warm water with added sugar and it went really well 🙌
Great! Sounds wonderful 🙂
Looks fantastic and mighty authentic. Many recipes for NY Style pizza incorrectly omit the long cold rise of the dough, those folks might as well give up and use graham crackers for crust. Some of the best places in Brooklyn let the dough rise with a very light coating of sauce on them and then par-bake it. Your recipe is fantastic.
Thanks so much, Vernazio 🙂
Alex, rec’d your book today PIZZA NIGHT and spent the rest of the day enjoying myself reading through it all. What a wonderful book and love how it is arranged. The salads are so enticing, for us, just as enticing as the pizza!! One bonus for me that I hadn’t considered was I was able to discard so many of the printed pizza recipes and techniques I had printed from your site. Now, I have all that, along with the gorgeous photos in one spot! Thank you for this very insightful and happy book.
Awww, Denise! It’s so wonderful to read all of this! Thank you for your kind words. I’m glad all the info is in one spot! I so appreciate your support and enthusiasm over the years!
Can I still make this piiza without a baking steel or pizza stone?
Yes!
Hi Ali,
I totally love the Neapolitan dough recipe from your new book cooked in my new outdoor pizza oven, OMG good!!!
I just made a new batch of this dough and its handling well. I decided to mix a batch of the pan dough recipe. Way wet,not possible to ball up. I would like to know how to proceed when this happens? I left it to rise the 6+ hours. Put a crazy amount of flour on my board hoping I would be able to incorporate enough flour to ball it. No way, so I just put into my proofing container and into the frig for the 2-3 days. I will attempt to parbake on a sheetpan. I did weigh ingredients…!?!?
Thank you so much 💓
Hi Robin! So nice to read about the Neapolitan dough! Bummer to hear about the stickiness with the pan pizza dough, though I think it might be OK — it is definitely a wet, sticky dough (88% hydration!). Questions: what type of flour are you using? And was it humid when you mixed the dough?
Depending on how the Sicilian pizza turns out, next time around you may need to add less water from the start. You were right to add more flour this time around, though it’s OK if it’s not forming a right ball when you mix the dough — a loose ball is fine… it shouldn’t look like batter, but again, a loose ball is fine.
This is a question for the recipes in your book. To make a smaller Sicilian pizza, could you split the dough and use a 12×12 pan? Or would another size work better? I do have heavy dark 9×9 cake pans, too.
Thanks for all the wonderful recipes, advice, and tips!
Hi Marie and apologies for the delay here! I think the 12×12 pan for half the amount of dough will make for a much thinner pizza, which is fine, but just something to keep in mind. I think the 9×9-pan is probably the better size for half the dough. Thank you for your kind words!
Thanks! I will try that and let you know how it works out.
This recipe was AMAZING. Perfect, pillowy, crunchy on the edges, and made for piling on toppings. Used 1/2 and 1/2 regular flour and pizza flour and baked in a cast iron skillet. Will most def be making again and again.
Great to hear! Thanks so much for writing 🙂
I have been looking and looking for this pizza. In Lusk Wyoming there is a pizza place that makes sicilian pizza, it is two hours away. I have been making pizza, trying this, trying that to make that pizza. THIS IS IT! We love this. I have the pan, but mine is 14 x 14. I calculated the area of each pan and went with the closest recipe. Worked perfectly. Thank you so much.
Wonderful to hear, Monica! Thanks so much for writing and sharing your notes. I love this one, too 🙂
Amazing! My husband is Sicilian from Long Island and he challenged me to make an authentic Sicilian crust. I researched and came across your five star recipe. So much great information included. I also purchased a Lloyd “grandma” pan. So so glad I did. He was beyond amazed over the final product. I’m making it again today with your tomato sauce recipe. It’s not hard, follow the recipe, use a scale to measure everything and be patient! So happy with the results! Thank you!
Hooray! So great to read all of this, Becky. The Lloyd pan is such a beauty. So great to hear you added one to your arsenal — I encourage everyone I know who is interested in pan pizza to get one. Thanks for writing and sharing your notes/thoughts 🙂
Hi Ali, it’s Ali! LOL I’ve been making this pizza almost weekly and the family adores it. This week my extra fridge died on me and so I cannot do the overnight ferment. Will be getting a used on shortly but wanted to know if I could adjust this recipe to make without the overnight ferment. If you have another suggestion for a sheet pizza without the long slow rise, please let me know. Big hugs! Alex
Hi! And bummer to hear about the fridge… there’s always something!
You could do this all without refrigeration. Mix the dough at night using 1/2 teaspoon instant yeast and cold water, and let it rise overnight. In the morning, ball it up, and transfer it to your prepared pan. Let it rise 3-4 hours; then dimple and parbake.
Good things happen with a cold proof for a few days, certainly, but it will still be delicious with the slightly abridged timeline. Good luck!
Thank you! Will try it that way until I get a new extra fridge. I agree miracles happen with the long ferment! Have a great day and thanks for all the yummy recipes!
Good luck!
I love this recipe. I’ve been making it at my firehouse and at hime. Two quick questions.
I have a pizza stone but it is smaller than the pans I use. Since it doesn’t cover the entire bottom of the pan would you still use it? I’m concerned about uneven cooking. I have my cooking times pretty dialed in without that pizza stone. What could I expect when adding the stone, quicker or longer cook times? I have a pizza party coming up and don’t want to be experiment and burn the bottom.
How do you suggest preparing this ahead of time for a party. Par bake, cool, toppings then in fridge until ready to bake? Will to this change the cooking times as well for the second bake. Any tips are greatly appreciate!
I share your website and this recipe with all new sourdough bakers.
So nice to read all of this Preston! Thank you for your kind words.
Regarding your first questions, if you are having success with your timing, there is no need to use the stone. I do think a stone promotes an even crispier bottom without burning, and I wouldn’t worry about it being smaller than the pan — often it’s the middle portion of the undercarriage (as opposed to the edges) that doesn’t get quite as crisp.
How many hours do you think you’d have to store the parbaked/assembled pizzas in the fridge? I’ve left the parbaked/topped pizzas at room temperature for 3-4 hours without any issues — my kitchen is on the cool side.
Regardless, I don’t think storing in the fridge will affect the bake time of the final bake — possibly you might need to add a minute or two, but just rely on visual cues, because you might not need to add any more time.