 →
→ Homemade Sicilian-Style Pizza
This post may contain affiliate links. Please read my disclosure policy.
If you can make focaccia — and you know you can! — you can make excellent Sicilian-style pizza at home. It’s shockingly easy. Read on to learn the game-changing secret that allows the focaccia-like crust to stabilize and ensures the toppings do not overcook. 🍕🍕🍕

While the definition of Sicilian-style pizza as we know it today is debatable, the indisputable original Sicilian pizza is something called sfincione, a focaccia-like dough topped with onions, bread crumbs, and caciocavallo cheese. In Sicily, it’s traditionally served on New Year’s Eve.
If you go to a Sicilian-style pizzeria today, you’ll find slices that resemble sfincione with their focaccia-like foundation, but the toppings will vary as much as they would in any slice shop.
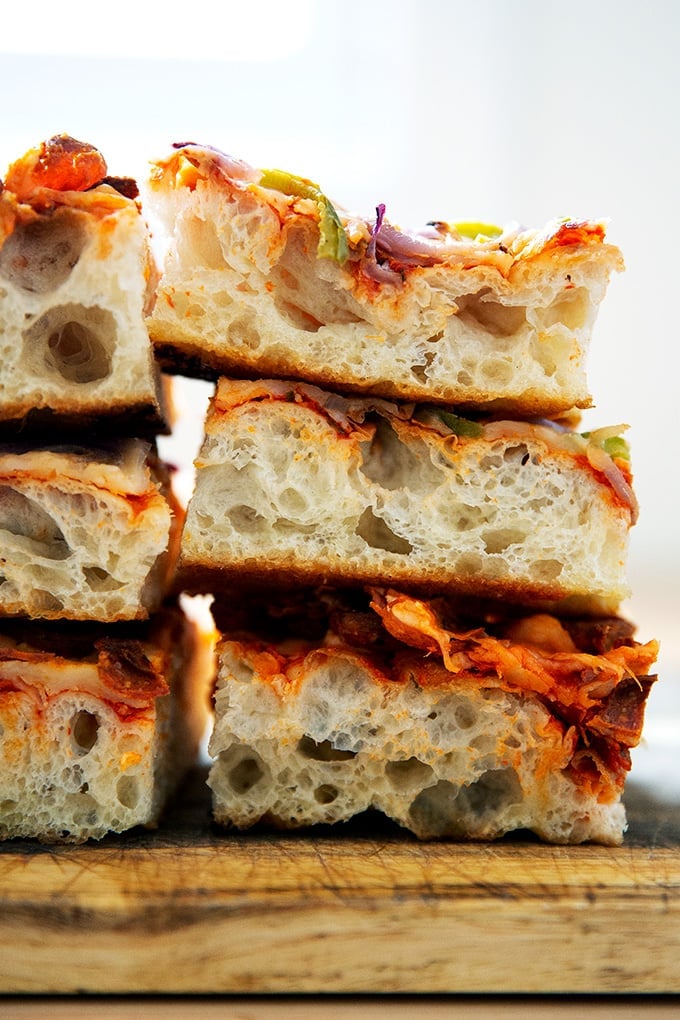
Unlike other styles of pan pizzas — I’m looking at you, Detroit — Sicilian-style pizza is incredibly easy to make at home: if you can make focaccia, either yeasted or sourdough, you can make excellent Sicilian-style pizza at home.
Find step-by-step instructions below but before you proceed, read these game-changing tips for success:
4 Tips for Sicilian-Style Pizza Success
- Butter your baking pan before adding the olive oil. With some pans, using butter in addition to olive oil is imperative to prevent sticking. Moreover, butter adds flavor and promotes browning.
- Take care with your final dimpling. Dimple throughout the center of the dough not the perimeter to ensure an even parbake. I learned this from Peter Reinhart’s Perfect Pan Pizza.
- Parbake your crust: This is game-changing! Parbaking allows the focaccia-like crust to stabilize, which will ensure the crust does not taste doughy or gummy. Furthermore, it will prevent the toppings from overcooking.
- Invest in a Lloyd pan: Lloyd pans conduct heat better than standard half sheet pans and, as a result, produce a superior, crisper crust. I love the 16×12-inch Lloyd “Grandma” pan.
How to make Sicilian Pizza, Step by Step
Gather your ingredients: bread flour, salt, instant yeast (SAF is my preference), and lukewarm water:
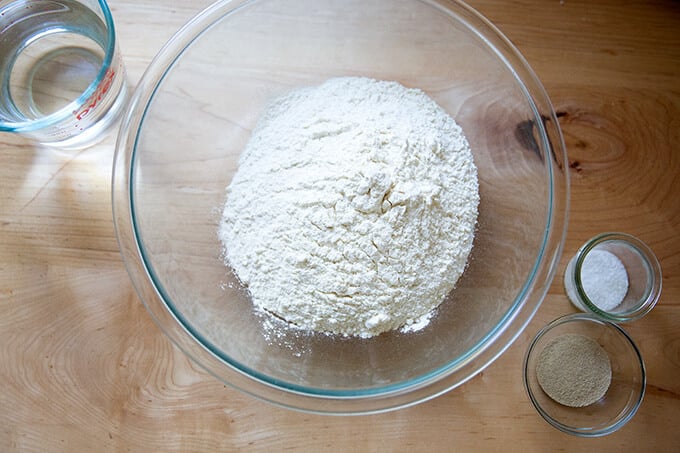
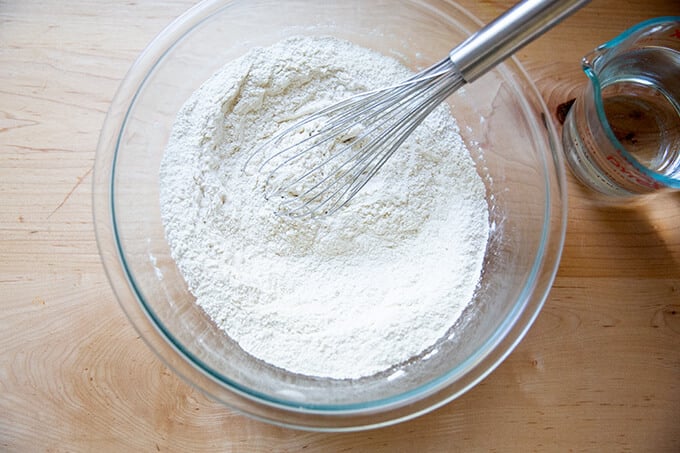
Whisk together the flour, salt, and yeast first:
Add the water:
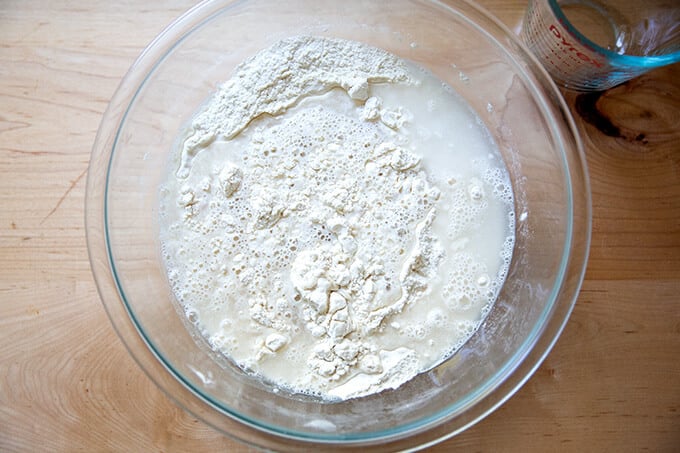
Use a spatula to stir the two together.
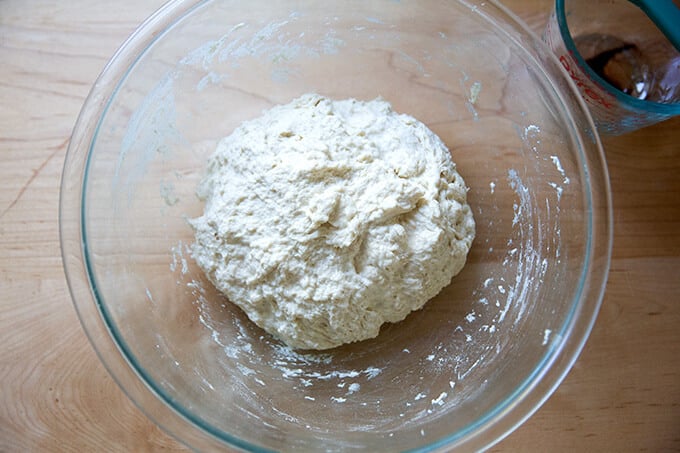
Slick the dough with olive oil:
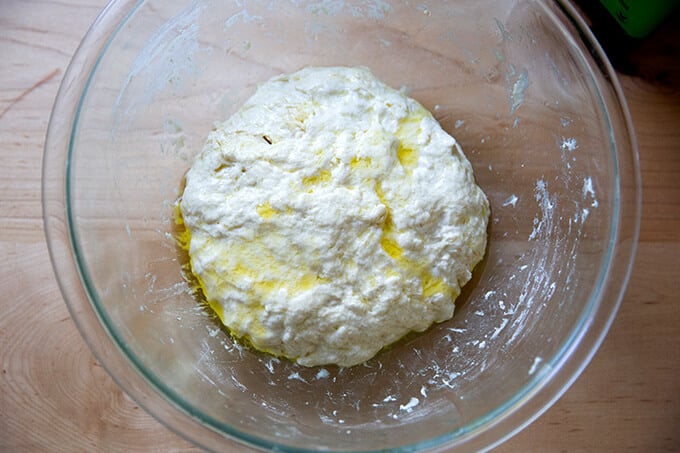
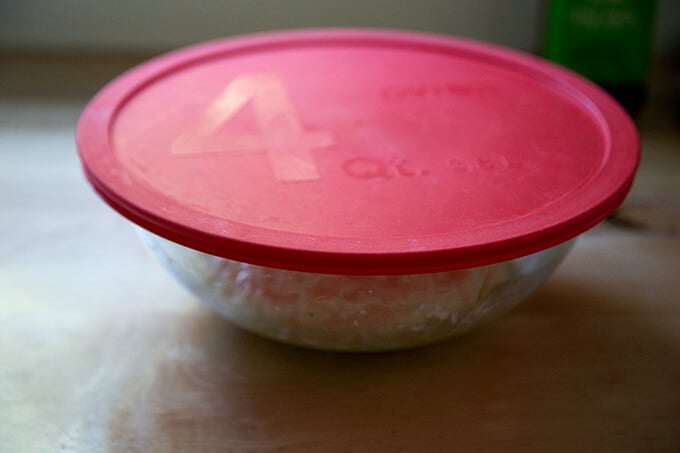
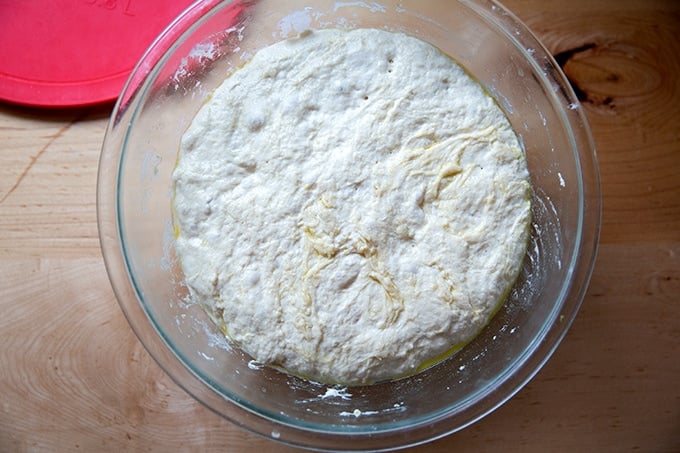
Then cover the bowl (with a lid or plastic wrap or something to make it airtight). Stick the bowl in the fridge immediately; leave it there to rise for 18 hours or longer—two to three days will give you an even lighter crust.
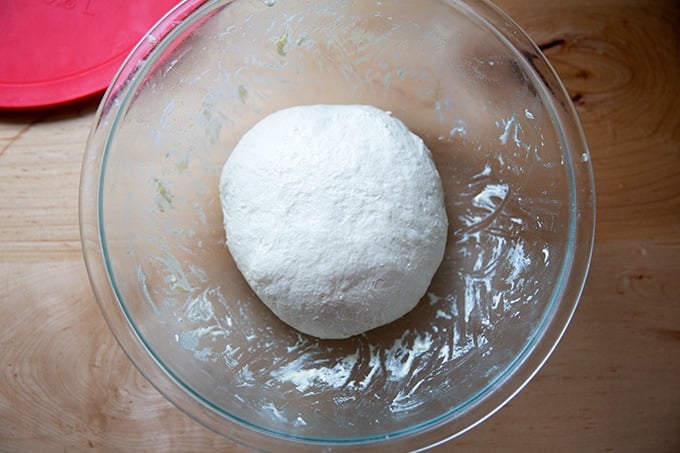
Uncover the bowl, then…
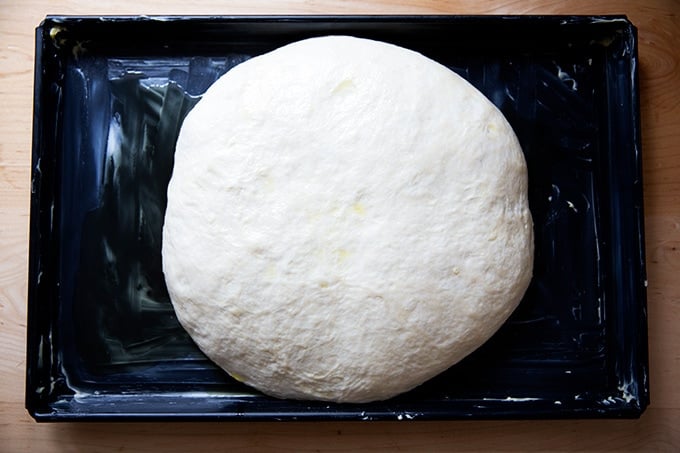
… deflate the dough. Using oiled hands grab a portion of the dough and stretch it up and toward the center. Turn the bowl slightly and repeat until you have created a rough ball.
Prepare your pan for baking with both butter and olive oil. I love this Lloyd Sicilian-Style Pizza Pan.
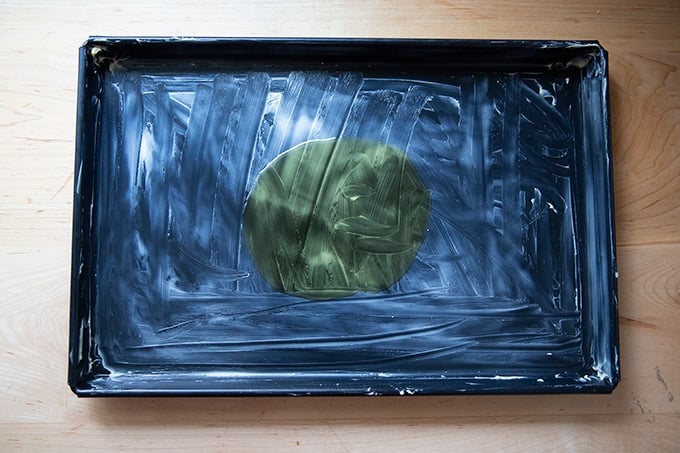
Transfer your dough ball to the pool of olive oil and turn it to coat.
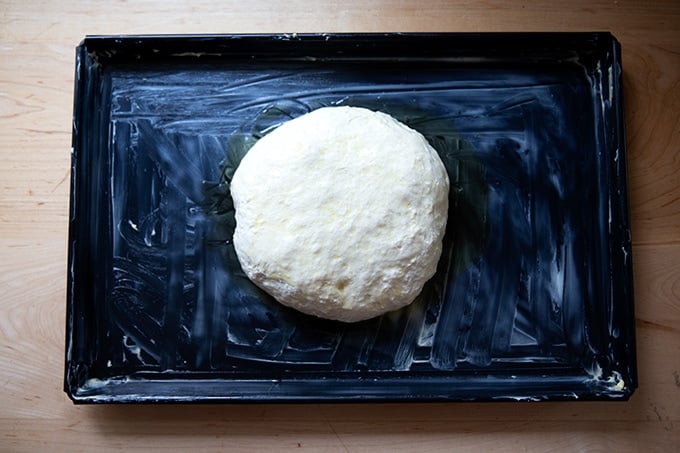
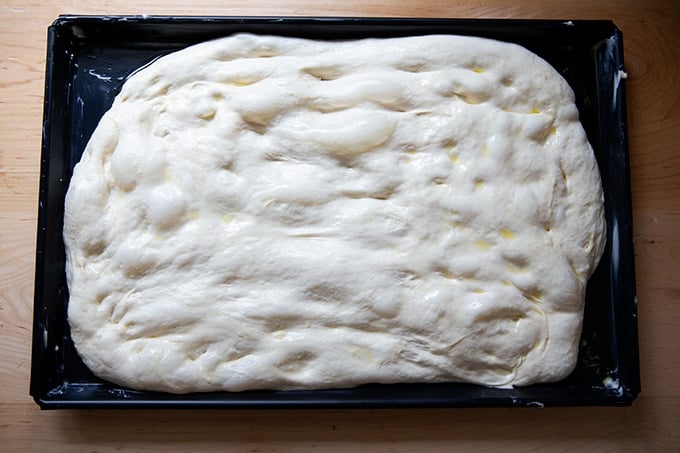
Let sit for 2.5 to 3 hours or until it has poofed considerably.
Dimple and stretch the dough to fit the pan. As soon as the dough resists, stop and let it rest for another 30 minutes.
Then stretch it again to fit the pan. At this point, the dough can hang out in the pan for several hours. Cover it with plastic wrap to ensure the dough does not dry out if you plan on doing so. Dimple one last time throughout the center of the dough before transferring it to the oven to parbake it.
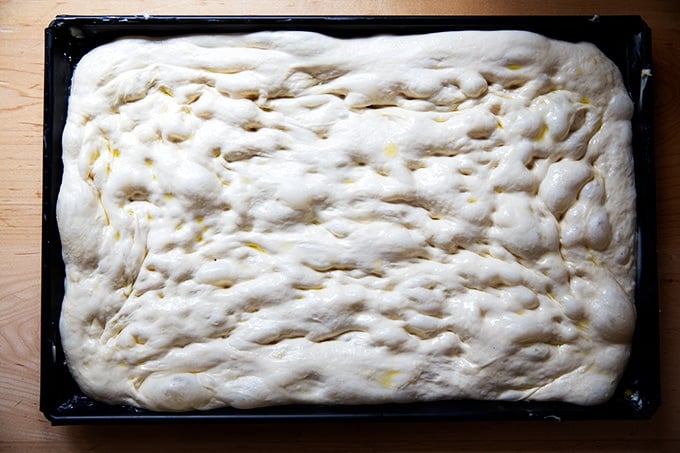
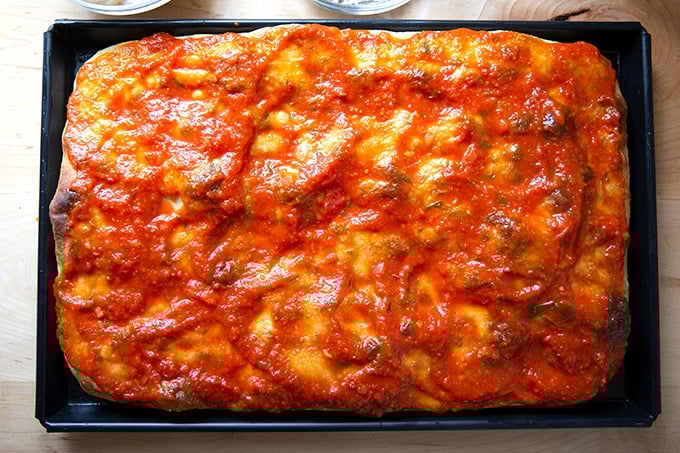
Parbake the dough for 11-12 minutes at 500ºF on a preheated Baking steel or pizza stone.
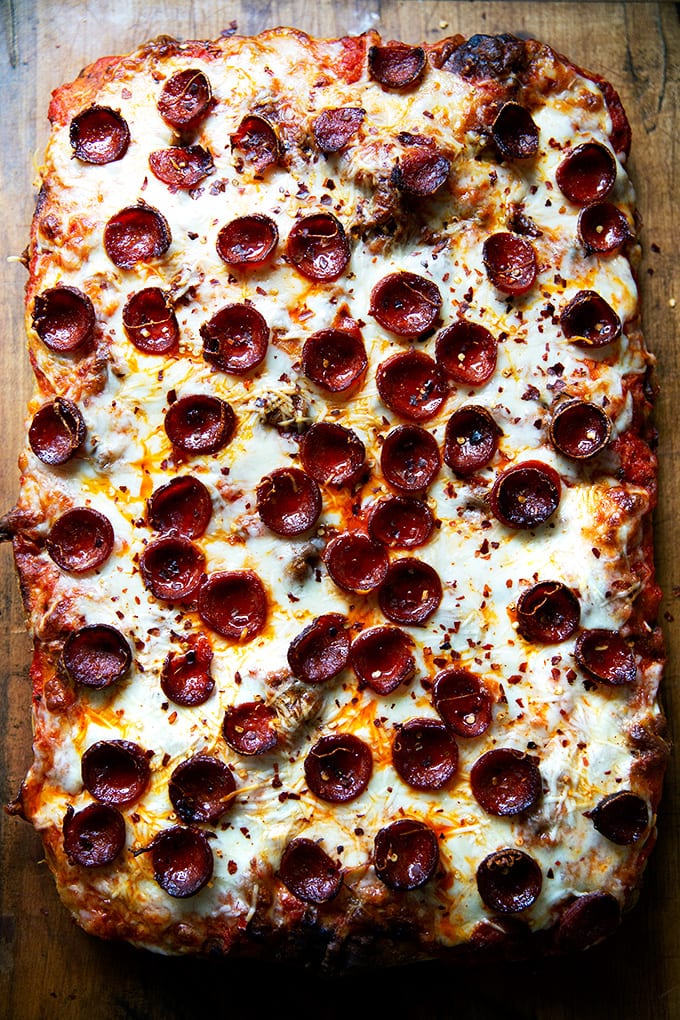
Then, top as you wish. I’m using my go-to homemade tomato sauce here.
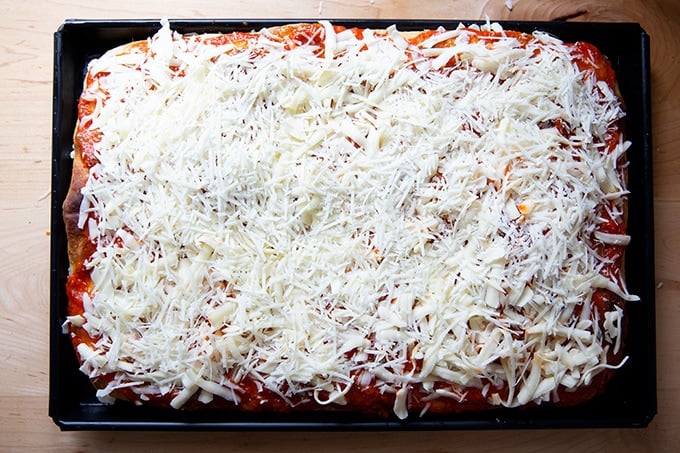
Top with cheese:
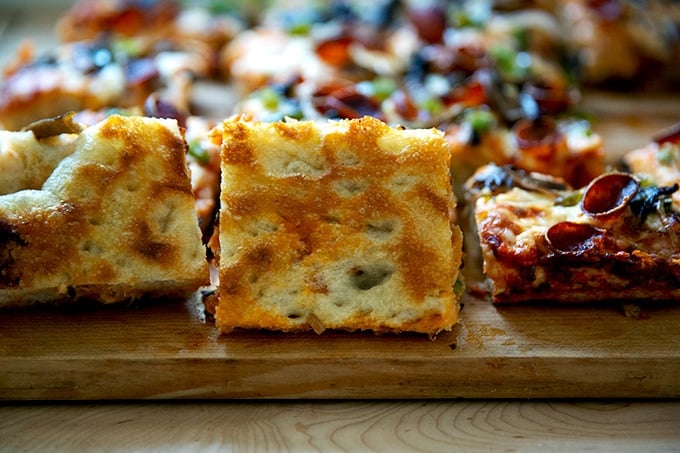
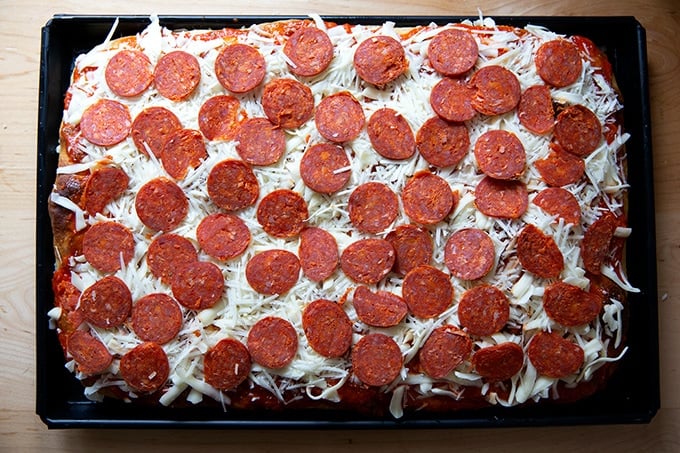
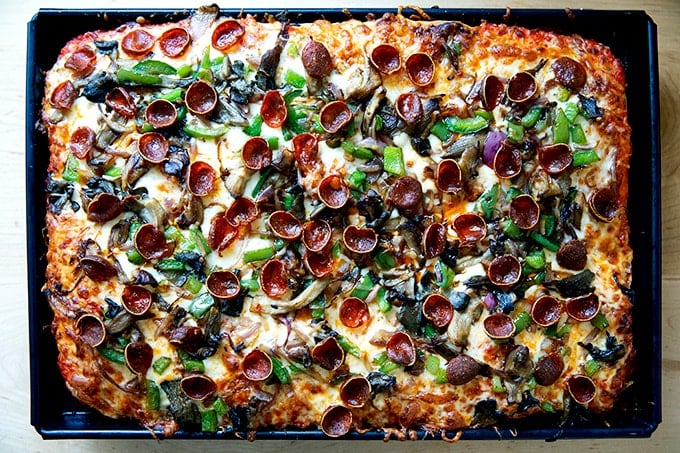
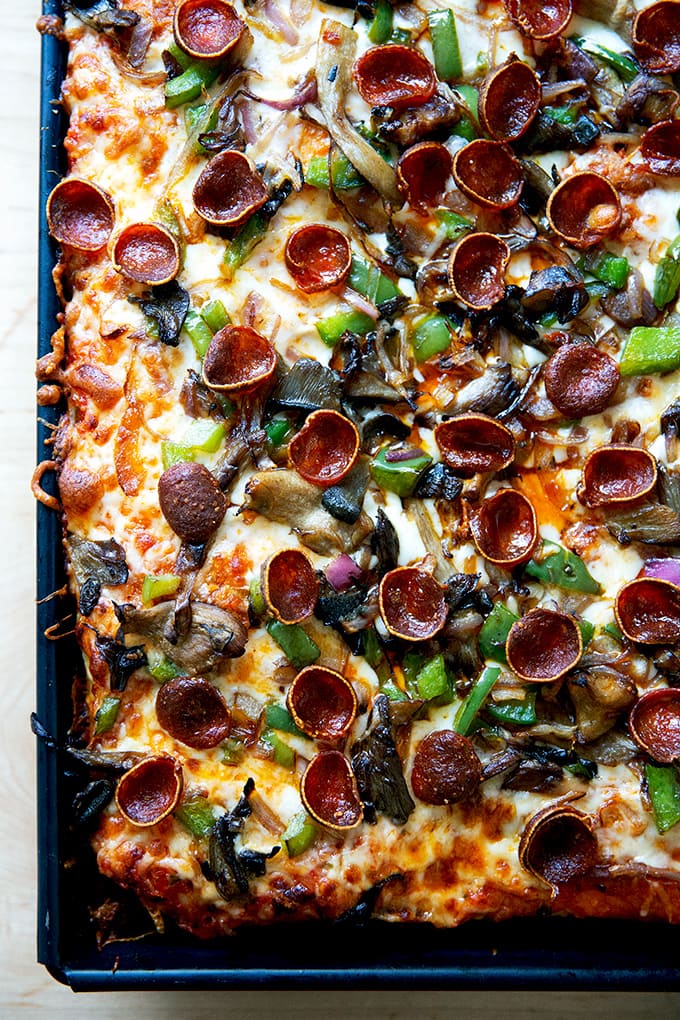
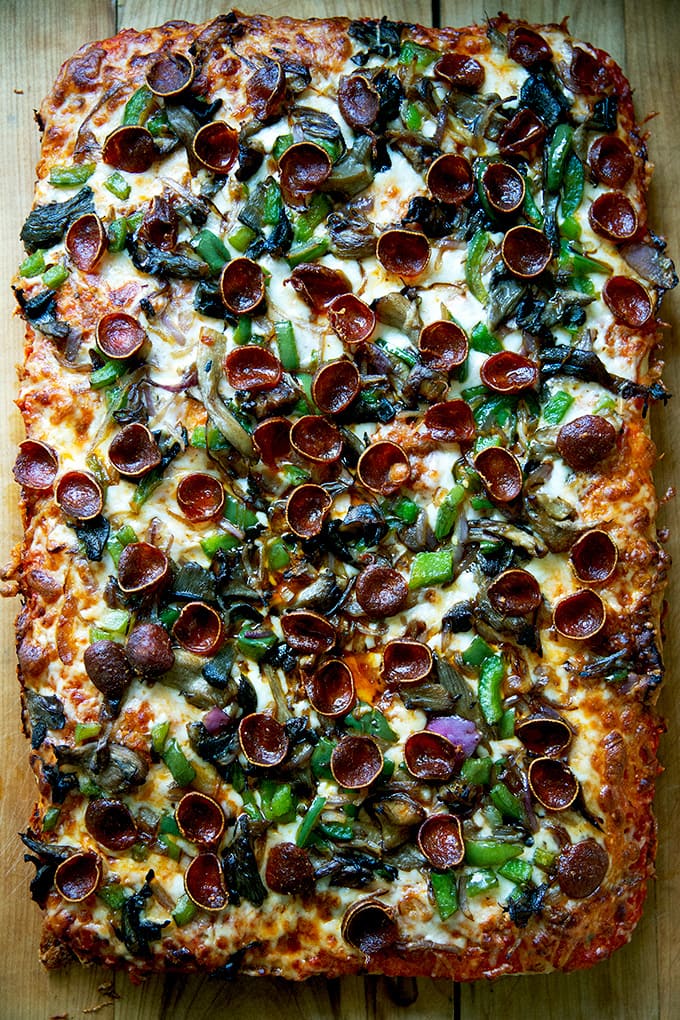
Then add pepperoni or sautéed vegetables or sausage or whatever you wish:
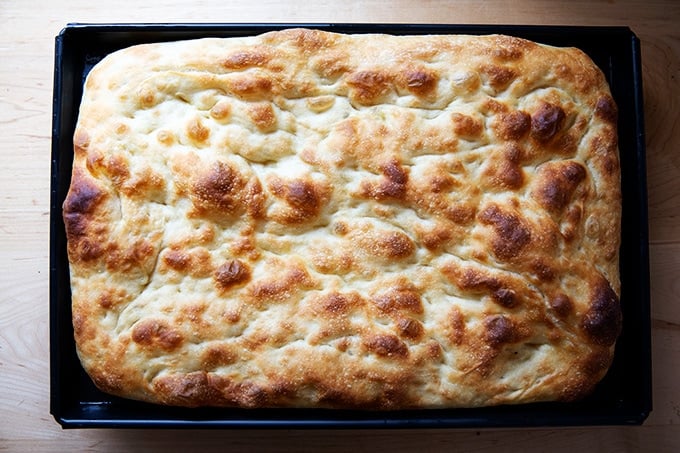
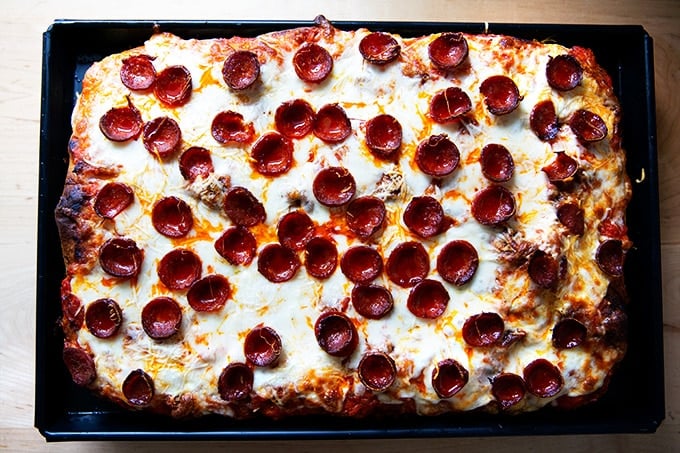
Transfer to the oven for another 10 minutes. Remove from oven and let rest in the pan for another 5 minutes before transferring the pizza to a board to rest.
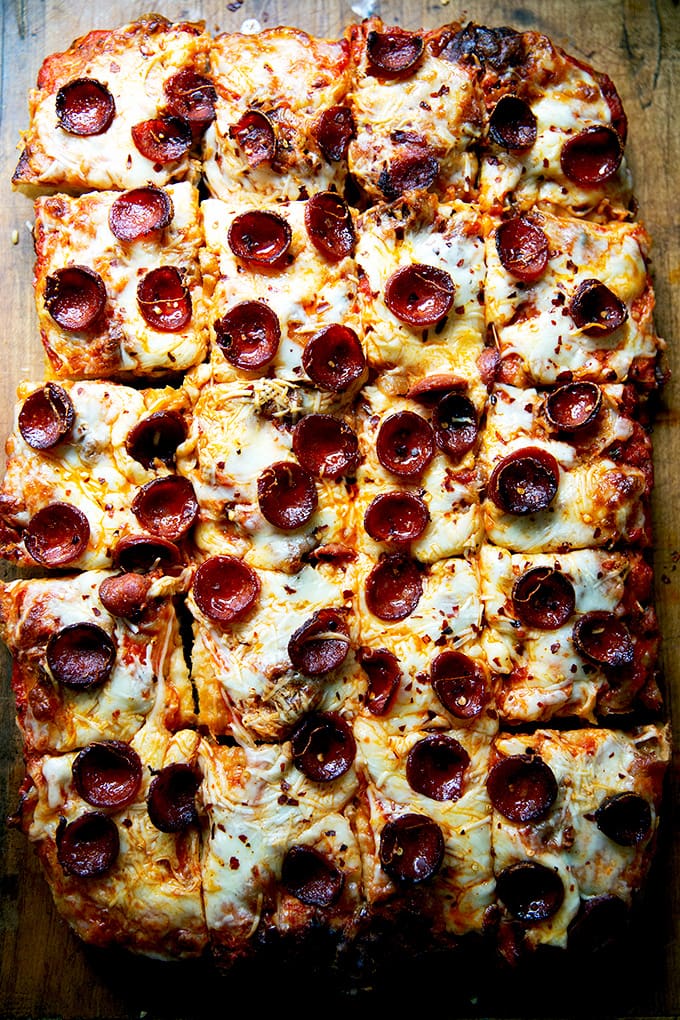
Shower with pepper flakes, if you wish.
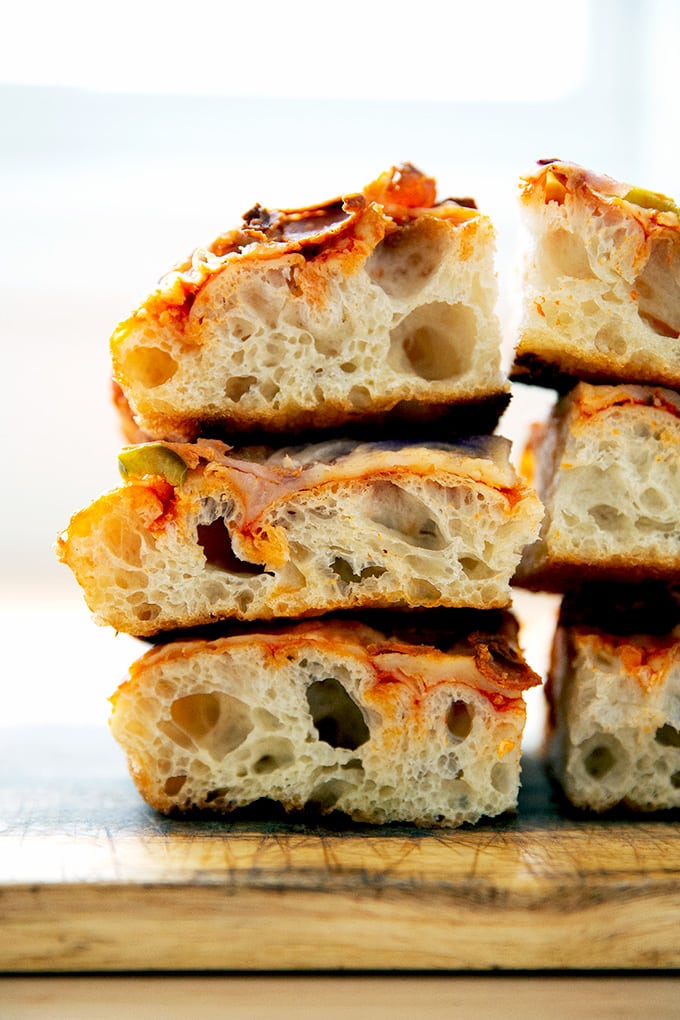
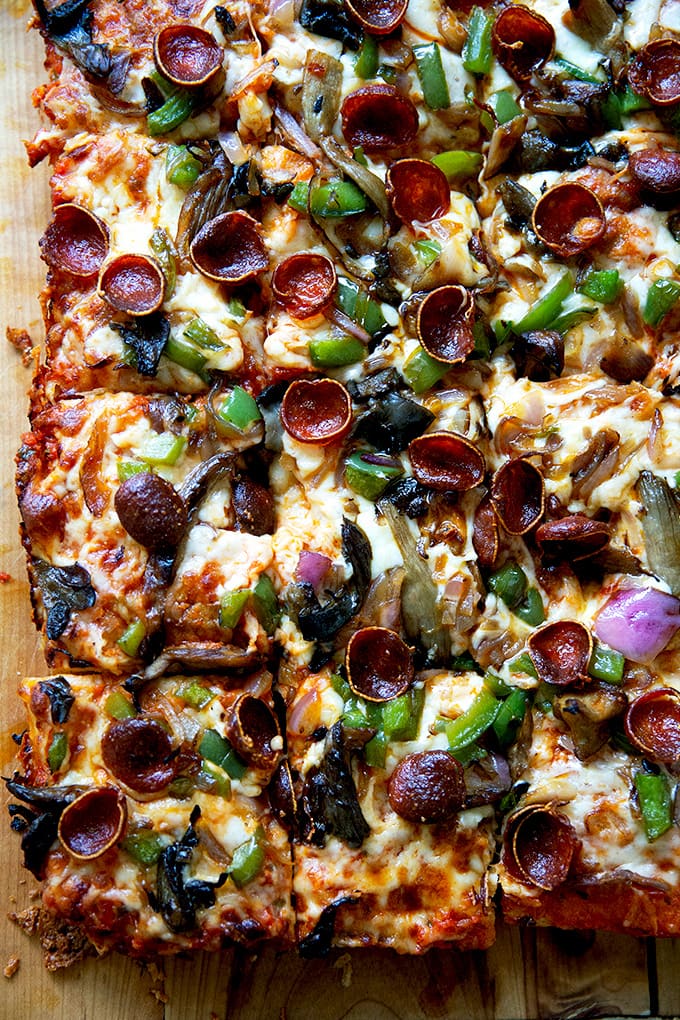
Cut into squares and serve.
Here’s the sautéed vegetable + pepperoni one:

Homemade Sicilian-Style Pizza
- Total Time: 24 hours 20 minutes
- Yield: Serves 10–12 1x
Description
If you can make focaccia — and you know you can! — you can make excellent Sicilian-style pizza at home. It’s shockingly easy. The key to success is to parbake the crust. Below you will find a yeasted dough recipe but if would like to make a sourdough version, follow the recipe for this simple sourdough focaccia bread recipe through step 5; then proceed with the recipe.
**Attention Pizza Fans**: My pizza cookbook, Pizza Night, is here!
Notes:
- As always, for best results, use a digital scale to measure the flour and water.
- As with the focaccia recipe, a long ferment is best. I often let the dough sit in the fridge for 2 days before proceeding.
- You’ll need a 12″ x 18″ sheet pan for this recipe.
- Lloyd makes a Sicilian-style pizza pan, which I love — it’s 12×16 inches, but it works great here.
- If you have a Lloyd Detroit-style pan and would prefer to use that here, see the notes below the recipe for scaling the dough recipe to fit that size pan.
- I love SAF instant yeast. I buy it in bulk, transfer it to a quart storage container, and store it in my fridge for months. You can store it in the freezer also.
- If you are using active-dry yeast, simply sprinkle the yeast over the lukewarm water and let it stand for 15 minutes or until it gets foamy; then proceed with the recipe.
- Flour: You can use all-purpose or bread flour here with great results. If you live in a humid environment, I would suggest using bread flour. If you are in Canada or the UK, also consider using bread flour or consider holding back some of the water. Reference the video for how the texture of the bread should look; then add water back as needed.
- Cheese: I know the idea of using grated cheese for some of you may be off-putting, but there are a few brands I like, and it saves some time using them: Trader Joe’s sells a Quattro Formaggi blend that’s great, and Tillamook sells a large-grate mozzarella that I also really love.
Ingredients
For the dough:
- 4 cups (512 g) bread flour, see notes above
- 2 teaspoons (12 g) kosher salt
- 2 teaspoons (8 g) instant yeast, see notes above if using active dry
- 2 cups (455 g) lukewarm water, made by combining 1/2 cup boiling water with 1 1/2 cups cold water
- olive oil
For the pizza:
- butter
- 2 tablespoons olive oil
- 12 ounces of grated cheese, such as whole milk mozzarella or a mix of Monterey Jack, Cheddar, and Mozzarella, see notes above
- 1 cup (+ a few spoonfuls) tomato sauce, such as this one or this one, or your favorite jarred sauce
For a veggie pizza:
- 3 tablespoons olive oil, divided
- 8 ounces mushrooms, sliced
- 1 green (or other) bell pepper, diced
- 1/2 red onion, thinly sliced
For a pepperoni pizza:
- 6 ounces pepperoni, I love Vermont Smoke & Cure, sliced as thinly as possible — if you want the pizza to be really loaded with pepperoni, you’ll need more like 12 ounces
- crushed red pepper flakes
For a pickled jalapeño & pepperoni pizza:
- 1 cup pickled jalapeños
- 6 ounces pepperoni, thinly sliced
- hot honey, optional
Instructions
To make the dough:
- Make the dough: In a large bowl, whisk together the flour, salt, and instant yeast. Add the water. Using a rubber spatula, mix until the liquid is absorbed and the ingredients form a sticky dough ball. Rub the surface of the dough lightly with olive oil. If your bowl has a lid, cover the bowl. Alternatively, transfer the dough to a vessel with a lid or cover the bowl tightly with plastic wrap to ensure the dough doesn’t dry out in the fridge.
- Transfer dough to the fridge for at least 18 hours but ideally longer: 24 to 48 hours. Longer is fine, too: I’ve kept the dough in the fridge for 3 days before proceeding.
Prepare the pan for baking:
- Grease a 12″ x 18″ sheet pan with butter. Pour 2 tablespoons of olive oil into the center of the pan. (Note: This greasing step may seem excessive, but with some pans, it is imperative to do so to prevent sticking. Moreover, it adds flavor and helps brown the bottom crust perfectly.)
Prepare the pizza for baking:
- Remove the dough from the fridge and use lightly oiled hands to release it from the sides of the bowl. Then, again with oiled hands, grab an edge of dough and pull up and to the center. Turn the bowl slightly and repeat until you’ve shaped the dough into a rough ball.
- Place the dough ball in the pan and turn to coat. (Note: You do not need to cover the dough here. The coating of oil should be sufficient to prevent the dough from drying out.) Let rest for 3 hours. With lightly oiled hands, stretch the dough to fit the pan — tent your hands, and use your fingers to dimple and stretch. You will likely not be able to get the dough to stretch all the way to the edges. When the dough resists, let it rest again for 30 minutes; then stretch it again using the same technique.
- At this point, the dough can hang out in the pan for a couple of hours (if your kitchen is on the cool side). I’ve baked it 30 minutes after this point, and I’ve baked it two hours later. If the dough is going to hang out for a while, cover it with a sheet of plastic wrap.
Bake and Top the Pizza:
- If you have a Baking Steel or pizza stone, place it on a rack in the middle or lower third of your oven, and heat your oven to 500ºF.
- Using oiled hand, dimple the dough one last time with the exception of the perimeter — this is important. It will help the dough bake more evenly.
- Transfer pan to the oven and place on heated Baking Steel or pizza stone for about 10 to 11 minutes or until evenly golden.
- Remove pan from oven and lower the oven to 475ºF. (Note: my oven doesn’t change temperature so quickly, so I actually turn the oven off during this period. Just before I return the pan to the oven, I turn the oven back on to 475ºF. Also: You can do this parbake hours ahead of time or even a day ahead of time.)
- Spread the sauce evenly over the dough. Top with the grated cheese. Then top as you wish:
- For the veggie pizza: In a large skillet over high heat, heat 2 tablespoons of the olive oil. When it shimmers, add the mushrooms and let cook undisturbed for about a minute. Season with salt; then stir. Cook for 3 to 5 minutes or until the mushrooms are beginning to brown. Transfer to a bowl. Add the remaining tablespoon of oil to the skillet; then add the peppers and mushrooms. Cook for 1 to 3 minutes, or until slightly softened. Season with salt; then transfer to the bowl with the mushrooms. Toss to combine. Taste and adjust with salt as needed. Spread this mixture over the cheese. Add some sliced pepperoni if you wish.
- For the pepperoni pizza: Arrange the sliced pepperoni over the cheese.
- For the pepperoni + pickled jalapeño pizza: Arrange the sliced pepperoni and pickled jalapeños over the cheese.
- Transfer pan to the oven and bake for 10 to 12 minutes or until the cheese is melted and just beginning to brown in spots.
- Remove the pan from the oven and let the pizza rest for 5 minutes in the pan. If you are making a pepperoni pizza and are using the crushed red pepper flakes, sprinkle some of the pepper flakes over the top. If you are using the hot honey for the pickled jalapeño pizza, drizzle some over the top.
- Run a knife or spatula around the pan’s edges. Then, carefully remove the entire pizza from the pan, transferring it to a cutting board. I like to use a serrated knife to cut this pizza. You can cut the pizza into however many pieces you wish. I’ve been doing 20 squares.
Notes
To Scale the Dough for a Lloyd Detroit-Style Pan, Use These Proportions (and please use a scale!):
- 277 g flour (2 cups + 2 tablespoons)
- 8 g salt (1.5 teaspoons)
- 6 g yeast (1.5 teaspoons)
- 245 g water (1 cup + 1 tablespoon)
- Note: My calculations lead me to think that a Detroit-style pan needs about 532 grams of dough. So another way to do it would be to make the recipe as written, use 532 grams of it for the Detroit-Style pan and use the remainder for something else — pizza, mini rolls, etc.
To Scale the Dough for a Lloyd Sicilian-Style Pan, Use These Proportions (and please use a scale!):
- 488 g (3 3/4 cups) flour
- 11 g (2 teaspoons) salt
- 8 g (2 teaspoons) yeast
- 432 g (1.75 cups + 2 tablespoons) water
- Prep Time: 24 hours
- Cook Time: 20 minutes
- Category: Pizza
- Method: Oven
- Cuisine: American, Sicilian
This post may contain affiliate links. Please read my disclosure policy.


238 Comments on “Homemade Sicilian-Style Pizza”
Thanks for this new recipe – I can’t wait to try it! Quick pan questions – is there anything else you think the pan could be used for? Maybe focaccia? Have you tried the Lloyds pan for this recipe? I love their Detroit pizza pan and am wondering if the higher price (vs the one you linked) is with it. Based on product dimensions, it looks like Lloyds’ grandma pizza pan is equivalent to the linked option.
Hi! Great question. Yes, I think you could use the pan for anything from focaccia to roasted vegetables. I have this 16×12 Lloyd Grandma pan and while I love the pan, it’s a little smaller than the one I link to in this post, and the smaller size is a bit too small for the amount of dough here. I’ve been meaning to scale this recipe and add the measurements to the notes for anyone who has that Lloyd pan, because it will be too thick if you try to use it in this recipe. Hope that helps!
It would be really helpful to have some guidance on scaling the recipe for a different pan size, as I got the 10″x14″ Lloyd Detroit pizza pan and would appreciate being able to re-use that here. I know the Detroit pizza pan has higher sides at 2.5″ instead of 1″ on the Grandma pan, so I assume that has some effect, but I have ended up not making Detroit-style pizza as often as I thought I might and unfortunately don’t have too much room for additional pans currently. The thin crust sourdough pizza recipe is just so easy, to pull out pizza dough rounds out of the freezer and it helps me use my sourdough starter regularly!
Hi! OK, I think this should work:
277 g flour (2 cups + 2 tablespoons)
8 g salt (1.5 teaspoons)
6 g yeast (1.5 teaspoons)
245 g water (1 cup + 1 tablespoon)
I’ll add this to the notes. My calculations lead me to think that one of those Detroit-style pans, the bottom of which measures 12.25 x 8.25 inches, needs about 532 grams of dough. So another way to do it would be to make the recipe as written, use 532 grams of it for the Detroit-Style pan and use the remainder for something else — pizza, mini rolls, etc.
Hi! I finally made this recipe last night. Delicious! I ended up buying the 12×18 grandma pizza pan from Lloyds and it worked great with the recipe as written. Thanks for yet another fantastic recipe!
So great to hear this, Nolo!! Lloyd pans are the best. So glad this worked out.
This looks so delicious, Ali! Can’t wait to try it! I already love your focaccia recipe, so I imagine this will be a delight. For a pizza with honey on it, is it correct to assume you wait to drizzle the honey over top until after the bake? Thanks so much for sharing your wonderful recipes, tips, and videos!
Yes! A little drizzle post-baking is all it needs. Thank you for your kind words… means a lot 🙂 🙂 🙂
Ali, I love making your sour dough focaccia recipe and am excited to try the Sicilian style pizza using that. I really like Maurizio Leo’s Sourdough Pizza Romana (Food52) for square grandma style slices but I suspect the focaccia dough will have a more light and airy texture. I do have a 12×18 calphalon sheet pan that I may try for this recipe before purchasing another pan. I will make sure to butter and oil first and will have my fingers crossed that it won’t stick. Thanks for being so inspiring!
Definitely try that pan before buying another one! I hate to even suggest people buy one. more. thing. but the pan does make a difference 🙂
I will check out Maurizio’s recipe! Can’t believe I missed that one. Thank you for your kind words 🙂 🙂 🙂
Ali,
can you expand a bit on two of the steps please:
on the option to parbake in advance. After the parbake can it be cooled and placed in refrig and finished next day? Would I just bring to room temp add toppings and proceed?
(covered with plastic wrap) Also in the prepare pan for initial baking section where you say it can hang out for 30 min to 2 hrs in cool kitchen. Is this timing for convenience or am I waiting for the stretched/dimpled dough to puff up and fill the pan? Sorry if I”m being dense here, I want to be certain as to what the dough should be doing during this range of time from 30min to 2 hrs. Thank you for all these details and the pan links.
Not Dense at all!
After the parbake can it be cooled and placed in refrig and finished next day? Would I just bring to room temp add toppings and proceed?
I let the dough cool completely in the pan; then I simply wrapped the whole pan in plastic wrap so that it was tightly sealed, and I kept it at room temperature. Then, before baking it, I topped it as I wished and baked it in a 475ºF oven for about 10 minutes. Fridge is fine, too, but room temperature might be easier in terms of storage space.
Also in the prepare pan for initial baking section where you say it can hang out for 30 min to 2 hrs in cool kitchen. Is this timing for convenience or am I waiting for the stretched/dimpled dough to puff up and fill the pan?
Yes, just for convenience here. There were so many times throughout my experiments that I had to run out just when I was hoping to do the parbake, but by delaying the parbake here and there, I realized the timing can be flexible. Just be sure to cover the dough with plastic wrap if it’s going to be more than 30 minutes.
Hi Alexandra
What do you recommend for this pizza a steel or stone? I have neither but am considering investing in one. Thanks so much – can’t wait to try this !
Nancy
I’m a huge fan of the Baking Steel! It is really game-changing for all sorts of pizzas. I have The Original Baking Steel.
Recipe looks great! Question abt UK & Canadian flour. AP flour here in Canada has 13%+ protein and UK flour 10% at best. Is trecipe correct that water should be reduced using Canadian flour? Thanks!
Hi Ron,
I have never experimented with either UK or Canadian flour, but, through troubleshooting with many people from Canada and the UK over the years, oftentimes (but not all!) the water level needs adjusting in order to find success. You can either try making the recipe once as written; then adjusting next time around or with more flour if the dough is soupy. Or you could hold back some of the water and add it back gradually until your dough looks comparable to the texture in the photos or the video.
Hope that helps!
Hi Ali, thank you for what you do. Quick question as i am goong to make this pizza on friday. If i use active dry yeast does anything change? When i make bread i usually let it bloom in tepid water first. Can i just throw it in like you do? or bloom first then incorporate? Thank you
We have been searching and searching for the exact type of recipe/technique we want (my husband and i) and came across your video in youtube….and so happy I did. I will be watching many more and reading your blog posts. Cannot wait to give this a try. WE COULD LIVE on pizza alone we always say haha.
Great question, Christina! Definitely bloom it in the lukewarm water first — let it sit for 15/20 minutes or until it gets foamy; then proceed with the recipe. Hope the technique works well for you! And I totally agree: I could live on pizza 🙂 🙂 🙂
Thank you, thank you. Yes pizza is life 😉 especially homemade with love
Could you use a normal half sheet pan that is well buttered/oiled?
Woops! Just saw in your write up that you can but may be not as good crust 😀
Glad you saw it Audrey! My husband still devoured the pizza I made on a regular sheet pan, but I was disappointed with the crust — it didn’t have the crispness.
Just popped the dough into the fridge for pizza this weekend, I’m excited!
I missed hearing your little ones playing piano in the background of the video. It always makes me smile 😊
Great to hear, Prudence 🙂 🙂 🙂 And thank you! I need to better schedule my video-ing to coincide with their practicing, which has been non-existent of late these days 🤣
Hi Ali, Any word on when you will be able to scale this down to the Lloyd pan. They are the best. Thank you. Tom
They really are excellent pans. OK, I think this should work:
277 g flour (2 cups + 2 tablespoons)
8 g salt (1.5 teaspoons)
6 g yeast (1.5 teaspoons)
245 g water (1 cup + 1 tablespoon)
I’ll add this to the notes. My calculations lead me to think that one of those Detroit-style pans, the bottom of which measures 12.25 x 8.25 inches, needs about 532 grams of dough. So another way to do it would be to make the recipe as written, use 532 grams of it for the Detroit-Style pan and use the remainder for something else — pizza, mini rolls, etc.
Thank you very much.
Hi Ali, OOPS! I guess I wasn’t clear. I was thinking about the Lloyds 12 x 16 grandma pie pan, not the Detroit pan. Thank you. Tom
Oh shoot! OK, I will make those calculations and report back shortly.
Morning! This should work:
488 g (3 3/4 cups) flour
11 g (2 teaspoons) salt
8 g (2 teaspoons) yeast
432 g (1.75 cups + 2 tablespoons) water
Do you have a scale? I hope so!! These are awkward cup measurements.
At least on par with the best pizza I’ve made, if not the best. I divided the dough in 2 once it was proofed since I only have 13×9 pans. Made one hot sausage pizza and the other spinach and garlic. This dough is outstanding!! Put it together on Wednesday in time for Friday Night Pizza Night, as is our religion. Thanks for a fabulous recipe and perfect directions!
So wonderful to hear this, Marsha! Thanks so much for writing and sharing your notes. Great to know that splitting in two and baking in two 9×13-inch pans works — that’s so helpful for people who don’t have the Sicilian-style pan. We are pizza-every-Friday family as well 🙂 🙂 🙂
Hi. I don’t know if you’ll see this, but when you split the dough into 2 and used 2- 9×13 pans, did you cook for the same amount of time as the recipe?
I made the sourdough version with 30% whole wheat. The rise was fantastic, the chew even better! We all loved it. The large pan provides everyone their favorite: corner piece, cheese only, or the works. Brilliant!
Great to hear, Nana! Thanks so much for writing and sharing your notes 🙂 🙂 🙂
Hi,
Thank you for taking on this Sicilian pizza! My family, especially my four little guys, love your easy focaccia recipe so I was very excited to see this extension. I immediately bought the Winco pizza pan you recommend. I followed your directions and it came out crisp and looked perfect. There was one issue that I wonder if you know the answer to. It was delicious except for an off taste which we think was on the bottom of the crust. We experienced the same off taste when we baked King Arthur Baking Recipe of the Year 2020 Crispy Cheesey pan pizza which bakes in a cast iron pan. We never have this flavor/taste when we bake your focaccia in our USA Pan cake pans. Could it be the iron pans? Or I wonder if it was the EVOO brand I was using? I was out of California Olive Ranch and had Kirkland organic EVOO. Do you think it could be the olive oil? The iron pans? Any thoughts another cause?
I so want to make this work especially after investing in the pan and seeing how wonderful the pizza emerges from the oven!! Thank you for any guidance.
Take care,
Maureen
Hi Maureen! Great to hear the pizza was a success. Bummer about the off taste! It is definitely possible that it’s the pan, though I never experienced it, so I can’t say for sure. And it’s definitely possible it’s the olive oil. You could try with different olive oil, which might be the easiest place to start. If you still get the off taste, you could use parchment on the bottom. I think you’ll still get good browning with a sheet of parchment in the pan. I’m so sorry to hear this!
in italy we use most diffrerent type of salami (pork)
This pizza was soooooo good and so easy! I had hit or miss success with the Detroit pizza but found this focaccia version to be almost fool proof. Everyone at our house (including the 2 and 4 year olds!) loved it.
So great to hear this, Andrea 🙂 🙂 🙂 And honestly, making this one made me want to completely revisit the Detroit post … I think I can simplify the process and improve it applying the method here. Fingers crossed anyway. Hope all is well!
This is another fabulous winner, Ali, from your standout recipe collection. Having had so much success with the Lloyd Detroit style pan you recommend that I purchased their Sicilian Style one for this recipe – so worth it!!! One question — you note the Detroit Style Pan needs 532 grams of dough – can you tell me how many grams the Lloyd Sicilian style pan needs. Loved this pizza so much last weekend that I am making it again this weekend — along with your Hot Cross Buns recipe for Easter! Big thanks for helping making all things delicious in our kitchen!!!
Great to hear this, Sally! Thanks so much for your kind words… means so much 🙂 🙂 🙂
OK, if my calculations are correct, you’ll need about 930 grams of dough for the Lloyd Sicilian-style pan.
Wishing you and your family a happy happy Easter!!
Thanks so much, Ali 🌺
Hi Ali, quick question: do you think I could freeze the parbaked crusts and top them/bake them off later? If so, would you bake from frozen or defrost first?
Since it’s my first comment/question, I also wanted to say an enormous thank you for all your recipes – they are just incredible. I have your book too and my whole family are in love with all your breads, pizzas and other recipes. The breads are so easy (and satisfying!) to make. 🙂
Vicki, thank you 🙂 🙂 🙂 This means the world. I so appreciate you taking the time to write.
I think you can definitely freeze the parbaked crusts. I would defrost them before topping and baking them. Interestingly enough, I was listening to a podcast about a pizza place in Vegas that serves Sicilian-style pizza. The owner freezes all of his parbaked pizza doughs before topping them. It’s part of his production process — he thinks it makes a superior crust because, as I remember, water evaporates during the freezing process, which makes the bread even lighter. Will be curious to hear how it works out for you!
We love the Sicilian pizza, it is perfection! I recently bought the Lloyd’s Grandma Pan and followed your instructions, Ali, for using less dough for that size pan. The pizza turned out better than I had hoped and I think the pan and the dough made all the difference. The parbaking is a game changer for this thicker crust and not dimpling the edges of the dough is spot on! The crumb on this pizza was fantastic. I look forward to making this again when the whole family is here!
So nice to read all of this, Lu! I’m so glad the Lloyd pan worked out for you as well as the smaller amount of dough. Your IG photo of the crumb shot was stunning. As always, thanks for writing 💕💕💕💕💕 xo
I’ve made this recipe twice now and both times it was spectacularly delicious. The crust is chewy and complex, and the veggie toppings are perfect. Thanks so much Ali! Your attention to detail is much appreciated!
So great to hear this, Cheryl 🙂 🙂 🙂 Thanks so much for writing, and thank you for your kind words.
Ali,
I just took the dough out of the fridge after 48 hours and it was extremely moist. Couldn’t get it to take shape to allow the 3 hour rest period. I measured out ingredients. Not sure what I could have done incorrectly but giving it another try this evening. Any suggestions if my dough turns out the same on the 2nd attempt?
Hi Nick! Apologies for the delay here. I’m likely not getting to you in time. Are you using a scale to measure the flour and water? Do you live in a humid environment? What type of flour are you using?
You can definitely hold some of the water back if the dough is too wet.
Hello!! I am so excited to make this pizza. What type of results will I get if I do t have a steel pan or pizza stone? Also for the steel pan and this recipe, are you placing the pan on top of the preheated steel? I have seen recipes that cook directly on the steel or stone.
I will be baking at 9200 elevation. Fingers crossed. Baking has been a challenge since I relocated from the Midwest but I’ve had success with these overnight bread recipes.
Thank you in advance and so glad o found you 🙂
-Mary
Hi Mary! Yes, I place the pan directly on the preheated Baking Steel. You will still get good results: I recommend buttering your pan before adding the olive oil because the butter will help encourage browning and will prevent sticking. You just won’t get quite the crispness on the bottom that you get with a steel pan.
Fingers crossed this works well for you! Happy to hear the other bread recipes are working well for you at such high elevation.
Hi Ali,
Just want to say this is just one of your excellent recipes. I currently have three pizza’s waiting to go in the oven soon. The par baking idea is great and works really well. I’m actually going to freeze the par baked shells to take on vacation so we can put the sauce and cheese on later. I love your website and recipes and I’m sorry it has taken so long to review. Your homemade pizza dough with kale is the BEST. That recipe has been passed on to many. Last night I made the feta and tomato which was also amazing, Thank you again for all the great recipes and for creating such a fantastic website.
Shannon, you are too sweet 🙂 🙂 🙂 Thank you so much for taking the time to write all of this. Truly nothing makes me happier than to hear about people’s successes in the kitchen. So glad you love the kale pizza, and I love that you are bringing par-baked Sicilian pizza crusts with you on vacation… a girl after my own heart 💕💕💕💕
Alex, My dough is in refrig, step one for 18-24 hrs in an oiled bowl. It’s only a few hours and it has risen almost double already. I used the recipe for the 12 x 16 pan. Should I punch it down and just leave in refrig or transfer to larger vessel and let it keep growing? Thanks for any suggestion.
Hi! I would punch it down and maybe also transfer it to a larger vessel to ensure it doesn’t pop off the lid of the bowl.
Alex, I have a general question re: the Baking Steel original. Do you keep it in your oven all the time regardless what you are using the oven for? If so, do you store it on the bottom rack or the main rack that you use for whatever you are cooking or baking, ie, just put your pan on top of the steel rather than the rack. I have searched online and find mixed suggestions, I figure you’ll have a definitive and well-tested response! Thank you.
Hi Denise! I do keep it in my oven at all times, mostly on the very top rack because that’s my preferred location for pizza, which I make a lot 🙂 I also have two ovens, so keeping it in one oven isn’t a big deal. I do understand that it is a pain to move — it’s only 12 lbs or something like that but it feels heavier when you are moving it around. When I take it out, I have a case for it with handles, and I tuck it into one my vertically oriented storage shelves for sheet pans. Hope that helps!
I have to say this recipe is amazing left the dough in fridge for 3 days, bought the Lloyds pan and pepperoni, followed all your suggestions and recipe exactly, It looked Just like your I should have posted a picture, The issue was the crust never got real brown and it was so crispy i thought I was going to break a tooth, lol I was so looking forward to this, I will make again and see what the issue with the crust was, what do you think? I think my pan was the 14 x14 Lloyds
Hi Ileen! Great to hear all of this except for the excess crispiness. I’m not sure what can explain it. Questions: are you saying the crust on top didn’t get brown or the crust on the bottom? And is your pan really 14×14? Or 10 x14?
Hi and thank you yes it is the 14 x 14 Lloyd’s pan. Leaked perfect, the bottom crust was too crunchy and not brown at all after the par back, am going to try again and make the same day I par back and only leave in the fridge for 2 days maybe too light and crisp crunchy, like hard crunch.weird yes will make again and report back
Can i use a regular half sheet pan here?
Exciting news about your new cookbook! I’m sure it will be great. Hope you still have time for your online postings which are like valentines in my inbox. 😊
Awwww Leslie, that means the world… thank you 🙂 🙂 🙂
Yes, you can use a regular half sheet pan. Definitely grease with butter first and use the olive oil, both of which will help with browning. I find I don’t get as quite a crisp crust when I use my sheet pan as when I use the Lloyd pan, but it of course still works.
I will try my best to keep up with my online postings. Thank you for your kind words!
I finally had an opportunity to make this recipe. Ali, you knocked it out of the park creating this one! The texture was so very light and airy but the crust had a bit of a crunch from prepping the pan with butter/olive oil. I actually used an old 12″ x 18′ caphalon sheet pan and it worked with no sticking. I followed the recipe to a “T’ and appreciate all the details that included the photos and video. I always make your focaccia using the sour dough method so I plan on doing that the next time when I make this style of pizza to compare. I made a simple marinara sauce for the pizza and used low moisture mozzarella (as suggested) and some pecorino. Yummy!
I can’t wait until your pizza cookbook is published!
So wonderful to read this, Nancy! Thank you so much for writing and sharing your notes about the pans, sauce, and cheeses. So helpful for others. And thank you for your kind words regarding the pizza book… means the world 🍕🍕💕💕
I’ve made this recipe a few times now and love it, but the dough seems too wet, which gives me a decent crust, but thinner than I’d expect. I’m trying again today and cut the water to 422. With the 512/454 flour to water it’s unable to hold a shape and is very sticky. It’s worked out, but I feel like it could be even better. Any thoughts?
Hi Chris! It’s definitely possible that you need to reduce the water given the flour you are using and your environment. What type of flour are you using? My first thought is to try bread flour if you are not using it. And how long are you letting it rise in the fridge?
This is really weird. I used more flour once and that seemed to make it a little less airy/fluffy. This time I cut the water and it seemed like there was no gluten build up. I’m using all purpose flour and leave it in the fridge for at least 48 hours. When I left in the pan for the 3 hour rest it looked as if there was no yeast activity at all and when I tried to stretch it it pulled apart and was like a really thick, sticky soup. I tossed it. Maybe despite what I thought your recipe is the way to go for Sicilian and I’m just too used to other types of breads that aren’t as wet.
Hi Chris! Bummer to hear you can’t get this to work. My suggestions are bread flour for you. It sounds as though your environment is making for a super wet dough. I also can’t recommend SAF instant yeast enough. Not sure what kind of yeast you are using. When you remove the dough from the fridge, are you noticing activity? i.e. Is the dough rising in the fridge? Also, what size is the sheet pan you are using?
I think my problem is that my expectations are different than the reality of making this type of pizza. The first time I made it, it was great, but I think my expectation was for something a little different and that caused me to try and tweak the recipe. I’m making it for NYE and am sticking to your original measurements.
I’m using instant yeast and had been using all purpose flour, though I’m now using bread flour. It has always looked fine coming out of the fridge other than being a wetter dough than I was expecting. I have no doubt sticking to your recipe is going to be what I need to do going forward.
My fingers are crossed, Christopher! Truly hope you have success, and wishing you a happy New Year as well!
My last update… I just need to stick to the original recipe. The issue I was having was my own… I did not understand how this would be a bit different than my experience with other types of bread. The recipe as is was much better than any of my tweaks. Will be making it more than occasionally because I love pizza and this is a great recipe.
Nice to hear all of this, Chris! Thanks for writing and reporting back and sharing all of your notes and thoughts along the way.
I am absolutely enamored by your culinary skills and aesthetic of your website/photos/videos. Thank you!
I have a strong allegiance to Reinhardt’s tragically underrated Pan Pizza book. I probably make his sicilian 2-4 times a month if not more.
My question is this: your recipe appears to be a deviation from his – he uses cold water, does sets of stretch and then dimples every 20 minutes after bulk fermentation. Curious how you arrived at your process and if you like your system more. Excited to hear about this.
Awww thank you 🙂 I can’t believe this, but I actually have not made Peter’s Sicilian pizza recipe. I found that my focaccia recipe — either yeast or sourdough — worked perfectly as a base especially when parbaked. I’ll take a look at Peter’s recipe. I am a fan of using cold water especially if the rise is going to be long.
I want to make this for a group gathering. Have you had any success making it the day before, cooling in pan completely, wrapping, refrigerate then reheat next day. If this works, how would you heat up for best results.
Yes! After you parbake, wrap the pan very well. No need to refrigerate. Then proceed with topping and finishing the bake the next day.
Ok, great option, I’ll do that, thank you.
I have another question re: Lloyd pans. I have several and use the 18 x 18 for Sicilian and the 10 x 14 for your Detroit. I find I have sticking problems with these pans and removing the pizza is always an issue. Sometimes they even rip on me. Do you have tips to ensure a good release. I don’t want to try parchment assuming I’d interfere with the crispiness.
I think buttering the pan well first, then adding a teaspoon of oil to the pan (or 2 teaspoons for the larger 18 x 18 inch pan) should do the trick. I find butter always works to create a nonstick barrier.