 →
→ How to Parbake Pie Crust + Foolproof Flaky Pie Dough
This post may contain affiliate links. Please read my disclosure policy.
Below you will find guidance for both making pie dough and parbaking or blind baking it. This trusted method will ensure your crusts do not shrink in the oven and will prevent your finished pies from having soggy bottoms.
For many years, I shied away from parbaking my pie crusts. I never found the bottoms terribly soggy when I didn’t parbake, and I hated the process: from dealing with pie weights to chilling to baking, I found the process time-consuming, and, moreover, I always found the crust of my finished pies to be overbaked.
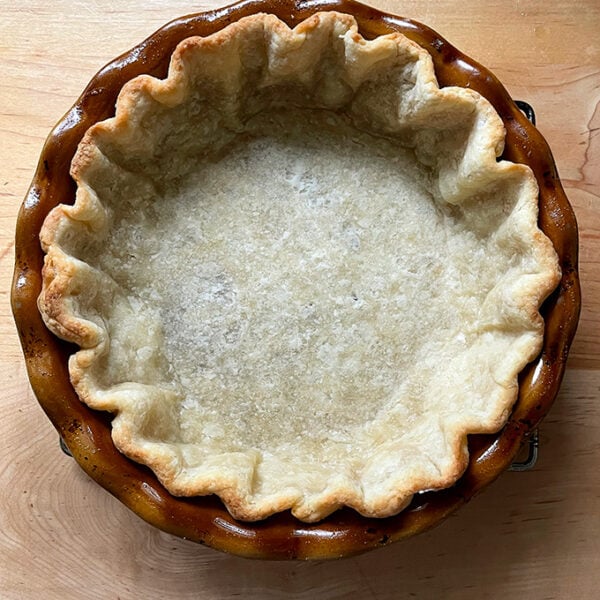
Several years ago, however, I saw a photo in The Book on Pie depicting a correctly baked parbaked pie crust. It looked barely toasted, mostly blonde with the faintest hint of brown; the edges were lightly golden. The suggested baking method called for an initial 15-20 minutes with pie weights in the crust, followed by 2-3 minutes without the weights.
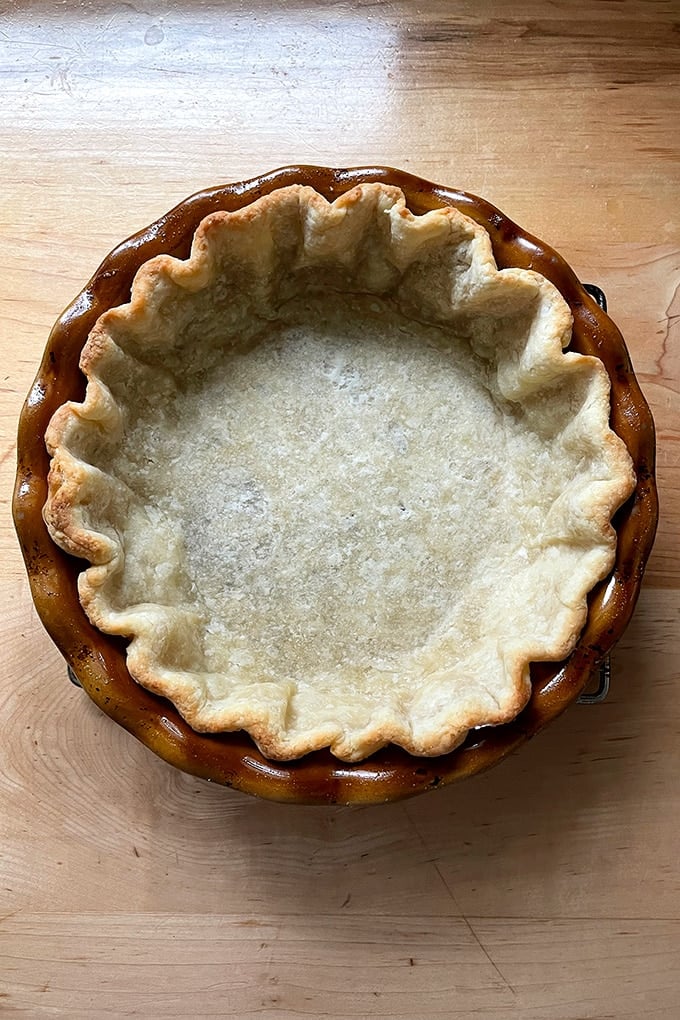
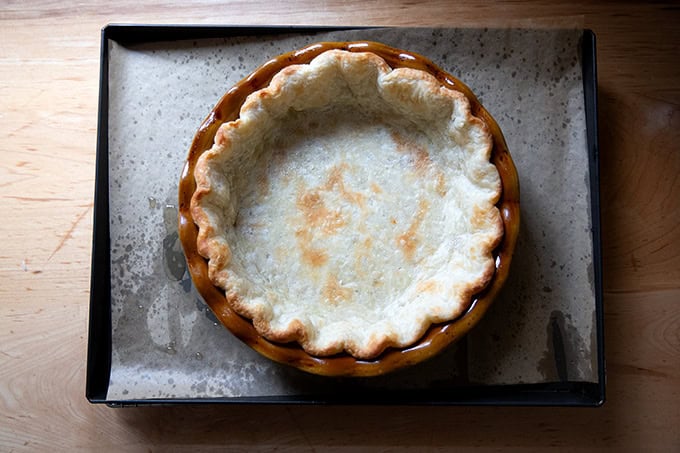
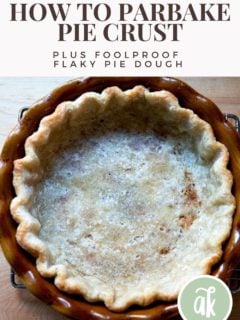
Following the method, my parbaked crust emerged from the oven with edges lightly toasted and the bottom surface mostly blonde. And the crust of the finished pie was deeply caramelized but not at all overcooked. See below:
Parbaked crust:
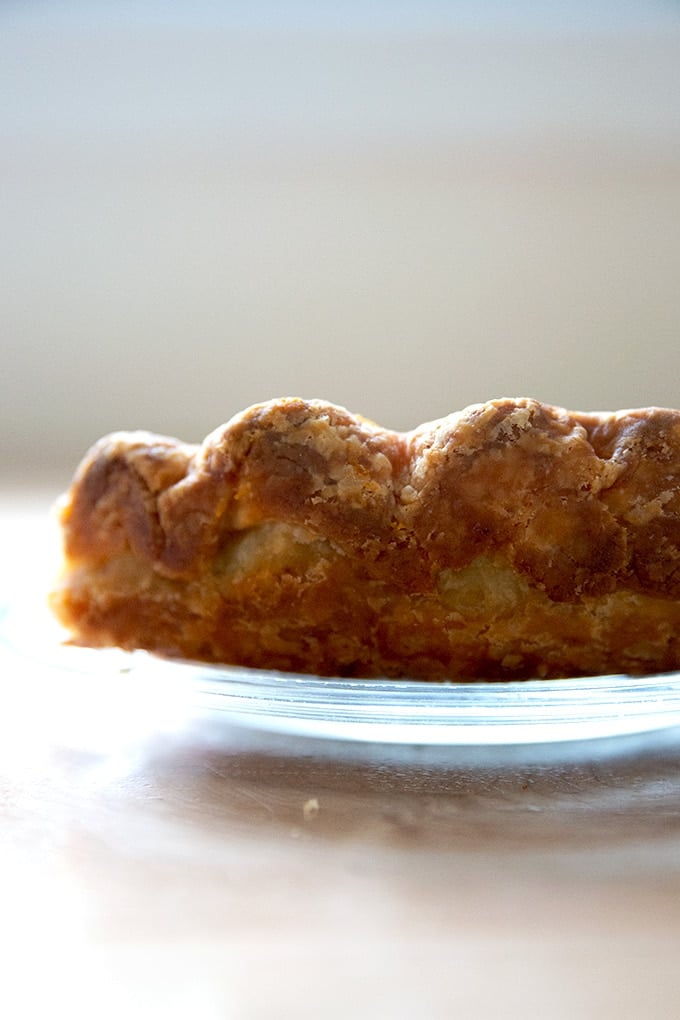
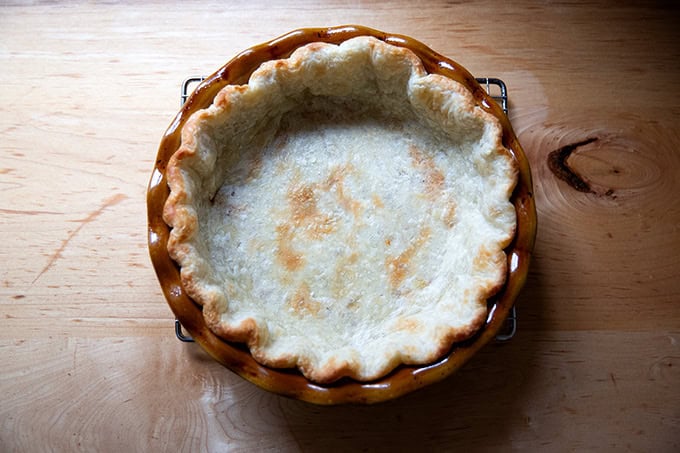
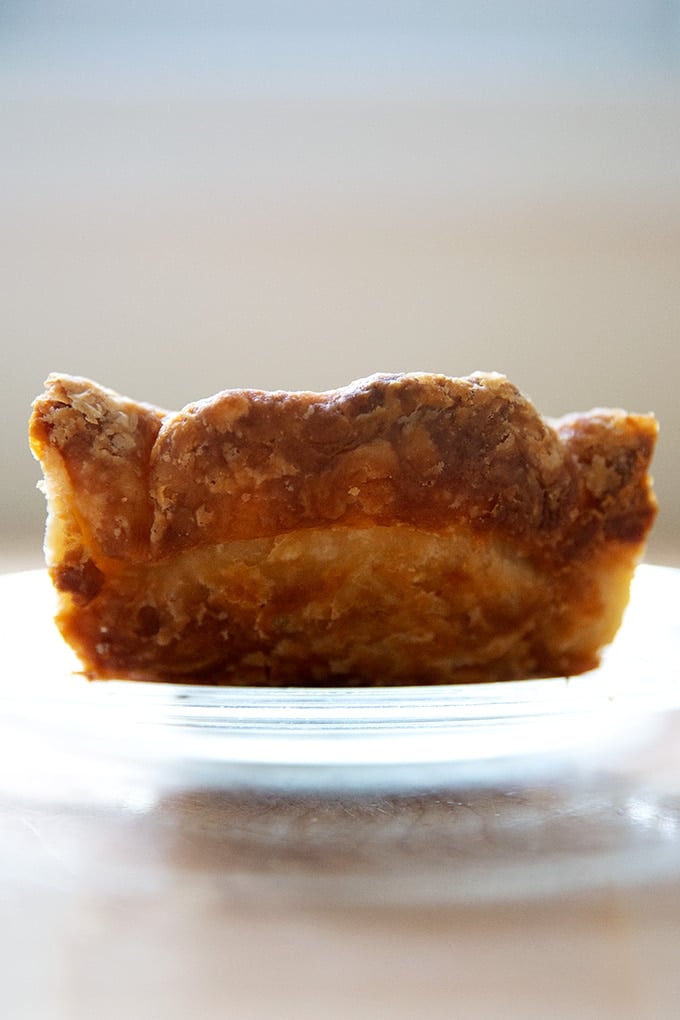
Fully baked crust:
I now find parbaking an essential step in my pie-making process. It does require some planning, but overall it is not hard, especially if you pay attention to the details, namely two things:
- Chilling your pie dough before rolling it out and before parbaking it.
- Using a sufficient amount of pie weights.
Let’s explore each:
The Importance of Chilling Your Pie Dough
After you make your pie dough, you should let it rest in the fridge for at least 30 minutes or better, 12 to 24 hours, before you roll it out. Why? For two reasons:
- Chilling the dough after mixing makes it easier to roll out. This is because chilling allows the natural protein stands (i.e. the gluten) that form when flour is hydrated to soften and relax, making the dough easier to roll out.
- A rested dough will shrink less in the oven due, again, to the gluten having had the chance to relax.
You Need More Pie Weights Than You Think
When you fill your parchment-lined pie shell with weights (or dried rice or beans, which you can save and reuse), be sure to fill it to the very top. I use 3.5 pounds of dried rice/beans per shell, and I pile them high above the rim of the dough.
How to Parbake Pie Dough, Step by Step
Remove your chilled round of pie dough from the fridge. (See recipe box for pie dough recipe.)

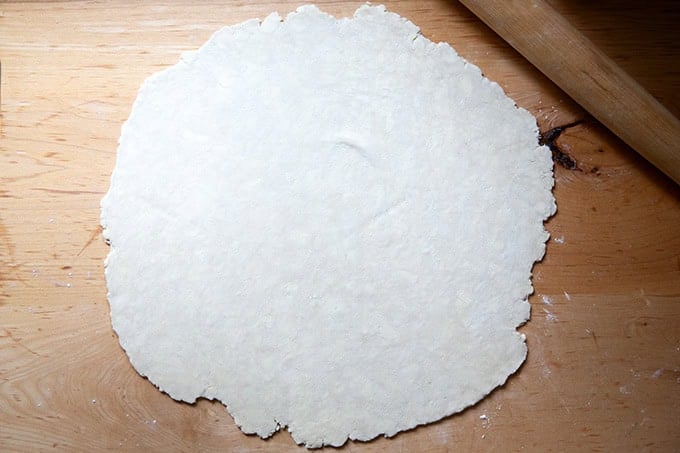
Roll it out on a lightly floured work surface into roughly a 15-inch round:
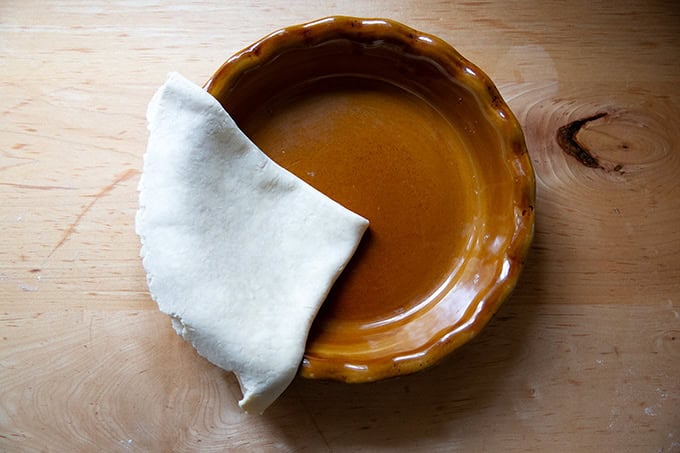
Fold in half, then half again, and transfer it to a pie plate:
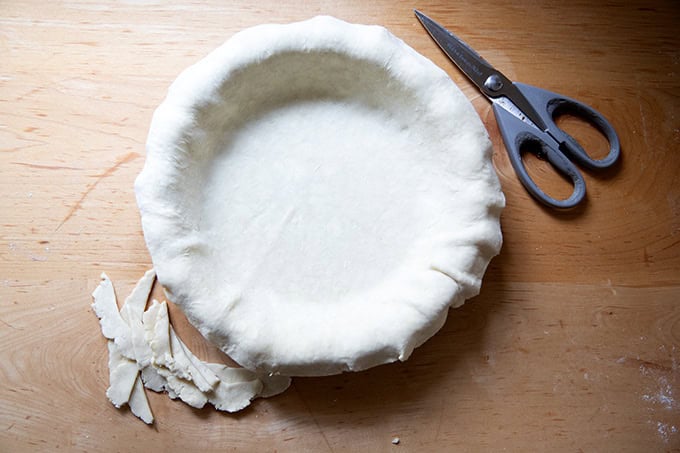
Unfold the pie dough and trim the over-hanging dough, leaving roughly a 1/2 inch of dough extending beyond the edge.
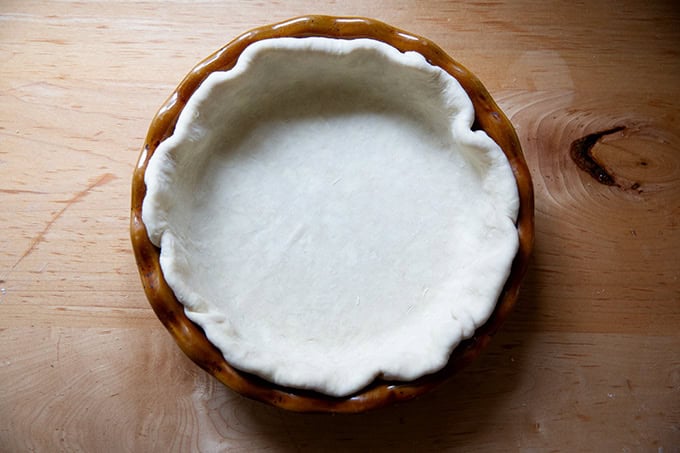
Tuck the overhanging dough behind itself into the pie plate:
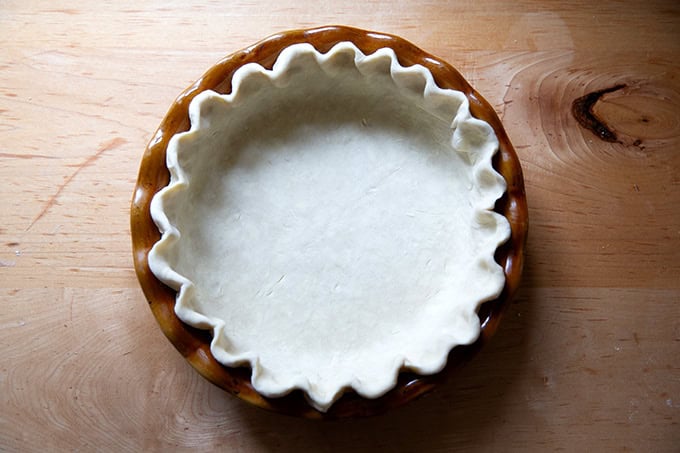
Then pinch the dough using both hands to make a pleated edge. Chill for 30 minutes.
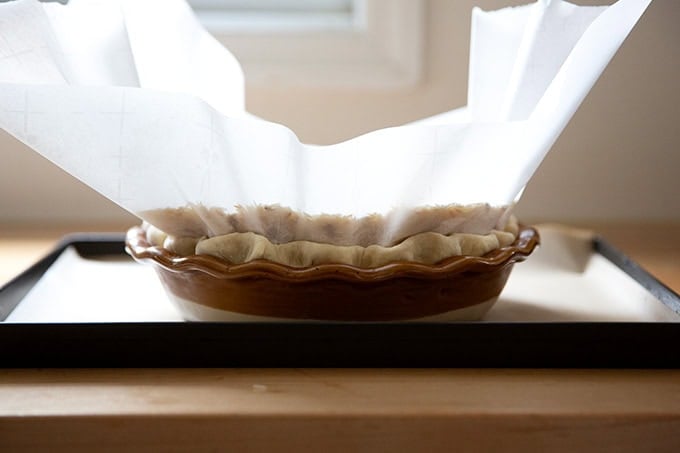
Lay a sheet of parchment paper across the dough and fill it with dried beans or rice: be generous with the beans/rice! I fill mine so that the beans and rice extend at least a half inch above the rim of the crust.
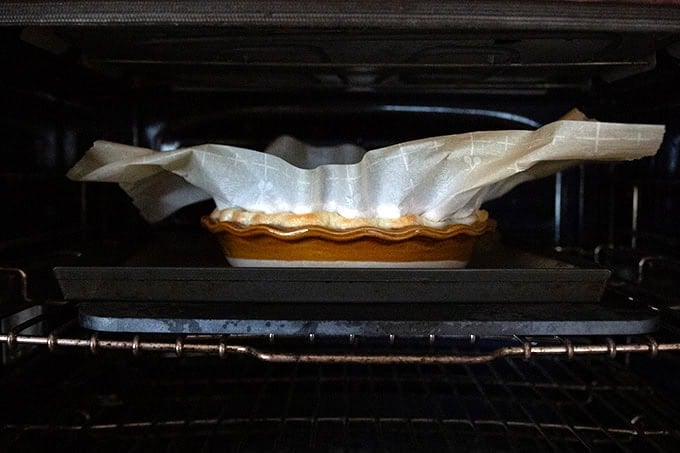
Transfer to the oven and bake for roughly 20 minutes, relying on the visual cues: remove the pan when you see light browning at the edges:
Lift the entire parchment paper sling out of the parbaked crust…

… then return the pan to the oven …
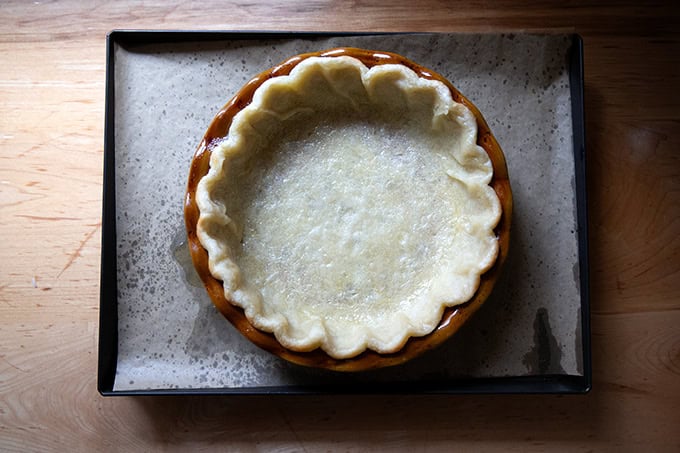
… for another 2-3 minutes:
Transfer to a cooling rack:
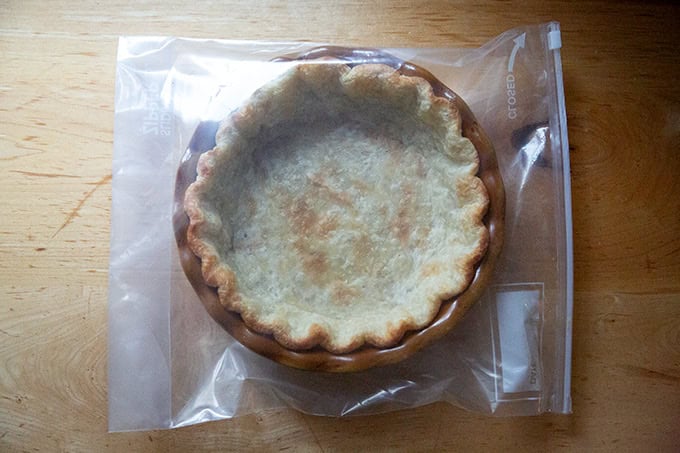
Let cool completely before storing. See storage notes in recipe box. I find these 2-gallon bags to be so handy for storing parbaked crusts and other large items.
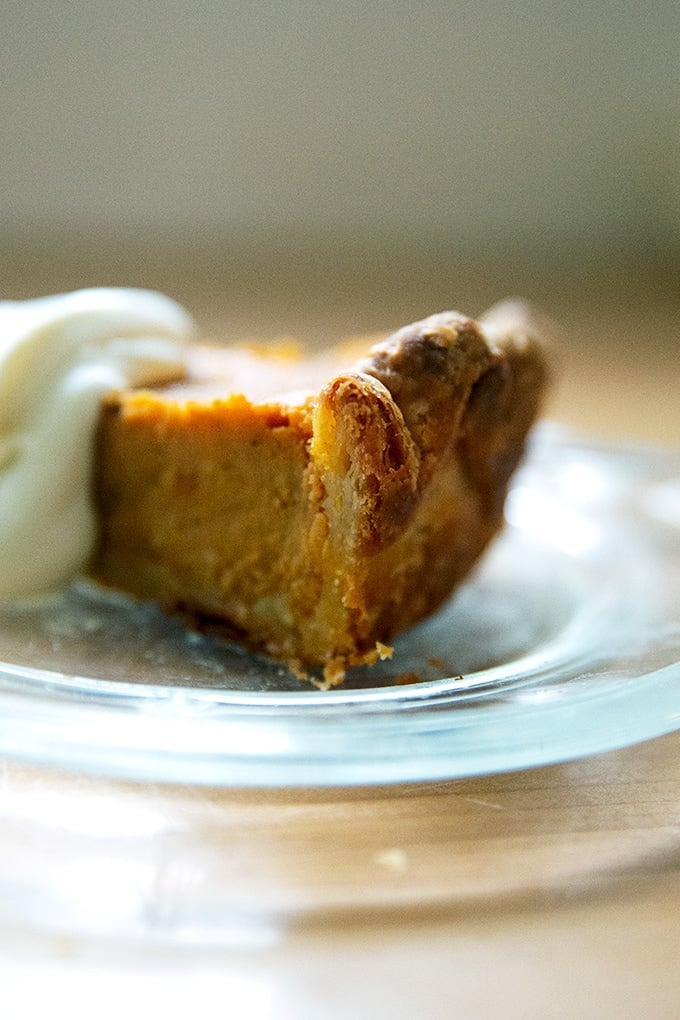
When you are ready to bake, simply fill your parbaked shell with the filling and bake as directed. This is this butternut squash pie filling:

Can you see how flaky the crust is?
How to Parbake (and Blind Bake) Pie Crust + Foolproof Flaky Pie Dough
- Total Time: 1 hour 25 minutes
- Yield: 2 pie crusts 1x
Description
Below you will find guidance for both making pie dough and parbaking or blind baking it. This trusted method will ensure your crusts do not shrink in the oven and will prevent your finished pies from having soggy bottoms.
Here are a few recipes that benefit from a parbaked crust:
- Bourbon Pecan Pie
- Roasted Butternut Squash Pie (i.e. The Best Pumpkin Pie)
- Salted Maple Pie
Notes:
- Plan ahead: Ideally, make your dough 12 to 24 hours before you plan to roll it out. Doing so allows the flour to fully hydrate and allows the gluten to relax. This makes rolling the dough out more easily and also helps minimize shrinking in the oven.
- To make a double batch: do not load your food processor with double quantities. Make the dough in separate batches — no need to wash the food processor in between batches.
- To make a half batch, see quantities in the notes section below.
- Favorite Pie Plate: I swear by my ceramic Emile Henry 9-inch Pie Plate.
- Do not bake pies directly on the rack — butter will seep out and when it hits the oven floor (or Baking Steel), it will make a smoky mess. Instead, place your pies on sheet pans and use parchment paper, if you wish, for easy clean up.
- Dough Storage: Dough can be made up to three days in advance and stored in the fridge or made weeks in advance and stored in the freezer. To thaw, place dough in the fridge overnight before baking.
- Once you roll out your dough and fit it into your pie plate, don’t freeze it — the crust will not bake properly directly from the freezer.
- Parbaked Crust Storage: Once you parbake your pie shells, let them cool completely; then store in an airtight vessel or bag — a 2-gallon zip-top bag works well. Store at room temperature for up to 3 days or freeze for up to 3 months.
- Pie-Making Schedule: This is a great schedule to follow if you are making pies for Thanksgiving or any holiday:
-
- Tuesday (or 2 days before you plan to serve your pies): Make the dough and chill it.
-
- Wednesday: Parbake the crust.
-
- Thursday: Fill and bake the pie.
-
Ingredients
- 2½ cups (320g) all-purpose flour
- 2 tablespoons (25 g) sugar
- ½ teaspoon (3 g) kosher salt
- 16 tablespoons (227g) unsalted or salted butter, cut into small pieces and chilled
- ½ cup + 2 tablespoons (142g) ice water
For baking and storing:
- pie weights or dried beans/rice — I always use dried beans/rice. You need more than you think — over 3 lbs. per pie. You can use them forever and ever. I store mine in this OXO vessel.
- parchment paper — I like the large size of Reynolds for parbaking.
- Jumbo ziptop bags — the 2-gallon size is particularly helpful
Instructions
- In the bowl of a food processor, pulse the flour, sugar, and salt together. Add the chilled, cubed butter. Pulse at 1-second intervals until butter is the size of peas — should be about ten 1-second pulses. Add the ice water and pulse again about 10 times until the mixture is crumbly but holds together when pinched. (To make without a food processor: In a large bowl, whisk flour, sugar, and salt together. Add the butter to the flour mixture, and using the back of a fork or a pastry cutter, incorporate it until it is in small pieces. Add ice water and continue to stir with a fork until mixture is crumbly but holds together when pinched.)
- Lay two clean tea towels on a work surface. Dump half of the crumbly dough mixture (roughly 350 grams) into the center of each. Grab the four corners of the towel together and twist to create a beggar’s purse, pressing the dough into a round. Use your hands to pack and flatten the round. Wrap in plastic wrap or parchment paper, place in ziplock or other airtight bag/vessel, and stash in the fridge for at least 30 minutes, but ideally 12 to 24 hours or for as long as 3 days. You also can store it in the freezer for as long as 3 months.
- To parbake or blind bake the pie crust: Heat your oven to 425ºF. If you have a Baking Steel or pizza stone, place it on a rack in the lower third of your oven. (Steels and stones retain heat well, and they encourage proper and even browning on the bottoms of pie. They also help keep the oven temperature’s even as you open and close the door to check on your pie.) On a lightly floured work surface, roll out one of the chilled rounds of pie dough, flipping the round over every few strokes, until you have a circle roughly 15 inches in diameter. Note: If you are using very chilled dough, you may find it helpful to pound it gently with your rolling pin before beginning the rolling.
- Transfer the round to a pie plate. Trim any excessive overhanging pie dough — there should be roughly one inch of dough overhanging the edge. Save the scraps in an airtight container in the fridge. Tuck the overhanging dough behind itself; then use your fingers to crimp the edge into a fluted pattern — video guidance here. If time permits, chill the shell for 30 minutes. Lay a sheet of parchment across the pie plate and pour pie weights or dried beans into the center until they reach the top of the pie crust. Use your hands to press the weights down and fit them into the edges of the fluted crust.
- Transfer the filled pie crust to a parchment-lined sheet pan and transfer to the oven for 15-20 minutes or until the edges are just beginning to color — do rely on the visual cues here. It sometimes takes my crusts a little longer to take on that light color at the edges.
- Remove the pan from the oven and carefully remove the pie weights or dried beans (which you can use again and again — let them cool completely; then transfer to a storage bag). Return the pan to the oven. For a parbaked crust, bake the shell for another 2 to 3 minutes — it should take on only the slightest bit of more color all around. For a blind-baked crust, return the shell to the oven for another 10 to 12 minutes or until the crust is evenly golden brown.
- Once you parbake or blind bake your pie shells, let them cool completely; then store them in an airtight vessel or bag — a 2-gallon zip-top bag works well. Store at room temperature for up to 3 days or in the freezer for up to 3 months. From here, proceed with whichever pie recipe you are making. I use this pie crust for every pie I make. See notes above.
Notes
Half Recipe Quantities:
- 1 1/4 cups (160 g) all-purpose flour
- 1 tablespoon sugar
- 1/4 teaspoon table or kosher salt
- 8 tablespoons (114 g) cold, cubed butter, salted or unsalted
- 1/4 C. + 1 T. (71 g) ice water
- Prep Time: 1 hour
- Cook Time: 25 minutes
- Category: Dessert
- Method: Oven, Food Processor
- Cuisine: American, French
This post may contain affiliate links. Please read my disclosure policy.


219 Comments on “How to Parbake Pie Crust + Foolproof Flaky Pie Dough”
Many of your delicious recipes are regulars on our table though I rarely comment at all, BUT I have to say I am MOST excited about the tea towel technique (have to make quiche today to try it, lol!) Thanks for sharing that and the sound track at the end of the video took me back….. LOVED when the kids practiced while I was cooking and baking <3
Awww, so nice to read all of this 🙂 🙂 🙂 Thank you for the kind words. Glad you liked the piano, and I hope you love the tea towel trick — it’s game changing to prevent overmixing. Thanks for writing!
Have you ever prebaked the bottom if you were making an apple pie which would have a top crust?
Hi Joyce! I have not, but Erin does have a page in her book dedicated to that topic… my book is in my suitcase unfortunately, and I’m at the airport, so I can reference it at the moment, but I will when I get home, and I’ll report back.
Thanks, have a safe trip!
Hi Joyce! Sorry for the delay here. OK, as I noted, in Erin McDowell’s The Book on Pie, there is a very detailed tutorial, but in short, you would do this:
1. Roll out your pie dough and fit into your pan being sure to leave 1-inch of dough overhanging the edge. Refrigerate for 15-20 minutes.
2. Fill it with pie weights, and parbake as directed in this post.
3. Let cool 3 to 5 minutes; then cut the excess crust away so that it is flush with the pie plate. As you work, carefully loosen the crust from the edge so that it is not sticking.
4. Fill your crust. Top it with the other round. Trim it; then tuck the dough under the parbaked crust. Crimp with a fork.
Hope that helps!
I’ve been using your tea towel method for awhile now and love the result. I think I’ve been overtaking my par-bake as well, and think I’ll have to make a pie today to check that out. Your videos always are so helpful. Thank you!
So nice to read all of this, Deborah! I was shocked to see that photo in the book… so helpful. Happy Baking!
Any opinions/experience on the ideal/reliable pie baking plate? Ceramic, aluminum, glass? Does it factor in on results?
Yes! So glad you asked this Hillary! I swear by my Emile Henry ceramic pie plate and I was so pleased to read in Erin’s book that she also prefers ceramic pie plates over glass and metal.
Very interesting! My biggest problem with par baking lately has been the liner *always* sticks to the crust when I take it out—I usually use parchment but have tried foil and no luck, any tips: buttering it? Letting it cool slightly? Ive been skipping it after ringing several crusts. Thanks!
Hi Sara! I think it might be a matter of your parchment paper. Do you know what brand you are using? I’ve had success with If You Care and Reynolds. I have had problems with various brands of parchment (ordered from the internet), and I wonder if your problem would be solved if you simply tried a different brand of parchment.
So happy you came over to team parbake! The first few words made me think we were having our first argument!😂.
I love the towel trick also. Have used it since I first saw it with your galette recipe.
Have you ever heard of or tried the cooking oil pastry recipe? This was my go to recipe for decades. So easy, fast, and foolproof. I finally learned to make a good butter/shortening pie crust but strangely enough, I can’t slip it by my family. My son knows immediately and now reminds me to make “my” piecrust ahead of time.
🤣🤣🤣🤣🤣 Never! So happy to read all of this 🙂
Is the cooking oil pastry recipe a pat-in-the pan recipe?? I’m so intrigued. If it’s not a family secret, please share. Gotta love the acute palates of your nearest and dearest 💕💕💕
No, it’s rolled out which I do between pieces of cling wrap. Here’s a very terse recipe:
1 crust
1 cup + 2 Tblsp flour
1⁄2 tsp salt
1⁄3 cup oil
2 Tbsp cold water
2 crust
1-3⁄4 cup flour
1 tsp salt
1⁄2 cup oil
3 Tblsp cold water
Mix the oil with flour and salt using a fork, then sprinkle with cold water and continue to mix until cohesive. Bake 1 crust at 450 for 12-15 minutes; 2 crusts at 425.
I have taken to using the 2 crust recipe for just 1-9” pie pan. It’s very delicate and having a thicker crust works well. I think it was a recipe on one of the oil brands probably 60 years ago. I think I’ve seen versions that also use a little milk in the recipe 😳. And I do blind bake it now for most any filling. I think you’d be surprised how good it is.
Carolyn you are the best for sending this recipe along as well as all of your notes! I cannot wait to try it! I will do the double batch in a single pan. I know I am going to love it. Thank you thank you!!
👍😊
My dough is very crumbly. I managed to roll it out to make it almost large enough for the pie plate and then had to kind of mend it up with left over pieces of dough. I rested the dough in the fridge for a full 24 hours. Used Land-o-lakes butter. I have two more crusts to roll out and wondering if I can do anything at this point to make it a little easier to roll out and not quite so crumbly. I almost put my back out rolling the first one.
Hi! You may find that if you pound the disc gently with a rolling pin after you remove it from the fridge, before you roll it you, that it will help the dough come together more.
Did you use a scale to measure the ingredient? Did the dough come together easily in the tea towel?
I suspect that maybe the butter pieces weren’t small enough?
I’m so excited for this. Now I feel like I’m ready to make pie for the holidays! Do you have a favorite butter? Some times I find the European butters to be greasy but the flavor is good.
Yay! I hope you love it:) I actually have never tried the European butters here, but I love them spread on toast. I most often use Cabot butter these days or Land O’Lakes, but I have also used the Whole Foods 365 Brand and Trader Joe’s brands with success.
The technique you used to mix the pie dough, by putting it in the towels is genius! I will be trying that real soon. It certainly prevents over mixing the pie dough and making it tough. Love your website!
It was a revelation for me as well, Char! The French woman teaching the cooking class was a real hoot 🙂 Thank you for your kind words.
Love this tea towel trick!! 🤯
My question is about the need for par baking. I was planning to try the maple pie this year and you say over in that recipe not to par bake. So is this new advice? Also I’ve only ever used enough pie weights to cover the bottom. Do you find it works better to completely fill the crust as you show here? I didn’t know that was necessary.
Lisa, great question! I need to update all of my pie recipes ASAP. Yes, this is new advice. I have always been on the fence about parbaking — when I’ve skipped the step in the past, no one seemed to notice, and truthfully, I always found the crusts to turd out just fine — good enough not excellent. I am liking this new method, however, and I am advising employing it for all of my Thanksgiving pies, because I do think it creates a superior crust.
Regarding pie weights: yes, I do think it’s important for the weights to fill the pie plate completely. Erin addresses this in her book in fact — she says most packages of pie weights are not enough to properly parbake a crust and she advises buying more to ensure you are filling your pie completely. Dried beans/rice work great, and, as I noted in the post, you can continue to use them again and again as you would pie weights.
Let me know if there is anything else!
is it important to use unsalted butter? could i use regular salted butter and omit the kosher salt? thank you! btw, I love hearing someone practicing the piano in the background of your videos!
Thank you, Stephanie! You can use either salted or unsalted. And you don’t need to omit the salt if you use salted butter — it won’t make the dough too salty.
Thank you for your video. I am giving you 5 stars for great tips, music and overall easy to understand video. And I’m sure it tastes as delicious as it looks. I am new to baking pies…even though I am 60 yrs old. LOL
My question to you is…Once the pie is par baked do I bake my pie recipe as is? Or do I need to change the time so that the crust does not over bake.
Thanks again for your great recipes! 🙂
Thank you, Ingrid 🙂 🙂 🙂
You should not need to change your pie recipe, as long as the recipe calls for a reasonable baking temperature (350F to 400ºF). If it is higher, I would lower the temperature to the range I just noted.
Let me know if there is anything else!
What a great and useful post! I have long loved and used your/David L’s pastry for pies and galettes. The tea towel move is *genius* and I always use it now. But I recall that in the original (to me) video where you showed how to make the pastry for an apple galette, you said (I think?) that it was not necessary to chill the dough before rolling out for the galette. Do you still think that for galettes? Is it only for pies (or even only blind baked crusts) that chilling is a good idea? Inquiring minds (that is, those of us who do things at the very last minute) pine to know! Thank you.
So nice to hear this, Rose, and I am so glad you brought it up — in one variation of the post, I had included a note about this, but I deleted it so as not to confuse anyone, but I think I might add it back.
So yes, you are absolutely right, I don’t chill the dough for galettes — I’ve always found it easier to roll the dough out immediately, and I’ve never experienced any adverse effects doing so.
The reason I say to chill is mostly because not only was Erin McDowell so emphatic about doing so, but so were a few other pastry whizzes I really admire: Melissa Weller and Claire Saffitz. In all three of these women’s books (that came out last fall), they all emphasize the importance of chilling pastry dough after mixing it for a few reasons: 1. to allow the flour to properly hydrate, to allow the gluten to relax (which makes it easier to roll out), and to decrease the amount the dough shrinks — apparently rested dough shrinks less.
I haven’t done enough experiments to really test, but I just trust that they’re right 🙂 Hope that helps!
Hi! So the crust recipe as written makes 2 discs which is enough for a double crust pie right? I wouldn’t need to double it? I’m so excited to try the tea towel method!
Correct! No need to double. Hope you love it!
Can I par bake the day before I put the filling in to bake off fully? Small oven, too much overtime at work and scary guests at Thanksgiving all at play here.😆
Thanks!!
Yes, absolutely! That is what I am doing this year 🙂 🙂 🙂 Happy Happy Thanksgiving to you and your (scary) guests!!! 🤣🤣🤣🤣
Do you parbake for apple pies?
Hi Elizabeth! I do not parbake for apple pies, but in Erin McDowell’s The Book on Pie, there is a very detailed tutorial. In short, you would do this:
1. Roll out your pie dough and fit into your pan being sure to leave 1-inch of dough overhanging the edge. Refrigerate for 15-20 minutes.
2. Fill it with pie weights, and parbake as directed in this post.
3. Let cool 3 to 5 minutes; then cut the excess crust away so that it is flush with the pie plate. As you work, carefully loosen the crust from the edge so that it is not sticking.
4. Fill your crust. Top it with the other round. Trim it; then tuck the dough under the parbaked crust. Crimp with a fork.
Hope that helps!
I’ve had great success making pie dough in a food processor with a recipe very similar to this, including the ice water. I’ve always wondered though: does ice water mean icy-cold water, or water with ice cubes in it, and if so, do you weigh the water with the ice cubes in it, and how much water to ice cubes are we talking? Does that even make sense, haha? I’ll be making this Wednesday for bourbon pumpkin pie 🙂
Oh yum! Bourbon-Pumpkin Pie sounds amazing!
OK, so I always fill up a liquid measure with water and a lot of ice cubes. Just before I’m ready to use the water, I pour the water into a different vessel on the scale, so there are no ice cubes in the water itself, but the water is ice cold. Hope that makes sense. Happy Happy Thanksgiving to you!
Just made this crust today and parbaked it but now I’m wondering how to store it overnight before I do the final bake tomorrow. Do I just leave it out uncovered or wrap it with plastic wrap? Thanks!
So sorry just getting to this! Going to add notes to the recipe ASAP. I would let it cool completely; then store it in a giant ziplock if you have it. Store it at room temperature. Plastic wrap will work, too.
Hope the pie/pies turned out well, and I hope you had a wonderful Thanksgiving!
I ended up leaving it out uncovered and despite a small nibble from a naughty dog, it was everyone’s favorite pie crust!
Oh yay! So nice to hear this, Julia! Thanks for reporting back. I updated the recipe with notes 🙂
I used your fool proof pie dough recipe (love the tea towel technique!) and followed your instructions here, and I think I made my best pie crusts to date. Thank you so much! I didn’t even tell anyone in the family I had switched things up this year, but multiple people (both family and new guests) commented on how good the pies were and specifically mentioned the crust. My mom even said she thought I was perfecting my pie making skills. And it’s all thanks to you!
Oh yay! Lindsey, it’s so nice to read all of this. Love that your family commented without you having to hint. Thanks so much for writing. Hope you had a wonderful Thanksgiving.
The video was incredibly helpful, I learned a few new tricks. Thank you so much for taking the time to explain how to get the pie crusts just right and for making the video. Loved the piano towards the end. I actually looked up from my telephone for a second to see if it was my son playing! 😁
Awwww so sweet 🙂 🙂 🙂 Love this so much. Thanks so much for writing!
Recommendation of frozen piebcrusts.
Using the beggar’s purse is so fabulous. The discs are perfectly rounded and ready to roll. I’ll let you know on Thanksgiving Eve day how they turned out for my double crust apple pie and the two prebaked pumking custard pies.
Wonderful to hear, Linda! I’m parbaking all of my crusts today. Good luck with your pie making!
Thanks for the great recipe! I have pastry flour from King Arthur that I want to try. Would I just sub it out 1:1 with the AP or would I need to make other adjustments? Thanks in advance!
I think a 1:1 swap should be just fine! I bet it will turn out great. Good luck!
Are we putting the sheet pan directly on to the baking steel or just having in the oven? The sheet pan should be in the lower 1/3 of the oven regardless if using baking steel? Thanks again Ali!
Pan directly on the Baking Steel. Middle or lower third of the oven is fine. Good luck Shelley!!
Happy Thanksgiving Ali!
Thank you for this wonderful tip about par-baking!
Like you, I avoid par-baking for all the same reasons! Last night I par-baked the crust for the sweet potato pie I will be making and it came out beautiful!
I am wondering if I should do the same for the apple crumble pie as well?
I am always trying to up my “game” and I know this tip will certainly help me succeed!
Have a lovely holiday filled with many sweet memories!! 🍁🥧🧡
Great to hear, Stacey!! Thanks so much for writing. And yes, I can’t think of a pie that wouldn’t benefit from a parbake. How long does the apple crumble bake for total?
Looks delish! Is the kosher salt in this recipe (and typically in your recipes in general) Diamond Crystal or Morton’s?
Hi! It’s Diamond Crystal 🙂
Perfect, thanks! Can’t wait to try this tonight.
Not to be dramatic, but this dough recipe changed my life! After a few disastrous attempts at homemade pie dough I had resigned myself to premade frozen pie shells. After seeing this recipe on Instagram I decided to try homemade one last time and I’m so grateful I did. What a breeze, and the results couldn’t be more delicious.
Both the Apple Galette and Salted Maple Pie turned out wonderfully.
Thank you for sharing this recipe. Happy Thanksgiving to you and yours.
So nice to read this, Cody 🙂 🙂 🙂 Thanks so much for writing and sharing your experience. And Happy Thanksgiving to you as well!!
this is my first butter pie so I was very careful to follow the directions. All was well until I took the beans out (making a blind crust) and i discovered all this butter and a wet crust bottom. Any idea what happened? Also the crust humped up in the middle after the beans came out
We use your bread cookbook always.
Hi Linda! Questions: did you use a scale to measure? What material was your pie plate? Regarding the hump in the middle, did that happen after you returned the pan to the oven without the beans in it?
The hump went away but the bottom of the crust was pretty wet with butter. After the second time in the oven I turned the oven off and set the pie (no weights) in the oven to see if it would dry. It did but we’ll see how it turns out when I cut the pie.
I used my old Corning plate and yes, I always use the scale.
So far I found making a Crisco crust much easier but I know that stuff isn’t at all healthy.
Looking forward to your new book.
Thank you, Linda 🙂
My only other thought is that you may not have cut the butter into small enough pieces. I always use my food processor, and once when I used my food processor, depsite counting for 10 pulses, I just didn’t get the butter small enough, and I noticed this when I was rolling out the dough — the butter was in too large pieces… in other words, not totally blended with the flour. As a result, a lot of butter seeped out when I baked it.
Do you think something like this may have happened to you?
I had given up on homemade pie crusts and resorted to ready made crusts. This recipe is outstanding. Beautiful flaky crust. Forming in a towel is a game changer. Made a beet galette which involved spreading Boursin cheese on the crust and topping with sliced beets.
Thanks Ali !
Oh wow! That sounds absolutely outstanding! Thanks so much for writing and sharing this, Donna.
Wonderful video, wonderful instructions, and wonderful pie crust. When I make the crust for a savory tart or quiche ( Alexandra’s version of Tartine’s creme fraiche and swiss chard quiches), I do not add the sugar to the dough. It’s amazing to make a quiche without a soggy bottom crust. Anyone fearful of piecrust and blind baking should fear no more.
Hi! Just want to ask if I should remove the parbaked crust from the pie plate if I want to store it in an airtight container? Will it deform or soften when I store it even though it is not fully baked? I want to make big batch of mini custard pies but I only have few pie plates. I would like to parbake in advance so I can save time on my actual baking day. Thank you!
The parbaked crusts should hold up fine in an airtight container for a few days. So yes, it’s OK to remove the crusts from the pie plates.