 →
→ Simple Sourdough Ciabatta Bread
This post may contain affiliate links. Please read my disclosure policy.
Made with four ingredients, this sourdough ciabatta has a crisp crust, a beautiful honeycomb crumb, and a lovely lightness and chew. The process is truly simple, and the ciabatta is so tasty, perfect for sandwiches of all kinds, for dunking into soup, or transforming into bruschetta.

Originating from the Lake Como region of northern Italy, ciabatta means “slipper” in Italian. Traditional ciabatta is characterized by its slipper shape and extremely porous, light texture, created with a biga (a preferment), a high-hydration dough, and a long, slow rise.
A biga is made with a small amount of yeast, flour, and water. In this recipe, I’ve replaced the biga with a sourdough starter, but kept the remaining elements the same: the high-hydration dough is made with four ingredients and requires a long, slow rise, which produces a crisp crust, a beautiful honeycomb crumb, and a lovely lightness and chew. This ciabatta is perfect for sandwiches.
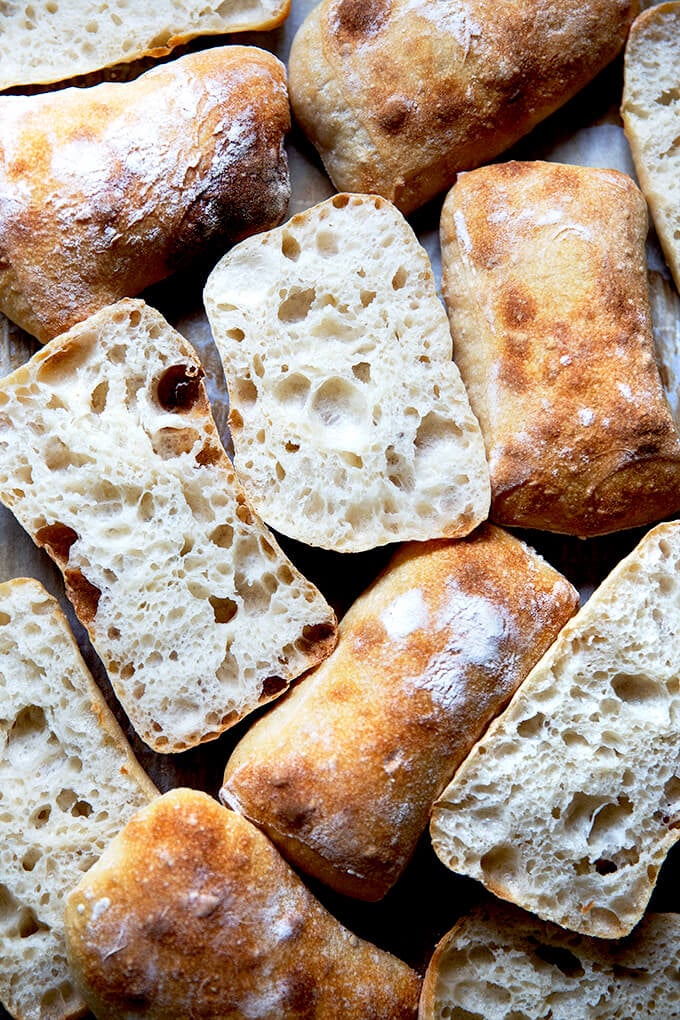
Best of all: the process is truly simple. The dough does not require an autolyse, a preheated Dutch oven, or a baking stone. If you have a sheet pan, you’re good to go. What’s more, there’s no shaping, scoring, or balling up dough. After the bulk fermentation, you turn the dough out onto a floured work surface, pat it into a rectangle, and divide it into 8 pieces. You then transfer those pieces, irregularly shaped and all, to a sheet pan, and bake them one hour later.
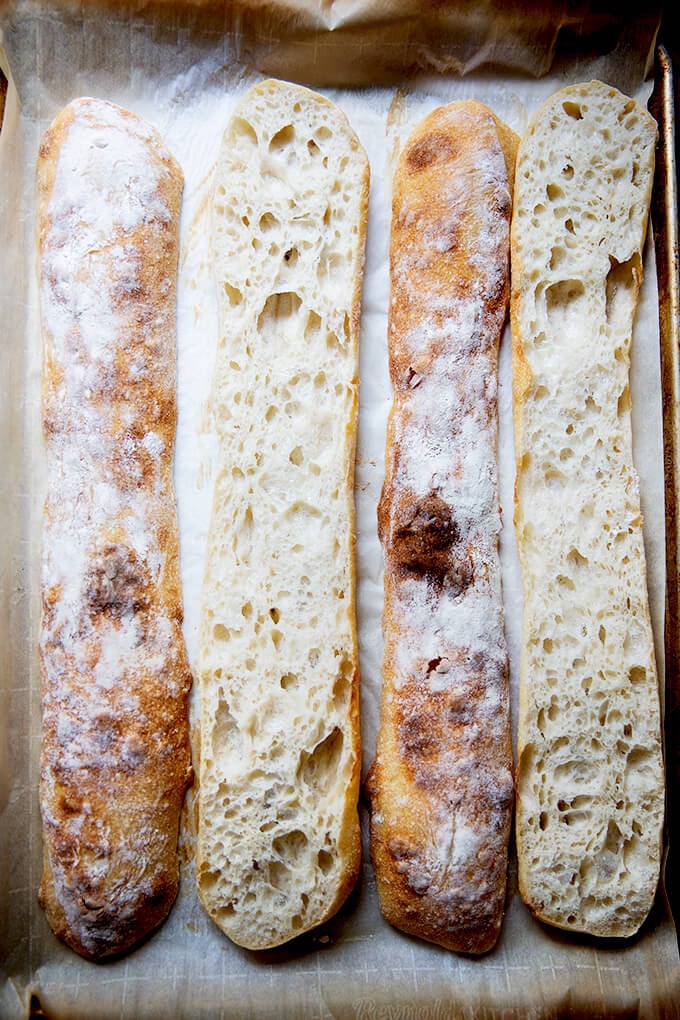
Can I tell you the most exciting part? This dough makes an excellent baguette! Unscored and flour-dusted, it has a crumb and flavor better than any other I’ve attempted previously. See photos below.
PS: If sourdough isn’t your thing, please try this yeast-leavened ciabatta bread recipe.
How to Make Sourdough Ciabatta, Step by Step
Gather your ingredients: bread flour, water, salt, and a sourdough starter. I am a proponent of buying a starter (see recipe box for sources), but if you are up for it, you can build a starter from scratch in just about 1 week.
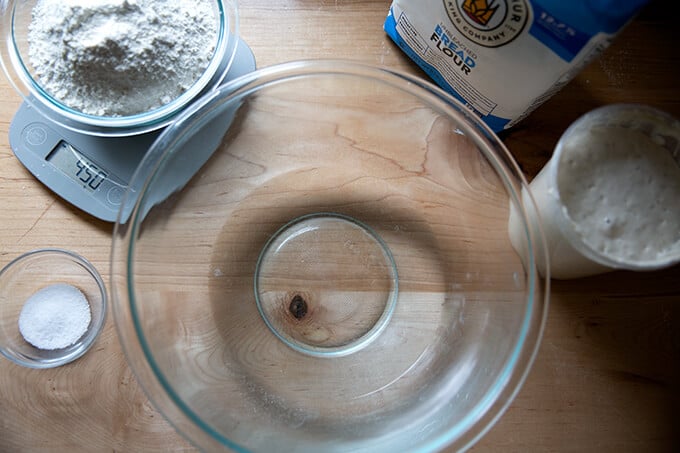
For this recipe, you’ll need: 100 grams sourdough starter, 360 grams water, 450 grams flour, and 12 grams salt. It’s 80% hydration.

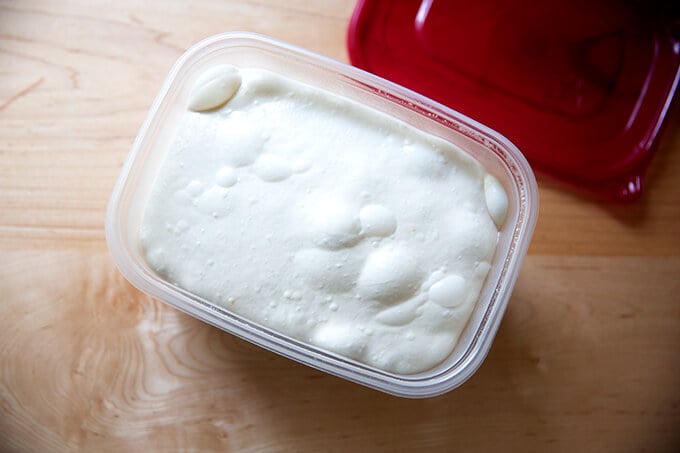
Mix together the water, sourdough starter, and salt.
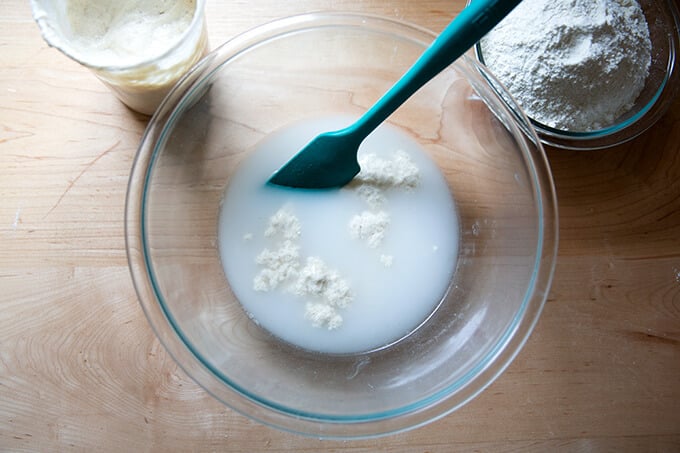
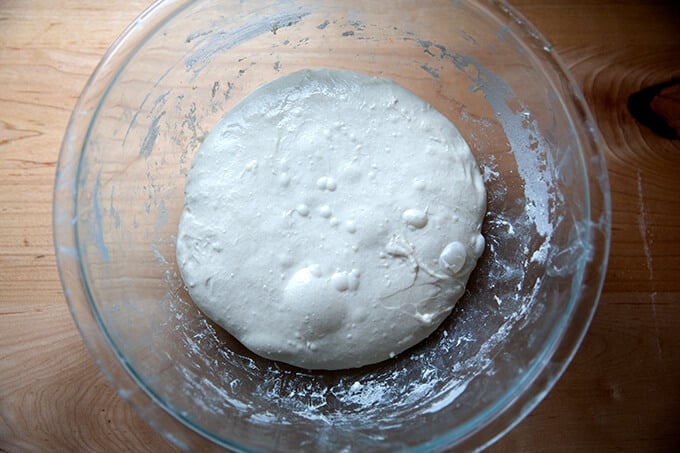
Add the flour and mix to form a sticky dough ball.
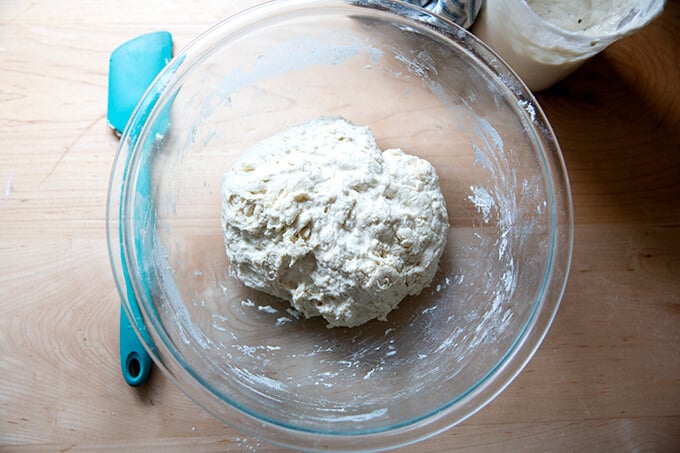
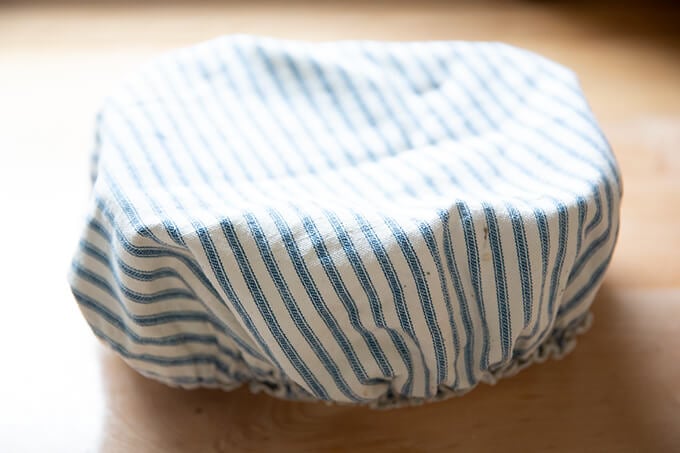
Cover the bowl and let rest for 30 minutes. Then perform a set of stretches and folds. See the video above or in the recipe box for guidance. This is what the dough will look like after one set of stretches and folds.
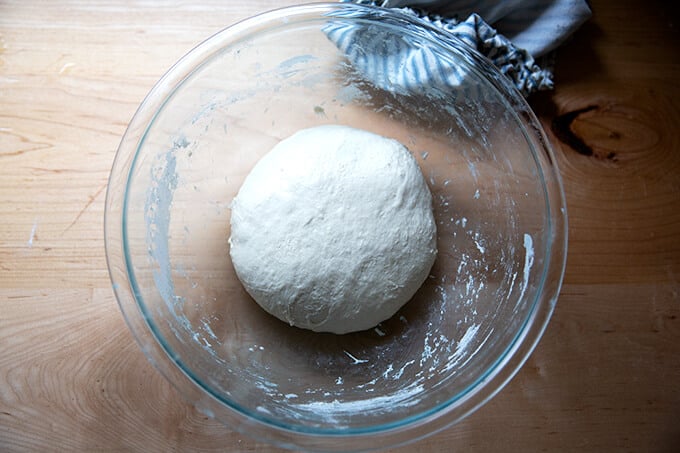
This is what the dough will look like after 4 sets of stretches and folds.
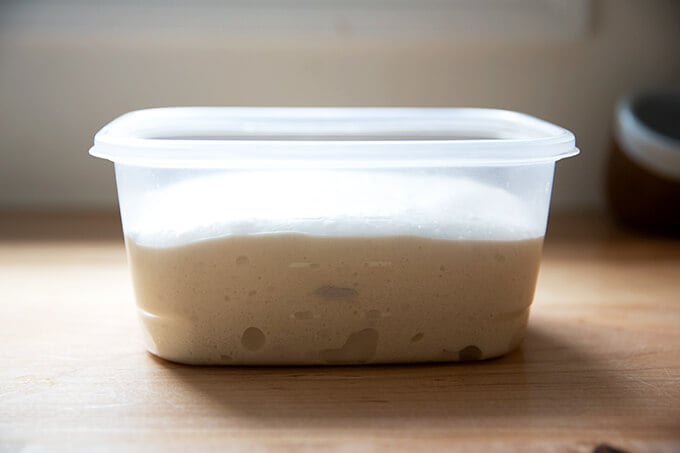
Transfer dough to a straight-sided vessel (this one is 8 cups, but anything similarly sized will do) for the bulk fermentation (the first rise):

Mark the height of the dough on the vessel, cover the vessel, and let the dough rise until it increases in volume by roughly 75%.
When the dough has increased by 75% (roughly), place a lid on the vessel, and transfer it to the fridge for 12-24 hours.
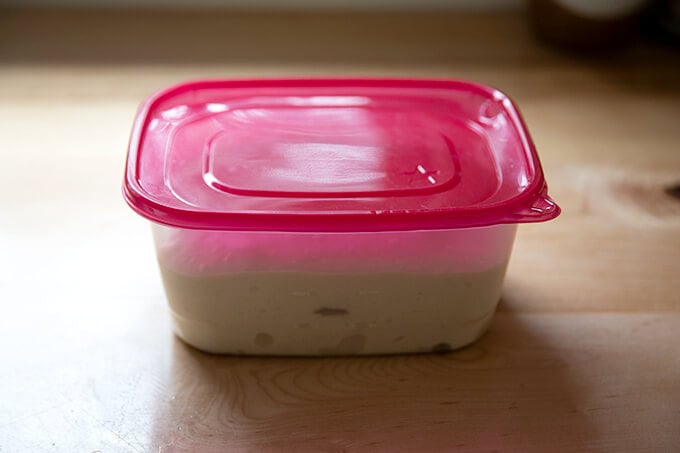
When ready to bake, remove the vessel from the fridge.
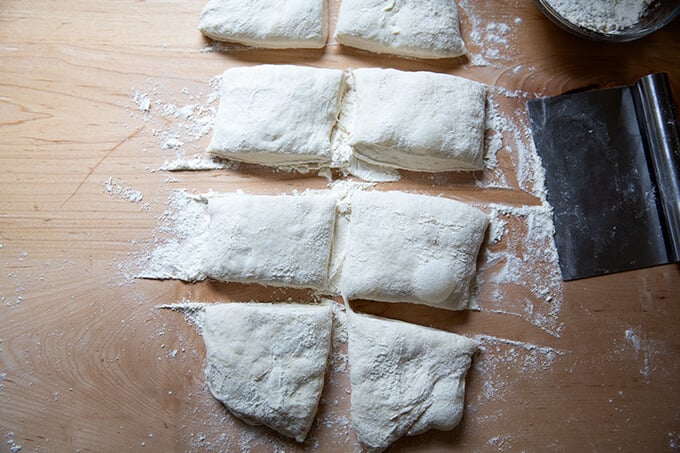
Dust the top of the dough liberally with flour. Dust a work surface liberally with flour, too.
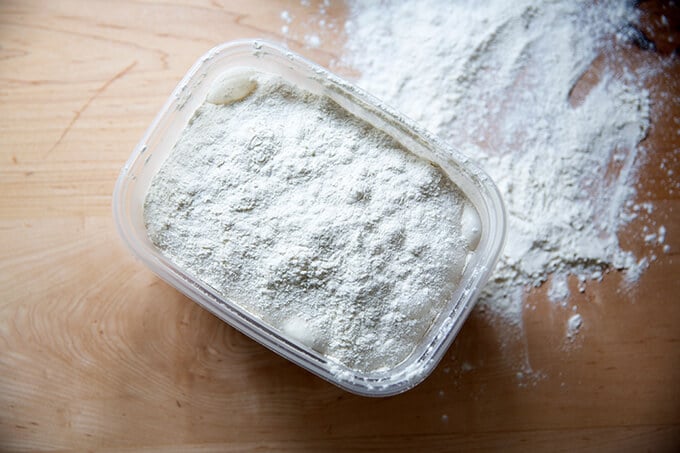
Turn the dough out onto the prepared work surface.
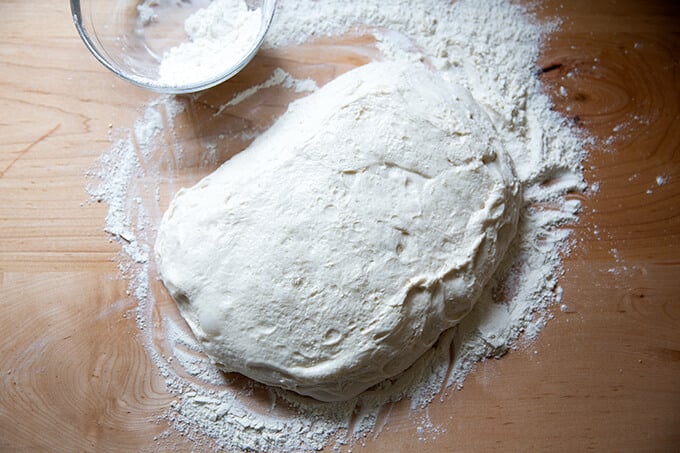
Pat the dough into a rectangle.
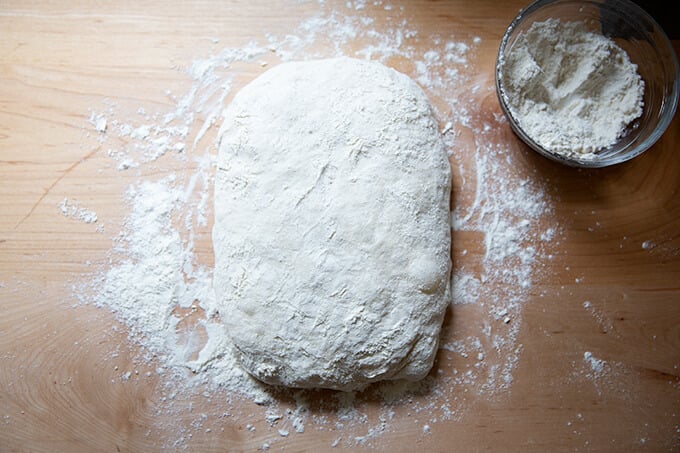
Cut the rectangle into 8 roughly equal portions.
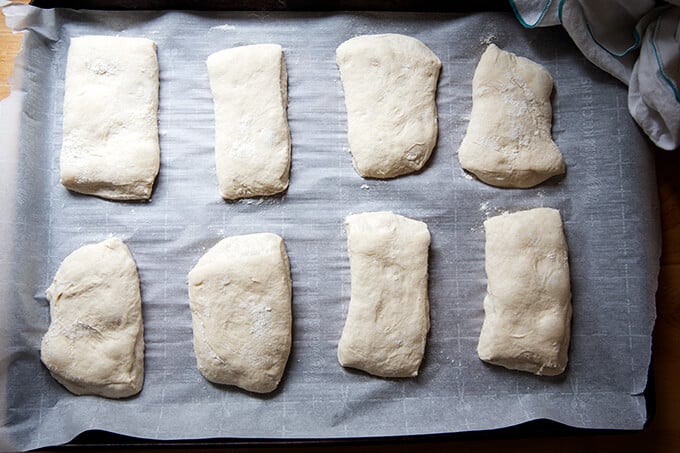
Transfer the portions to a parchment-lined sheet pan. Let rest for 1 hour. Then transfer to a 475ºF oven for 10 minutes. Lower the heat to 450ºF and bake for 10 minutes more.
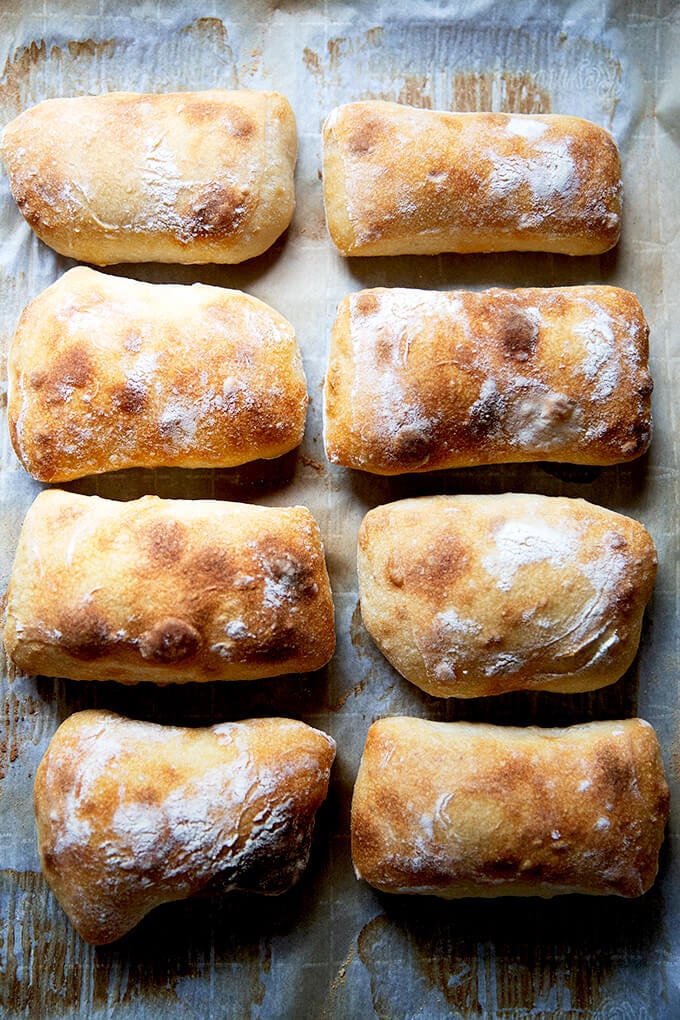
Transfer the rolls immediately to a cooling rack, and let cool for at least 20 minutes before cutting.
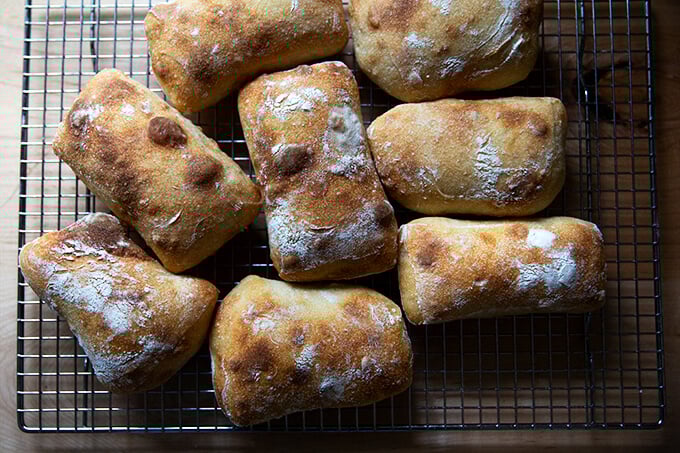
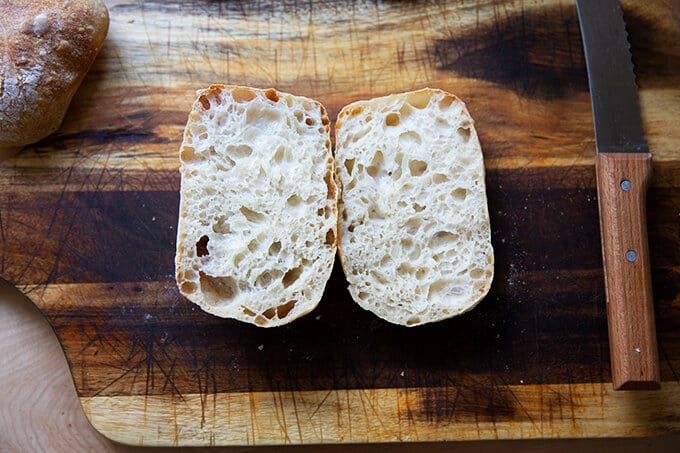
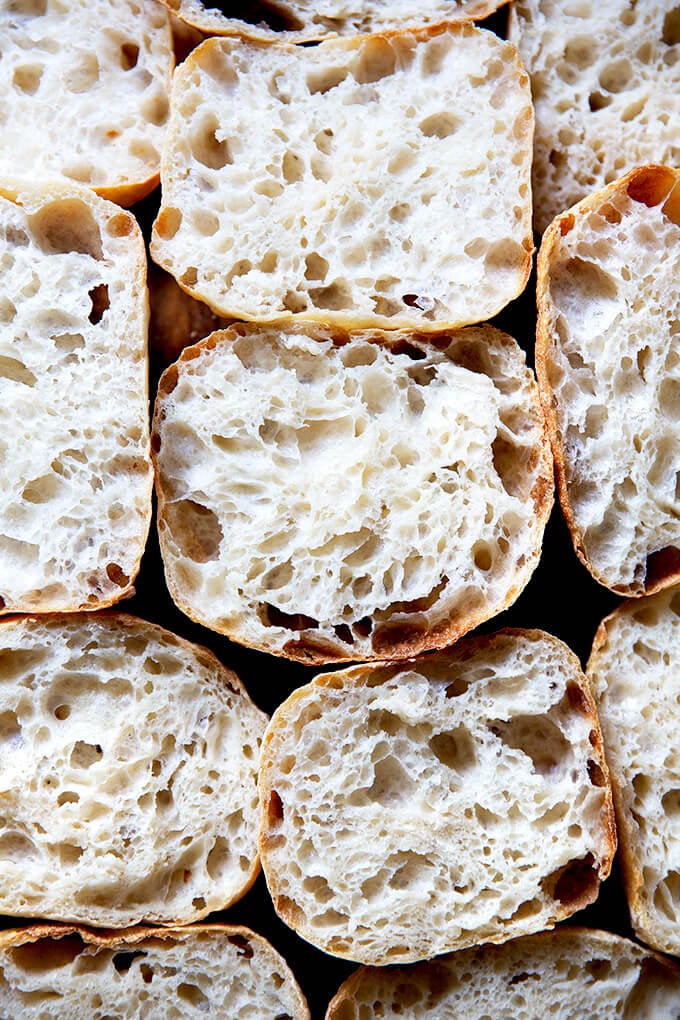
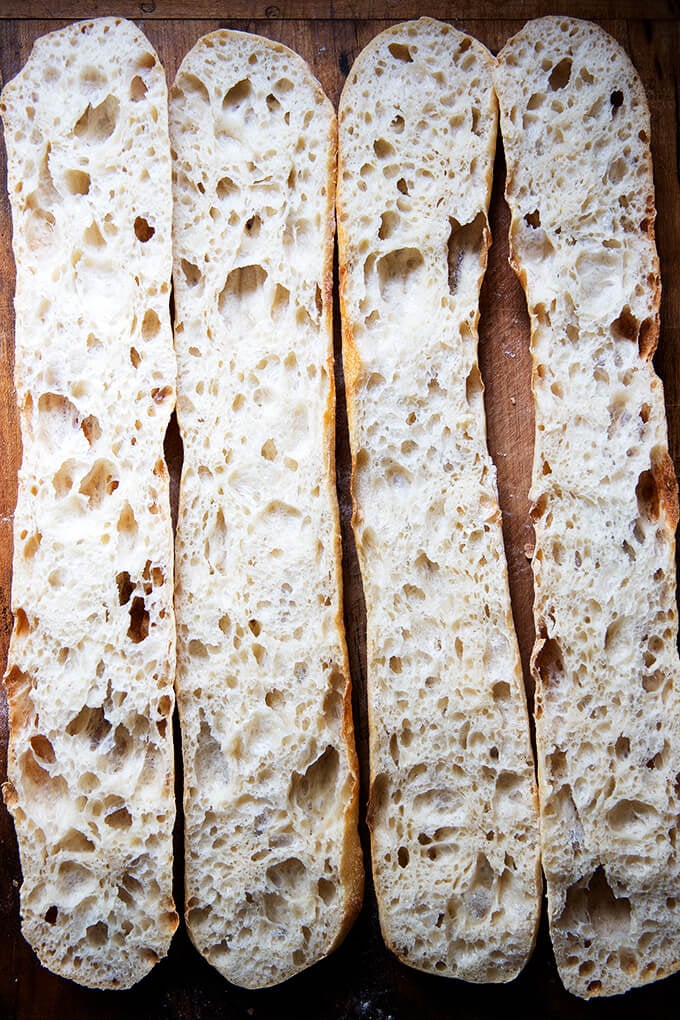
How pretty is that crumb?
Ciabatta sandwich: This recipe is inspired by Gabrielle Hamilton’s Blood, Bones, and Butter. In short, the success of the sandwich relies on a delicate balance: “the perfection of three fats together — butter, olive oil, and the white fat from prosciutto or lardo.” To make it, spread good bread with “cool waxy butter,” top with prosciutto (more than you think), and arugula. Drizzle it all with good olive oil.

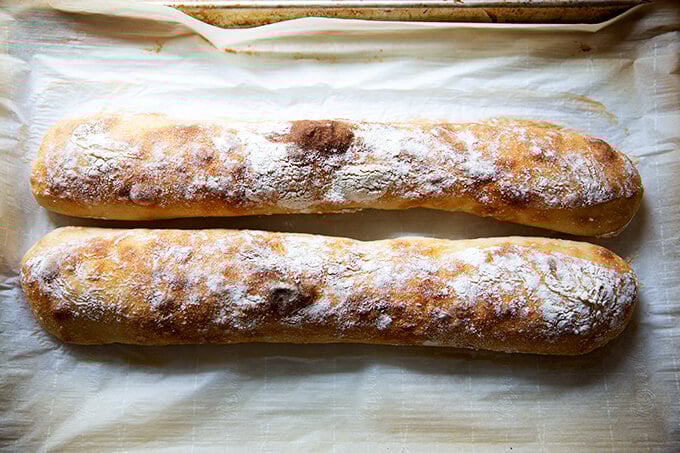
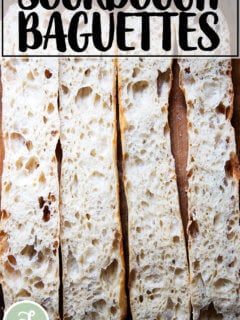
Sourdough Ciabatta “Baguettes” 🥖🥖🥖
To make baguettes, follow the same process, but instead of dividing the rectangle of dough into 8 portions, divide it into two. I find an extra-large sheet pan to be necessary to bake both baguettes at the same time. If you don’t have an extra-large sheet pan, I would bake one baguette at a time, and orient it at a diagonal angle from one corner to another.
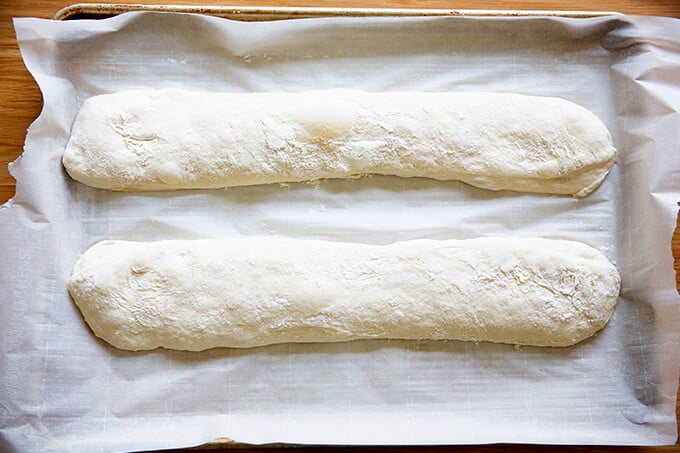
Bake the baguettes at the same temperature and for the same amount of time as the rolls.
Not bad for the effort, right?
These ciabatta “baguettes” would be great vessels for giant sandwiches.

Simple Sourdough Ciabatta Bread
- Total Time: 24 hours 20 minutes
- Yield: 8 Rolls 1x
- Diet: Vegan
Description
Made with four ingredients, this sourdough ciabatta has a crisp crust, a beautiful honeycomb crumb, and a lovely lightness and chew. The process is truly simple, and the ciabatta is so tasty, perfect for sandwiches of all kinds, for dunking into soup, or transforming into bruschetta.
Notes:
- You need an active sourdough starter. You can build a starter from scratch in just about 1 week. But I am a huge proponent of buying a starter. Here are two sources:
- As always, I highly recommend investing in a digital scale before beginning any bread baking adventure.
Flour: I have had success using all-purpose flour, but if you can get your hands on bread flour, that is ideal, especially if you live in Canada or abroad. Moreover, if you live in Canada or abroad, you may need to reduce the water amount. Consider holding back some of the water during the mixing process to ensure you don’t end up with a soupy mess.
Straight-Sided Vessel:
- The vessel I use in this recipe, similar to this one, is 8 cups. Most grocery stores carry storage vessels similarly sized.
- Using a straight-sided vessel for the bulk fermentation will help prevent over-fermentation because it allows you to see when the dough has truly increased by 75% (or slightly more or less) in volume.
Ingredients
- 360 grams (about 1.5 cups) water
- 12 grams (about 2 teaspoons) salt
- 100 grams (about 1/2 cup) active sourdough starter, see notes above
- 450 grams (about 3.5 cups) bread flour, see notes above
Instructions
- Mix the dough: Place the water in a large bowl. Add the salt and stir briefly. Add the starter and stir briefly to incorporate. Add the flour, and stir until you have a wet, sticky dough ball. Knead briefly with your hands if necessary to incorporate the flour. Cover with a tea towel or cloth bowl cover and let sit for 30 minutes.
- Stretches and folds: With wet hands, grab one side of the dough, and pull up and to the center. Rotate the bowl a quarter turn, and repeat the grabbing and pulling. Do this until you’ve made a full circle. (Watch the video for more guidance. I do a few more pulls and turns in the video.) Cover the bowl. Repeat this process three more times at 30-minute intervals for a total of 4 sets of stretches and folds over the course of two hours. (In the video, I switch to coil folds for the last two sets of stretches and folds.)
- Bulk fermentation: Transfer the dough to a straight-sided vessel. Cover the vessel with a towel. Let rise at room temperature until the dough nearly doubles in volume (shoot for a 75% increase in volume). Times will vary depending on your environment and the strength of your starter. Recently, this has taken about 4 hours for me, but don’t worry if it takes longer for you. Cover vessel with a lid (ideally) or a towel (if you are using a towel, slick the top of the dough with oil to prevent it from drying out.) Transfer to fridge for 12-24 hours.
- Shape: Remove vessel from fridge. Remove lid. Sprinkle top of dough liberally with flour. Turn dough out onto a floured work surface. Pat dough into a rectangle. Sprinkle top with flour. Use a bench scraper to cut the dough in half vertically. Then make three cuts equally spaced in each half to create 8 small rectangles.
- Line a sheet pan with parchment paper. With floured hands, transfer each rectangle to the prepared pan, gently pulling outward. Cover the pan with a towel. Let stand for one hour.
- Bake: Heat oven to 475ºF. Transfer pan to oven and bake for 10 minutes. Lower heat to 450ºF, rotate pan, and bake for 10 minutes more. Remove pan from oven. Transfer ciabatta rolls to a cooling rack. Let cool for 20 to 30 minutes before slicing.
- Prep Time: 24 hours
- Cook Time: 20 minutes
- Category: Bread
- Method: Oven
- Cuisine: American, Italian
This post may contain affiliate links. Please read my disclosure policy.


804 Comments on “Simple Sourdough Ciabatta Bread”
Okay, I’ve just finished making the recipe for the second time, and they are delicious. No complains about the taste or texture. However, I can’t get them to brown! What am I doing wrong? I would love some advice. Thank you so much.
Jackie, hi! What kind of flour are you using? Including the brand name would be helpful, too.
I’m using King Arthur bread flour. I called their bakers help line and they think I might have over proofed it because the inside was a little gummy as well.
OK, thanks for reporting back!
Thank you very much for all the amazing recipes. I have tried multiple of your sourdough recipes in the past few weeks with great success. My ciabatta came out tasty but a little flat and thin. I think my issue was my lack of gluten development. I just got a Kitchen Aid stand mixer which I have been learning to use for sourdough. The manual says a max speed of 2 when mixing dough. After 10 minutes of mixing on speed 2, my dough still doesn’t pass a windowpane test. The dough also never gathers together as one ball around the dough hook but rather stuck to the bottom of the bowl with the hook mixing the center of the dough only. Before I knew about max speed of 2, I used speed 6 and the dough balled up and appeared to have a good structure. Any tips for using the Kitchen Aid? I read online that stretch and folds should not be necessary when using a stand mixer. All advice is greatly appreciated! I can’t wait to try the recipe again.
Hi Preston! I have never used my Kitchen Aid for sourdough — only stretches and folds — so I’m not sure how to advise there. I might consider trying the recipe without the Kitchen Aid. I’m wondering if you might need to reduce the water. Do you live in a humid environment? Are you using a scale to measure?
Did this on a Ninja woodfire outside grill and came out heavenly. The backing was quicker, just preheat Grill high. Transfer pan to oven and bake for 5 minutes. Lower heat to medium rotate pan, and bake for 5 minutes more.
Wow, amazing! Great to hear and thanks for writing 🙂
I never reply on recipe blogs. This recipe is amazing. I’ve both ways now. My husband raves about it. I’m raising 3 hungry grandkids. They LOVE IT! It’s an easy recipe, with great instructions.
My husband can be picky. I did make a minor change. I used 2 cups bread flour & the rest 00 flour. This dough will make killer pizza crust too.
Thanks!
Great to hear, Lina! Thanks so much for writing 🙂 🙂 🙂
I added olives and rosemary and it turned AMAZING! It was much easier than regular sourdough loaves too.
Thank you so much for sharing Ali 🙂
Great to hear, Em! Thanks for writing 🙂 🙂 🙂
I love all your recipes and make the sandwich bread all the time. This was my first time making the ciabatta rolls and they are delicious with a beautiful crumb, but like several other commenters they aren’t brown and crispy on top. I use the Kirkland organic AP flour from Costco. Do you have any recommendations for a better crust?
I might try using King Arthur Flour bread flour. King Arthur Flour adds malted barley flour to their bread flour, which helps with browning. You could also try increasing the oven temperature.
So easy & delicious!!
Great to hear, Kayla!
I tried your recipe, and it turned out well. The crumb was perfect, although the crust was a bit thicker than I thought it would be. In any case, my problem was that it didn’t turn out golden, like yours. It was a rather unappetizing grey-brown color. Crust was still good, but not the awesome color you got. Is it just the differences in our ovens?
Hi Dan! Bummer to hear about the color. Possibly it is an oven issue. What type of flour are you using? Brand name would be helpful.
WOW! These were so yummy and easy to make! Question about storage: should I do foil, or kitchen towel to store? Can they be frozen and reheated later? Thanks for this awesome recipe!
Great to hear! I actually prefer a ziplock bag — any vessel or bag that is airtight is best for storing bread to preserve its freshness. I always reheat day-old bread to revive its crust before serving. Yes, you can definitely freeze for a future day!
I’ve made this and it’s perfect!
If I’m making sourdough baguettes, is this the best recipe? If so, should I divide the dough into 3 or 4 pieces to fit the baguette pan? Assuming cook time would be a little less?
Great to hear, Scott! I think for this recipe, dividing the dough into 3 pieces should be fine, but I think that all depends on how big your baguette pan is.
I have only ever made baguettes on a sheet pan using this recipe. I make 2 large baguettes. Bake time and temp are the same. Is the baguette pan you are using lidded? I’m not sure how to advise… I’d suggest probably the same temperature. Maybe do 10-15 minutes covered; then uncover and bake until browned to your liking?
I finally have a successful sourdough starter going, and made this recipe today. OMG I am so happy. It was very easy to do, I carefully watched the YouTube video that showed me everything I needed to do. They turned out amazing!!!! I’m SO happy. Thank you for this wonderful recipe <3
Great to hear, Rachelle! This is one of my favorite sourdough recipes for its ease + payoff. So easy and good! Thanks or writing 🙂
Wanted to bake some ciabatta bread, but the starter is unavailable on Amazon now. Could you please recommend me some alternative? Thank you!
Hi! I have a yeast version of the recipe here: How to Make Fresh Homemade Ciabatta Bread
Hi Ali.
Thank you for all your wonderful recipes.
I tried the sourdough ciabatta bread and it was a success! Definitely, this is on my weekly to do list!
Your recipes are easy to follow and I refer to your cookbook (bread toast crumbs) often😊
So nice to read all of this, Silvia 🙂 🙂 🙂 Thank you for your kind words.
Hi Ali, I mixed up the dough today and am planning to back off the ciabatta tomorrow. Do you think using a silpat instead of parchment paper would make a meaningful difference? I prefer to use them to reduce waste, but I’ve found that it’s not a great swap for all recipes. Thanks!
Hi Taylor, I think it should be fine. I honestly haven’t used a Silpat in ages, however. Do you find it makes for a less crisp bottom? That is is my only thought here, but I’m thinking this crust is crisp enough, so the extra insulation from the Silpat will be fine.
Just baking my rolls right now and I have six minutes left on 450 and mine are not nice and brown. They look very pale. Is there a trick to making them dark on the outside?
Hi! It’s possible you just need to crank up your oven a little hotter. Is it generally accurate?
I’ve been baking Sour Dough loaves for a couple of years and got it off to a tee using cast iron pot. Tried this recipe to make rolls and WOW they are brilliant, especially hot from the oven with a fried egg!
Whats you perspective on batch baking & freezing. I do this with slices loaves with great success.
Cheers
Hi Dean! Great to read all of this. I am a fan of freezing all breads! I think that’s the much better way to go versus freezing dough balls, which, especially in the case of sourdough, just do not perform well after any amount of time in the freezer.
If I wanted a larger loaf, would you think splitting in half would be a good size? Or would you use all the dough for a single rustic loaf?
Thanks for the recipe.
I think splitting the dough in half is a great idea.
I just took the ciabatta rolls out of the oven an hour ago. They are perfect. I had such difficulty with very sticky dough when I first started baking sourdough a year ago . I finally get it and no longer fear the goopiness. Your instructions are so good. I have been using your guidance all along and have had such satisfying successes. Thank you again for making this “craft” so approachable.
So nice to read this, Kate 🙂 🙂 🙂 Thanks so much for writing and sharing this.
Ooh! These came out beautiful! Nice crumb and chew. I had the dough cold fermenting for about 18 hours, using a very happy WW/dark rye starter. Thanks for sharing! *thumbs up*
Had no issue (as some seem to have) with browning and crispness of the crust. I gave them a spritz of water before placing in the oven, and used the convection fan and a slightly lower temp. Worked perfectly. Just stay near the oven, haha!
Great tips, Nat! A spritz of water is a great idea. Thanks so much for writing and sharing all of this — so helpful for others.
Oh my this one is so good! Definitely will be a new staple in my weekly preps for the week, kids loved them too
Great to hear, Lisa! Thanks so much for writing 🙂 🙂 🙂
These were absolute perfection. 🙏🏼
Great to hear, Michelle!
I have this recipe proofing as I type this (as well as your sourdough focaccia, which I have made so many times before :).
I’m wondering if it would be possible to make these into round rolls instead of flat rolls. I was hoping to have smaller individual serving sizes to enjoy with pasta, and wondering your thoughts on making these into 16 individual servings instead of 8. Love your recipes. My go to for all things sourdough!
Yes, absolutely! Go for it … I’m likely too late here… so sorry. Thank you for your kind words. It’s so nice to read all of this.
LOVE this recipe! Super easy, and very well explained. Came out so good I’m making it again 2 days later 🙂 Good little tips included as well
Great to hear, Genevieve! Thanks for writing 🙂
Perfect! Now apart of my rotation! Thank you!!
Great to hear, Savannah!
I’ve made this recipe a bunch of times now and they always come out perfect! Dunno about others, but I always place my tray on the middle rack and spritz with water. The crust comes out perfect and browned every time.
I’m trying the “baguettes” this time, and want to make them more rounded and baguette-like (instead of flattened and ciabatta-like). Do you think it would make a difference in oven spring or baking duration if I shaped them differently? Have you tried this?
Great to hear, Laurel! Thanks so much for writing and sharing your notes. I don’t think there will be any difference in oven spring or baking duration if you shape them differently. Go for it!
Can I add some olive oil to the dough; like focaccia
Worth a shot! It might affect the crumb but it will of course be delicious.
The crumb was good but the rolls were a little flat. But delicious
Any suggestions for flat rolls that don’t rise? I’m trouble shooting this recipe after attempting it twice. The rolls are very flat and slightly domed after baking. I’m using King Arthur bread flour.
Are you using a scale to measure?
Yes! I’m using a scale. Possible Do you ever let the shaped dough proof longer than 1hour?
You can definitely let the shaped dough proof for longer than one hour! Great to hear you’re using a scale. Are you new to sourdough?
Yes, I am fairly new to sourdough. And thought ciabatta would be a good place to start, especially with very little shaping (to affect oven spring).
OK, good to know all of this. It might be worth spending some time strengthening your starter. And I think I can tell from your email that you’re in Canada, right? Having troubleshooted with many Canadians over the years, I’ve found that sometimes reducing the amount of water helps, so you may want to consider holding back some water from the start.
Check out this troubleshooting post: Why is my sourdough so sticky? 4 Common Sourdough Mistakes + Answers to FAQ’s
I’d also consider starting with focaccia if you are new to sourdough — it’s high hydration but very forgiving: Simple Sourdough Focaccia: A Beginner’s Guide
So so good!!!
Can I overnight proof in the fridge longer than 24 hours? I miscalculated the timing for one part of the recipe.
Yes! Up to 48 hours should be fine.