 →
→ Simple Sourdough Ciabatta Bread
This post may contain affiliate links. Please read my disclosure policy.
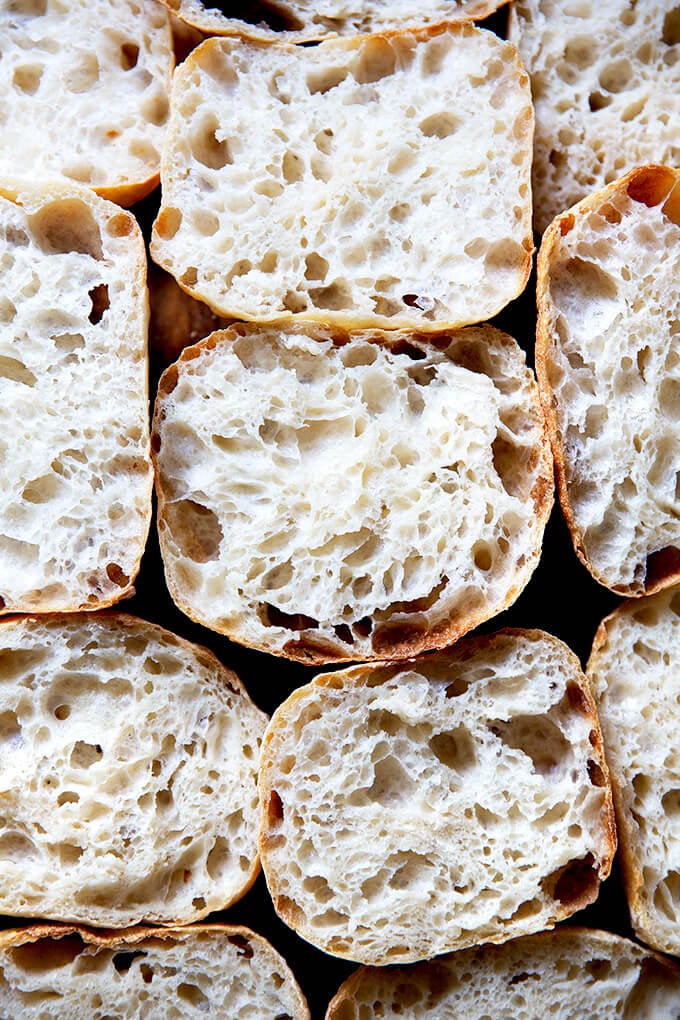
Made with four ingredients, this sourdough ciabatta has a crisp crust, a beautiful honeycomb crumb, and a lovely lightness and chew. The process is truly simple, and the ciabatta is so tasty, perfect for sandwiches of all kinds, for dunking into soup, or transforming into bruschetta.

Originating from the Lake Como region of northern Italy, ciabatta means “slipper” in Italian. Traditional ciabatta is characterized by its slipper shape and extremely porous, light texture, created with a biga (a preferment), a high-hydration dough, and a long, slow rise.
A biga is made with a small amount of yeast, flour, and water. In this recipe, I’ve replaced the biga with a sourdough starter, but kept the remaining elements the same: the high-hydration dough is made with four ingredients and requires a long, slow rise, which produces a crisp crust, a beautiful honeycomb crumb, and a lovely lightness and chew. This ciabatta is perfect for sandwiches.
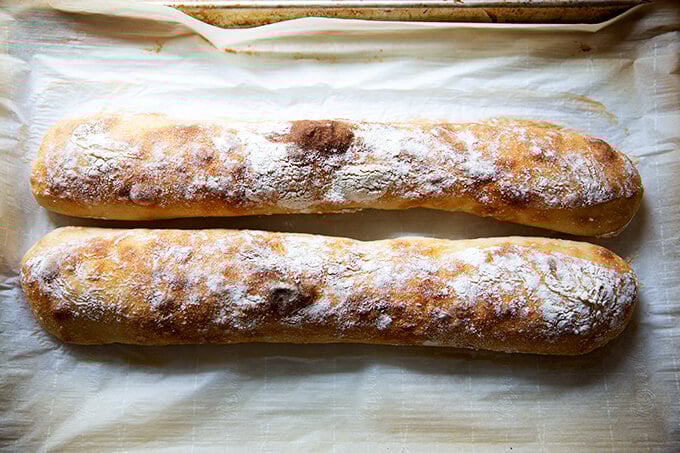
Best of all: the process is truly simple. The dough does not require an autolyse, a preheated Dutch oven, or a baking stone. If you have a sheet pan, you’re good to go. What’s more, there’s no shaping, scoring, or balling up dough. After the bulk fermentation, you turn the dough out onto a floured work surface, pat it into a rectangle, and divide it into 8 pieces. You then transfer those pieces, irregularly shaped and all, to a sheet pan, and bake them one hour later.
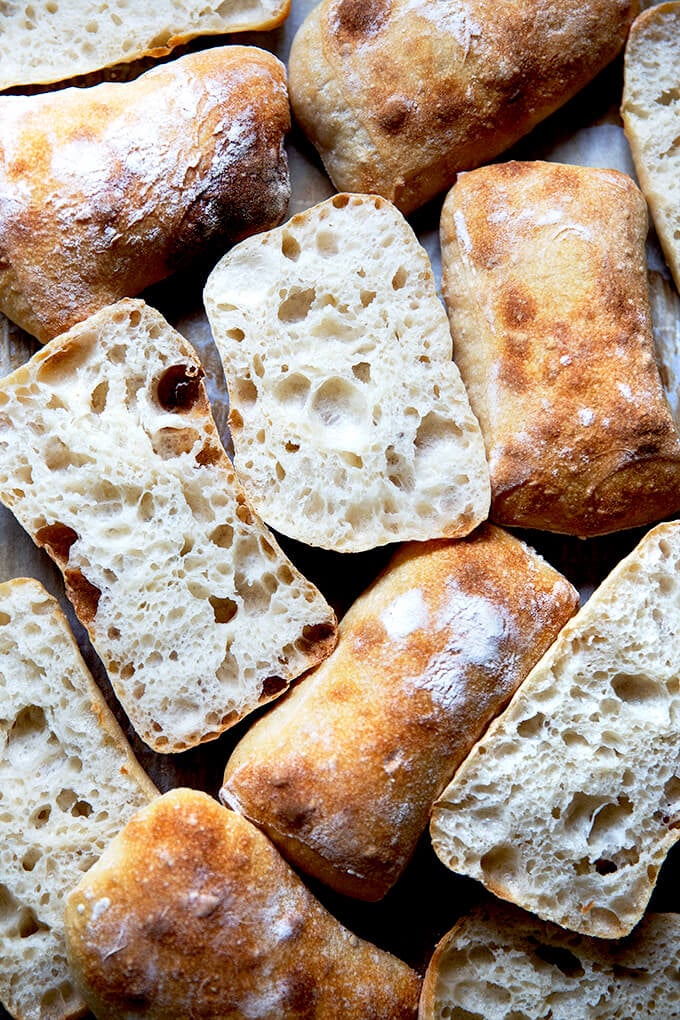
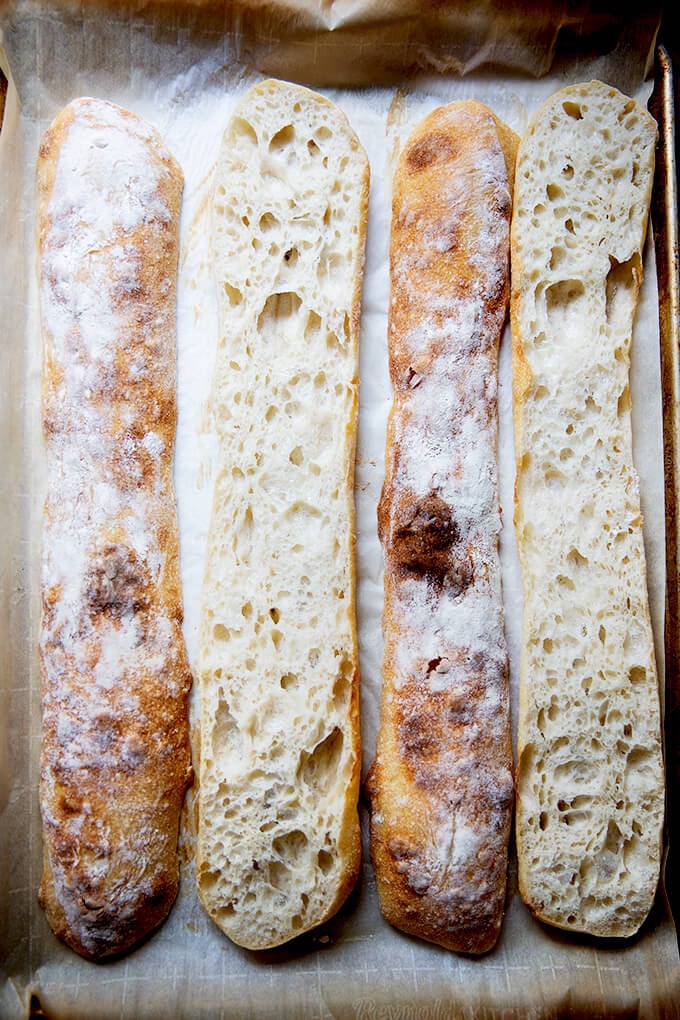
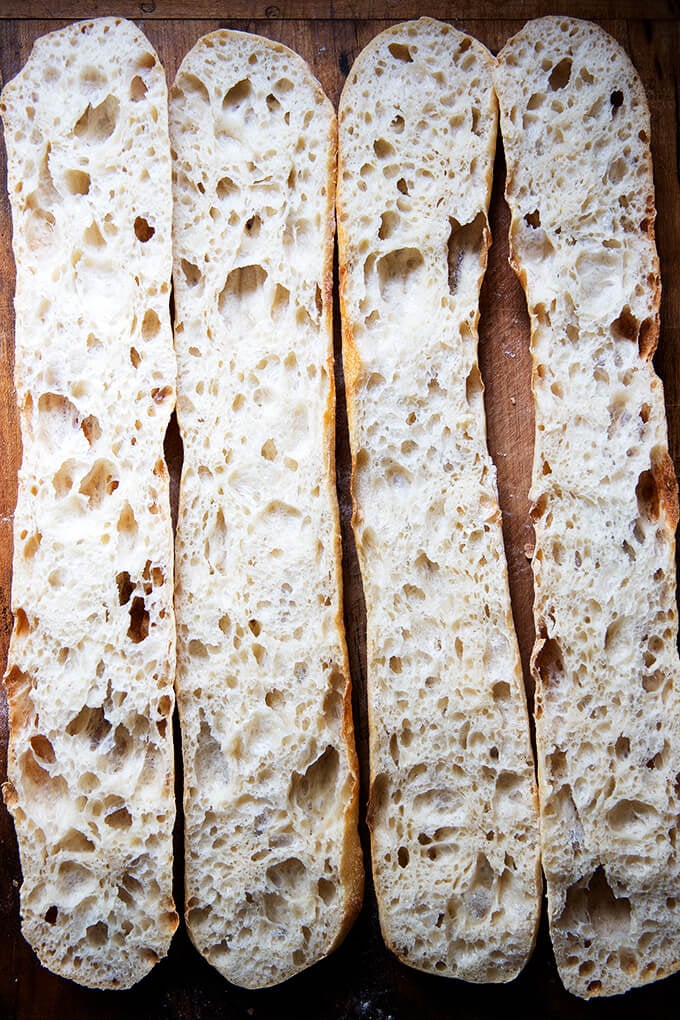
Can I tell you the most exciting part? This dough makes an excellent baguette! Unscored and flour-dusted, it has a crumb and flavor better than any other I’ve attempted previously. See photos below.
PS: If sourdough isn’t your thing, please try this yeast-leavened ciabatta bread recipe.
How to Make Sourdough Ciabatta, Step by Step
Gather your ingredients: bread flour, water, salt, and a sourdough starter. I am a proponent of buying a starter (see recipe box for sources), but if you are up for it, you can build a starter from scratch in just about 1 week.
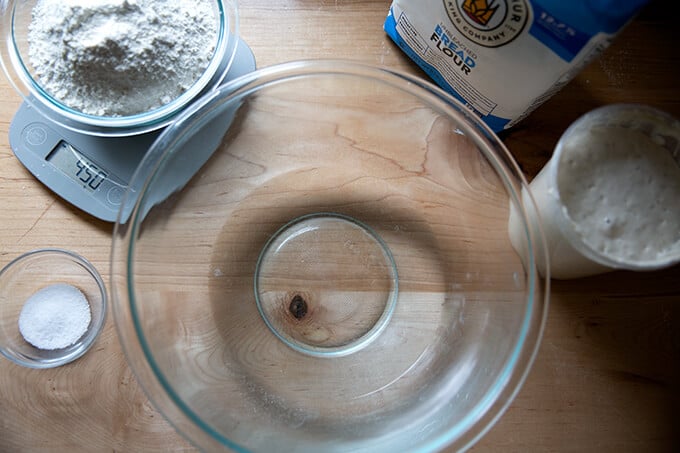
For this recipe, you’ll need: 100 grams sourdough starter, 360 grams water, 450 grams flour, and 12 grams salt. It’s 80% hydration.

Mix together the water, sourdough starter, and salt.
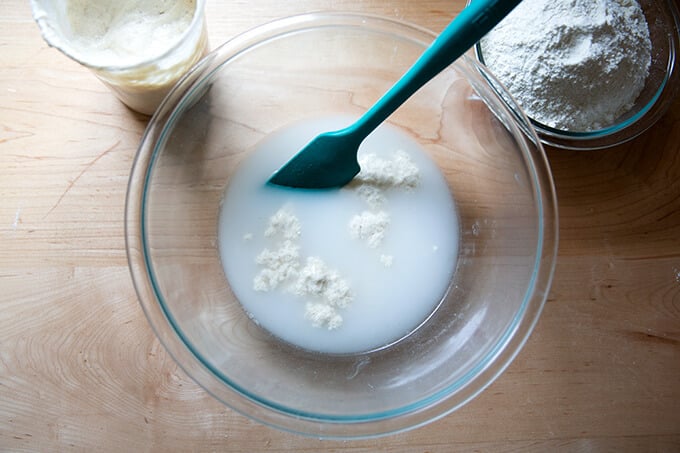
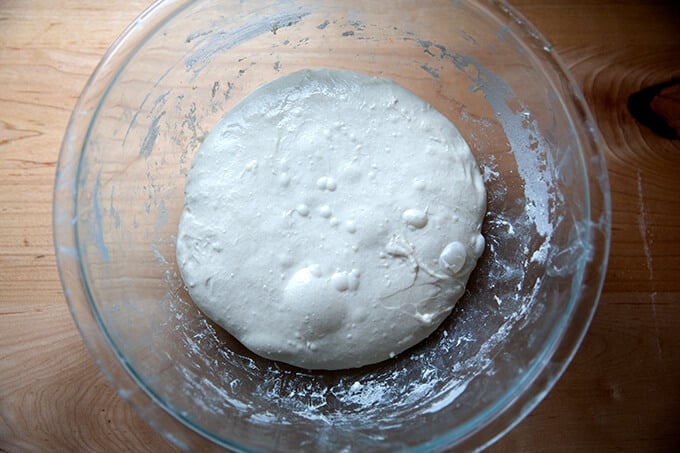
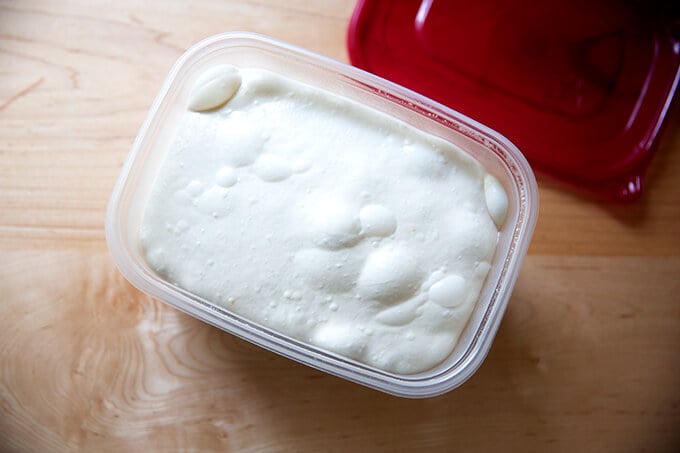
Add the flour and mix to form a sticky dough ball.
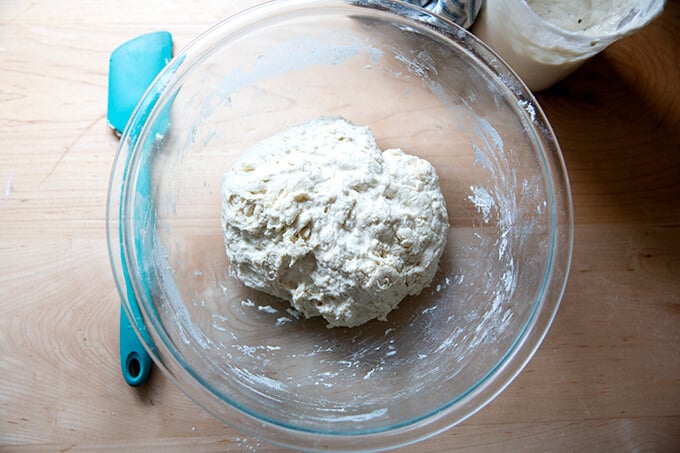
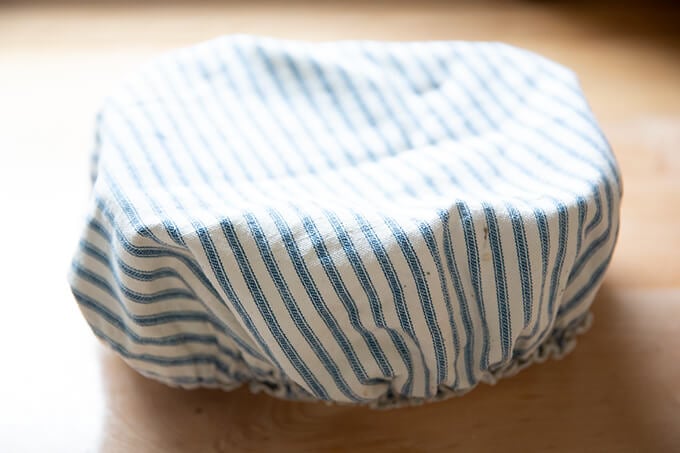
Cover the bowl and let rest for 30 minutes. Then perform a set of stretches and folds. See the video above or in the recipe box for guidance. This is what the dough will look like after one set of stretches and folds.
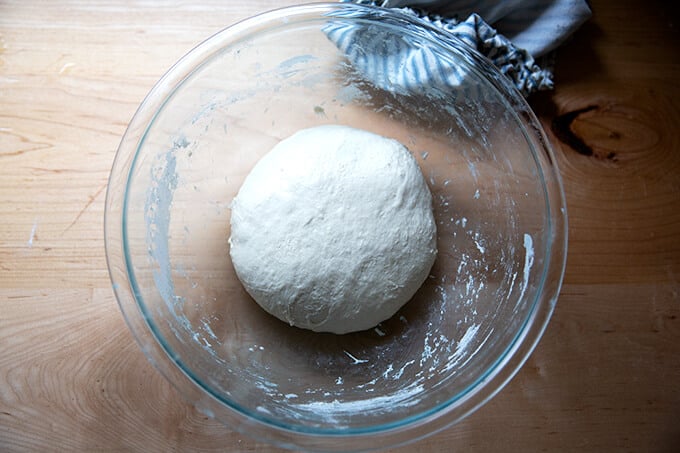
This is what the dough will look like after 4 sets of stretches and folds.
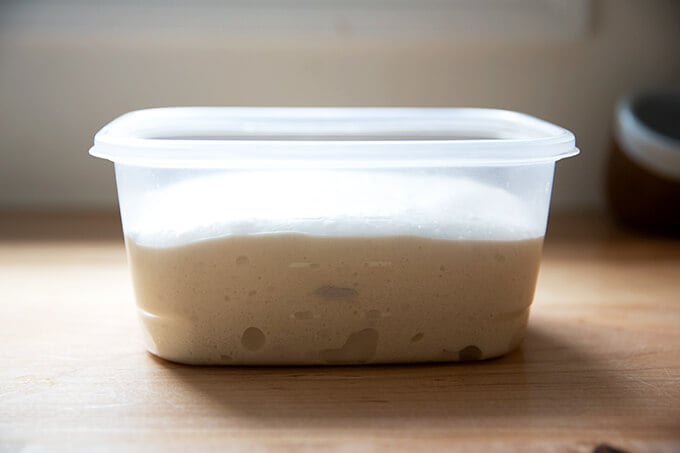
Transfer dough to a straight-sided vessel (this one is 8 cups, but anything similarly sized will do) for the bulk fermentation (the first rise):

Mark the height of the dough on the vessel, cover the vessel, and let the dough rise until it increases in volume by roughly 75%.
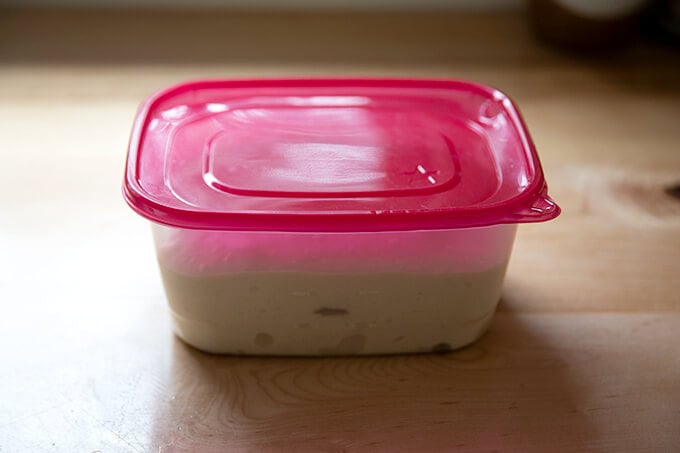
When the dough has increased by 75% (roughly), place a lid on the vessel, and transfer it to the fridge for 12-24 hours.
When ready to bake, remove the vessel from the fridge.
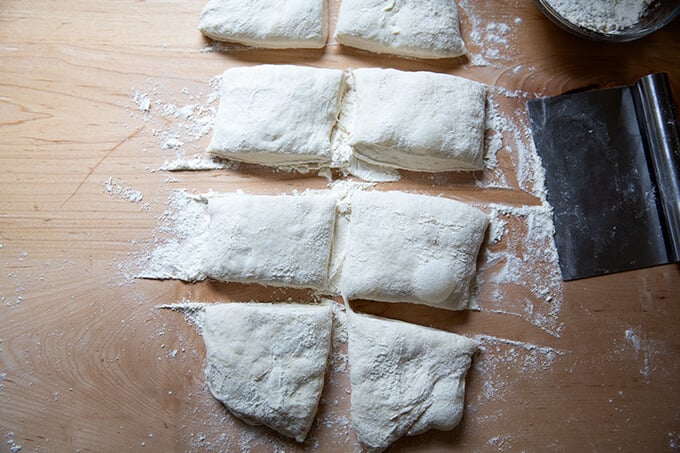
Dust the top of the dough liberally with flour. Dust a work surface liberally with flour, too.
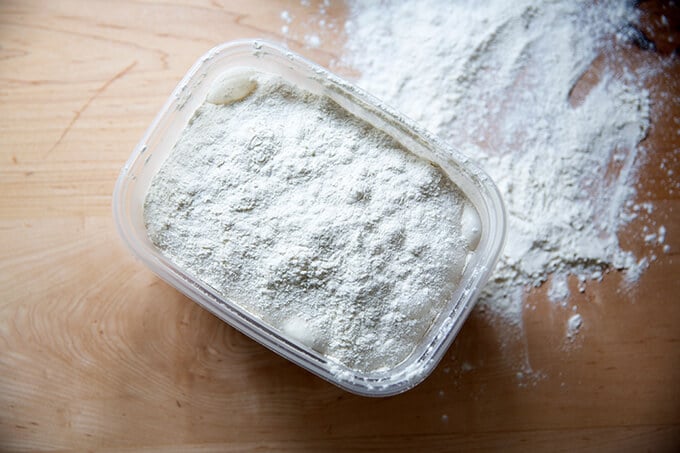
Turn the dough out onto the prepared work surface.
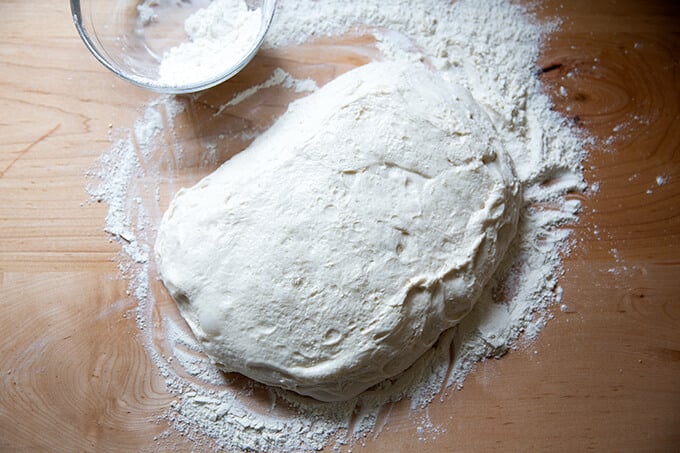
Pat the dough into a rectangle.
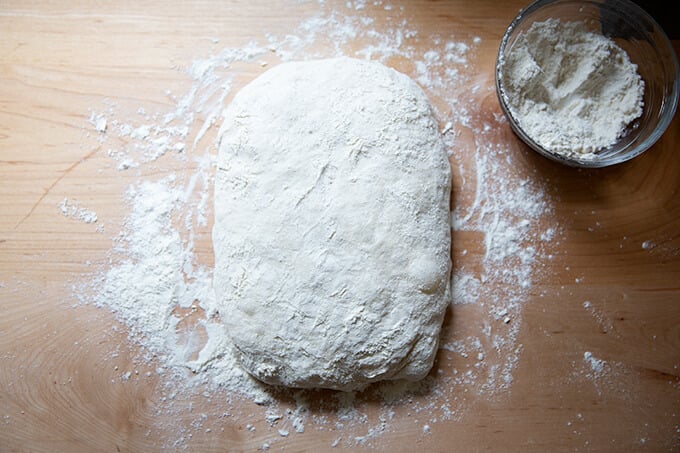
Cut the rectangle into 8 roughly equal portions.
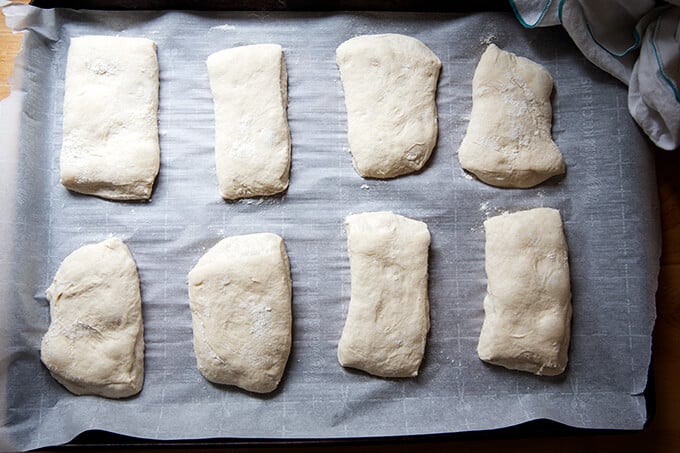
Transfer the portions to a parchment-lined sheet pan. Let rest for 1 hour. Then transfer to a 475ºF oven for 10 minutes. Lower the heat to 450ºF and bake for 10 minutes more.
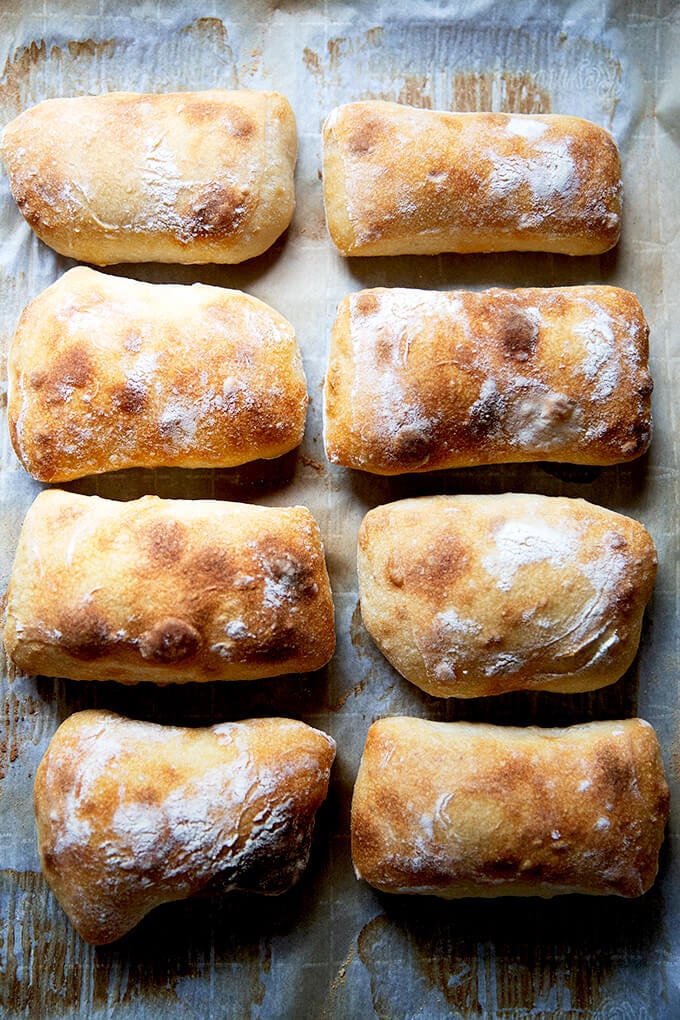
Transfer the rolls immediately to a cooling rack, and let cool for at least 20 minutes before cutting.
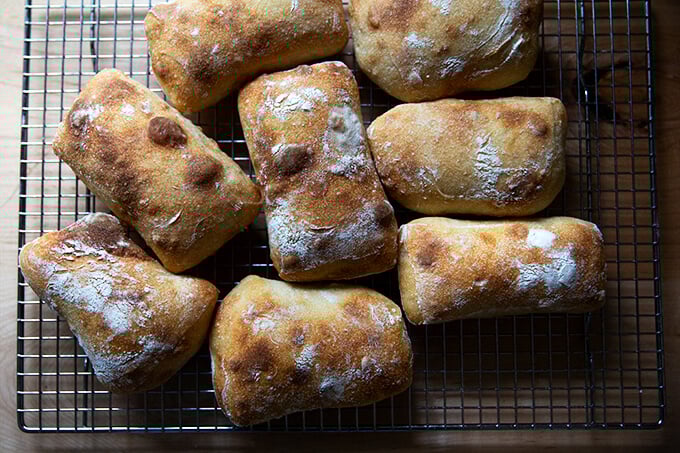
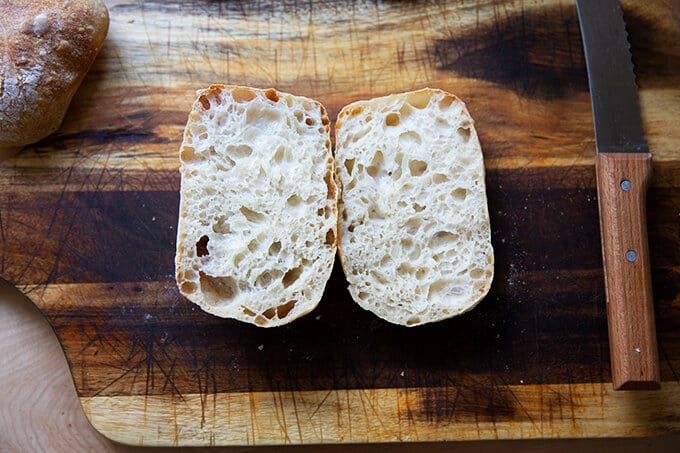
How pretty is that crumb?
Ciabatta sandwich: This recipe is inspired by Gabrielle Hamilton’s Blood, Bones, and Butter. In short, the success of the sandwich relies on a delicate balance: “the perfection of three fats together — butter, olive oil, and the white fat from prosciutto or lardo.” To make it, spread good bread with “cool waxy butter,” top with prosciutto (more than you think), and arugula. Drizzle it all with good olive oil.

Sourdough Ciabatta “Baguettes” 🥖🥖🥖
To make baguettes, follow the same process, but instead of dividing the rectangle of dough into 8 portions, divide it into two. I find an extra-large sheet pan to be necessary to bake both baguettes at the same time. If you don’t have an extra-large sheet pan, I would bake one baguette at a time, and orient it at a diagonal angle from one corner to another.
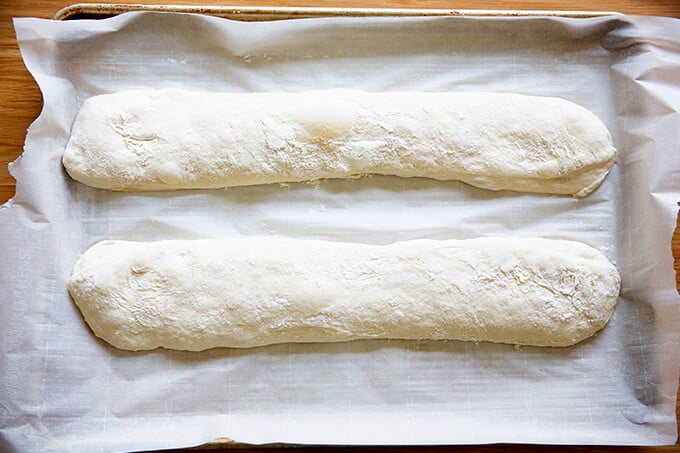
Bake the baguettes at the same temperature and for the same amount of time as the rolls.
Not bad for the effort, right?
These ciabatta “baguettes” would be great vessels for giant sandwiches.

Simple Sourdough Ciabatta Bread
- Total Time: 24 hours 20 minutes
- Yield: 8 Rolls 1x
- Diet: Vegan
Description
Made with four ingredients, this sourdough ciabatta has a crisp crust, a beautiful honeycomb crumb, and a lovely lightness and chew. The process is truly simple, and the ciabatta is so tasty, perfect for sandwiches of all kinds, for dunking into soup, or transforming into bruschetta.
Notes:
- You need an active sourdough starter. You can build a starter from scratch in just about 1 week. But I am a huge proponent of buying a starter. Here are two sources:
- As always, I highly recommend investing in a digital scale before beginning any bread baking adventure.
Flour: I have had success using all-purpose flour, but if you can get your hands on bread flour, that is ideal, especially if you live in Canada or abroad. Moreover, if you live in Canada or abroad, you may need to reduce the water amount. Consider holding back some of the water during the mixing process to ensure you don’t end up with a soupy mess.
Straight-Sided Vessel:
- The vessel I use in this recipe, similar to this one, is 8 cups. Most grocery stores carry storage vessels similarly sized.
- Using a straight-sided vessel for the bulk fermentation will help prevent over-fermentation because it allows you to see when the dough has truly increased by 75% (or slightly more or less) in volume.
Ingredients
- 360 grams (about 1.5 cups) water
- 12 grams (about 2 teaspoons) salt
- 100 grams (about 1/2 cup) active sourdough starter, see notes above
- 450 grams (about 3.5 cups) bread flour, see notes above
Instructions
- Mix the dough: Place the water in a large bowl. Add the salt and stir briefly. Add the starter and stir briefly to incorporate. Add the flour, and stir until you have a wet, sticky dough ball. Knead briefly with your hands if necessary to incorporate the flour. Cover with a tea towel or cloth bowl cover and let sit for 30 minutes.
- Stretches and folds: With wet hands, grab one side of the dough, and pull up and to the center. Rotate the bowl a quarter turn, and repeat the grabbing and pulling. Do this until you’ve made a full circle. (Watch the video for more guidance. I do a few more pulls and turns in the video.) Cover the bowl. Repeat this process three more times at 30-minute intervals for a total of 4 sets of stretches and folds over the course of two hours. (In the video, I switch to coil folds for the last two sets of stretches and folds.)
- Bulk fermentation: Transfer the dough to a straight-sided vessel. Cover the vessel with a towel. Let rise at room temperature until the dough nearly doubles in volume (shoot for a 75% increase in volume). Times will vary depending on your environment and the strength of your starter. Recently, this has taken about 4 hours for me, but don’t worry if it takes longer for you. Cover vessel with a lid (ideally) or a towel (if you are using a towel, slick the top of the dough with oil to prevent it from drying out.) Transfer to fridge for 12-24 hours.
- Shape: Remove vessel from fridge. Remove lid. Sprinkle top of dough liberally with flour. Turn dough out onto a floured work surface. Pat dough into a rectangle. Sprinkle top with flour. Use a bench scraper to cut the dough in half vertically. Then make three cuts equally spaced in each half to create 8 small rectangles.
- Line a sheet pan with parchment paper. With floured hands, transfer each rectangle to the prepared pan, gently pulling outward. Cover the pan with a towel. Let stand for one hour.
- Bake: Heat oven to 475ºF. Transfer pan to oven and bake for 10 minutes. Lower heat to 450ºF, rotate pan, and bake for 10 minutes more. Remove pan from oven. Transfer ciabatta rolls to a cooling rack. Let cool for 20 to 30 minutes before slicing.
- Prep Time: 24 hours
- Cook Time: 20 minutes
- Category: Bread
- Method: Oven
- Cuisine: American, Italian
This post may contain affiliate links. Please read my disclosure policy.


804 Comments on “Simple Sourdough Ciabatta Bread”
Hi Alexandra,
Can’t wait to try this.
Just interested in why the different folding techniques? Apologies in advance if this had been asked before.
Hi Owen! I always start with stretches and folds — it’s what the dough is capable of doing shortly after being mixed. After it gains some strength and elasticity, I switch to coil folds, mostly because it’s just fun. As far as results are concerned, either method will work just fine. You’re just looking to build strength in the dough. Hope that helps!
Hi Ali, this has become a weekly bake for me — once again, a mash-up: this recipe, but with the pre-shape/shape method from the sourdough version. Love it. Thank you so much!
So nice to hear this, Carole 🙂 🙂 🙂 Thank you for all of your nice comments. Means a lot!
Hello Alexandra
I’m curious about your thoughts on steam for this ciabatta recipe. Do you think it’s unnecessary because the buns are in the oven for such a short time or perhaps steam would not let the crispy crust form? I have my first ciabatta dough in the fridge right now and looking forward to the results 🙂
Hi Howard! Apologies for the delay here. Someone else coincidentally just commented saying he did include a pan of water in the oven to help create steam and he had success. For me, I never do these sorts of things, because I don’t think they’re ever really worth the effort (not that it’s hard) but by all means go for it. I don’t think it would impede the development of a crispy crust.
This was such a great failsafe recipe! my oven was a little too small to accommodate 8 pieces so i had to bake the remaining 2 in the lower rack, which affected the browning, but thats a small issue. also had a small sheet pan of boiling water in the bottom to create a steaming environment. will make it over and over again!
So nice to hear all of this. Thanks so much for writing and for sharing your notes 🙂 🙂 🙂
Made these today and my shaping technique definitely needs some work but the recipe itself is fabulous!
Great to hear, Lindz! Thanks so much for writing 🙂
Hafa Adai from Guam,
Made it twice, familia’s favorite now, a must on the weekly menu. Thank you so much.
Wonderful to hear this! Thanks for writing 🙂 🙂 🙂
For this recipe, you’ll need: 100 grams sourdough starter, 360 grams water, 450 grams flour, and 12 grams salt. It’s 80% hydration
———
Just calculated and the above is actually 82 percent hydration.
So which was it meant to be 80 or 82?
Thanks
I guess it’s 82% then.
I apologize if this question has already been answered (so many lovely comments to sort through), but can you tell me if I can easily double the recipe by simply doubling the ingredients, or is there some nuance to consider? I’ve been going crazy over this simple and delicious recipe!!! Thank you for this fabulous site, Ali!!
Hi Laurie! No nuance to consider, but that is a great question. Just double the ingredients and go for it. So nice to hear you like this one 🙂
Amazing recipe!! I can always trust YOUR sourdough recipes to be attainable and delicious. This one (I make baguettes mostly) is my weekly go-to and is the perfect grilled cheese or cheese board bread, with long diagonal slices 🙂
So nice to hear this, Tina 🙂 🙂 🙂 Thanks so much for writing. This might be my favorite of all the sourdough recipes for its simplicity and flavor.
Hi can I make a single loaf of bread with this recipe instead of 8 small rolls?
Yes!
This is a great recipe! I made it for the first time last weekend, and I couldn’t believe how easy it was, and how GREAT my bread came out! Ciabatta is my husband’s favorite bread, so he was thrilled! I made the dough yesterday again, and I noticed the activity in my starter was starting to wane a little. Could that be why it took about 4 hours for the folding process? I’m gonna bake them tonight, so we’ll see.
Great to hear, Carol!
And yes re starter. The more I make sourdough the more I realize: it’s all about the starter. It pays to take the time and even delay mixing up a batch of bread to get your starter back up to strength. But I also understand the need to just push forward, too! I’m sure they will be just fine. Report back if you feel like it 🙂
Hi- LOVE this recipe and made it successfully one time. I’m making a second batch and forgot to let it rise on the counter after the stretch & folds. I put it right into the the refrigerator for 24 hrs. It has risen 75% while in the fridge. Should I give it some time to ride outside the fridge or just proceed with baking? –Thank you!
Sorry just seeing this! If the dough has increased by 75% in volume, you can proceed… no need to let it sit on the counter. Hope it turned out OK!
Thank you- It was great despite my mistake! Thanks again!
Great to hear, Teresa!
This has to be the sexiest dough I’ve ever worked with and the resulting ciabatta is the best! I’ve made it twice in the last week and the second time I doubled the recipe to keep up with demand. I did have to reduce the amount of water slightly, but not by much.
So nice to hear this, Debbie 🙂 🙂 🙂 It’s one of my faves as well. Thanks so much for writing!
Hello! I’m making this as my first sourdough bread attempt. I got the 75% rise on the counter and refrigerated. It’s been over 12 hours and it hasn’t risen at all in the fridge. Should it? In the video, it looked like the dough had almost risen to the top of the vessel. Thanks!!
That’s Ok! Sourdough often will not rise in the fridge. It depends on the temperature of your fridge and the strength of your starter. Hope it turned out well! Report back if you feel like it.
New favorite sourdough recipe!! So much easier than the boule!
So great to hear this, Karen! Thanks for writing 🙂 🙂 🙂
Just made these and my word – they are amazing!! So tasty. Crunchy on the outside, soft and chewy on the inside. Such an easy recipe to follow too! Thank you!!
Great to hear this, Jenni! Thanks so much for writing 🙂 🙂 🙂
Great recipe! Do you grease your straight sided container? It was hard getting it into an even rectangle with how it came out of the container.
Hi Sara! I do not, but I think you definitely could next time if removing the dough was tricky.
Hi
The bread turns out great. I have tried it twice, but it feels little sticky. Not dry like it normally should. Can you guide me please.
Hi Saloni! I might try reducing the amount of water next time around. Hold back 50 grams or so and see if that makes a difference.
When I take my starter out of the fridge and feed it and leave over night on counter, do I do a discard? And on the second feeding the next morning do I discard first before feeding. I’m trying to understand if I always discard before feeding my starter or only sometimes? Not clear to me. I’m new at this!
Hi Debbie! Apologies for the delay here. Yes: you do discard every time you feed it. So, at night, when you remove the starter from the fridge, discard most of it, leaving behind just a tablespoon or two behind. Add fresh water and flour, stir to combine. Let it rise overnight. The next day. Repeat the process.
Good luck!
Love this bread! Any idea of nutrional value for this recipe?
Hi Jocelyn! I do not I’m afraid. My Fitness Pal is a website that lets you calculate nutritional values.
Wow!! Best ciabatta recipe. I’ve tried so many in the past and have up. Tried this one because the reviews were all so good. This is now my go to recipe. Making my 2nd batch today and 2 more for a friend this weekend.
Wonderful to hear this, Terri! Thanks so much for writing 🙂 🙂 🙂
Hi! I’m getting ready to let my rolls sit for an hour and then bake. Do you normally slice them all after baking or just slice them before making a sandwich? I can’t wait to try them!
Hi Denise! Apologies for the dealy here … I wait to slice them until just before making a sandwich. Keeps them fresher this way! Hope they turned out well for you!
Thanks for the reply! They turned out great! I only sliced what I used last night.
Wonderful! Thanks for reporting back 🙂
You’ve made me fall in love with baking bread… I love all of your recipes!
So nice to hear this, Courtney 🙂 🙂 🙂 Thanks for writing!
I love this bread and my husband loves it even more! It’s PERFECT for tomato sandwiches or breakfast egg sandwiches.
Here is a picture of how mine turned out after a few attempts:
https://imgur.com/a/3ZFpQPJ
*chef’s kiss*
Oh they’re gorgeous!! Thank you so much for sending the picture. I love this bread for sandwiches, too … so sturdy. Thanks for writing!
Thanks for the technique Ali
The little slippers look awesome
Would lightly roasted garlic and thyme + touch of rosemary work in ciabatta?
Roasted garlic + thyme sounds absolutely amazing. Go for it!
I have built a spreadsheet for this recipe that has all your steps. It allows the user to enter a desired start time and then it calculates the times for each subsequent step allowing the user to see the finish time for their bread. If you would like a copy I would be happy to send it to you.
That’s so awesome! Of course I’d love to see it. I wonder if we could somehow make it into a Google Spreadsheet so that we can share it with the world 🙂 ? No need to do more work … I can try and figure that out. In the meantime, if you want to email it to me, I’d love to see it: alexandra@alexandracooks.com
Excellent recipe that produced excellent results which led to an excellent ham sandwich. Thank you!
Excellent! So nice to hear this, Todd 🙂 🙂 🙂 Thanks so much for writing.
Such an easy and great recipe.
Great to hear, Phuong! Thanks for writing 🙂
Hi Alexandra! May I know what is the purpose of transferring the dough to a straight wall vessel? Can I just leave it in the original mixing bowl?
Update: I baked it without transferring into a straight vessel bc i was too lazy to wash another dish. it turned out fine! as long as you shape it before you bake it 🙂
Great to hear! Apologies for the delay here … catching up on comments now.
Hi! So glad your method worked out just fine. The purpose of transferring the dough to a straight-sided vessel is so that you can truly see when the dough has doubled in volume. A bowl makes it a little trickier to discern.
I am curious about the suggestion to hold back water if from Canada. Is our water different?! Or our bread flour?! I initially thought it might have something to with the climate, but parts of Canada are warmer than parts of the US in the winter (I’m in balmy Vancouver, much like Seattle’s climate). In any case each time I make these I don’t use the full amount of water, and the rolls turn out great. I never remember how much I hold back either but it doesn’t matter – a foolproof recipe! Thanks again for an easy and delicious recipe!
Hi Alexa! Great to hear you have success with the recipe and that holding back some of the water works for you.
Regarding your question, it’s not Canada’s water, it’s Canada’s flour… at least sometimes. I have troubleshooted with many people from Canada (and the UK) over the years, and for reasons I cannot explain because it does seem to be related to the flour’s protein content, often my dough recipes come out too soupy if the full amount of water is used. Holding back some of the water usually does the trick.