 →
→ How to Make Fresh Homemade Pita Bread
This post may contain affiliate links. Please read my disclosure policy.
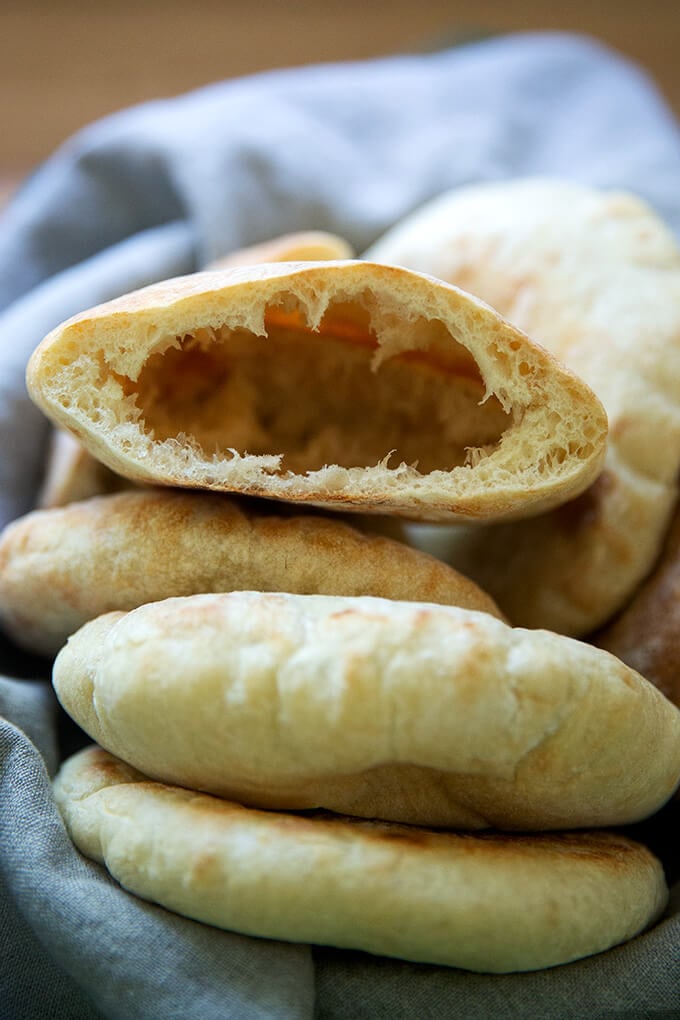
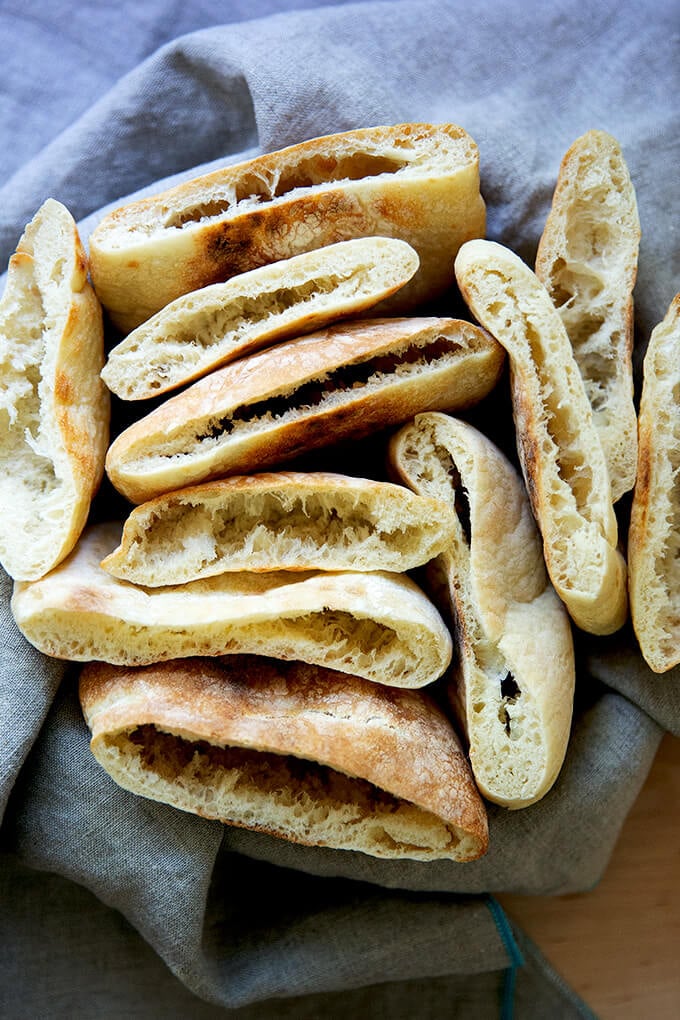
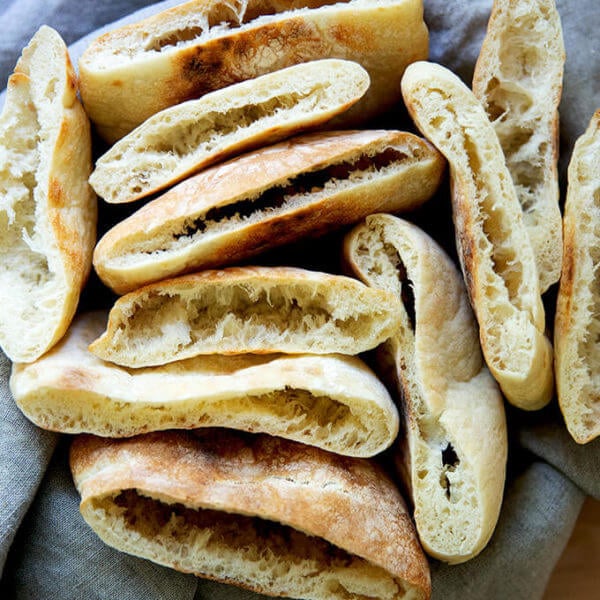
Making fresh pita bread at home couldn’t be easier. This recipe uses instant yeast and requires no kneading or complicated shaping. The pita rounds balloon into perfect pockets in 2 minutes in the oven. Read on to learn three tips for success!
Making pita requires neither kneading nor complicated shaping. It’s one of the easiest bread recipes you could make, in fact, right up there with no-knead focaccia and homemade pizza dough. The recipe below is essentially a half recipe of my mother’s peasant bread recipe with the sugar omitted, the hydration lowered, and the addition of a small amount of olive oil.
And while the overall process is simple, there are a few keys to success:
The Secret to Getting Pita to Puff in the Oven?
- Handle the dough gently during the rolling process. When you roll, use a gentle hand so that you don’t deflate all of the air bubbles created while the dough was rising.
- Allow the dough to rest. After rolling out your rounds, let them rest for 15 minutes, which will allow the dough to recover — it allows the gluten to relax — from the rolling process, which in turn will allow them to puff back up again slightly before baking.
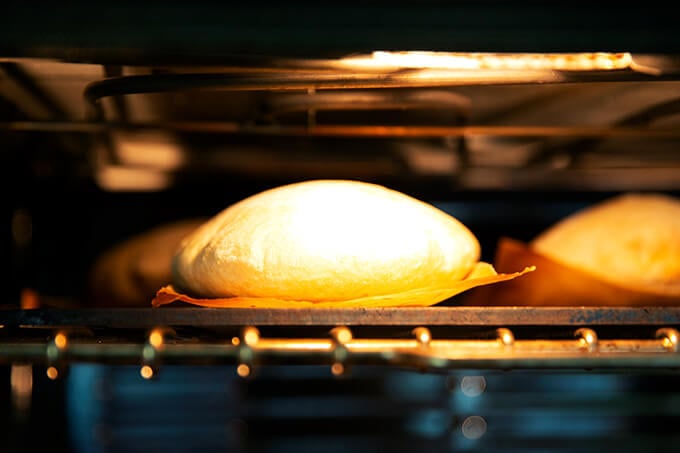
- Cook the pita on a hot surface. If you have a Baking Steel or pizza stone, cook your pita on it: as soon as the pita meets the hot surface, the heat will quickly transfer to the dough, making it instantly spring:
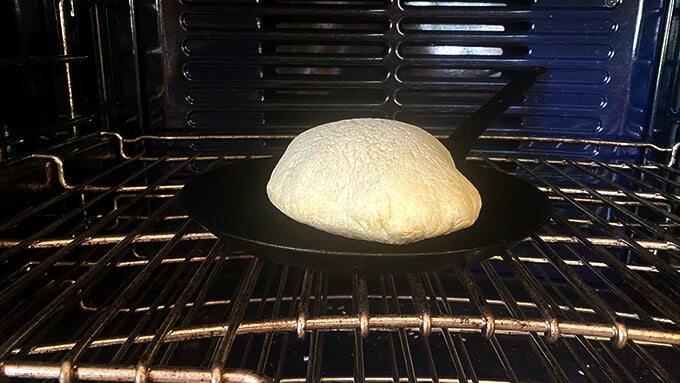
If you don’t have a Baking Steel or pizza stone, you can use a preheated cast iron or other oven-safe skillet (see recipe box for details):
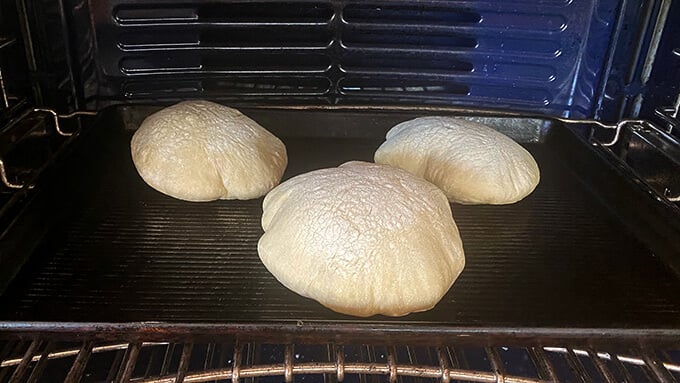
Or you can use a preheated sheet pan (see recipe box for details):
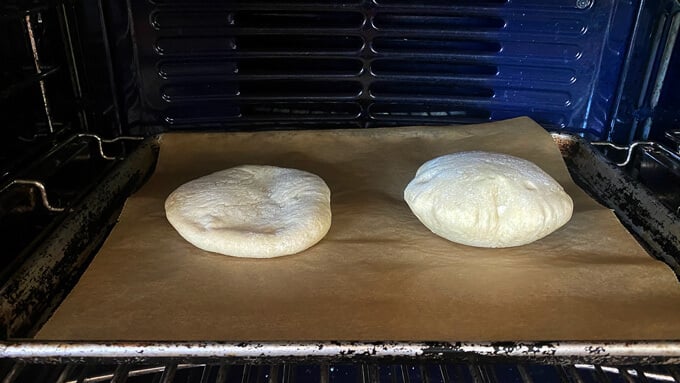
A non-preheated sheet pan will not work as effectively, see below: one pita puffed, one did not:
PS: Simple Homemade Naan (5 Ingredients)
How to Make Pita Bread, Step by Step
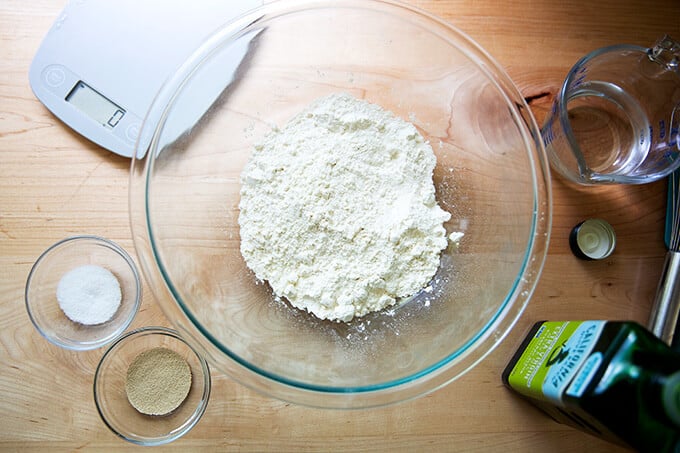
Gather your ingredients: flour, salt, instant yeast, water, and olive oil. As always, for best results, use a digital scale to measure.
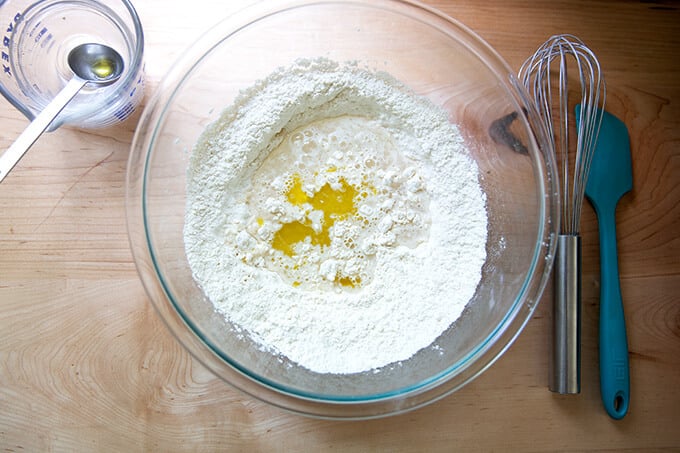
Whisk together the flour, salt, and instant yeast. Add the water and olive oil.
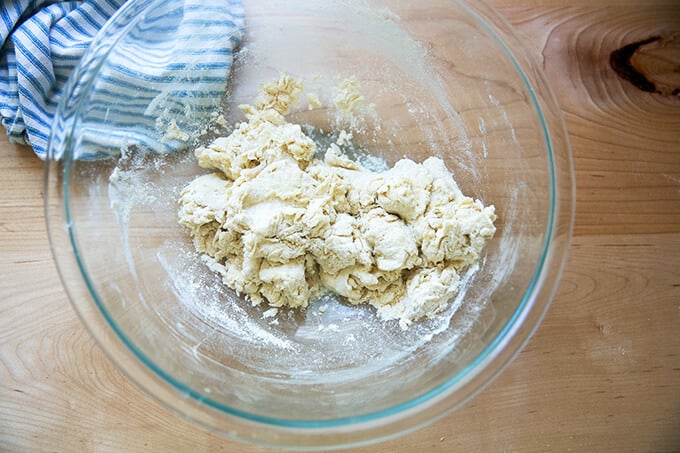
Mix with a spatula until you have a shaggy dough — mixture will feel dry.
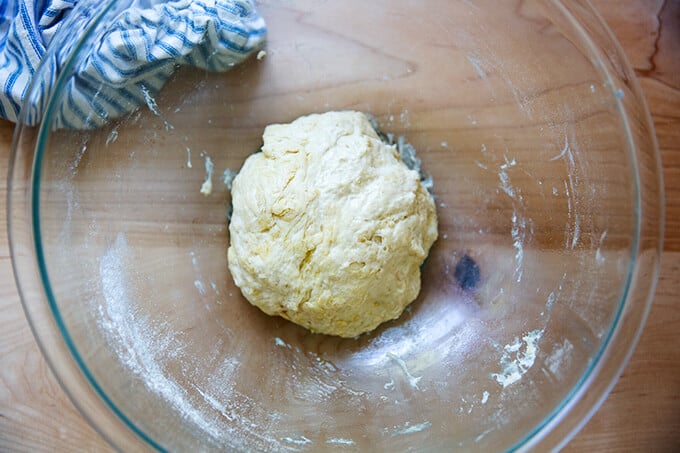
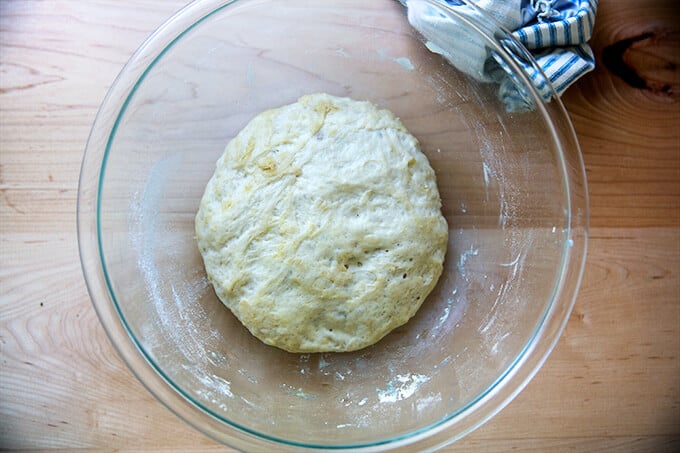
Use your hands to briefly knead the mass into a dough ball. Drizzle with olive oil. Turn to coat. Cover bowl with a cloth bowl cover, and let rise in a warm spot for 1.5 hours or until …
… slightly puffed.
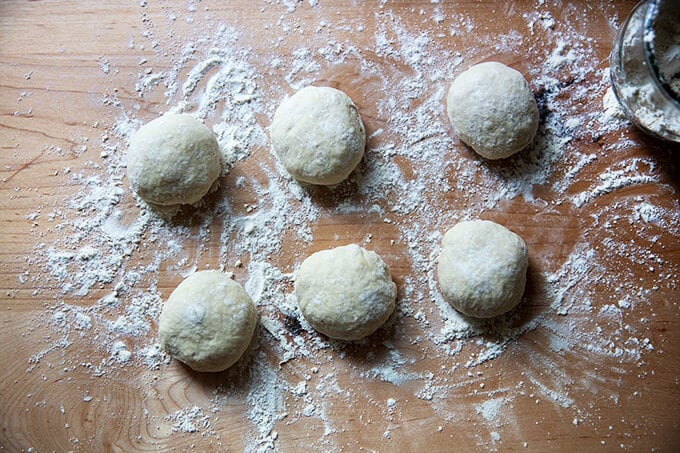
Turn out onto a lightly floured work surface, knead briefly, then use a bench scraper to divide the mass into 6 roughly equal portions. If you’re using a scale, each portion should weigh about 73 grams.

Shape each portion into a ball; then let rest for 30 minutes. This allows the gluten to relax: the brief rest will make them easier to roll out into rounds.
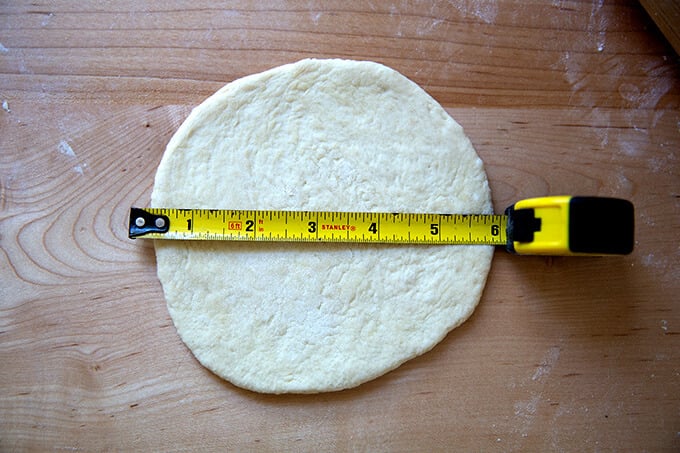
Flatten each ball with your hands; then working with one round at a time, roll into a 6-inch round.
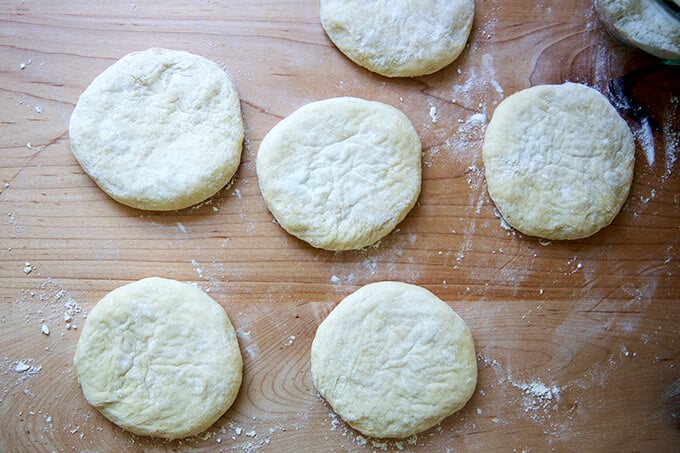
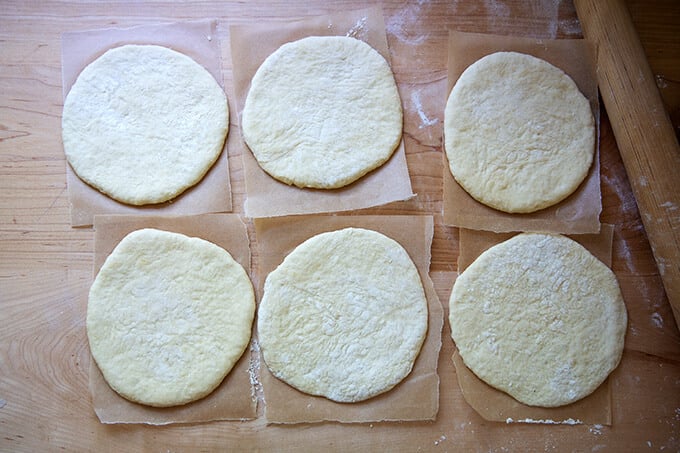
Transfer each round to a sheet of parchment paper. Let rest for another 15 minutes. Meanwhile, heat a Baking Steel or pizza stone to 550ºF. (Note: If using a stone, reference the manufacturer’s manual regarding heat tolerance.)
Bake three rounds at a time for 2-3 minutes, or until lightly golden.
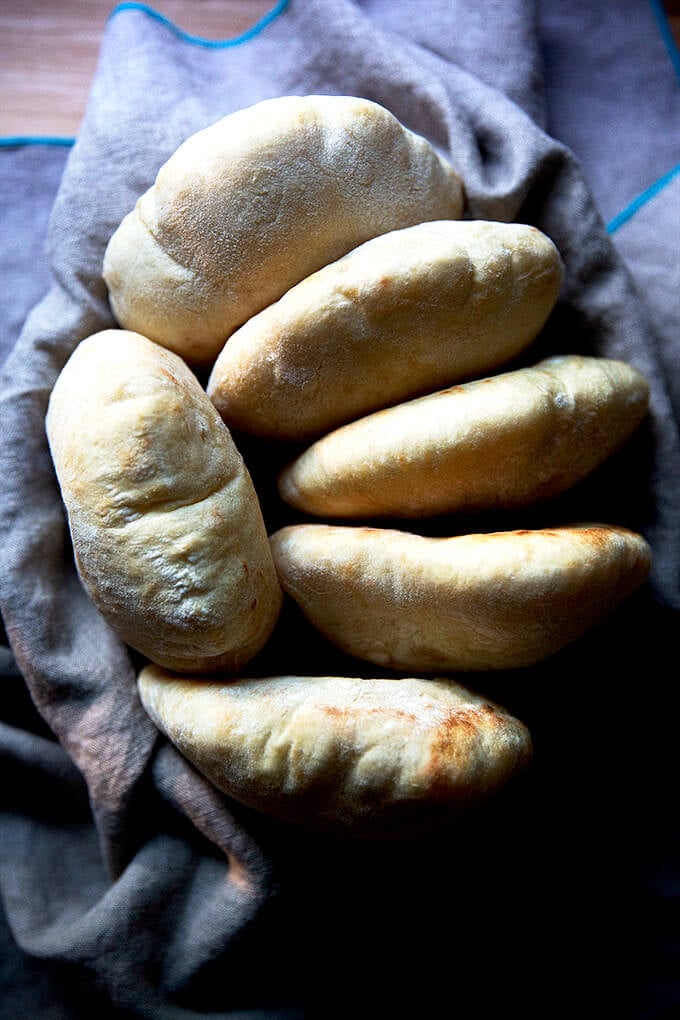
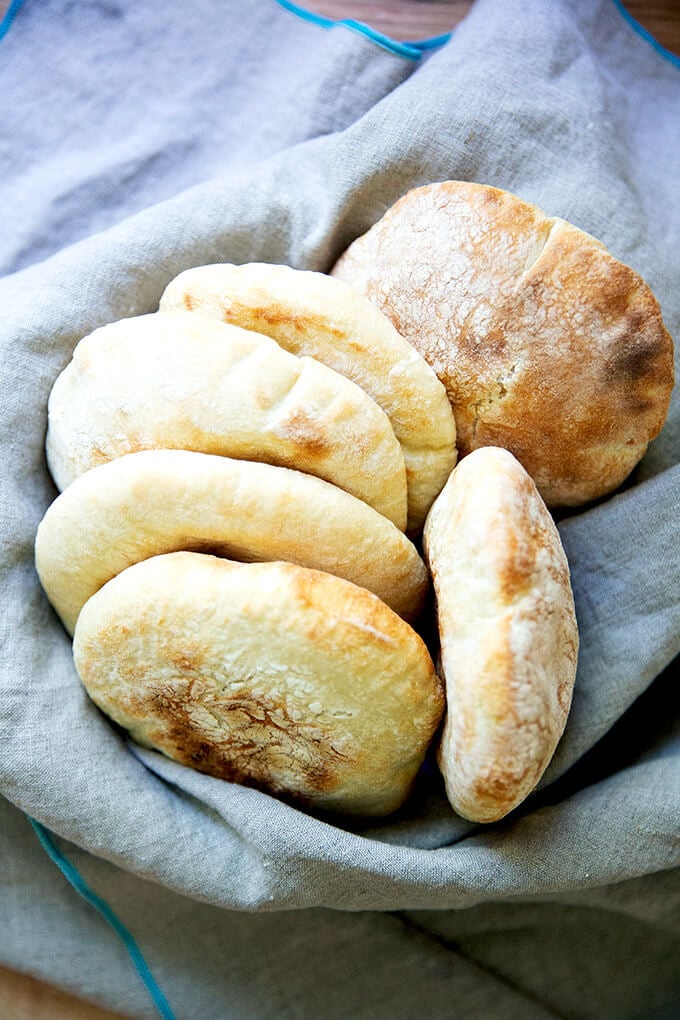
Transfer freshly baked pita to a towel-lined bowl. Wrap to cover until ready to eat.
How to Make Fresh Homemade Pita Bread
- Total Time: 3 hours 4 minutes
- Yield: 6 1x
- Diet: Vegan
Description
Making fresh pita bread at home couldn’t be easier. This recipe uses instant yeast and requires no kneading or complicated shaping. The pita rounds balloon into perfect pockets in 2 minutes in the oven.
Notes:
To create a warm place to rise: Preheat your oven for 1 minute; then shut it off.
Parchment paper sheets: If you buy parchment paper that comes in sheets, such as the If You Care brand, you can fold the sheet lengthwise, then into thirds widthwise, and cut along the creases to create 6 equal pieces.
If you don’t have instant yeast, you can use active-dry yeast. Simply sprinkle it over the lukewarm water, and let it stand for 15 minutes; then proceed with the recipe.
FAQs:
Can I use whole wheat flour?
I suggest using no more than 50% whole wheat flour (1 cup or 128g) in this recipe because using too much could prevent the pockets from puffing in the oven. The more whole wheat flour you use, the more bran there will be in the dough: bran cuts through the gluten structure, which can prevent the dough from puffing in the oven. Depending on the whole wheat flour you are using, you may need to increase the amount of water: whole wheat flour tends to be thirstier. Reference the video for how the dough should look; then add more water if necessary.
What if I don’t have a Baking Steel or pizza stone?
Here are two alternative methods:
- Place a cast iron skillet in the oven, and let it heat for at least 5 minutes; then bake each round one at a time for 2-3 minutes total.
- Place a sheet pan in the oven, and let it heat for at least 5 minutes; then bake three rounds at a time for 2-3 minutes total.
Ingredients
- 2 cups (256 grams) all-purpose flour, plus more for sprinkling
- 1 teaspoon (5 grams) kosher salt
- 1 teaspoon (4 grams) instant yeast, see notes above
- a scant 3/4 cup (165 grams) lukewarm water
- 1 tablespoon (14 grams) olive oil, plus more for drizzling
Instructions
- Mix the dough: In a large bowl, whisk together the flour, salt, and instant yeast. Add the water and oil. Stir with a spatula until a shaggy dough forms — the mixture will appear dry and unevenly mixed. Use your hands to knead the dough briefly in the bowl just until the flour is absorbed and you have a sticky ball, about 30 seconds. Drizzle a little olive oil over top, turn the dough to coat, cover bowl with a tea towel, and transfer to a warm place (see notes above) to rise for 1.5 hours.
- Prepare the oven: Heat the oven with a Baking Steel or stone inside at 550ºF. See notes above if you do not have a Baking Steel or pizza stone. Cut a sheet of parchment paper into 6 small pieces about 6-inches square, see notes above.
- Portion the dough: Turn out the dough onto a lightly floured work surface. Knead briefly to form a ball. Use a bench scraper to divide the dough into 6 equal portions — each ball should roughly weigh 73 grams. Using flour as needed to prevent sticking, ball up each portion, using the pinky edges of your fingers to create tension (see video for guidance). Let the portions rest for 30 minutes.
- Roll out each ball: Flatten one ball, and, using flour as needed, gently roll it out with a rolling pin until you have a 6-inch round — the key is to not roll too aggressively in order to prevent the air pockets from being forced out. If a round is resisting, set it aside, begin rolling out another one, and return to the stubborn one at the end. Transfer each 6-inch round to a sheet of parchment paper. Let rest for 15 minutes.
- Bake the pita: When the oven has preheated, use a pizza peel to shimmy one round at a time, parchment paper and all, onto the preheated Baking Steel. I like to cook 3 at a time. Set a timer for 2 minutes. If the pita is lightly golden, it’s done. Remove pita, transfer to a tea towel-lined bowl, and close the towel. Repeat with the remaining 3 rounds of pita.
- Store the pita: Store pita at room temperature in an airtight bag or container for 3 days or freeze for up to 3 months. Reheat before serving.
- Prep Time: 3 hours
- Cook Time: 4 minutes
- Category: Bread
- Method: Yeast
- Cuisine: Mediterranean
This post may contain affiliate links. Please read my disclosure policy.


568 Comments on “How to Make Fresh Homemade Pita Bread”
Thank you that your recipe is also in grams, not every cook or chef does that, I will try making it today. Pita is one of my favorites and if it puffs in the oven, I will be in heaven.
Hope you love it, Audrius! Let me know how it turns out 🙂
All five of them turned out just fine, all of them puffed in the oven, I will keep a note of this recipe and will double or triple it next time. Thank you!
Wonderful to hear this, Audrius! Thanks so much for reporting back.
Yesterday I doubled the recipe and baked 10 pitas and we stuffed their pockets with pork pibil and mexican corn salad. Heaven! This will remain on constant rotation in our home. Greetings from Vilnius!
Wonderful to hear this, Audrius! This all sounds sooo good.
delicious! much fluffier than pitas I had made before. made them with your falafel burger recipe and had a fantastic meal! thanks!
So great to hear this, Michelle! Thanks so much for writing 🙂 🙂 🙂
I wanted to tell you I made pita on friday, maple oat bread from your cookbook on saturday and rye bread from your cookbook today. they were all so delicious! I borrowed the book from the library but I definitely need to get my own copy. I am not a baker but your recipes are so easy to follow and so delicious. Thank you!
So wonderful to hear this, Michelle! Thanks so much for writing. Hope you get your own copy of BTC soon! Happy happy baking!
Great pita bread! I used a sheet pan and could only heat my oven to 475F. Still, the bread puffed up and was delicious. Your instructions were perfect. Thank you!
Wonderful to hear this, Judy!
It’s easy to make and it’s fluffy, light and delicious! Thank you for this recipe 🙏🏻
Wonderful to hear, Liene!
I’m going to make this for friends this weekend with a mezze dip situation! Your focaccia is one of the easiest recipes that is foolproof and my friends beg for me to make it every time we get together with food. I’m excited to try this next!
Oh yay! So nice to hear this, Anna!
I made these with light spelt flour and baked them at 200C for 4 min on an upside down tray. They puffed up and were unbelievably soft and fluffy. I need to practice rolling dough into a circle but no matter what shape they end up, this is a great recipe!
Wonderful to hear this, Kay! Great to hear an upside-down tray worked well.
Making this for the first time right now, and my dough ball was super sticky, like clung heavily to my hand sticky. I used a scale, but I’m wondering if I did something wrong already, haha.
Hi! What type of flour did you use?
I used all-purpose! They turned out ok, I just used a little extra flour when I rolled them out. I also couldn’t get the video to work (internet issues, but the tv worked) so I had to YouTube how to create tension and that took about 20 minutes. So all in all, I really want to try this again! My technique could definitely use some work 😆
Ok, nice to hear! Keep me posted next go around. You may want to hold back some of the water next time; then add it slowly as needed to get the dough the right consistency … if you can get the video to work, I think that will help.
Made this tonight and it turned out fantastic. I wanted the pitas a little bigger so I cut the dough into 4 and they turned out perfect.
Wonderful to hear!
OMG, these are so yummy. Made for the 2nd time this morning. Can’t believe how quick and easy they are to make. I certainly won’t be buying those horrible cardboard ones from the supermarket again. Will definitely be doubling up the quantity next time.
So great to hear this, Elaine! And I know … store-bought pita is mostly a disappointment. Thanks so much for writing!!
These were so much fun to make! I did them on a lark, I’m not a big bread maker, so kept my expectations low 😄 but your instructions were excellent and they came out beautifully. I was afraid I was overhandling them, but that was not the case. And I measured ingredients, I suspect that helped. Thank you so much!
Wonderful to hear this, Amy! Thanks so much for writing. I love watching these puff in the oven 🙂
The best pitas!! Easy and so delicious. I used 3/4 C King Arthur White Whole Wheat flour with remainder AP. Puffed and baked to perfection. Thank you for this recipe!
Wonderful to hear this! Thanks so much for writing. Love the idea of a little whole wheat flour here.
This recipe is incredible! This is the 3rd one I have tried for pita bread, and the first two were an epic fail. Balls of dough with no pocket, and I followed each recipe perfectly. This recipe was perfect. Worked out just as shown in the photos, I couldn’t believe how quickly they puffed up and had such incredible pockets. I do not normally write reviews for recipes, but I had to for this one, I will make it over and over again. And it’s easy! Thanks Alexandra!
So nice to hear this, Shari! Thanks so much for writing. I love homemade pita … it’s so magical seeing them puff 🙂
This worked perfectly! I’m quite practised with homemade bread so knew what to look for but generally very easy recipe. I subbed about 30g of flour for wholewheat bread flour and needed a touch more water because of that. Also needed around 4 minutes in the oven to get golden brown on the bottom but that’s probably down to the individual oven! Fab recipe though, will double it next time and make again without hesitation!
Wonderful to hear this, Alice! Thanks so much for writing 🙂 🙂 🙂
this is a great and easy recipe and they puffed up beautifully. However, mine had a very thin
upper layer and a thick bottom so that the top tore when trying to stuff them. would placement higher in the oven remedy this? thank you! baked on middle shelf.
Great to hear this! And gosh, I don’t know what explains the difference in thicknesses from the upper layer to the bottom. I always encourage people to play around with oven racks because every oven is different. Question: are you using a sheet pan or a baking stone?
Hi Ali,
I have tried for years to bake pitas that actually ballooned and created wonderful pockets to stuff with tasty ingredients. My list of tries includes Peter Reinhart and ATK/Cook’s Illustrated and none of them worked as well as yours. I would occasionally get one or two to balloon but I had success with every one from your recipe.
We stuffed them with a Greek lamb mix, Tzatziki, Kalamata olives, lettuce, and tomatoes. So tasty.
Thanks for sharing this wonderful recipe.
Oh yay! Wonderful to hear this. And your Greek lamb mix stuffing with all the fixings sounds absolutely delicious. Thanks so much for sharing all of this!
I missed the rise after they were rolled into a ball and my oven wasn’t hot enough but we still had great soft fresh pita bread to eat with our grilled chicken, feta, tomatoes, and olives. Will make again.
So nice to hear this, Sue! Thanks so much for writing 🙂 🙂 🙂
This pita bread was a fun project to do with my son, and the results were 5-star! The video and your directions make it easy! We did a Greek night with hummus, tzatziki, olives, cucumber, crackers, and this bread. YUM! The trick of preheating the oven for one minute I will use forever–that’s a good one!
Thanks!
Jessica
Oh Yay! Love your Greek menu!! Sounds absolutely amazing … truly the ideal meal if you ask me.
So easy, soft and tasty! I love how much all your bread recipes are helping me reduce my plastic consumption. A new one to make on rotation. Next I will try freezing some. Thank you!
Great to hear this, Rebeca! Thanks so much for writing. And it’s so true: an added bonus of making bread at home is reducing plastic consumption 🍞🍞🍞🍞🍞
wouldn’t have thought these would be easy to make, as you write, and so much better than from a bag in a store, thank you!
Wonderful to hear this, Sabrina! I was shocked by the simplicity of the process as well.
Bless you, Ali! for posting in grams!
I’d seen this recipe earlier in the week and decided to make it yesterday to go with some falafel and your wonderful raw beetroot dip.
Somehow, the afternoon got away from me and I skipped looking over the photos and just re-read the ingredients list and threw everything into a mixing bowl.
As I stirred this soupy mixture, I scanned the recipe again, saying “This doesn’t feel right”, looked at your photos and saw that something was indeed amiss. And I realized, after adding two panicked fistfuls of flour, that I’d forgotten to zero out my scale before weighing the flour. Knowing that everything else was there in the correct quantities, it was apparent that I was missing the 152g that was the weight of the bowl! So added in what was needed, followed your recipe exactly and got my very first pitas! It was so gratifying to work with instant yeast — I’m used to the snail’s pace of sourdough. Beautiful, balloony pitas. I’m going to try with SD, knowing that it’s a bigger investment of time and attention. But thank you again — and again and again — for all your work. I consult and execute often, and don’t acknowledge or thank you nearly enough.
Stay safe.
Oh Carole, Yay! So nice to hear all of this, and nice work fixing the “soupy” situation. And I know: doesn’t using instant yeast feel like a complete miracle when you’ve found yourself consumed by sourdough? I make sourdough all the time … there is something about the challenge that I love … but man, yeast is fast and good 🙂 🙂 🙂
I make sourdough breads at least twice a week (one loaf for the firemen next door), and have read your SD posts attentively — actually, I read all of your posts attentively and would probably follow you off the end of any cooking pier you could name. But yeast, wow!
I’m thinking I’d like to try a SD pitas, and can’t decide to riff on yours, eliminating the yeast and subbing in 50g of starter for 25g each of flour and water, or using this recipe: https://www.weekendbakery.com/posts/favorite-flatbreads-sourdough-pita/, although the hydration seems to be lower than yours. Any thoughts?
And if I did stick with your recipe with starter, would you let the bulk ferment go overnight?
Thanks again — and thanks for the quick reply!
Hi Carole! The Weekend Bakery recipe looks great! I might try that first, and depending on your results, then try my recipe with starter. I think your method sounds good. The bulk fermentation could go overnight, but I worry a little bit as we head into warmer months about over-fermentation. As I always advise, let the dough rise in a straight-sided vessel, and stop the bulk fermentation when the dough has increased in volume by 50-75% (or a little more is fine).
Hi Ali, finally reporting back on this one. So, in fact, the Weekend Bakery formula is essentially the same as yours, except that it uses 10g of starter (which means subtracting the equivalent quantities of flour and water from your instant yeast version). And yes, the rise is much longer, but I just mix up the dough, knead it a little, let it sit at room temp for a couple of hours and then stick it in the fridge until the next evening. Weekend Bakery says room temp for 24 hours, and while the dough is still workable, it does result in pretty sour-tasting pitas. I prefer your method of letting the dough balls sit for half an hour, and I’ve discovered that — for me, anyway — the puffing is better when the rolled-out disks also have some time to hang out for a little while. So thanks again for this. In these times of rising energy costs, it’s good to have bread that doesn’t need close to an hour to get done 😉
So true, Carole! Everything is getting so expensive. Thanks so much for reporting back with your results. It’s nice to be able to point others to a reliable recipe/method when they reach out, which I know they will, especially as we head back into baking season. Thanks again for writing and sharing your notes!
First time I’ve tried pittas, and BOY does this recipe work! They are soft, puffy and exactly as I like pittas. They worked exactly as the recipe suggested, even down to the weight of the balls! My partner was blown away and said “if they are that good, why would we ever buy them again?!” Thank you 😊
Oh Yay! So nice to hear this, Ali 🙂 🙂 🙂 Thanks for writing!
Made this Pita recipe and overall it was easy and the breads turned out good. Only minor issue was the salt was a little heavy handed (could be coz I use pink himalayan not table salt).
Also my oven temp didn’t go as high as required so they took 4mins rather than 2mins for each batch.
Please explain why there are 2 different oven temperatures in the recipe: 475 and 550 F. My oven goes up to 500 F for the baking setting,. Could I use the convection baking setting?
I was also wondering why when I roll out the dough to 6 inches, they got smaller by the time they are ready to place in the oven. Do I roll them back to 6 inches?
Hi Henri! Apologies for the delay here. The two oven temps refer to different baking methods. If you have a baking steel or stone, use the 550ºF (or 500ºF) setting. Convection is fine. If you are using a skillet or sheet pan, use the 475ºF setting.
No need to roll the pieces back, but it’s possible you need to roll them out larger the first time around so that when they shrink, they end up closer to 6 inches. How did they turn out?
This recipe works every time! Tripled the recipe and added 300 g of whole wheat flour. The bread puffed and turned out beautifully. Thank you!
Wonderful to hear this, Annie! Thanks so much for writing and sharing — so helpful for others as many people ask about using whole wheat flour here.
Great results – thank you for sharing this recipe! I followed as written and everything worked perfectly- the video was really helpful & bonus that I got to try out my new scale! Do you think this might work if I replaced all purpose flour for cassava flour? As much as I love the yummy taste of these – as is- I’ve heard cassava is better for you an often it’s a 1:1 replacement with flour. Would love your advice on what to be aware of as I give it a try.
Also have you ever tried adding dried herbs to the dough? I’m wondering if experimenting with flavors would work?
Great to hear, Sedef! My worry with cassava flour is that it’s gluten free, so I’m not sure it will have the strength/structure to puff and create a pocket. That said, I’ve never tried, so I can’t say for sure.
I have not experimented with dried herbs, but I think dried herbs would be great here. Go for it!
How do I begin to sing your praises?! I’m a confident and pretty good cook but baking has always been my Achilles Heel – that is, until now. First off, I took your advice regarding a food scale. WOW, I measured using spoons as I usually do and then placed the same on the scale – quite a difference! Your recipe is absolutely on point! I was doing the happy dance when I pulled those pitas out of the oven all puffed up with perfect pockets!! Only bummer is my home oven only reaches 500 and I think 550 would be perfection. I had to bake a few minutes longer but didn’t achieve that shade of gold. I also think that perhaps I should bake on the center rack, I think mine was on the top rack. I preheated and baked on a regular baking sheet. I’m baking the Focaccia this weekend & if all goes well I’ll be ordering your book immediately. Thank you so very much for your precise and easy to follow directions & NO fail recipe.
Sharon, yay!! So nice to read all of this. A scale is game-changing, right?
And yes, most ovens do not get as hot as we would like them to. But I’m so glad you got a good puff nonetheless … I would take the puff over the color 🙂
Hope the focaccia turns out well for you. Thanks so much for writing!
I did everything exactly according to the recipe, but they never rose at all. I suspect it was because I used active dry yeast ( in your notes you said that would work, if I mixed it with warm water and let it sit — which I did.) BUT — in my experience, yeast needs a bit of honey or sugar to activate, and since you didn’t say anything about that, I didn’t do it. Next time I will — maybe then it will work. As for the six little frisbees that I npw have, I guess we can fold them over like tacos.
Hi Margery! Bummer to hear this. Did the yeast ever get foamy? About how long did you let it sit? Are you confident in the freshness of your yeast?
Again, I’m sorry this didn’t work out, but I have used active dry with success here. A sweetener definitely helps activate active-dry yeast in a more timely manner, but it isn’t actually a necessity.
This really is a great recipe!
The secret for me is a pizza stone set in upper third of oven. No convection. Then wait a few min between each pita to let the stone warm up.
Super good.
Great to hear, Susan! Thanks so much for writing 🙂 🙂 🙂
Hi, I am going to try making these today and will let you know how they come out, but I have a question.
You don’t cover the dough either time it is resting? I’m just curious, because every bread recipe I’ve ever seen tells you to cover dough with a damp cloth while rising/resting. That is not in your instructions or video. Maybe that’s part of the magic of pita?
Hi Jeff! I cover the dough bowl for the initial rise, but not afterwards, though you absolutely could if you find your dough tends to dry out. Neither of the resting periods is too long, so the dough should be fine.
Yes! I made these today and they were absolutely perfect!!!
I have been trying to master all kinds of bread for the past year, and I’ve made things like croissants, naan, sourdough, brioche, etc. And, now, I can add pita bread to my list of accomplishments.
Thanks so much for the wonderful recipe and detailed instructions and video!
Wonderful to hear this, Jeff! Thanks so much for writing. And bravo on all of your bread accomplishments 👏👏👏👏👏
I couldn’t get the pita bread video to open. I don’t have a steel,or pizza stone, what other method can I use to bake these pita. I love pita bread and would love to try this recipe. Thank you
Hi Theresa! Can you try opening the video again? It’s working just fine on my end … just trying to see if there is a technical issue I should be aware of.
There are notes in the post about other methods. I’ve pasted them here, too:
First, heat your oven to 475ºF. Then:
Place a cast iron skillet in the oven, and let it heat for at least 5 minutes; then bake each round one at a time for 2-3 minutes total.
Or place a sheet pan in the oven, and let it heat for at least 5 minutes; then bake three rounds at a time for 2-3 minutes total.