 →
→ How to Make Fresh Homemade Pita Bread
This post may contain affiliate links. Please read my disclosure policy.
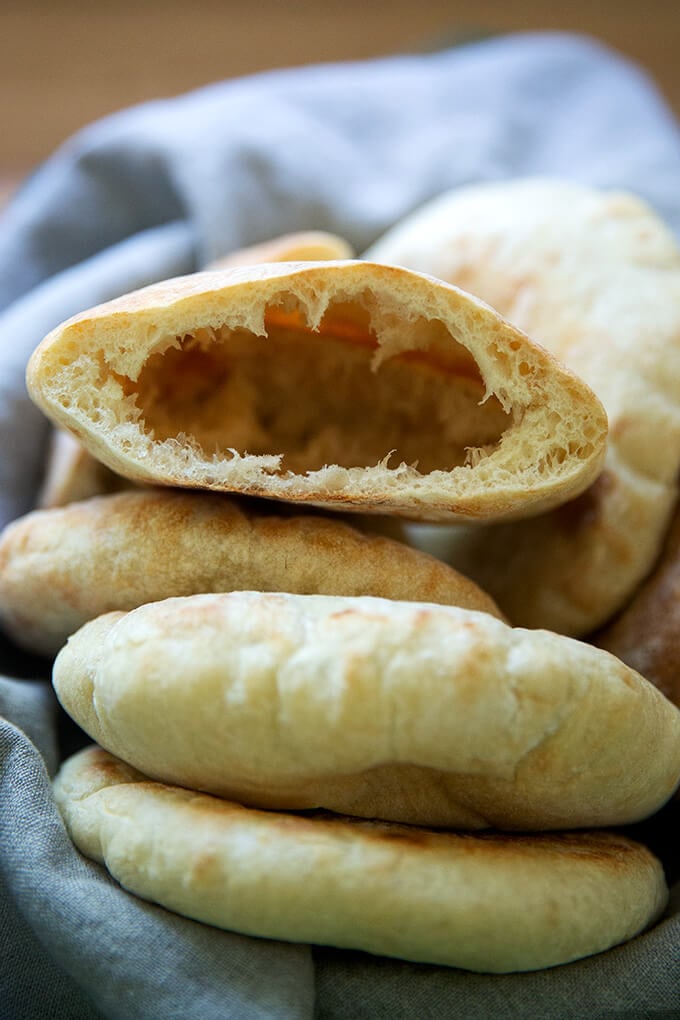
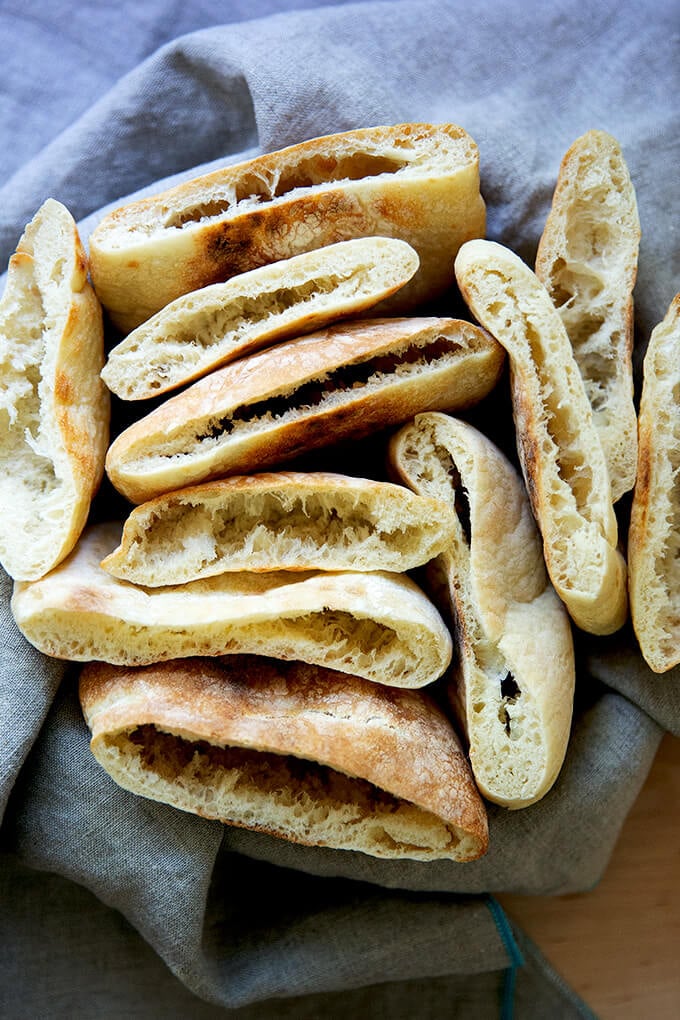
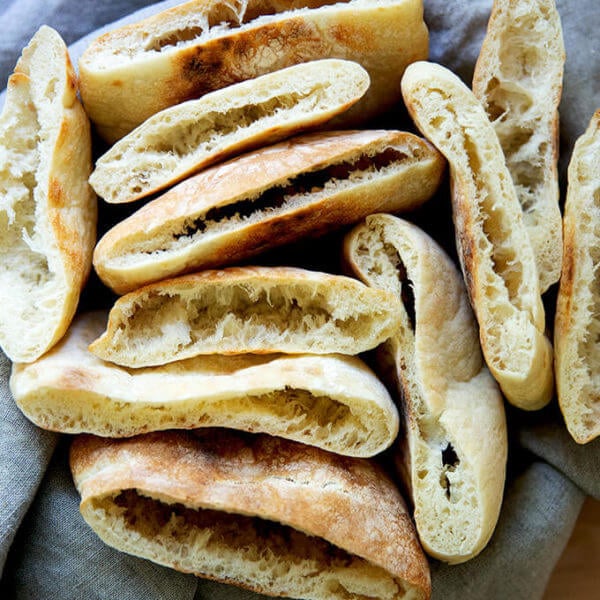
Making fresh pita bread at home couldn’t be easier. This recipe uses instant yeast and requires no kneading or complicated shaping. The pita rounds balloon into perfect pockets in 2 minutes in the oven. Read on to learn three tips for success!
Making pita requires neither kneading nor complicated shaping. It’s one of the easiest bread recipes you could make, in fact, right up there with no-knead focaccia and homemade pizza dough. The recipe below is essentially a half recipe of my mother’s peasant bread recipe with the sugar omitted, the hydration lowered, and the addition of a small amount of olive oil.
And while the overall process is simple, there are a few keys to success:
The Secret to Getting Pita to Puff in the Oven?
- Handle the dough gently during the rolling process. When you roll, use a gentle hand so that you don’t deflate all of the air bubbles created while the dough was rising.
- Allow the dough to rest. After rolling out your rounds, let them rest for 15 minutes, which will allow the dough to recover — it allows the gluten to relax — from the rolling process, which in turn will allow them to puff back up again slightly before baking.
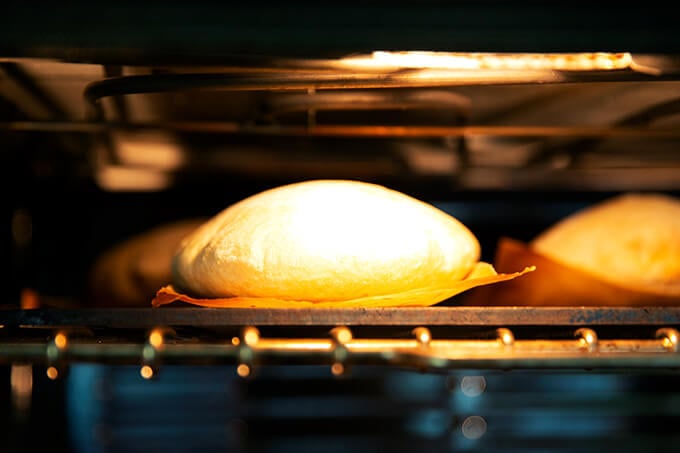
- Cook the pita on a hot surface. If you have a Baking Steel or pizza stone, cook your pita on it: as soon as the pita meets the hot surface, the heat will quickly transfer to the dough, making it instantly spring:
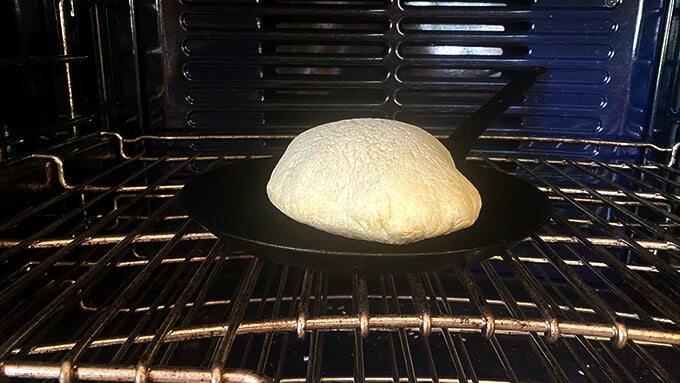
If you don’t have a Baking Steel or pizza stone, you can use a preheated cast iron or other oven-safe skillet (see recipe box for details):
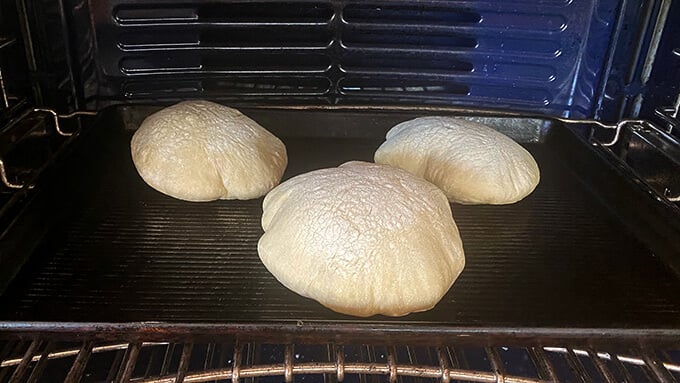
Or you can use a preheated sheet pan (see recipe box for details):
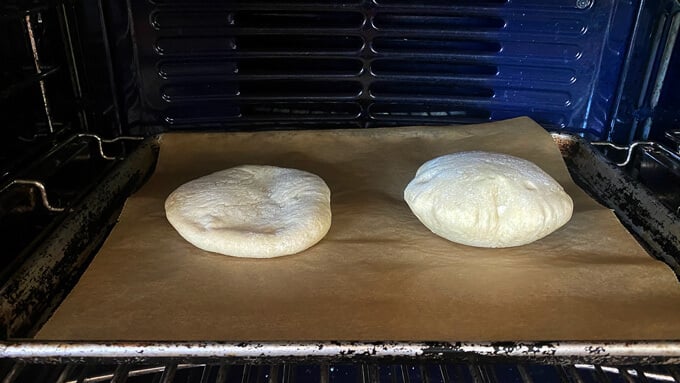
A non-preheated sheet pan will not work as effectively, see below: one pita puffed, one did not:
PS: Simple Homemade Naan (5 Ingredients)
How to Make Pita Bread, Step by Step
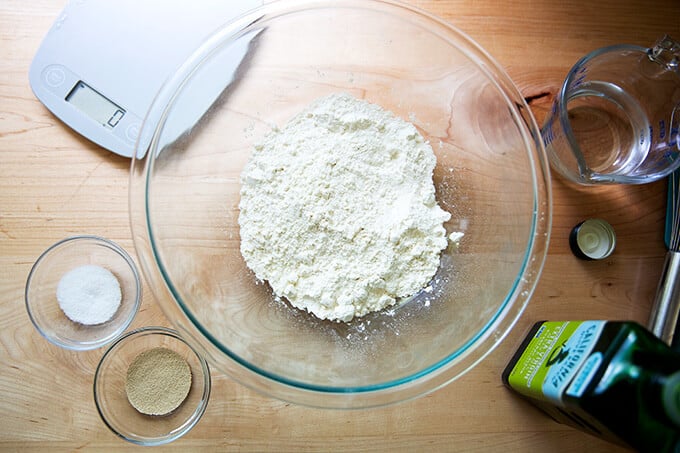
Gather your ingredients: flour, salt, instant yeast, water, and olive oil. As always, for best results, use a digital scale to measure.
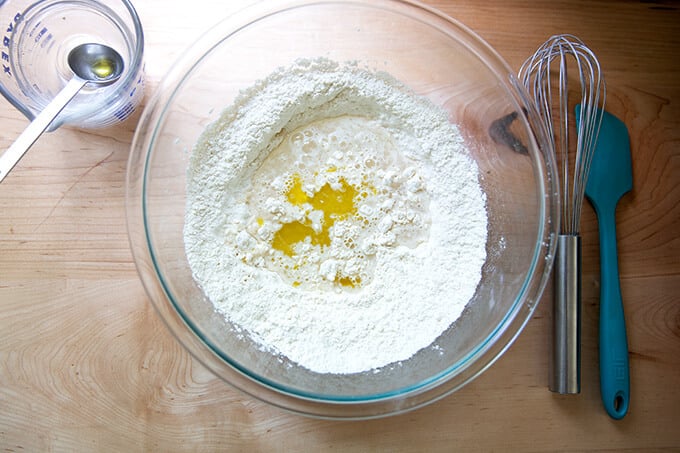
Whisk together the flour, salt, and instant yeast. Add the water and olive oil.
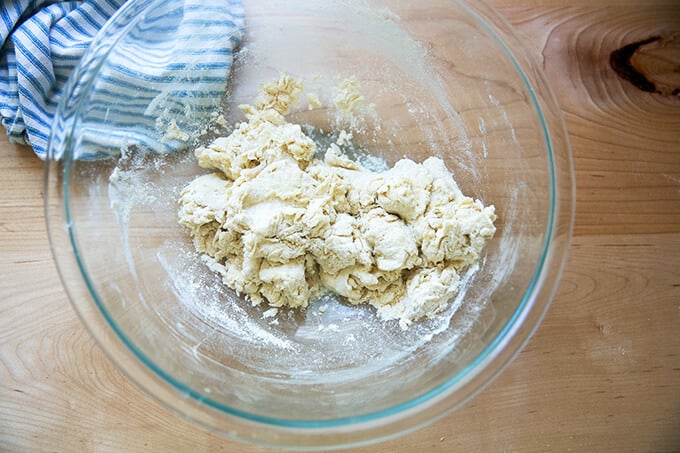
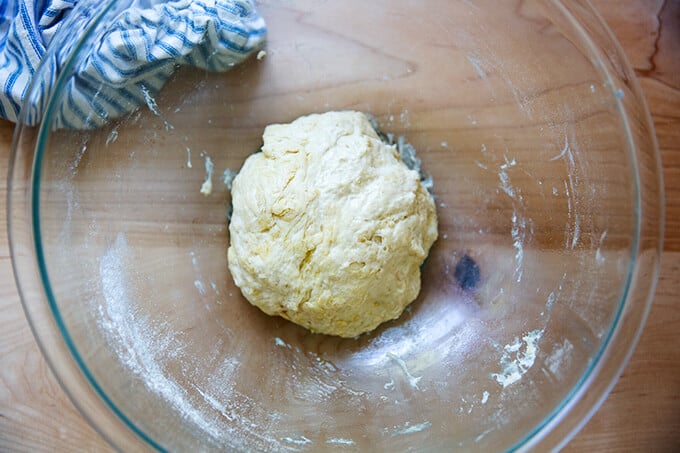
Mix with a spatula until you have a shaggy dough — mixture will feel dry.
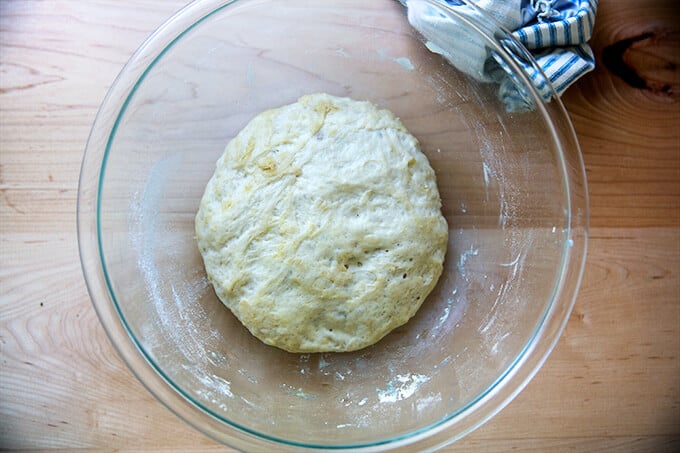
Use your hands to briefly knead the mass into a dough ball. Drizzle with olive oil. Turn to coat. Cover bowl with a cloth bowl cover, and let rise in a warm spot for 1.5 hours or until …
… slightly puffed.
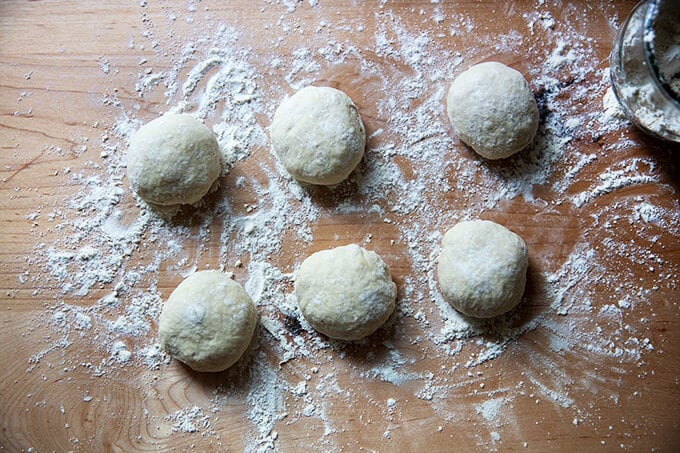
Turn out onto a lightly floured work surface, knead briefly, then use a bench scraper to divide the mass into 6 roughly equal portions. If you’re using a scale, each portion should weigh about 73 grams.

Shape each portion into a ball; then let rest for 30 minutes. This allows the gluten to relax: the brief rest will make them easier to roll out into rounds.
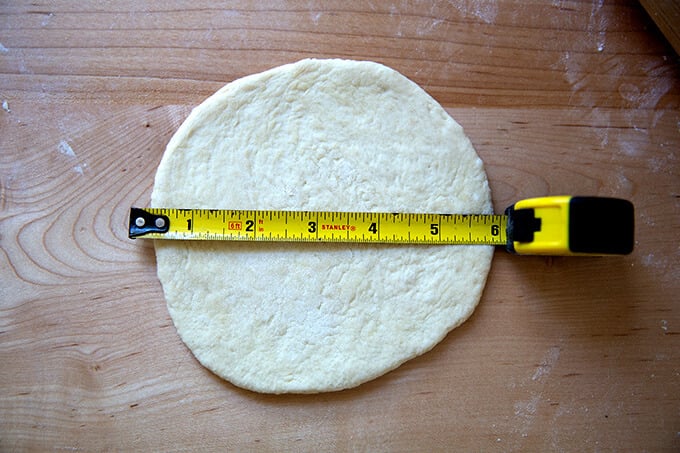
Flatten each ball with your hands; then working with one round at a time, roll into a 6-inch round.
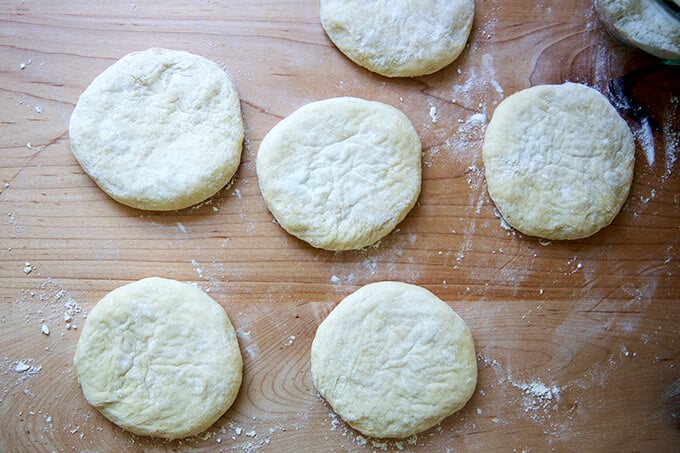
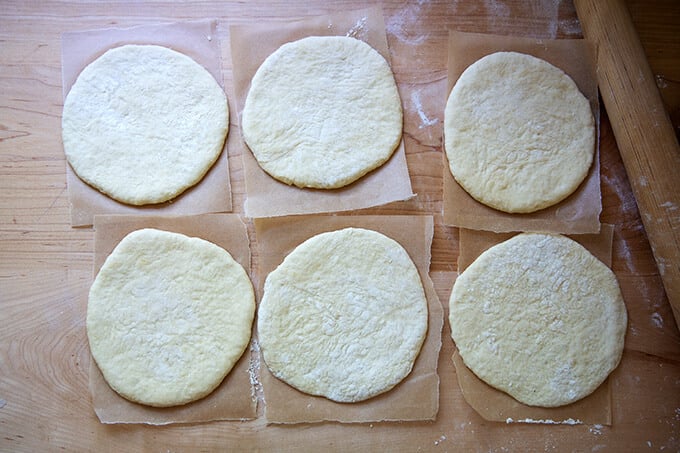
Transfer each round to a sheet of parchment paper. Let rest for another 15 minutes. Meanwhile, heat a Baking Steel or pizza stone to 550ºF. (Note: If using a stone, reference the manufacturer’s manual regarding heat tolerance.)
Bake three rounds at a time for 2-3 minutes, or until lightly golden.
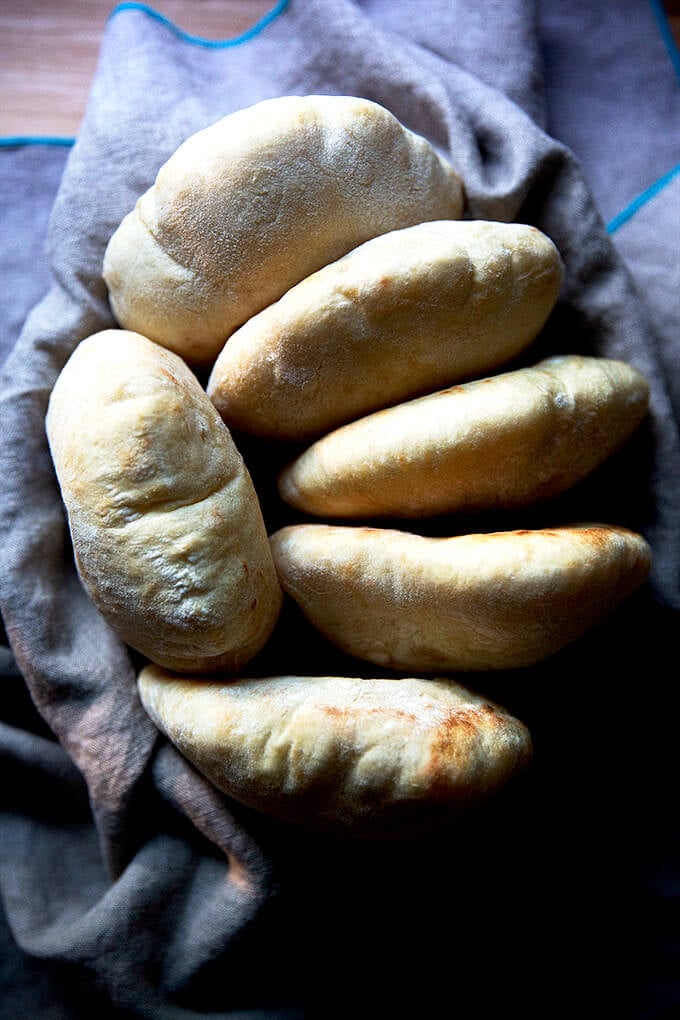
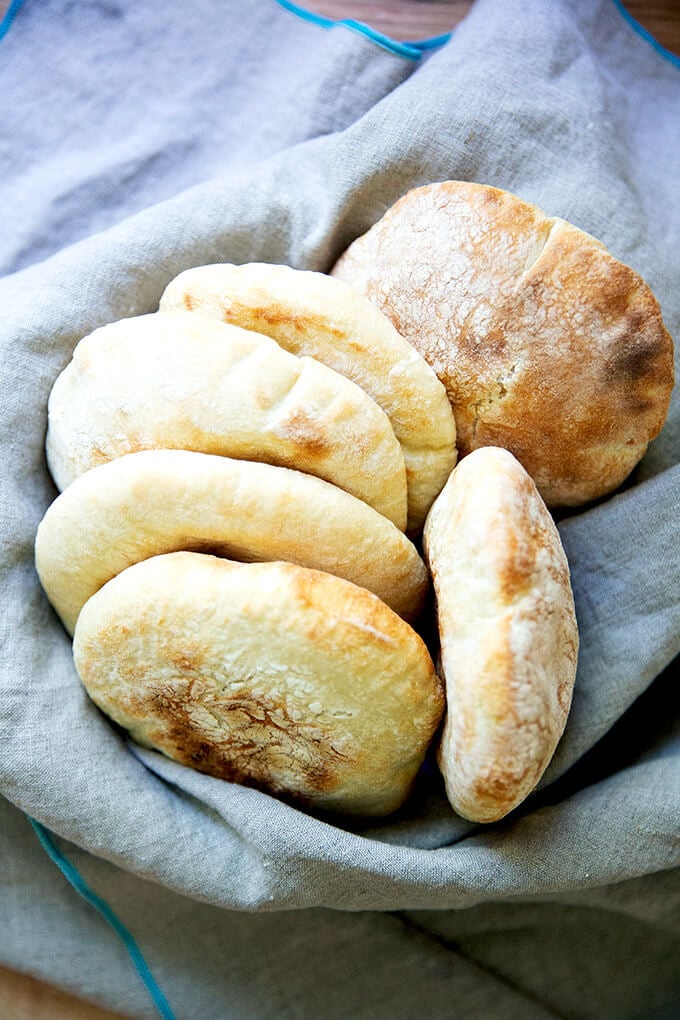
Transfer freshly baked pita to a towel-lined bowl. Wrap to cover until ready to eat.
How to Make Fresh Homemade Pita Bread
- Total Time: 3 hours 4 minutes
- Yield: 6 1x
- Diet: Vegan
Description
Making fresh pita bread at home couldn’t be easier. This recipe uses instant yeast and requires no kneading or complicated shaping. The pita rounds balloon into perfect pockets in 2 minutes in the oven.
Notes:
To create a warm place to rise: Preheat your oven for 1 minute; then shut it off.
Parchment paper sheets: If you buy parchment paper that comes in sheets, such as the If You Care brand, you can fold the sheet lengthwise, then into thirds widthwise, and cut along the creases to create 6 equal pieces.
If you don’t have instant yeast, you can use active-dry yeast. Simply sprinkle it over the lukewarm water, and let it stand for 15 minutes; then proceed with the recipe.
FAQs:
Can I use whole wheat flour?
I suggest using no more than 50% whole wheat flour (1 cup or 128g) in this recipe because using too much could prevent the pockets from puffing in the oven. The more whole wheat flour you use, the more bran there will be in the dough: bran cuts through the gluten structure, which can prevent the dough from puffing in the oven. Depending on the whole wheat flour you are using, you may need to increase the amount of water: whole wheat flour tends to be thirstier. Reference the video for how the dough should look; then add more water if necessary.
What if I don’t have a Baking Steel or pizza stone?
Here are two alternative methods:
- Place a cast iron skillet in the oven, and let it heat for at least 5 minutes; then bake each round one at a time for 2-3 minutes total.
- Place a sheet pan in the oven, and let it heat for at least 5 minutes; then bake three rounds at a time for 2-3 minutes total.
Ingredients
- 2 cups (256 grams) all-purpose flour, plus more for sprinkling
- 1 teaspoon (5 grams) kosher salt
- 1 teaspoon (4 grams) instant yeast, see notes above
- a scant 3/4 cup (165 grams) lukewarm water
- 1 tablespoon (14 grams) olive oil, plus more for drizzling
Instructions
- Mix the dough: In a large bowl, whisk together the flour, salt, and instant yeast. Add the water and oil. Stir with a spatula until a shaggy dough forms — the mixture will appear dry and unevenly mixed. Use your hands to knead the dough briefly in the bowl just until the flour is absorbed and you have a sticky ball, about 30 seconds. Drizzle a little olive oil over top, turn the dough to coat, cover bowl with a tea towel, and transfer to a warm place (see notes above) to rise for 1.5 hours.
- Prepare the oven: Heat the oven with a Baking Steel or stone inside at 550ºF. See notes above if you do not have a Baking Steel or pizza stone. Cut a sheet of parchment paper into 6 small pieces about 6-inches square, see notes above.
- Portion the dough: Turn out the dough onto a lightly floured work surface. Knead briefly to form a ball. Use a bench scraper to divide the dough into 6 equal portions — each ball should roughly weigh 73 grams. Using flour as needed to prevent sticking, ball up each portion, using the pinky edges of your fingers to create tension (see video for guidance). Let the portions rest for 30 minutes.
- Roll out each ball: Flatten one ball, and, using flour as needed, gently roll it out with a rolling pin until you have a 6-inch round — the key is to not roll too aggressively in order to prevent the air pockets from being forced out. If a round is resisting, set it aside, begin rolling out another one, and return to the stubborn one at the end. Transfer each 6-inch round to a sheet of parchment paper. Let rest for 15 minutes.
- Bake the pita: When the oven has preheated, use a pizza peel to shimmy one round at a time, parchment paper and all, onto the preheated Baking Steel. I like to cook 3 at a time. Set a timer for 2 minutes. If the pita is lightly golden, it’s done. Remove pita, transfer to a tea towel-lined bowl, and close the towel. Repeat with the remaining 3 rounds of pita.
- Store the pita: Store pita at room temperature in an airtight bag or container for 3 days or freeze for up to 3 months. Reheat before serving.
- Prep Time: 3 hours
- Cook Time: 4 minutes
- Category: Bread
- Method: Yeast
- Cuisine: Mediterranean
This post may contain affiliate links. Please read my disclosure policy.


568 Comments on “How to Make Fresh Homemade Pita Bread”
These look wonderful!
Thank you, Amelia!
A great recipe and video, as always.
Thank you Lili 💕💕💕💕
Hi Ali
I really want to try these. However, in order to not cause a problem, the highest I like to heat my oven is 450. I do have a baking stone. How long should I leave them in at this lower temp?
Hi Susan! I don’t think you’ll need too much more time: I would still take a look at 2 minutes; let them go for a couple minutes more, but check on them every minute. You can also do a tester one: cook 1, let it cool, evaluate the results and cut back on the time or add more depending on how you like it.
YESSS! I seriously made a badge this week, not your recipe… and I was not happy with the result.
I’m really looking forward to give these a try… no-knead is the best! Thanks for sharing 🙂
Yay! Hope you love them Eveline!
Can’t wait to make this. I could make one of your meatball recipes and stuff the pita! Now I know what I am making for dinner 😂.
The Caramelo tortillas that you recommended were amazing. So good that I can’t buy tortillas from the grocery store anymore. Since there is a 4 week delay in getting the tortillas, I ordered more packs after I finished my first tortilla!
Oh my gosh I love all of this so much 😂😂😂😂 I feel panicky when I only have 1 pack of Caramelo tortillas on hand. Hope you love the pita, Sonia!
Is it possible to use a sour dough starter instead of yeast and let it rise longer?
I haven’t tried, but I would imagine yes! I would try 50 g of starter. I’ve been meaning to give this a go. If I do, I will report back with more details.
This looks great, and I can’t wait to try. To be fair, I have found one store bought pita that I’m pretty happy with: Trader Joe’s mini whole wheat. I always eat them warmed up, which may make store bought tastier.
Great to hear this, Tonya! I have a favorite, too, from a market in Albany called Nora’s … it gets flown in from Montreal on Tuesdays, and it’s a real treat. Great to know TJ’s has a good one, too. Thanks for sharing.
Just confirming…only 1 tsp of yeast??? Can’t wait to try!
Yes!
Can’t wait to try this tonight! I assume we should put the baking stone in the top third of the oven like for pizza?
I love that there is no spritzing of the dough with water!
That is where I keep mine! Honestly for these, I think you would have success with the stone or Steel in any part of your oven. When I did the tests with the preheated sheet pan and skillet, the pans were in the middle of the oven, and the pita ballooned up just fine.
Hope you love them, Andrea!
After all the rising & resting, can the raw dough be frozen & baked as needed? It works for the Naan bread but that is cooked on a skillet. I’d love to know. I’m baking just for myself. Thanks!
I haven’t tried freezing this dough, but I have successfully frozen pizza dough, so I don’t see why this would be any different. As soon as you ball up the portions, I would freeze them. I think you could freeze them on a tray to start, and once they are solid, you could transfer to a smaller vessel or airtight bag. Let me know if you give it a go! And I’ll try to get a batch in the freezer ASAP to test as well.
Ali, you are the best teacher. And of course, delicious recipes too.
Thank you, Dana 😍😍😍💕💕💕💕
I’m going to make this recipe next week. I have a lot of luck with your bread recipes and make your sandwich loaf all the time. I always make two loaves at a time, slice them, and freeze them and toast them as we are using them – dark for toast toast and lighter for sandwiches. Because I do this, I leave the oil out. This is a truly great recipe, and I am never without a loaf in the freezer. I bake them in Lodge cast iron loaf pans and score them down the middle. When the bread is toasted, the edges get all crispy and delicious because the pans are liberally buttered. I will have to make the pita on either my Lodge pizza pan or my Emile Henry pizza pan as I gave my baking steel away – I am slight, and it was, unfortunately, too heavy for me to lug in and out of the oven. It’s okay though because it has a good home, one where BTC is a star, as are you! xxxx
Oh Victoria! So nice to hear all of this 😍😍😍😍. Thanks so much for writing. I think your Lodge pizza pan or EH pizza pan will work great here. And I hear you re the Steel… it’s heavy! Thanks again for your kind words.
Has anyone had success converting this to gluten free?
Lovely! Imagine dipping them in some of cheese sauce recipe must be yummy!
😍😍😍
I have made numerous from Alexandra Cooks, all have been hits, and these were easy and amazingly good, super fun to see them puff up, I used a baking stone and they turned out great
Wonderful to hear this, Colby! You’re so speedy!! Thanks for the kind words and thanks for writing.
I just made these this afternoon and they are so good!!!!
Thank you for the recipe and the instructional video. I have searched for the perfect pita recipe and I finally have it now, thanks to you!
Wonderful to hear this, Debi! Thanks for writing 😍
Can bread flour be used instead of all purpose flour?
Yes!
Fantastic recipe! I found it so much easier than I thought it would be. My oven doesn’t go up to 550° so I used our Kamada Joe and it worked perfectly. Can’t wait to make them again.
Wonderful to hear this, Kellie!
I made these last night. I discovered our oven can only be set to 500 but it seemed to work. I cooked them two at a time, and the first two puffed and seemed done at 2 min but I cooked the others for 3 min. I honestly didn’t notice a difference. They didn’t get very brown but they were soft and tasted great. I served them with chicken shawarma from the NY Times and everyone loved it! Thanks for the recipe.
Wonderful to hear this, Sue! I’ve got to try that shawarma recipe!
Hi, thanks so much for this recipe. Have never made bread before but saw this on your Instagram stories and I felt inspired! Bought some yeast and made them today – I was nervous but they came out great and went down a treat. We had lamb burgers with them and tzatziki, everyone said they were delicious, and were impressed I’d made the pita myself. I owe that to you, thank you for this recipe and inspiring me to bake! Think I’ll try bread next… thank you! Julia:)
Wonderful to hear this, Julia! And pita + lamb burbers + tzatziki sounds like a lovely meal! Thanks for writing 💕
These were great! So much better than store bought. And so easy.
Wonderful to hear this, Suzanne!
I lived in the Middle East for most of my life and I missed a good Pita since I moved away. This is the best Pita recipe I found! It’s so easy to make and tastes authentic! Love it!!!
Oh yay! So wonderful to hear this, Debby! Thanks so much for writing.
Can I use bread flour for this recipe? Thanks. Wandee
Yes!
I’m so excited to try this recipe! This will be my first time making pita bread & this recipe looks so simple and beginner friendly.
Quick question – if using active dry yeast instead of instant rise, how much water should we let it rise in – the normal 3/4 cup needed in the recipe? Thank you!
Hi Inbar! Yes, use the same amount of water: sprinkle the active dry yeast over the 3/4 cup lukewarm water and let it stand for 15 minutes or so. Do weigh the water for best results, however, if you have a scale. Good luck!
As a full time RV’er I bake in a convection oven. 425 is my max temperature. I’ve been successful at lower temps for sourdough. Any suggestions for time & temp. It would help lower the mistake curve.
I think you can get away with 425F. If you can preheat a skillet or a pan for many longer than the suggested 5 minutes, that might help.
can we replace the dry Instant Yeast with starter ..and how much gram ??
thanks
I haven’t tried, but I would start with 25-50 g.
First attempt at homemade pita, fantastic!
Wonderful Pina!
I have just made a batch. Wonderfully easy. And they have puffed. WOW.
The only difference – I have used the whole sheet of paper – with four pittas at once.
Thanks Alexandra. Greetings from Poland.
Wonderful to hear this, Iwona! Thanks for writing 😍😍😍
I love this recipe and so does my family. We have been making these on repeat. It’s easy, fast and delicious!
Wonderful to hear this, Amanda!
if i use the refrigerator rise methods (in any of the 3 scenarios you described), do i need to let the dough rest at room temp beyond what you specified in the recipe? thanks so much and thanks so much for the recipe..cant wait to try.
Hi Tasha! Possibly! But it’s so hard to say. Because the dough gets divided into 6 small-ish portions, they come to room temperature pretty quickly (regardless if you portion before or after refrigerating). Hope that helps!
NICE POSTING!
THANK YOU FOR SHARING….
These were amazing! I’ll be making them frequently
Wonderful to hear this, Martha!