 →
→ Simple Sourdough Pizza Crust: A Step-by-Step Guide
This post may contain affiliate links. Please read my disclosure policy.
As far as sourdough pizza recipes go, this one is as simple as it gets: it’s made with all-purpose or bread flour, and there is no autolyse or preferment — everything gets mixed together at once. Ready? Wake up your starter! Read on to learn 5 secrets to sourdough pizza success.🍕🍕🍕

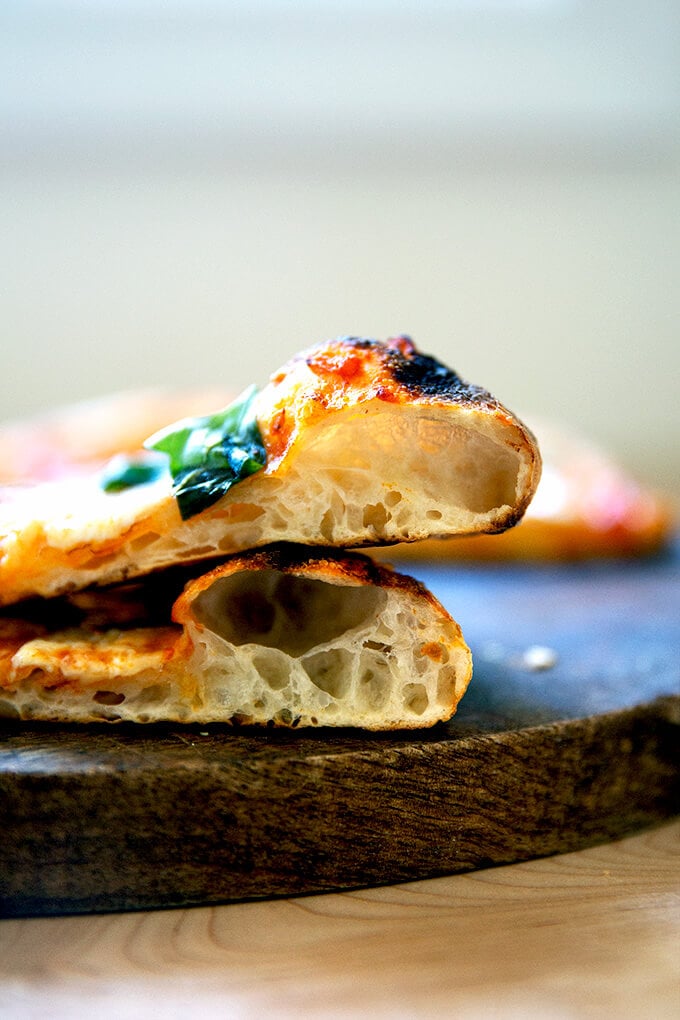
This sourdough pizza recipe produces a pizza with a ballooned, blistered edge and a crisp but pliable crust. The secret to achieving this texture in a home oven is to use a high-hydration dough (75%), proper fermentation (long and slow) at each phase, gentle handling of the dough, and a screaming hot oven (ideally outfitted with a Baking steel or pizza stone).
Let’s explore each in more detail:
5 Keys to Sourdough Pizza Success
- Use a high-hydration dough: Because home ovens rarely reach above 550ºF, it takes longer for pizzas to cook. In contrast, a 900ºF oven will cook a pizza in 60 seconds. To prevent pizza dough from drying out in a home oven, it is important that the dough has a lot of water in it — i.e., it is high-hydration. In contrast, outdoor oven pizza doughs can be much lower hydration.
- Ferment sufficiently: After the first long, slow rise, transfer the dough to the fridge for at least 12 hours and up to 3 days. Time further develops flavor, helps with browning, and improves the texture of the pizza dough.
- Proof sufficiently: If time permits, allow the dough to come to room temperature for at least an hour before baking (and up to 2), which makes it easier to shape — room-temperature dough stretches into a round more easily than cold dough.
- Handle the dough minimally: Using a delicate hand when shaping the dough preserves the air pockets created during fermentation.
- Invest in a Baking Steel: Steel is a better conductor of heat than stone — i.e., it transfers heat to the dough faster — which promotes great oven spring, which translates to glorious bubbles throughout the dough.
How to Make Sourdough Pizza, Step by Step
As always, a scale is essential for the best results. You need water, flour, salt, and a sourdough starter:
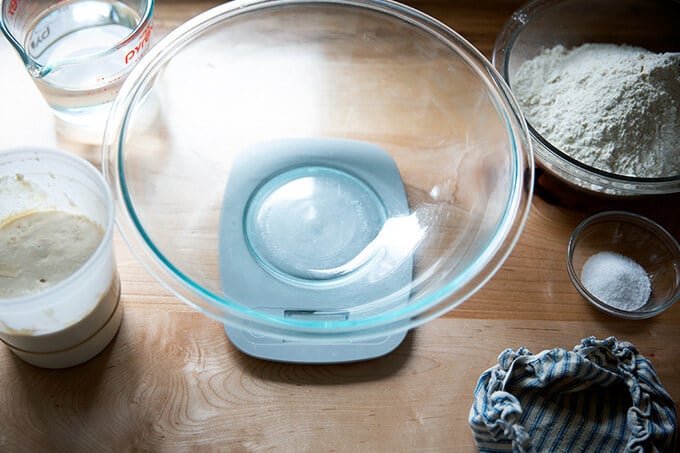
Combine 375 g water, 100 g sourdough starter, and 10 g salt in a bowl. (See notes in recipe box about using less water if you live in a humid environment.)
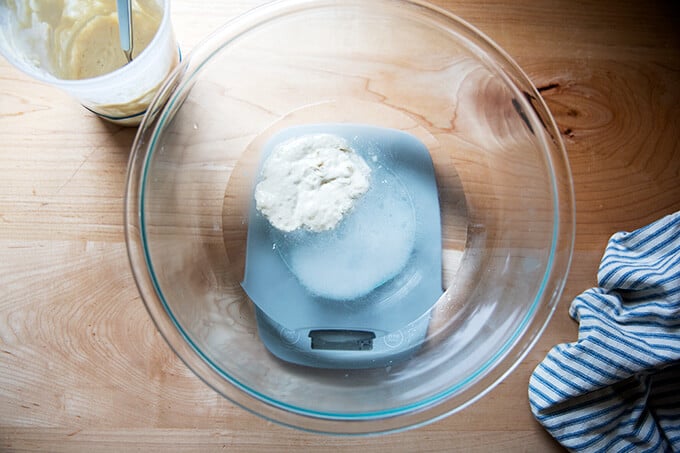
Stir to combine; then add …
… 500 g all-purpose flour.
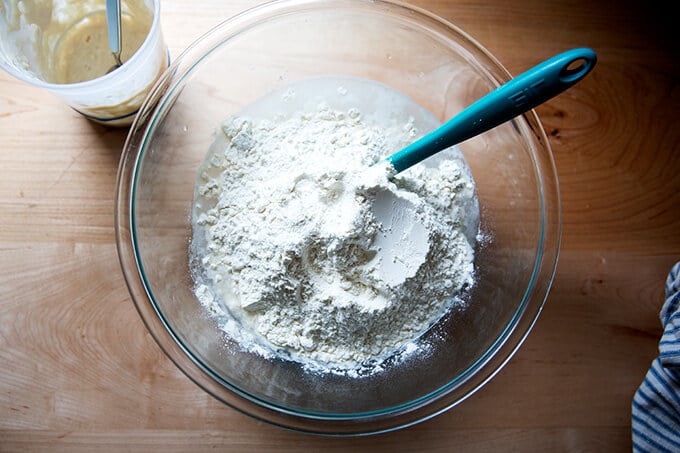
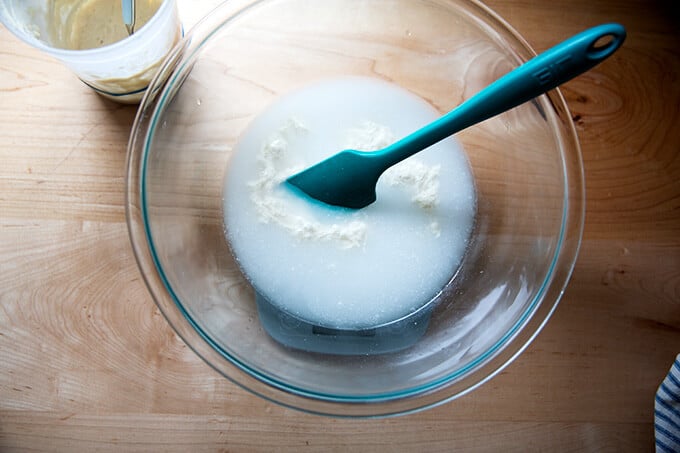
Stir until you have a sticky dough ball.
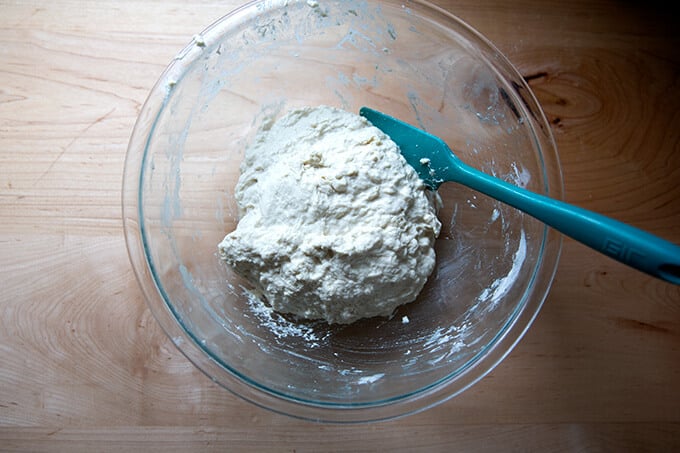
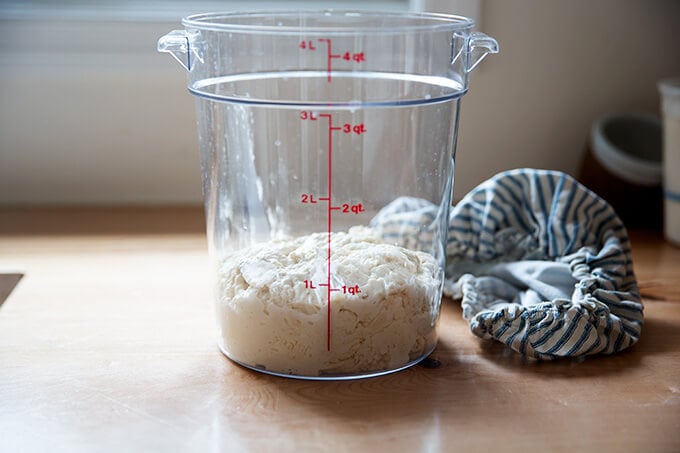
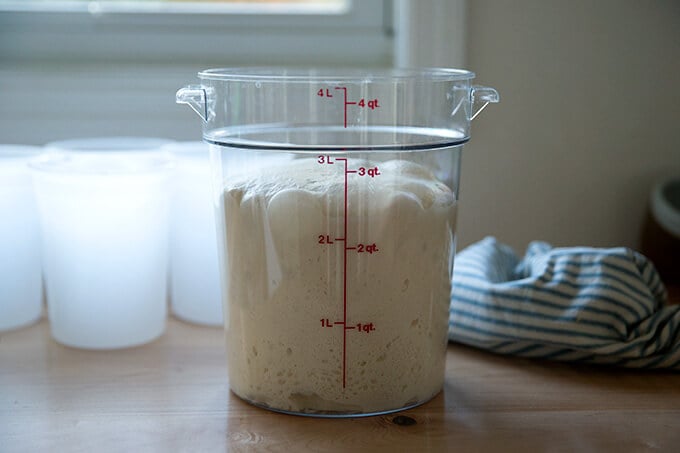
Transfer to a straight-sided vessel (if possible) and let rest for 30 minutes. Then, “stretch and fold” the dough (see video for guidance) 4 times at 30-minute intervals. Cover the vessel. Let it rest for 6 to 12 hours (see recipe notes for timing) or until the dough…
… has about doubled in volume. (Note: This is a little bit more than double. Ideally, you don’t want your dough to rise much beyond double. More recently, in fact, I stop the bulk fermentation when the dough has increased in volume by 50%.)
Turn the dough out onto a work surface. Use flour here as needed.
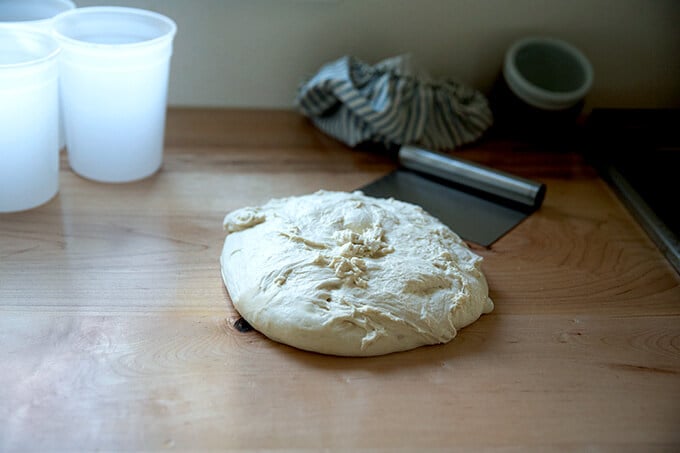
Portion into 4 equal pieces, again using flour as needed.
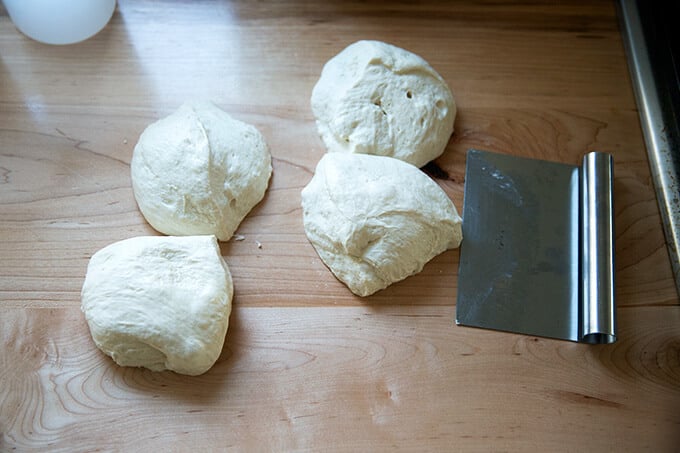
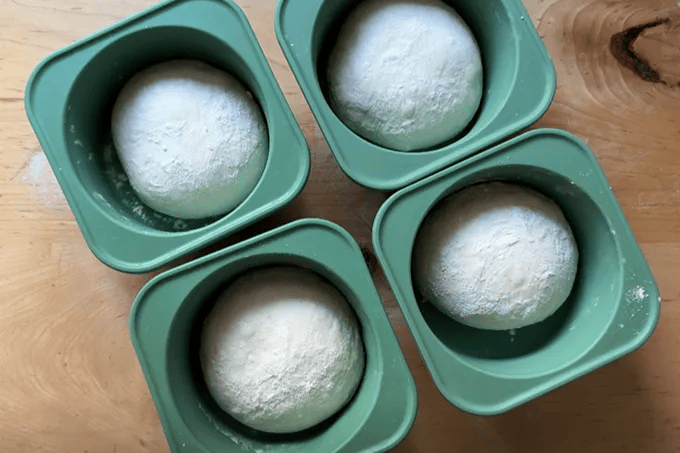
Ball up the dough, transfer the balls to storage containers, and stick them in the fridge. These Kevjes Dough Storage Vessels have become my favorite storage vessels for pizza dough balls:
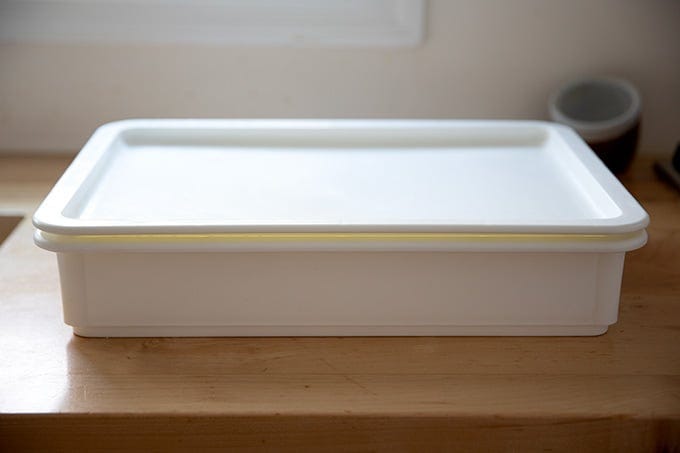
An hour prior to baking, remove a round (or more) of pizza dough from the fridge, and transfer it to a lidded vessel such as a DoughMate or a 9×13-inch baking dish covered with plastic wrap (to prevent the dough from drying out). If you have a Baking Steel, place it in the upper third of your oven, and heat the oven to 550ºF convection roast. (See recipe for other options.)
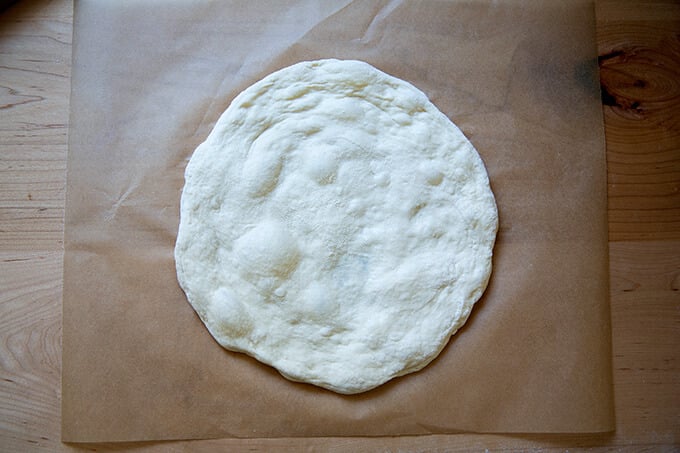
When the dough has proofed, delicately stretch it into a round, trying as best you can to preserve those air pockets.
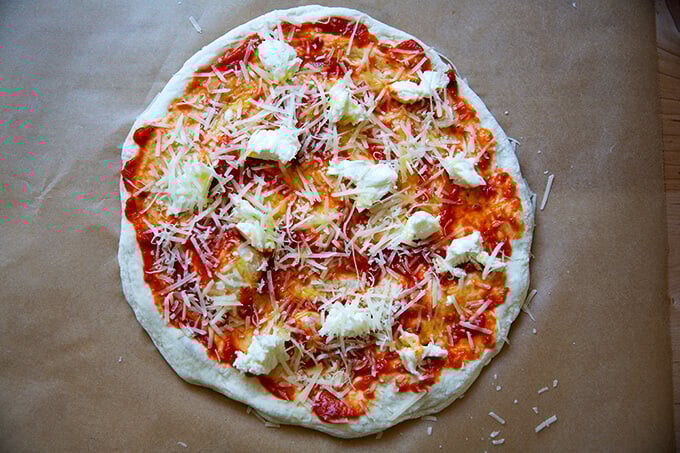
Top as you wish. This one is spread with tomato sauce and topped with fresh mozzarella, parmesan, olive oil, and sea salt.
Transfer pizza, parchment paper and all, to a preheated Baking Steel or stone, using a peel — my favorite peel is the Epicurean Pizza Peel. Bake 5 to 6 minutes or until cooked to your liking.
Slice and serve.

A little fresh basil is always nice.

This is the beauty of the Baking Steel: oven spring!


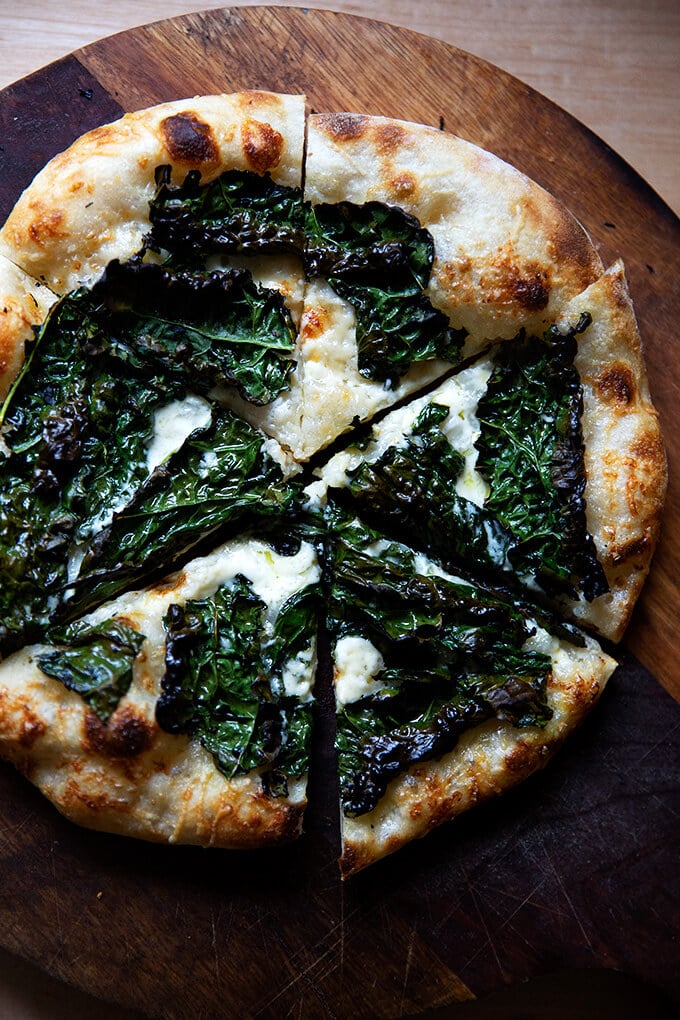
Another favorite: kale + crème fraîche:
Another favorite: “naked” + spicy scallion (or ramp) oil:

Looking for more pizza inspo? My cookbook, Pizza Night includes 52 pizza and 52 salad recipes, one pair for every week of the year, as well as five simple desserts 🍕🍕🍕


Simple Sourdough Pizza Crust
- Total Time: 1 day + 1 hour
- Yield: 4 pizzas 1x
Description
Here is my guide for making sourdough pizza crust at home. Made with all-purpose or bread flour and no autolyse or preferment, the dough comes together simply: everything gets mixed together at once, and you are on your way! 🍕🍕🍕
**Attention Pizza Fans**: My pizza cookbook, Pizza Night, is now available everywhere books are sold. Get your copy here: Pizza Night
What you need to make this recipe…:
- …a sourdough starter. Ideally, you want to use your starter 4 to 6 hours after you feed it, when it has doubled in volume and is very bubbly and active. You can build a starter from scratch in just about 1 week. Or you can buy one. Here are two sources:
- …time. Once your starter is ready to go, this recipe requires an initial 6 – 18 hour rise, followed by at least 6 hours in the fridge or up to 3 days.
Timing/Schedule:
The timing will depend heavily on the time of year and the temperature of your kitchen. In the summer, because it is warm and humid, the first rise (bulk fermentation) of all my sourdoughs takes between 6 – 8 hours; in the winter it will take longer, 10 to 12 hours.
It is best to rely on visual cues. For the bulk fermentation, you want the dough to double or less than double: I now end my bulk fermentation when the dough has risen by 50% to 75% in volume. This is why I cannot recommend using a straight-sided vessel (as opposed to a bowl) enough. It makes gauging the first rise easier.
If at any point you are worried the dough will over-ferment — say, for example, the bulk fermentation is nearly complete but you are tired and want to go to bed — stick the vessel in the fridge and pick up the process in the morning. (Note: If your dough rises above double, don’t despair … my dough has tripled in volume during an overnight rise, and the resulting dough still had plenty of strength and spring.)
Schedule: I like mixing this dough in the evening, performing 4 stretch and folds before I go to bed (if time permits), then letting the dough complete its bulk fermentation at room temperature (68ºF) overnight or in the refrigerator (especially in the summer, when my kitchen is much warmer). In the morning, it’s typically ready to be portioned (if it rose at room temperature), transferred to storage vessels, and stashed in the fridge. If I had let my dough spend time in the fridge for the bulk fermentation, I remove it in the morning, and let it complete its bulk fermentation at room temperature. Once complete, I portion the dough and stash it in the fridge. Sometimes I’ll use the dough that same evening; sometimes I’ll use it the following day or the next. I encourage using the dough within 3 days.
In short: If you want pizza for the weekend, mix your dough on either Wednesday or Thursday.
Troubleshooting: If you have issues with your dough being too sticky, please read this post: Why is my sourdough so sticky? The 4 common mistakes.
Water: If you live in a humid environment or if you are making this on a particularly humid day, consider starting with less water, such as 335 grams of water, which will bring the hydration down to 70%. This amount of water will still produce a light airy crust but the dough will be more manageable.
Flour choice:
- You can make this dough with all-purpose flour or bread flour, and it works beautifully. You can use Tipo 00 flour if you want, but you’ll likely need to reduce the amount of water. Start with 350 grams and adjust moving forward based on your results.
Can You Freeze Sourdough Pizza Dough?
Yes. But, in my experience, the pizzas made from frozen dough do not spring as high upon being baked. They will still taste delicious as long as the time spent in the freezer is relatively short: the more time sourdough spends in the freezer, the more air bubbles it loses. After 1 week in the freezer, my dough will bake up fairly well. After 3 weeks in the freezer, my dough will be less bubbly and will bake into a thinner and crisper crust.
To freeze sourdough pizza dough: make it through step 4 in the recipe below or until after you transfer the portioned rounds to quart containers. At this point, transfer the quart containers to the freezer. To thaw, remove a container (or more) and let thaw in the refrigerator for 1 day or thaw at room temperature for 8 hours. Then, proceed with the recipe.
Favorite Pizza-Making Tools:
- Baking Steel
- Pizza Peel
- Parchment Paper: I bake my pizzas on parchment paper on my Baking Steel. Parchment allows for easy transfer from peel to steel.
- Cast Iron Skillet: If you do not have a Steel or stone, you can use a cast iron skillet. Rub a half teaspoon of oil over its surface, transfer a stretched dough round to the skillet. Top as desired. Bake at 450ºF for about 15 minutes.
- I love these Kevjes containers.
Ingredients
For the dough:
- 375 g water (or less, see notes above)
- 100 g sourdough starter, active and bubbly, see notes above
- 10 g salt
- 500 g all-purpose or bread flour
For each Margherita pizza:
- 2 tablespoons tomato sauce
- 1 to 2 oz mozzarella
- handful of grated Parmigiano Reggiano (less than an ounce)
- drizzle olive oil
- pinch sea salt
For each kale and crème fraiche pizza:
- extra-virgin olive oil
- a couple handfuls of baby or Tuscan kale
- 1 to 2 cloves garlic
- Sea salt, such as Maldon
- 2 tablespoons crème fraîche
- grated Parmigiano Reggiano, about 1/4 to 1/3 cup
For each naked pizza with ramp or scallion oil:
- 1/4 cup olive oil
- 1/4 cup minced scallions or ramps
- 1 teaspoon crushed red pepper flakes
- 1 to 2 tablespoons crème fraîche
- handful grated Parmigiano Reggiano
- sea salt
Instructions
- Mix the dough. Place the starter, salt, and water in a large bowl. Stir with a spatula to combine — it doesn’t have to be uniformly mixed. Add the flour. Mix again until the flour is completely incorporated. Transfer to a straight-sided vessel (if you have one.) Cover vessel with tea towel or cloth bowl cover and let stand 30 minutes.
- Stretch and fold: after 30 minutes have passed, reach into the vessel and pull the dough up and into the center. Turn the vessel quarter turns and continue this pulling 8 to 10 times. See video for guidance. Let the dough rest for another 30 minutes; then repeat the stretching and folding. If possible, repeat this cycle twice more for a total of 4 stretch and folds. By the 4th cycle, you will notice a huge difference in the texture of the dough: it will be smoother, stronger, and more elastic.
- Bulk fermentation: Cover vessel with a tea towel or bowl cover and set aside to rise at room temperature (70ºF/21ºC) for 4 to 18 hours (the time will vary depending on the time of year, the strength of your starter, and the temperature of your kitchen; see notes above) or until the dough has roughly doubled in volume. (UPDATE: In the past I have recommended letting the dough rise until it doubles in volume. If you’ve had success with this, continue to let the dough double. Recently, I have been stopping the bulk fermentation when the dough increases by 50% in volume, and I feel my dough is even stronger in the end.) Note: Do not use your oven with the light on for the bulk fermentation — it is too warm for the dough. When determining when the bulk fermentation is done, it is best to rely on visual cues (doubling in volume) as opposed to time. A straight-sided vessel makes monitoring the bulk fermentation especially easy because it allows you to see when your dough has truly doubled.
- Portion and shape: Turn the dough out onto a work surface and shape into a rough ball, using as much flour as needed — the dough will be sticky. Using a bench scraper, divide the dough into 4 equal portions. Sprinkle portions with flour. With floured hands, roll each portion into a ball, using the pinkie-edges of your hands to pinch the dough underneath each ball. Transfer each round of dough to a plastic quart container, cover, and store in fridge for at least 6 hours or up to 3 days or transfer to the freezer for up to 1 week. (To thaw, remove a container (or more) and let thaw in the refrigerator for 1 day or thaw at room temperature for 8 hours. Then, proceed with the recipe.)
- Make the pizzas: Pull out a round (or more) of dough from the fridge one hour before you plan on baking. Dust dough with flour and place on a floured work surface. Let sit untouched for about an hour (a little longer or shorter is fine). Place a Baking Steel or pizza stone in the top third of your oven. Set oven to 550ºF. Heat oven for at least 45 minutes but ideally 1 hour prior to baking.
- Shape the dough: Gently shape dough into a 10-inch (roughly) round handling it as minimally as possible. (See video for guidance.) Lay a sheet of parchment paper on top of a pizza peel. Transfer the dough round to the parchment-lined peel.
Top and Bake
- To make a classic Margherita-style pizza: Spread 2 tablespoons of tomato sauce over the surface of the dough. Top with mozzarella to taste. Sprinkle with parmesan to taste. Drizzle with olive oil. Sprinkle lightly with sea salt. Shimmy the pizza, parchment paper and all into the oven. Bake pizza until top is blistered, about 5-6 minutes. Transfer to cutting board. Sprinkle with basil, if you have it. Cut and serve. Discard parchment paper.
- To make a kale and crème fraîche pizza: Place the kale in a small bowl, drizzle with olive oil, season with sea salt, and toss. Spoon crème fraîche over the dough leaving a 1/2-inch border or so—I use about a tablespoon per pizza. Sprinkle with minced garlic and a handful of grated Parmigiano Reggiano. Top with the kale. Shimmy the pizza, parchment paper and all into the oven. Bake pizza until top is blistered, about 5 – 6 minutes. Transfer to cutting board. Cut and serve. Discard parchment paper.
- To make a naked pizza with scallion oil: Heat 1/4 cup olive oil in a skillet with 1/4 cup of minced scallions (or ramps!) and 1 teaspoon crushed red pepper flakes. Keep it over low heat while you make the pizza. Spoon crème fraîche over the dough leaving a 1/2-inch border or so—I use about a tablespoon per pizza. Sprinkle with a handful of grated parmesan. Shimmy the pizza, parchment paper and all into the oven. Bake pizza until top is blistered, about 5 – 6 minutes. Transfer to cutting board. At this point, the scallions should be starting to “frizzle”. If they aren’t, crank up the heat until the oil is sizzling. Spoon a few tablespoons of the hot oil over the pizza (you’ll have extra oil). Sprinkle with a pinch of sea salt. Cut and serve.
- Prep Time: 24 hours
- Cook Time: 5 to 6 minutes
- Category: Pizza
- Method: Oven
- Cuisine: American, Italian
This post may contain affiliate links. Please read my disclosure policy.


1,553 Comments on “Simple Sourdough Pizza Crust: A Step-by-Step Guide”
Hi, love your stuff! Just tried this…and my pizza was flat – didn’t rise or blister in the oven. Do you broil? Not sure what I did wrong.
Hi Kristin! And thanks! 🙂 A few questions:
Did everything initially seem OK? As in, during the stretches and folds, did the dough seem to get more elastic and stronger as time went on? After the bulk fermentation, did the dough feel nice, as in still strong and elastic and able to be shaped into balls?
How long did the dough spend in the fridge before being baked?
When stretching the dough into a round, did you see nice pockets of air throughout the dough?
Are you using a Baking Steel or pizza stone? If not, what are you using to bake the pizzas on? How hot does your oven get?
I’ve made this a couple of times and have always had the same issue as well. No rise in the oven and the dough wouldn’t get any colour. Prior to baking, the dough was excellent; it had doubled in size and was airy, just as it should be. Tried pizza stone and pizza steel, always in the upper third of the oven at 550 F, occasionally switching to broil. I’m baffled why it never rises in the oven. Could leaving in out on the counter overnight and then in the fridge for 3 days possibly result in over-proofed dough?
Hi Katie! Sorry to hear all of this
What kind of flour are you using?
How long is your bulk fermentation going? And when you go to shape the dough, do you have any trouble portioning it/balling it up?
When you remove the dough from the fridge and set it on the floured countertop for an hour or so, does the dough seem to have air bubbles? And does it feel light?
If it feels totally slack, then it has over-fermented. I don’t recommend storing the dough for longer than 3 days, but I’ve had success leaving it longer, so I think this time period varies from person to person/sourdough starter to starter.
How is the flavor?
Hi, I made this recipe and I had the same issue that other people mentioned. The dough was loose and did not rise, turn any color or blister. Do you know what might be happening? I love your recipes and this is the first one that didn’t work out.
Hi Camille! Sorry to hear this.
Questions: when you say did not rise, do you mean in the oven itself? Can you tell me a little bit more about your experience … was everything going fine with the bulk fermentation, the stretches and folds, etc? How long was your bulk fermentation? What type of flour are you using?
Is there a way to make this dough in advance and freeze it?
Hi Travis! You can freeze sourdough pizza dough, but my experience is that the longer it freezes, the more it loses some of its oomph. When I freeze it for a week, I notice the pizza will still have some nice bubbles when it bakes; when I freeze it for three weeks, the dough will be thinner with fewer bubbles, and will bake up crisper. There are instructions in the post on how to freeze sourdough pizza dough.
Dear Ali,
I’ve now made this recipe twice, and I love how the pizza comes out. I have been doing it in a pre-heated cast iron pan, and it’s perfect. I have a question though: the dough is VERY wet and sticky. When I do the folds (in a tall sided container, as suggested) I just get it all over my hands. Nonetheless, after all the stickiness, the pizzas are excellent, so I wouldn’t want to change any proportions (i.e. adding more flour). When I watch your video and you do the stretch and folds, I don’t see anything sticking to your hands. How is that possible? All tips and advice would be welcome. Separately, any tips for getting the pizza into a pan without using parchment?
Thanks,
Sam
Hi Sam! Great to hear this.
A few thoughts: you could try reducing the water just a tad: try 365 g water and see if it makes the stretching and folding more manageable. The dough does stick to my hands a little bit during the first two sets of stretches and folds, but after that it becomes tacky enough that it doesn’t stick. You cold also try wetting your hands lightly — just dip them into a glass of water — before you perform the stretches and folds.
Regarding the parchment question, I think you would have to use something like cornmeal, but to be honest I haven’t experimented with this in so long. The beauty of the parchment is twofold: easy transfer and no mess — cornmeal and other ingredients to prevent sticking (flour, etc.) will burn during the baking.
One other thought would be to remove your preheated cast iron pan quickly to your stovetop (or another safe area); close your oven to reduce heat loss, drop your dough directly into the heated pot, quickly top it; then get it back into the oven … not ideal but it might work.
What is a substitute for sourdough starter?
Are you OK using yeast? This is my yeasted pizza dough recipe: Homemade Pizza Dough
We made this for the first time the other night. my kiddo made a pizza and my husband and i made a calzone!
Oh yum! Love this 😍😍😍
I’d love to know how you did the calzone! I’m a full-on, Ben Wyatt style calzone lover. 🙂
My pizza dough is currently rising…so excited!
LOL YES BEN WYATT! This is the first recipe I’m making with our new sourdough starter (Yep, on that Sourdough bandwagon! But only bc we couldn’t – and still can’t – find yeast in our grocery stores). I didn’t realize it’d take 6 hours to proof for the initial bulk fermentation: I didn’t have that much time so I’m curious to see how it’s going to turn out. Probably not as crisp? Or fully proofed? It remains to be seen in… 5-6 minutes!
How did it turn out?? I would imagine it just wouldn’t be as poofy/airy without a long enough bulk fermentation. Let me know if you have any other questions!
Thank you for the wonderful yet simple recipe. We just made the best pizza ever 😊 so fluffy and crispy at the same time!!
Hi Emmi! So great to hear this 🍕🍕🍕
Help – beginner baker here. Have finally nurtured a lovely lovely starter to life, and have now used twice for pizza. But both times the dough seems very wet. When made into balls don’t really hold their form. Moving forward will just try less water, but canan I save those I’ve already made with extra floor now or is it too late?! Thanks so much for the recipes
Hi Jodi! Question: how wet is the dough? Is it totally slack, as in, is there no strength or elasticity left? Or is there some strength still? If there is still strength in the dough, then the extra flour is fine; if there is no strength left and the dough is unmanageably sticky, it’s a sign the dough over-fermented and unfortunately is unsalvageable.
How long was the bulk fermentation? What temperature is your kitchen? And do you live in a humid environment?
I think you should cut some of the water back next time.
The same happened to me. I live in Florida and our kitchen temperature is aprox 75. After overnight fermentation, the dough was very wet but I added a lot of flour to make it into the 4 balls. It’s in the fridge for overnight rest and will see tomorrow if the pizza dough is good enough to use. Will keep you posted.
OK, keep me posted! I’m curious as to if the dough over-fermented or if it just is too high hydration given your environment. Let me know! If the dough over-fermented, you will know when you bake … it won’t taste right and the texture will be off. If the dough tastes good and has a nice texture, you’re in business, and next time, I would reduce the water … maybe start with 350 g.
Hi, following this. Just learning baking with sourdough starter. I had no idea how versitile it is. I’ve done sponge for bagels and biga for ciabatta rolls, but always thought that sourdough was some mystical thing. I’ve found it difficult to add water to dough so I hold a bit of flour back until the dough is formed and adjust with flour. What’s the best way to add water? Also, a bit off topic, I have a Kitchenaid mixer and when I use the dough hook the dough wraps around the hook and spins in the middle of the round bowl. I’ve used a bread machine in the past and the rectangular pan keeps this from happening. Would using the machine to do the initial stage be OK? I wouldn’t do the complete dough cycle, just until the dough is formed and ready to knead by hand?
Hi there! Regarding adding water, are you using a scale to measure the flour and water?
I have never used a bread machine unfortunately, so I can’t advise on that front. It worries me a little bit, however, because I worry the environment will be too warm for sourdough.
Hi,
Thanks so much for your brilliant recipes to keep us entertained! I made the sourdough focaccia the other week and it was brilliant – so simple.
I am just resting my pizza dough to bake it and watching your video I have noticed that my dough is significantly more liquid than yours, though I am not sure why. I followed the recipe, using plain flour (closest UK equivalent to all purpose flour, I think – though maybe too coarse/not coarse enough?). The dough texture changed a bit with the folds, though nowhere near as much as shown in your video. Basically, my pizza dough is more puddle than ball. Any help would be greatly appreciated!!
Hi Lara! Great to hear the focaccia turned out well. Are you using the same flour with this dough as you used with the focaccia? And when you made the focaccia, did you notice a change in texture in the dough with the stretches and folds?
Also, when you turned out the dough after the bulk fermentation, was there any strength and elasticity in it? Or was it completely slack? If there is still some strength, then my advice is to simply use as much flour as needed during the shaping process to help you get it into a ball.
What I am a little worried about is that the dough over fermented during the bulk fermentation. How many hours was it? And what temperature is your kitchen?
I had the same issue, it was basically a puddle. but it has been really hot here and I think I overproofed it. Is it salvageable?
It sounds as though it over-fermented during the bulk fermentation… so frustrating. I’m sorry. Unfortunately it is not salvageable.
If you are willing to give it another go, I would shorten the bulk fermentation. How long did it go initially? And how warm is it where you are?
Hi Ali,
Thanks for your response! it was about 8 hours, and yesterday it was about 80 degrees at night. Should I try the fridge next time, or will that not work?
Ok, yeah that is quite warm. If you want to start the dough at night, I would stick it in the fridge before you go to bed; then pick up in the morning so that you can monitor it at room temperature. It won’t make much progress in the fridge. So, you’ll want to get it to room temperature in the morning, let it double or near double; then turn it out, shape it, and get the portioned rounds back in the fridge.
I had this exact problem too- I’m also in the UK. I added lots of flour and I was then able to shape it into balls. How do you know it it has over-proofed please?
Hi Chelsie! OK, next time I would reduce the water a bit to make the dough more manageable. Was it sticky from the get go? Were you able to do stretches and folds, and if so, did you feel that the dough was getting stronger and more elastic?
Signs that the dough has over-fermented after the bulk fermentation: totally slack, very wet/sticky, impossible to shape, no strength or elasticity.
Thanks Ali. Yes it was quite sticky from the outset, I was able to do stretch and folds although some was sticking to my hands. It did change and get stronger the more stretch and folds I did.
I left it overnight on the counter for 8 hours and when uncovered it this morning it had a few large bubbles on the surface. When I lifted it out of the pot it was very sticky and hard to shape- it felt like a third of the mixture ended up stuck on my hands! Adding some flour made it easier to handle so I shaped it into balls and its been in the fridge all day. I just tried to poke it as I’d read something about the dough needing to spring back. It does slowly return to normal shape but it takes a while.
Sorry this is only the second sourdough recipe I’ve made so I don’t know much about what to expect. Do you think it will be ok? Many thanks!!
Hi Chelsie! OK, this is encouraging. I think your dough should be fine. 8 hours is about right for a bulk fermentation and it doesn’t sound as though it completely over-fermented. Next time, I would reduce the water to 350 g. Keep me posted on how the pizzas turn out!
Hi Alexandra,
thanks for the reply – only just saw it. Once I ‘shaped’ the pizza (tricky with very wet dough!) it actually came out quite well! Both taste and texture were fine, so probably humidity issue rather than proving. I will try it again this weekend and keep an eye on proving time and add extra flour to the shaping if needed and see what happens!
I used different flours – for the focaccia, I started off with white bread (strong) flour but ran out so it was 50% wholemeal strong flour and 50% white strong flour; the pizza dough was plain flour rather than bread/strong flour.
Lara
OK, sounds good Lara, keep me posted! The more I troubleshoot with sourdough the more I realize it often comes down to two things: 1. getting the water amount right (hydration) depending on the environment and flour you are using and 2. ensuring that the dough doesn’t over ferment during the bulk fermentation.
Glad to hear it was a success despite the issues.
Hi, Sourdough newby here. I notice you mentioned a sourdough starter of 75% hydration. My sourdough starter is 50% each of water and flour (making it a 100% hydration). If I follow your recipe, do I up the flour content?
Hi Pix, My starter is 100% hydration, too, so you’re good to go. The pizza dough recipe itself is 75% hydration, but I use a 100% hydration starter.
Do you have the measurements in cups instead of grams? I don’t have a scale. Thanks!
Hi Erin!
I highly recommend investing in a digital scale for the best results. It makes all the difference! But here you go:
1/2 cup starter
1 1/2 cups water
4 cups flour
2 teaspoons salt
I plan on using this recipe for when I make pizza. I do have a quick question, when using starter for pizza, you use starter before peak correct? So after I use it for pizza dough should I wait to feed it until it reaches peak or should I feed it right after using it for pizza dough?
Hi Jordan! I use it at peak, actually. This is what I do: I take my starter out of my fridge, discard most of it, feed what remains with equal parts by weight flour and water; then when it doubles, which is usually 4-6 hours later, I use it in whatever recipe I am using.
Does this clarify?
I found this a little difficult to work with as mine was VERY wet, but maybe that was me not measuring correctly. However, it was utterly delicious and the best pizza I have made by far. Thank you for the recipe.
So great to hear this, Renee! You can definitely cut back the water a bit next time if your dough is too wet.
I just want to add – my initial bulk fermentation did not double the volume – and when I tried to work with it, it was almost wet enough to run through my fingers, so I floured the containers I was using for the refrigeration part of the recipe, cut the dough into 4 as best I could and chucked it into the containers. By the time we came to cook the next day they had firmed up a little, but still hadn’t risen much (my starter may not have been quite ready) , and I pulled them onto a floured wooden board to rest for an hour before going into the oven. When I picked them up to move onto the parchment – there was a circle of wet left on the wooden board. However – this did not affect the flavour – they were delicious, or the texture, they were crisp and honestly delicious. Noticeably better than my previous attempts at pizza base, which themselves were pretty good. This will be my go to recipe from now on – despite the slight difficulty working the dough.
Ok, interesting! I think next time, start with 350 g water. You can always add more water slowly to the dough while you are mixing if it seems too dry.
Remind me: do you live in a humid environment? And how long was your bulk fermentation?
It is pretty humid, and to be honest I can’t remember how long the bulk fermentation was – I think about 12 hours and then I was going to bed. Will time it better next tie to go overnight maybe?
Ok, yeah, I would start with 350 g water and shorten the bulk rise. If necessary, you can stick the container of dough in the fridge when you go to bed, which will ensure it will not over ferment; then you can take it out in the morning and let it continue to rise. This way you can keep an eye on it, and as soon as it doubles, it’s ready to be portioned, shaped, and refrigerated again.
How long can you store dough. Can I make it today and freeze/proof in the fridge and make in 2 weeks. We have pizza once a week. Just trying to make ahead. Also have you ever used your Izzy dough recipes to make nothing else? Like pretzels or sweet bread?
I store it in the fridge for as long as 4 days. If you want to freeze it, transfer it to the freezer immediately after shaping it. Thaw it in the fridge 1 day before baking or at room temperature for half a day.
I have not made anything else with this dough, but the possibilities are endless. I think you could absolutely use this base for cinnamon rolls or other sweet treats.
I don’t have plastic quart containers. Can I use zip plastic bags instead?
I think so! I would either be sure to really flour the balls well or to oil the bags lightly … I just don’t want you to have a lot of trouble with the dough sticking.
I have to say that as I was going along, I did not think this recipe was going to work out! The high hydration level was making the dough so sticky as I was trying to shape and cold proof it in the refrigerator. The dough rose beautifully in the refrigerator, but it was still pretty sticky to shape when ready. It stuck to the parchment paper and my fingers as I was shaping it. I finally got some olive oil on my fingers and shaped it out, trying not to de-gas it along the way. I managed to get it to keep its shape and topped it with toppings, but was still worried about how it glued itself to the parchment paper. But alas, after baking, it turned out PERFECTLY. I baked it on a fully-heated pizza stone, and the crust dried up quickly and separated from the parchment paper easily. The pizza crust had a lovely lip on the edges with air bubbles from the fermentation. It was crisp, delicate and delicious (crunchy with a slight tang), and the family loved it. I did use 00 flour and that probably is what made it so light and crunchy. My daughter is begging to make it again tomorrow 🙂 So 5 star rating for taste and the result. Thank you for this recipe!
Hi Irene! So wonderful to hear that it turned out well in the end. I think with 00 flour, you may need to decrease the water level, and based on your experience, I think you could probably reduce the water level to make the dough more manageable without compromising the texture/flavor. Maybe try 350 g water? You can always add water back in while you are mixing if it appears dry.
Hi Alexandra- Thanks for the feedback! I can’t stop thinking about how delicious this was 🙂 I will definitely make this again soon with slightly less water next time and see how it works… Will let you know!
Wonderful! Keep me posted, Irene!
I use starter and 00 Italian pizzeria flour from Naples, and cooked on a pizza iron plate.
I have made this 4 times and it has been the best pizza I’ve ever tasted. Restaurant quality.
I even made a double portion and used the extra to make sourdough loaves, amazing.
My only “problem” is even using 350g of water my dough does not hold its shape after fermenting. It’s more looks a blob than a ball. Can I use less water, 325g maybe? It still books and tastes great, but for the bread I get flatter wider loaves since it doesn’t shape as well.
This will be my go to pizza recipe forever.
Wonderful to hear this, Mark! Thanks so much for writing. Yes, absolutely try with 325 g water. You could even try with less, and if, when you mix the dough, it looks dry, you could add water a little bit at a time until you get the right consistency. I am all about using recipes as a guide and, especially with sourdough, finding the hydration level that works for you given your environment and the flour you are using. Keep me posted!
Hi Alexandra,
It’s me again. For some reason I wasn’t able to reply to your response so I’m writing a new comment. I tried the recipe again and OMG, it turned out SO good! I am so grateful to you for sharing this recipe as the crust I got was something I had been striving for for the last 5 years (I make pizza every week). Wow. This time, I didn’t leave the dough in the fridge for three days but only for one night, and that worked really well for me. The crust was light and crispy on the outside but soft and airy on the inside. It had lots of bubbles and a few nice charred spots. It was glorious – better than any pizza I’ve ever had a restaurant and I’m a die-hard foodie! Thank you for generously sharing your amazing recipe with the world!
Hi Katie! Wonderful to hear this! So glad you were able to find the timing that worked. Thanks for reporting back!
May I half the recipe successfully? Don’t have 4 cups of flour this morning.
I haven’t tried, but I don’t see why not!
We loved this! One question though – how do you prevent your bread from sticking to the parchment paper? I initially put the bread on the parchment, but it immediately attached and sort of “sunk in,” so I took it off and put it on a cookie sheet instead (unfortunately no stone or steel yet). I have had trouble with bread sticking to parchment in the past and did not want to have parchment paper stuck to the finished product. We had to scrape it pretty hard from the cookie sheet after baking but we were able to separate it. My dough was definitely on the Wet/sticky side, but it kept its shape and baked well. If it’s less wet would it not have stuck? Do you cover it in flour? Thanks! My husband said this was the best pizza I’ve ever made.
Hi Maggie! Not all parchment is created equally! I have had the same issue with parchment, and it is so frustrating when it sticks. This is the parchment paper I use.
Regarding using a cookie sheet, I would butter it first — just the center where the dough will be — then add a drop of olive oil and spread it over top. That should prevent sticking. Reducing the water in the recipe could potentially help, but it is not a guarantee.
Thanks! When you put your dough onto the parchment, should it not stick? I actually just bought this same parchment paper after a different kind did not work with another bread recipe. But when the dough stuck to this parchment, I panicked and didn’t use it. I’m wondering if maybe it sticks when wet but separates during baking. We have the second two balls of dough to use tonight, so I’m debating what is safest!!
Hi Maggie! It definitely separates during baking! You could rub a little bit of olive oil over it to be sure, but I have never had an issue with it sticking. Good luck! Keep me posted!
Thanks for the feedback. I tried it with the parchment paper, no oil, and it did separate easily after it baked. This was so delicious!
Oh yay! Wonderful to hear this, Maggie 🍕🍕🍕
Hi! I made the pizza dough but subbed with whole wheat flour. I think this made the dough a little too dry to bubble in the oven. It rose beautifully. What do you think? Maybe needed a bit more water.
Hi Lauren,
Whole wheat flour will definitely make for a more dense pizza or a dense loaf of bread. Adding more water might help, but I don’t think adding more water will give you the same texture of a pizza dough made with ap flour or bread flour. Whole wheat flour includes the bran and the germ, which can be described as little razor blades that cut the gluten, which impedes its ability to stretch and grow and create those glorious bubbles throughout the dough.
This looks great and I’m going to try, but have a question. What size pizzas does this recipe make, and do you have guidance on how to adjust for a 12, 14, or 16” pie? Thanks!
Hi Michael! Each pizza is definitely smaller than 11 inches, so if you’re looking to make larger pies, I might consider dividing the dough into 3 portions as opposed to 4.
Is the sourdough starter used in this recipe fed or discard/unfed?
I use fed starter. One commenter had success using discard, but I think she has a very active starter. I would advise using fed starter.
HI.. Love the way the process has been detailed out. Could you please guide if the pizza base can be baked before hand and stored in fridge?
Sincerely
Dipti
Hi! How long are you planning on storing it? The answer is yes, absolutely. I’m just wondering if you need to refrigerate it or simply leave it out at room temperature or in an airtight bag at room temperature.
Hi.. am planning to bake it a day earlier may be. What should be my oven settings if could please help.
Thanks
Dipti
Hi! If you have a Baking Steel or pizza stone, follow the recipe in regard to temperature, but consider baking it for a few minutes less, since you’ll be baking it again when you reheat it (right?)
If you don’t, I would bake it in a cast iron skillet at 450ºF for 10-15 minutes, again removing it when it’s a little pale because you’ll be cooking it again.
Help! Just mixed the ingredients and my dough is very wet. I into the the 3rd stretch and fold and a ton of it is still sticking to my hands. Should I add more flour? I already added an extra 30grams. Thanks!
Possibly! Can you email me a photo or a short video? alexandra@alexandracooks.com
Here in Boise, there is a pizza place called The Wylder. It’s a stylish, hip pizza and veggie place. Three weeks ago, we ordered take out pizza due to Covid19. When I took a bite into the crust, I thought I’d died and gone to heaven. The crust tasted light, flaky and crisp. The taste was amazing! I asked them if they ever just sold the dough and they said no. My friend told me that there crust is a sourdough crust that their other business, a bakery makes for them. The next day, I started my sourdough starter. For three weeks, I mothered that Baby. Then a couple of days ago, it doubled in size and I knew I was ready to go. Thanks to the video, your recipe was the first attempt at a true sourdough pizza crust. Tonight was it’s maiden voyage on top of a pizza stone in a 550 degree gas oven. I made my husband take the first bite. I was afraid, regardless of the beautiful, puffy air bubbles and the baby’s butt soft dough……….Italian OO flour at my local co-op thank you very much……in the bulk section no less. My husband took his first bite and his eyes closed and he said, “You nailed it!” When I took my first bite, I almost cried. My crust was as good if not better than The Wylder. Thank you so much for walking me through it and for giving me the recipe that would make my ideal homemade pizza crust possible. (PS I let it rise overnight on the counter and it was more than double. Didn’t hurt the crust one bit.) I’m the happiest girl in Boise tonight. THANK YOU!
Oh Julie, YAY 🎉🎉🎉 It is so nice to hear all of this. I am so impressed you made your starter from scratch … not an easy task … and I am so, so happy to hear you had success with this recipe. To me, there is nothing more satisfying than good, homemade pizza, and yes, so often it beats anything you can get from a restaurant. Thanks for writing 🍕🍕🍕🍕🍕
Hi Ali, just tried your recipe and it was great. Just made my 2nd batch of pizza dough. Using parchment paper was definitely the way to go. Question: when I put my dough in the straight sided vessel and leave it to rest I noticed my dough almost tripled within 6 hours. Is that ok? The first batch tasted great, but just wondering about this as your recipe calls for the dough doubling in size. Thank you, Ann
Hi Ann! I have had my dough triple overnight, too. It was fine for me, but I generally advise catching the dough around when it doubles because it is a fine line from the dough being fine to being over fermented and unsalvageable. It sounds as though you have a very vigorous starter, which is wonderful! I would keep doing what you’re doing … monitoring the bulk fermentation closely and shaping the dough when it doubles or just about triples or even triples, since that has worked out well for you 😍
Can you cook this on a gas grill?
Hi Diane! I worry a little that the dough is too wet/fragile. If you want to, I would reduce the amount of time you have it at room temperature before grilling it — cold dough is a little firmer, and you may have an easier time handling it. I would also maybe not stretch it out quite as wide to ensure it doesn’t tear.
I have this recipe in process, but my timing has been off. My dough will only be in the fridge for 4 hours for the final rest instead of 6–is that okay, or should i hold off and bake tomorrow instead?
Totally fine! Go for it!
Hi Hayley! Bummer to hear this.
Questions: how long did the bulk fermentation go? It sounds as though the dough may have over fermented.
When your daughter was doing the stretches and folds, did the dough become more elastic and strong with each set?
When your daughter was shaping the rounds, was the dough totally slack? Or was there some strength?
Unfortunately, when dough over ferments, there is no saving it.
Also unfortunately, all parchment paper is not created equally and some brands do stick. I recommend the If You Care brand.
Hello,
I have tried multiple sourdough recipes in the past and will be trying this in the next two days. I have never been successful in getting the dough to rise such as yours. I have gotten the hang of it but I believe it’s my flour availability and choice.
Would you share any factors in your experience that would help into getting the dough to rise as yours when cooked? What is the specs of your flour in terms of protein/ash/ww content?
Also what would be the max amount of whole wheat flour to use as to not disturb the gluten/rise.
Thank you!!!
Hi JJ! I have been using flour in this recipe varying from 11.7% to 12.7% protein. I don’t know the ash/ww content … perhaps 0? I’m using all-purpose flour or bread flour here.
Truthfully, I think so much about getting a good rise in the crust upon being baked is minimal handling of the dough. When you shape, try to be gentle stretching it out so as to not deflate all of those beautiful pockets created during the bulk fermentation and proofing phases.
Are you getting a good rise during the bulk fermentation?
Regarding ww flour, I would start small: try 50 g to start; then use more next time around depending on the result.
Hello!
Thank you for your response and details!
It’s been nearly 10 hours since start of bulk (I count from the moment I mixed in the starter)
I have the same cambro 4 qt container, it was just below the 1 qt after the 4 strech and folds mark and now (10 hours later) it’s gone past the 1qt mark but not fully doubled.
Iv alternated between room temp and 30 degrees c. Iv also used a mix of different flours of varying protein and extraction as my dad enjoys the more flavorful flours (ie not AP)
I understand this will affect rise in the oven and won’t be the same as yours, I will still have to try with AP once it’s available as that’s all we had.
Also, even though I followed the 77% hydration, I did feel that the flour mix I used sucked in more water the AP I used to use which was expected. (With 77% it’s usually more sticky like in your video)
I cannot wait to get this baked later today!!!! As I usually do sourdough pizza low hydration (Under 65%)
I will also try and bake this higher in the oven than usual, as in one of the picture Iv seen on your site, the closest to the top broil coil. It’ll be a tight fit though.
Lastly, I do not have quart containers, shall I just olive oil a pan and cover with Cling when I divide and shape?
Sure thing! OK, if you don’t have a quart container, use any vessel that you can fit the dough ball somewhat snugly in in terms of diameter — you just don’t want the dough spreading out too far because it will be trickier to shape. I would use flour, too, as opposed to oil in the vessel.
Keep me posted!
Hello again!
Made this maybe 3 times so far, I’m getting close to the result I’m looking for but not quite! They turn out pretty good when I thin the dough out but I cannot get it to rise in the oven ( crust ends up being dense or gewy) 🙁 I have a gut feeling it’s due to flour type. I keep trying different flours and combination of flours, still no dice on the pizza dough final look.
Something else, when you remove the dough from the bulking container, ideally, what should the dough look like? With around 6-14 hours that i tried this, I start reaching a somewhat sourdough starter feel to the dough ( Starts at the bottom of the container) with what I assume is gluten stripes. Does that mean I have over fermented?
Also it’s not as bubbly as in your video but the whole dough changed structure compared to the folding phase.
Little bit tricky to shape also, am I supposed to tension the pizza balls well before putting them in fridge? (Still missing trying to place them in a quart container, until I get some, so now I just opted for flour in a pan and in the fridge covered)
Feels like I’m almost reaching a breakthrough moment with your recipe, it’s like I’m learning to ride a bicycle haha , every iteration a new challenge and an aha moment.
Thank you for a beautiful recipe and this experience!
Hi JJ! Sourdough definitely is a journey! Questions answered below:
Something else, when you remove the dough from the bulking container, ideally, what should the dough look like? I would describe the dough as springy, bouncy, with some small bubbles throughout if you look at the sides and bottom of the container.
With around 6-14 hours that i tried this, I start reaching a somewhat sourdough starter feel to the dough ( Starts at the bottom of the container) with what I assume is gluten stripes. Does that mean I have over fermented? Possibly! But if the dough had strength and elasticity when you shaped it, it’s fine. I think you could reduce the fermentation time a bit. I might try 6-8 hours. How warm is your kitchen?
Little bit tricky to shape also, am I supposed to tension the pizza balls well before putting them in fridge? Yes!
can you use a stand mixer to knead the dough instead of the folding?
Paola, I haven’t tried, so I don’t know! I am all about experimenting. I don’t see why it wouldn’t work.
Thanks so much for the prompt reply, I’ll give it a try.
Fabulous recipe! I’m new to sourdough and loving experimenting, but this recipe explains everything really well and has great results! Thank you 😊
Wonderful to hear this, Danielle!