 →
→ Simple Sourdough Pizza Crust: A Step-by-Step Guide
This post may contain affiliate links. Please read my disclosure policy.
As far as sourdough pizza recipes go, this one is as simple as it gets: it’s made with all-purpose or bread flour, and there is no autolyse or preferment — everything gets mixed together at once. Ready? Wake up your starter! Read on to learn 5 secrets to sourdough pizza success.🍕🍕🍕
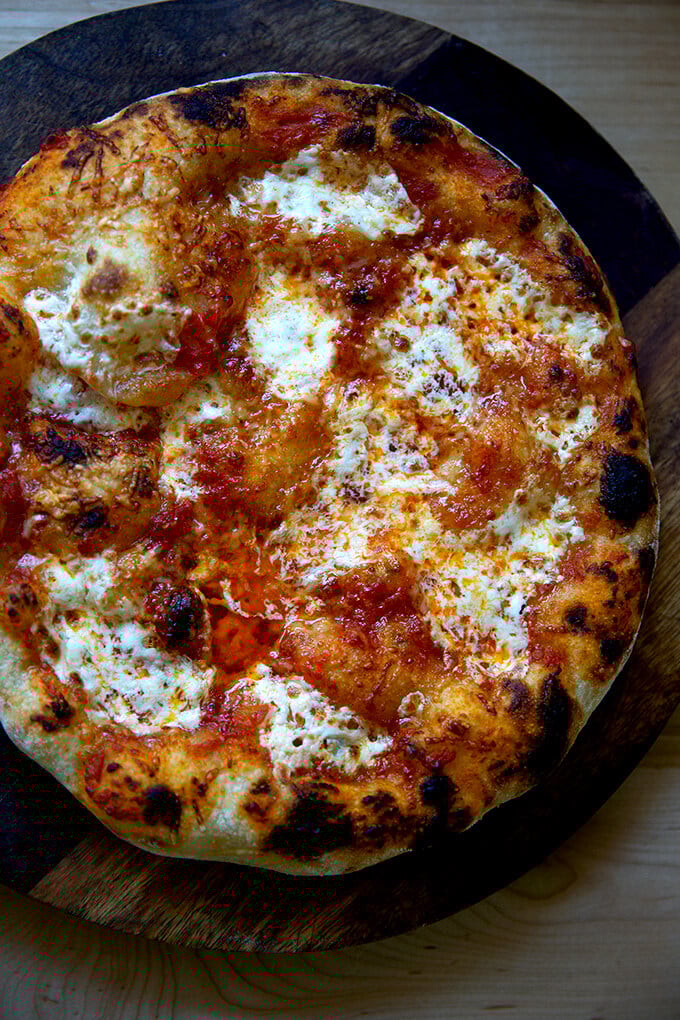
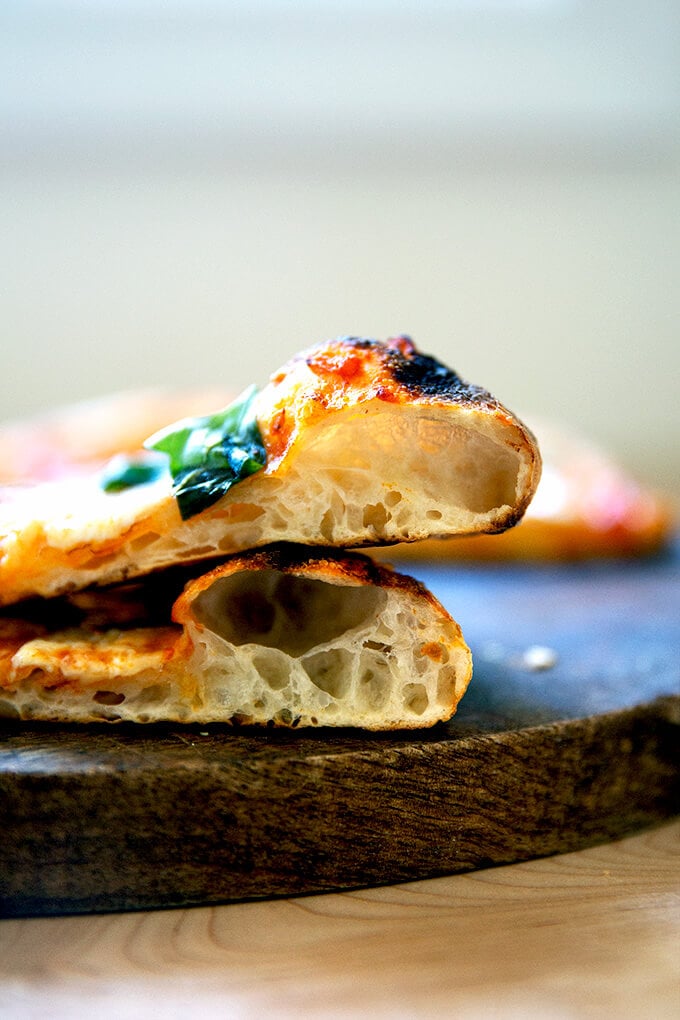
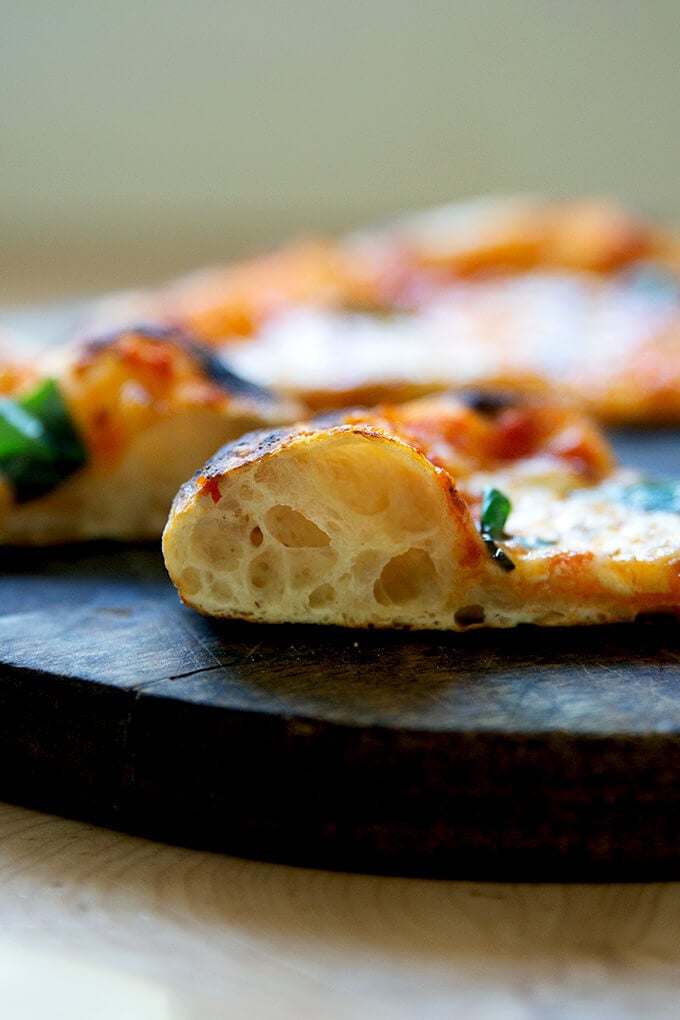
This sourdough pizza recipe produces a pizza with a ballooned, blistered edge and a crisp but pliable crust. The secret to achieving this texture in a home oven is to use a high-hydration dough (75%), proper fermentation (long and slow) at each phase, gentle handling of the dough, and a screaming hot oven (ideally outfitted with a Baking steel or pizza stone).
Let’s explore each in more detail:
5 Keys to Sourdough Pizza Success
- Use a high-hydration dough: Because home ovens rarely reach above 550ºF, it takes longer for pizzas to cook. In contrast, a 900ºF oven will cook a pizza in 60 seconds. To prevent pizza dough from drying out in a home oven, it is important that the dough has a lot of water in it — i.e., it is high-hydration. In contrast, outdoor oven pizza doughs can be much lower hydration.
- Ferment sufficiently: After the first long, slow rise, transfer the dough to the fridge for at least 12 hours and up to 3 days. Time further develops flavor, helps with browning, and improves the texture of the pizza dough.
- Proof sufficiently: If time permits, allow the dough to come to room temperature for at least an hour before baking (and up to 2), which makes it easier to shape — room-temperature dough stretches into a round more easily than cold dough.
- Handle the dough minimally: Using a delicate hand when shaping the dough preserves the air pockets created during fermentation.
- Invest in a Baking Steel: Steel is a better conductor of heat than stone — i.e., it transfers heat to the dough faster — which promotes great oven spring, which translates to glorious bubbles throughout the dough.
How to Make Sourdough Pizza, Step by Step
As always, a scale is essential for the best results. You need water, flour, salt, and a sourdough starter:
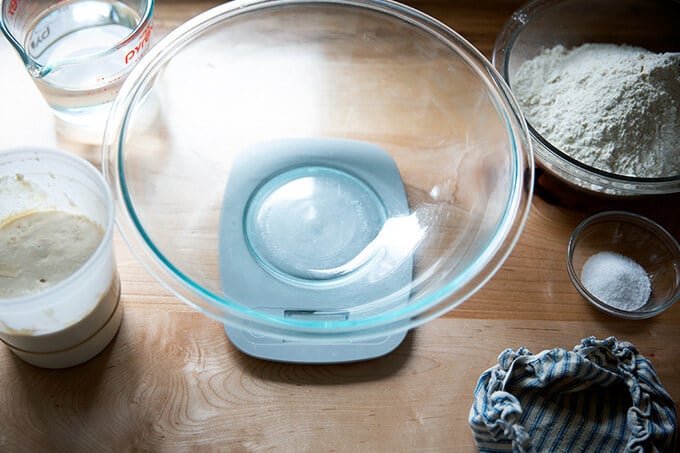
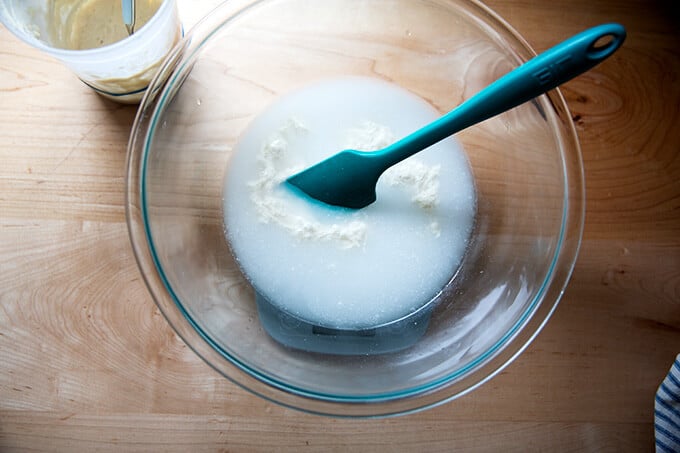
Combine 375 g water, 100 g sourdough starter, and 10 g salt in a bowl. (See notes in recipe box about using less water if you live in a humid environment.)
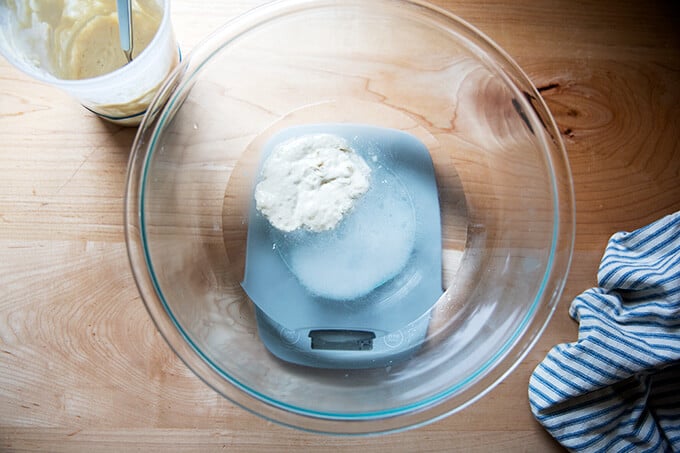
Stir to combine; then add …
… 500 g all-purpose flour.
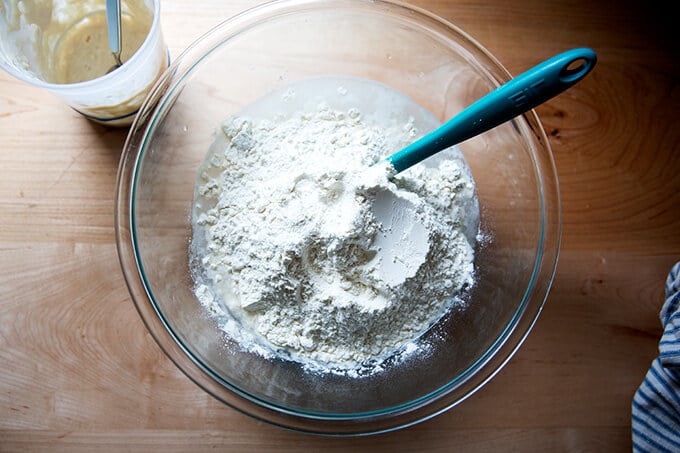
Stir until you have a sticky dough ball.
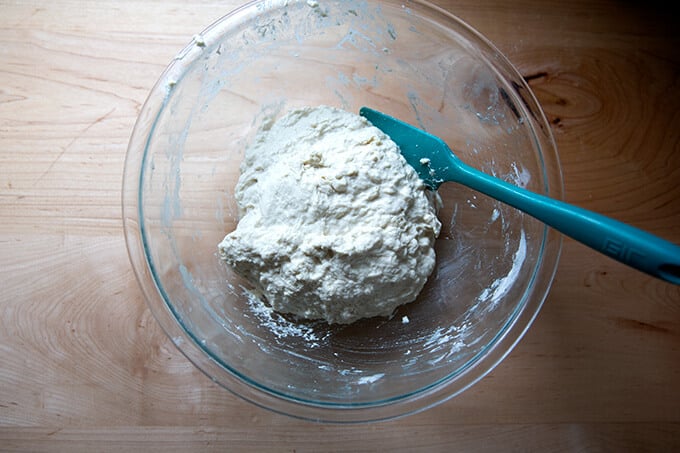
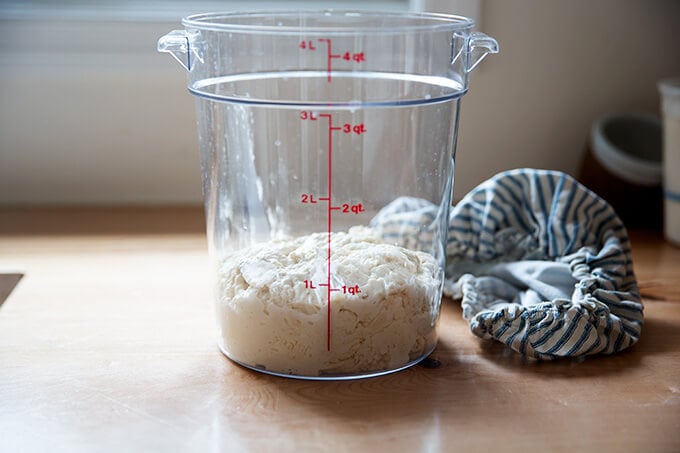
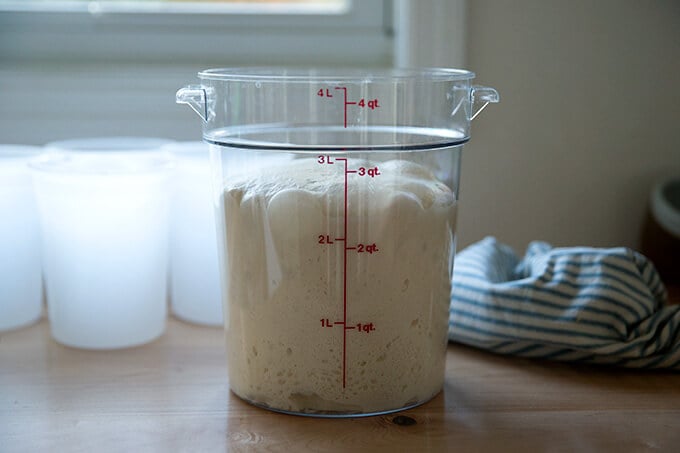
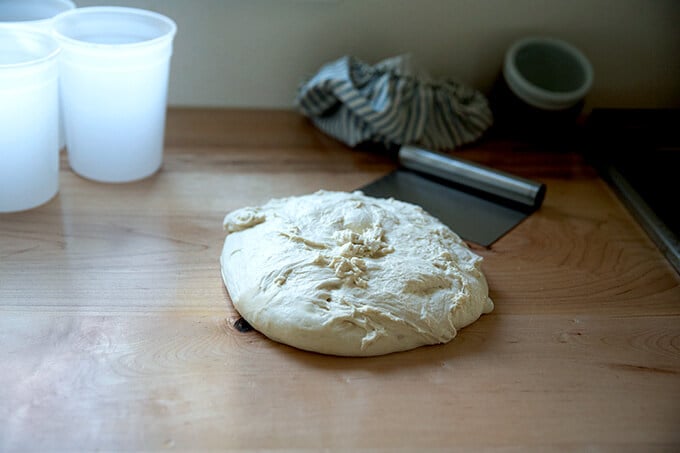
Transfer to a straight-sided vessel (if possible) and let rest for 30 minutes. Then, “stretch and fold” the dough (see video for guidance) 4 times at 30-minute intervals. Cover the vessel. Let it rest for 6 to 12 hours (see recipe notes for timing) or until the dough…
… has about doubled in volume. (Note: This is a little bit more than double. Ideally, you don’t want your dough to rise much beyond double. More recently, in fact, I stop the bulk fermentation when the dough has increased in volume by 50%.)
Turn the dough out onto a work surface. Use flour here as needed.
Portion into 4 equal pieces, again using flour as needed.
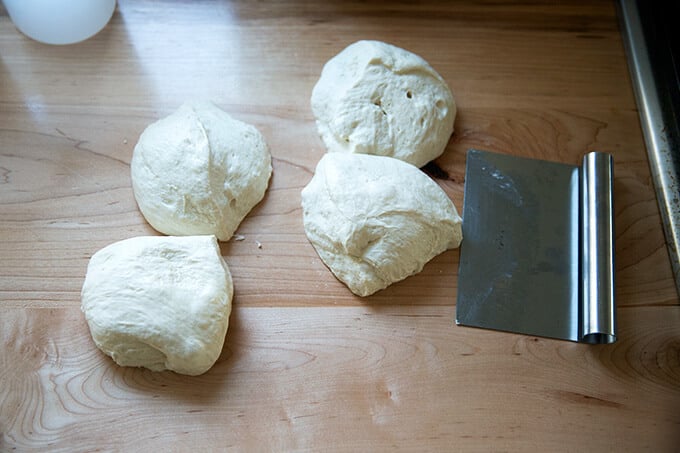
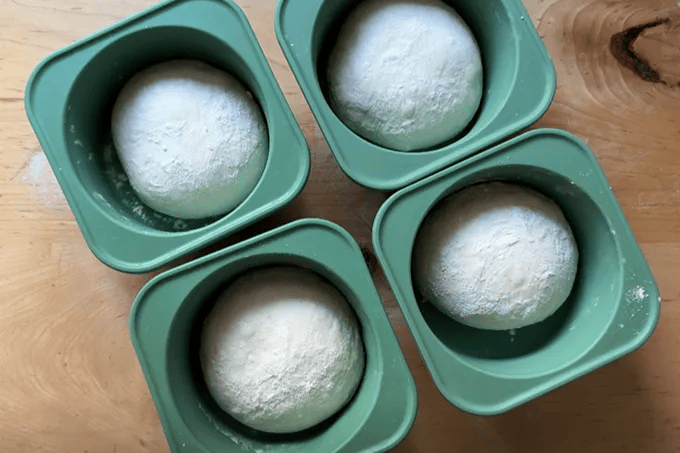
Ball up the dough, transfer the balls to storage containers, and stick them in the fridge. These Kevjes Dough Storage Vessels have become my favorite storage vessels for pizza dough balls:
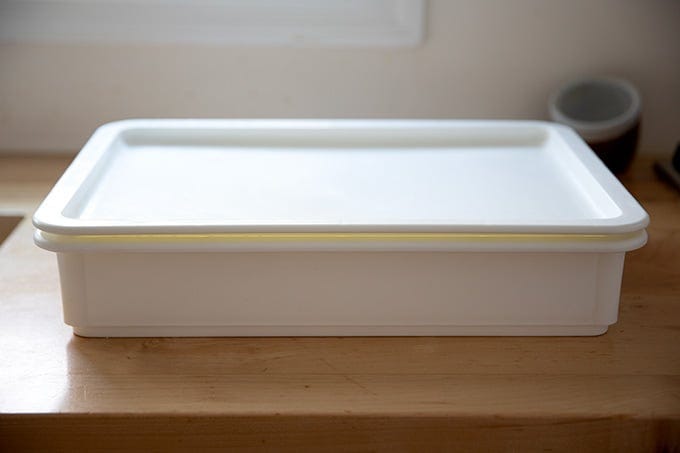
An hour prior to baking, remove a round (or more) of pizza dough from the fridge, and transfer it to a lidded vessel such as a DoughMate or a 9×13-inch baking dish covered with plastic wrap (to prevent the dough from drying out). If you have a Baking Steel, place it in the upper third of your oven, and heat the oven to 550ºF convection roast. (See recipe for other options.)
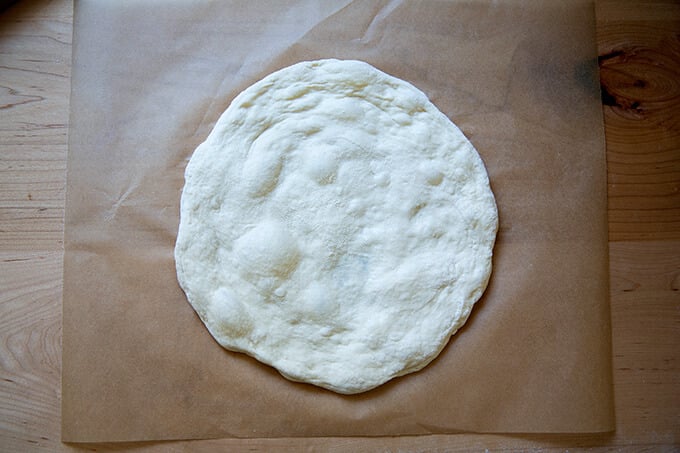
When the dough has proofed, delicately stretch it into a round, trying as best you can to preserve those air pockets.
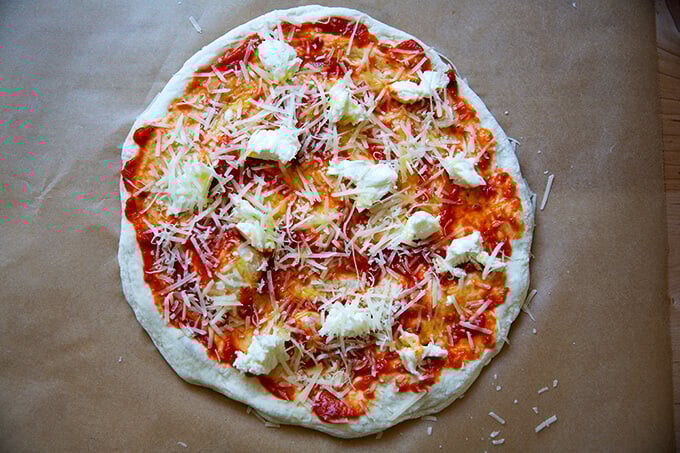
Top as you wish. This one is spread with tomato sauce and topped with fresh mozzarella, parmesan, olive oil, and sea salt.
Transfer pizza, parchment paper and all, to a preheated Baking Steel or stone, using a peel — my favorite peel is the Epicurean Pizza Peel. Bake 5 to 6 minutes or until cooked to your liking.
Slice and serve.

A little fresh basil is always nice.

This is the beauty of the Baking Steel: oven spring!

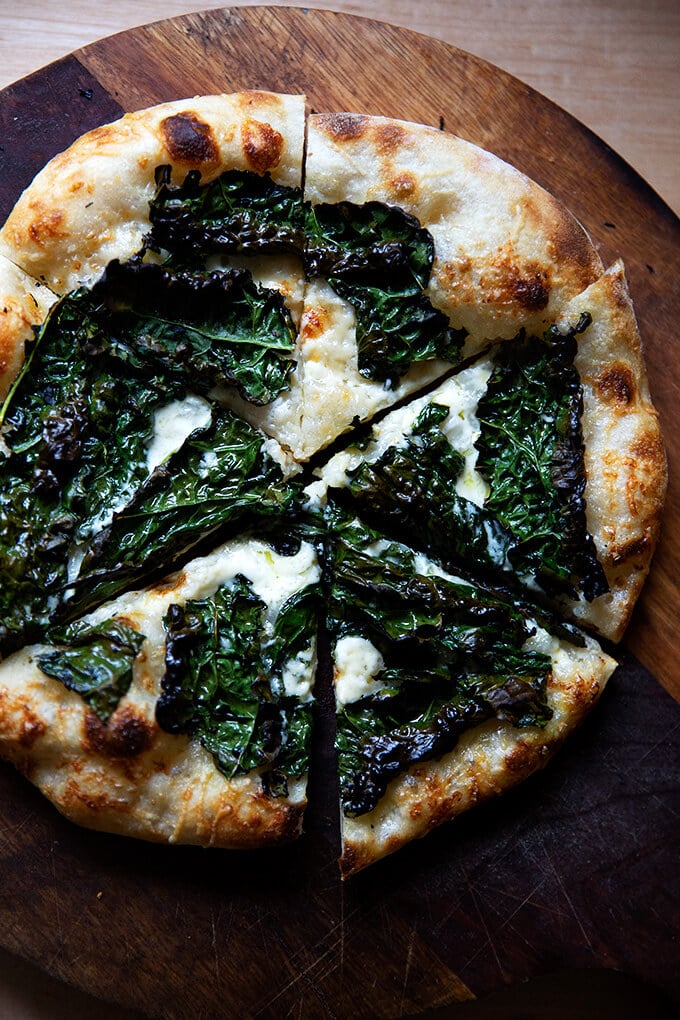
Another favorite: kale + crème fraîche:
Another favorite: “naked” + spicy scallion (or ramp) oil:

Looking for more pizza inspo? My cookbook, Pizza Night includes 52 pizza and 52 salad recipes, one pair for every week of the year, as well as five simple desserts 🍕🍕🍕


Simple Sourdough Pizza Crust
- Total Time: 1 day + 1 hour
- Yield: 4 pizzas 1x
Description
Here is my guide for making sourdough pizza crust at home. Made with all-purpose or bread flour and no autolyse or preferment, the dough comes together simply: everything gets mixed together at once, and you are on your way! 🍕🍕🍕
**Attention Pizza Fans**: My pizza cookbook, Pizza Night, is now available everywhere books are sold. Get your copy here: Pizza Night
What you need to make this recipe…:
- …a sourdough starter. Ideally, you want to use your starter 4 to 6 hours after you feed it, when it has doubled in volume and is very bubbly and active. You can build a starter from scratch in just about 1 week. Or you can buy one. Here are two sources:
- …time. Once your starter is ready to go, this recipe requires an initial 6 – 18 hour rise, followed by at least 6 hours in the fridge or up to 3 days.
Timing/Schedule:
The timing will depend heavily on the time of year and the temperature of your kitchen. In the summer, because it is warm and humid, the first rise (bulk fermentation) of all my sourdoughs takes between 6 – 8 hours; in the winter it will take longer, 10 to 12 hours.
It is best to rely on visual cues. For the bulk fermentation, you want the dough to double or less than double: I now end my bulk fermentation when the dough has risen by 50% to 75% in volume. This is why I cannot recommend using a straight-sided vessel (as opposed to a bowl) enough. It makes gauging the first rise easier.
If at any point you are worried the dough will over-ferment — say, for example, the bulk fermentation is nearly complete but you are tired and want to go to bed — stick the vessel in the fridge and pick up the process in the morning. (Note: If your dough rises above double, don’t despair … my dough has tripled in volume during an overnight rise, and the resulting dough still had plenty of strength and spring.)
Schedule: I like mixing this dough in the evening, performing 4 stretch and folds before I go to bed (if time permits), then letting the dough complete its bulk fermentation at room temperature (68ºF) overnight or in the refrigerator (especially in the summer, when my kitchen is much warmer). In the morning, it’s typically ready to be portioned (if it rose at room temperature), transferred to storage vessels, and stashed in the fridge. If I had let my dough spend time in the fridge for the bulk fermentation, I remove it in the morning, and let it complete its bulk fermentation at room temperature. Once complete, I portion the dough and stash it in the fridge. Sometimes I’ll use the dough that same evening; sometimes I’ll use it the following day or the next. I encourage using the dough within 3 days.
In short: If you want pizza for the weekend, mix your dough on either Wednesday or Thursday.
Troubleshooting: If you have issues with your dough being too sticky, please read this post: Why is my sourdough so sticky? The 4 common mistakes.
Water: If you live in a humid environment or if you are making this on a particularly humid day, consider starting with less water, such as 335 grams of water, which will bring the hydration down to 70%. This amount of water will still produce a light airy crust but the dough will be more manageable.
Flour choice:
- You can make this dough with all-purpose flour or bread flour, and it works beautifully. You can use Tipo 00 flour if you want, but you’ll likely need to reduce the amount of water. Start with 350 grams and adjust moving forward based on your results.
Can You Freeze Sourdough Pizza Dough?
Yes. But, in my experience, the pizzas made from frozen dough do not spring as high upon being baked. They will still taste delicious as long as the time spent in the freezer is relatively short: the more time sourdough spends in the freezer, the more air bubbles it loses. After 1 week in the freezer, my dough will bake up fairly well. After 3 weeks in the freezer, my dough will be less bubbly and will bake into a thinner and crisper crust.
To freeze sourdough pizza dough: make it through step 4 in the recipe below or until after you transfer the portioned rounds to quart containers. At this point, transfer the quart containers to the freezer. To thaw, remove a container (or more) and let thaw in the refrigerator for 1 day or thaw at room temperature for 8 hours. Then, proceed with the recipe.
Favorite Pizza-Making Tools:
- Baking Steel
- Pizza Peel
- Parchment Paper: I bake my pizzas on parchment paper on my Baking Steel. Parchment allows for easy transfer from peel to steel.
- Cast Iron Skillet: If you do not have a Steel or stone, you can use a cast iron skillet. Rub a half teaspoon of oil over its surface, transfer a stretched dough round to the skillet. Top as desired. Bake at 450ºF for about 15 minutes.
- I love these Kevjes containers.
Ingredients
For the dough:
- 375 g water (or less, see notes above)
- 100 g sourdough starter, active and bubbly, see notes above
- 10 g salt
- 500 g all-purpose or bread flour
For each Margherita pizza:
- 2 tablespoons tomato sauce
- 1 to 2 oz mozzarella
- handful of grated Parmigiano Reggiano (less than an ounce)
- drizzle olive oil
- pinch sea salt
For each kale and crème fraiche pizza:
- extra-virgin olive oil
- a couple handfuls of baby or Tuscan kale
- 1 to 2 cloves garlic
- Sea salt, such as Maldon
- 2 tablespoons crème fraîche
- grated Parmigiano Reggiano, about 1/4 to 1/3 cup
For each naked pizza with ramp or scallion oil:
- 1/4 cup olive oil
- 1/4 cup minced scallions or ramps
- 1 teaspoon crushed red pepper flakes
- 1 to 2 tablespoons crème fraîche
- handful grated Parmigiano Reggiano
- sea salt
Instructions
- Mix the dough. Place the starter, salt, and water in a large bowl. Stir with a spatula to combine — it doesn’t have to be uniformly mixed. Add the flour. Mix again until the flour is completely incorporated. Transfer to a straight-sided vessel (if you have one.) Cover vessel with tea towel or cloth bowl cover and let stand 30 minutes.
- Stretch and fold: after 30 minutes have passed, reach into the vessel and pull the dough up and into the center. Turn the vessel quarter turns and continue this pulling 8 to 10 times. See video for guidance. Let the dough rest for another 30 minutes; then repeat the stretching and folding. If possible, repeat this cycle twice more for a total of 4 stretch and folds. By the 4th cycle, you will notice a huge difference in the texture of the dough: it will be smoother, stronger, and more elastic.
- Bulk fermentation: Cover vessel with a tea towel or bowl cover and set aside to rise at room temperature (70ºF/21ºC) for 4 to 18 hours (the time will vary depending on the time of year, the strength of your starter, and the temperature of your kitchen; see notes above) or until the dough has roughly doubled in volume. (UPDATE: In the past I have recommended letting the dough rise until it doubles in volume. If you’ve had success with this, continue to let the dough double. Recently, I have been stopping the bulk fermentation when the dough increases by 50% in volume, and I feel my dough is even stronger in the end.) Note: Do not use your oven with the light on for the bulk fermentation — it is too warm for the dough. When determining when the bulk fermentation is done, it is best to rely on visual cues (doubling in volume) as opposed to time. A straight-sided vessel makes monitoring the bulk fermentation especially easy because it allows you to see when your dough has truly doubled.
- Portion and shape: Turn the dough out onto a work surface and shape into a rough ball, using as much flour as needed — the dough will be sticky. Using a bench scraper, divide the dough into 4 equal portions. Sprinkle portions with flour. With floured hands, roll each portion into a ball, using the pinkie-edges of your hands to pinch the dough underneath each ball. Transfer each round of dough to a plastic quart container, cover, and store in fridge for at least 6 hours or up to 3 days or transfer to the freezer for up to 1 week. (To thaw, remove a container (or more) and let thaw in the refrigerator for 1 day or thaw at room temperature for 8 hours. Then, proceed with the recipe.)
- Make the pizzas: Pull out a round (or more) of dough from the fridge one hour before you plan on baking. Dust dough with flour and place on a floured work surface. Let sit untouched for about an hour (a little longer or shorter is fine). Place a Baking Steel or pizza stone in the top third of your oven. Set oven to 550ºF. Heat oven for at least 45 minutes but ideally 1 hour prior to baking.
- Shape the dough: Gently shape dough into a 10-inch (roughly) round handling it as minimally as possible. (See video for guidance.) Lay a sheet of parchment paper on top of a pizza peel. Transfer the dough round to the parchment-lined peel.
Top and Bake
- To make a classic Margherita-style pizza: Spread 2 tablespoons of tomato sauce over the surface of the dough. Top with mozzarella to taste. Sprinkle with parmesan to taste. Drizzle with olive oil. Sprinkle lightly with sea salt. Shimmy the pizza, parchment paper and all into the oven. Bake pizza until top is blistered, about 5-6 minutes. Transfer to cutting board. Sprinkle with basil, if you have it. Cut and serve. Discard parchment paper.
- To make a kale and crème fraîche pizza: Place the kale in a small bowl, drizzle with olive oil, season with sea salt, and toss. Spoon crème fraîche over the dough leaving a 1/2-inch border or so—I use about a tablespoon per pizza. Sprinkle with minced garlic and a handful of grated Parmigiano Reggiano. Top with the kale. Shimmy the pizza, parchment paper and all into the oven. Bake pizza until top is blistered, about 5 – 6 minutes. Transfer to cutting board. Cut and serve. Discard parchment paper.
- To make a naked pizza with scallion oil: Heat 1/4 cup olive oil in a skillet with 1/4 cup of minced scallions (or ramps!) and 1 teaspoon crushed red pepper flakes. Keep it over low heat while you make the pizza. Spoon crème fraîche over the dough leaving a 1/2-inch border or so—I use about a tablespoon per pizza. Sprinkle with a handful of grated parmesan. Shimmy the pizza, parchment paper and all into the oven. Bake pizza until top is blistered, about 5 – 6 minutes. Transfer to cutting board. At this point, the scallions should be starting to “frizzle”. If they aren’t, crank up the heat until the oil is sizzling. Spoon a few tablespoons of the hot oil over the pizza (you’ll have extra oil). Sprinkle with a pinch of sea salt. Cut and serve.
- Prep Time: 24 hours
- Cook Time: 5 to 6 minutes
- Category: Pizza
- Method: Oven
- Cuisine: American, Italian
This post may contain affiliate links. Please read my disclosure policy.


1,553 Comments on “Simple Sourdough Pizza Crust: A Step-by-Step Guide”
I’ve tried many of your recipes and am always very happy. Out of curiosity, what differences have you noticed from a bulk rise of 50% vs 100%? Have you settled on a specific bulk rise amount lately? I like having a visual target vs a suggested time which varies for everyone.
What is your favorite amount of time for cold proofing? I hear a lot of people like 3-5 days. Would you adjust your bulk fermentation rise percentage for a long cold fermentation? Thank you for all the help and great recipes!
Hi Preston,
All great questions! I almost always let my dough rise in volume by nearly 100% during the bulk fermentation. I use a straight-sided vessel, so I am accurately monitoring this phase. I suggest the range of 50-100% because for some people, letting the dough double in volume leads to failure — overfermenting and therefore unworkable dough. That said, I do think that when people let the dough rise in a bowl (as opposed to a straight-sided vessel), they let the dough bulk ferment for too long because they’re not accurately assessing the growth in volume. In other words, when dough is rising in a bowl, someone might think the dough has only increased in volume by 50% when actually it’s closer to 100%. Hope this makes sense.
For me, I find 48 hours (or slightly more or less) in the fridge to be the sweet spot. If I mix my dough on Wednesday morning and ball it up Wednesday night, I’ll have great results using it Friday or Saturday night. After that, I find the results to be less reliable.
Finally, if you do a shorter bulk fermentation, I do think it potentially buys you more time on the other end — you may find you can keep your dough in the fridge for longer. I haven’t tested this extensively, so I can’t say for sure.
Hi,
Is there any chance that you have created a gluten free sourdough pizza crust that is similar to this one?
I have not I’m afraid. Do you have a gluten-free starter? You could try using it with this recipe if so: Thin and Crispy Gluten-Free Pizza Crust
Fabulous, detailed instructions and video yielded incredible, chewy tender crust. I used half tipo 00 and half KA bread flour. This recipe makes me want to buy a pizza oven! May try grilling it next! Our cheese of choice was smoked mozzarella. Sooooo good!
Wonderful to read all of this, Lin! Thanks for writing 🙂 🙂 🙂
Trying it. I’m at the bulk ferment stage. Portioning later.
Gread to hear, Richard!
I’m new to this way. I’m trying to make sure I get this right once assembled bake for 5 to 6 mins and it’s done?! Normally take 20 plus minutes for dought to bake. What am I missing thank you
Do you have a Baking Steel or a pizza stone?
Yes, with a properly heated oven at its hottest setting for 1 hour with a steel or stone inside, the pizza should take 5-6 minutes. It may take 8-10 minutes if your oven doesn’t get up to 500-550ºF.
Ms Ali,
I made this dough on Monday following your instructions down to the gram. I placed the rounded portions in quart containers until today. Popped one out, turned oven to 500 (that’s as high as my propane stove will go). Let the oven preheat, your the shaped pizza dough and baked for 14 minutes at 500°. It was perfect! I added some fermented jalapeños to mine, but my wife ate hers as is.
Thanks for a great recipe! Next I think I’ll try making discard muffins. I don’t have any blueberries but I have some chocolate chips.
Well be doing pizza a lot more often now thanks to Alexandra’s Kitchen.
So nice to read all of this, Richard! Thanks so much for writing and sharing your notes. I love the idea of using fermented jalapenos — yum! Discard chocolate chip muffins will be delicious 🙂
could i halve this recipe if i only want 2 pizzas?
Yes!
Hi Ali, thanks for this recipe and so many others that my family has loved! I’m excited to try this pizza recipe out and currently have my dough in the fridge. But I just scrolled down to the actual baking portion and realized I don’t have a baking steel or pizza stone (d’oh!), but I do have a pizza pan with holes. Would that work with this dough and, if so, do you have any advice on how I might need to tailor the instructions? Thank you SO much!
Hi! Am I too late here?
Do you have an old sheet pan you don’t care about? You could turn it upside down and preheat that instead. Or do you have a large cast iron skillet?
I only have limited experience with a perforated pizza pan — I think when I used it, my pizza stuck… have you had success in the past with it? If so, I’d just do what you’ve done in the past.
In general, you want your oven as hot as it will go. What is tricky with baking without a steel or stone is that the bottom might not cook to your liking.
I don’t wanna rate this poorly because I don’t think it’s the recipes fault but mine simply did not turn out. I followed the recipe to a T except I had to put my dough in glass Pyrex dishes because I didn’t have plastic. I let it sit until the next day in the fridge. I went for the margherita pizza and cooked for 6 minutes at 550 and when it came out the crust looked okay but when I cut it the entire center was undercooked. I then tried it with my second pizza I prepared and cooked it at 550 for 10 minutes and the top was getting too burnt but the crust on the bottom still didn’t cook. The outer crust rose a little bit and had some bubbles. But all the center with toppings was like not cooked barely and didn’t rise at all and I was just so confused. I am questioning if it’s my oven but I haven’t had issues with any other sourdough recipe, hoping for some advice!
Hi! Questions:
Are you using a scale to measure?
Did the dough feel good after the bulk fermentation? As in was it strong and elastic?
How long are you letting the dough rest at room temperature before baking?
Are you baking your pizzas on a preheated Baking Steel or pizza stone?
I am trying this recipe to compare it to the yeast version of your pizza dough, which we LOVE at my house.
For the bulk fermentation, I went ahead and spilt the dough into 2 balls and put them in containers separately, as you recommend for the regular pizza dough. I am wondering if there is a reason you did not mention that as an option for this recipe.
After shaping, I find it works well for the regular pizza dough to parbake the crusts for 2-3 minutes, then cool and freeze them for later use. This seems to work well as then anyone can grab a crust to thaw, preheat the oven to 550F for at least 10 minutes (30 is better), top the pizza with whatever we happen to have available, then bake for about 6 minutes on the hot pizza stone. I am assuming this will work for the sourdough version as well.
Hi Marie!
Regarding your parbake question: yes! That works well for sourdough, too 🙂
Can you clarify the first part about the bulk fermentation. Did you split the dough into 2 balls after the bulk fermentation or before? Are you making a full recipe or a half… or am I losing my mind? I recommend dividing the dough into 4 balls after the first rise for the yeast version, but do I recommend splitting it into two balls somewhere?
Hi Ali!
Sorry I was not clear about the splitting of the dough. I made the full recipe and split it into 4 balls prior to the bulk fermentation for refridgertor slow rise. Then I had the 4 containers that I shaped and put back into the containers for the 2nd rise in the fridge as well. Normally, I would only have one rise be cold, but it has been a busy week!
I hope that makes more sense. 🙂
Love it made it a few times now with AP and 00 flour my doughs tho no matter what I do they seem to be so sticky it takes 2 people to place it on paper to bake and once it’s on paper forget about removing it am I doing something wrong?
Hi! Are you using a scale to measure? Regardless, try holding back some of the water (25-50 grams) at the start the next time you make it.
Yes I use a scale. I will try using less water next time and keep you posted.
THANK YOU for another fantastic recipe! I followed your instructions to a T and the result was perfection. I did not think I had it in me to ever make my own pizza crust, but we may never go out for pizza again. Looking forward to trying more of your recipes. Thanks again!
Great to hear! Thanks so much for writing 🙂 🙂 🙂
This is just like the pizza we had in Italy during our trip there! We love it and it’s become a weekly ritual on Thursday nights in my house
Great to hear, Felicia! Thanks so much for writing 🙂 🙂 🙂
After step 4 can you use one of the portions to bake a pizza with immediately or does it need to go into the fridge for at least 6 hours before making a pizza with.
Hi! And yes, you can: do let it proof at room temperature. I like to do a room temperature proof in a lidded vessel now to ensure it doesn’t dry out. Shoot for at least an hour, during which time you can get your oven up to temperature.
You may find that your crust isn’t as quite as light and airy as when it’s had time to proof in the fridge but it will still be delicious.
Benefits of the fridge include better browning and flavor bc with time, enzymes in both the flour and the yeast break down the starches in the flour into simple sugars, which contribute both to flavor and browning.
Good luck!
I am in marathon baking mode these days. Tonight’s plan: sourdough pizza dough and regular pizza dough. I prepped both doughs and had them in the fridge for 48 hours. I found that the regular yeast dough was significantly easier to handle and shape into rounds. The sourdough got a couple of holes, which was a bit frustrating. How do I avoid this with the lovely air bubbles? Taste test: sourdough is a bit more chewy and crispy, but both are delicious!
Side note: My 20+ year old baking stone broke in half – I did order a replacement, but also ordered a baking steel griddle – see my note on pancakes. 🙂
Thanks, Ali!
Hi Marie! Apologies for the delay here. First: great news about the Baking Steel griddle, which you can also use for pizza (which I know you know, but which is exciting!!) I think you’ll find the Steel game changing.
Sourdough does tend to be a little trickier to work with. What kind of flour are you using? My suggestion would be bread flour if you’re not using it, and I would also suggest potentially holding back some of the water at the start next time around.
I’m looking for a Sourdough Pizza recipe for a long time. I made the recipe twice today. As always (I should’ve known) using European flours with US recipies asks for a Desaster. My first batch with 75% hydration plus starter with 00 Pizza flour ended up way way way too soft. So I did another batch with 65% which looks way more like a pizza dough. Maybe the sweetspot is somewhere in between. I will bake both doughs tomorrow. Can’t wait.
Hope they turned out OK Jonas! Yes, 00 flour will make for a much wetter dough. Glad reducing the water helped make it more manageable.
After much searching and many attempts for an outstanding sourdough pizza crust ….this is THE ONE ! I will never bother trying another. This was in my opinion -perfection . Thanks so much !
Great to hear, Melanie! Thanks so much for writing 🙂 🙂 🙂
Hi Ali
Will this dough stand up to a pizza ovens high fast bake? We have an ooni
Thank you for your help
Hi! And no: you should reduce the water. I use a relatively high hydration dough for the pizzas I cook in my outdoor oven (70% hydration), which for this recipe means 335 grams of water. But, I also cook my pizzas at a slightly lower temperature range (650ºF-750ºF) for slightly longer 2.5-3 minutes.
How hot and for how long are you typically cooking your pizzas?
Hi – how many grams is each ball when you separate into 4?
Roughly 245 grams.
Hi!
If you don’t have any of the options you listed above for baking the pizza what should I use? Does parchment on a baking sheet work?
Thank you! So excited to try this recipe!
Yes! You can also preheat the baking sheet to make it act more like a pizza stone or baking steel. Just keep in mind preheating it might make it warp a little bit. If you don’t want to preheat it, your pizza may take a little longer to cook and the crust might not be as crisp.
Do we keep the oven at 550 if using a baking sheet?
Yes! Are you preheating the baking sheet?
I wanted to! If it makes for a better crust then yes! I actually ended up using my cast iron pan but wanted to try my baking sheet!
I think you will find that a preheated vessel creates slightly better oven spring. You can also preheat your cast iron skillet, but depending on the size of it, it might be hard to lower the dough into it once it has been preheated.
If you are OK preheating your sheet pan, give it a go… keep in mind your sheet pan might warp a little bit.
I feel like this is the same dough recipe I use for my bread. Which happens to be my favorite recipe. The only change I make is I use 350 grams of water. Is it the same recipe?
The dough is a classic dough so not much can go wrong, but my issue with it is that is produces a dough that is far too sticky to be properly worked like other recipes. Making a drier dough and using olive oil instead of flour as the nonstick element will make for a more authentic result. Lastly, don’t use a tea towel to cover the dough – if it is rising overnight, there is a strong chance of it drying out in that case. Use plastic wrap on it instead to retain the moisture and prevent a crust from forming.
Delicious pizza dough recipe! Kid approved, they said it was the pizza ever and not disgusting according to the 3yo. I was curious if I could freeze the dough in rounds? If so after what step would you suggest?
Great to hear, Lisette! I do not recommend freezing sourdough dough — it does not hold up well even after short periods of time in the freezer. You can parbake the rounds, let them cool; then freeze.
Hi AlI, I was wondering how much dough to portion for a 16” pizza? Will the time and/or temperature of the oven change as a result? Should I parbake? Or do you not recommend one that big?
Thanks for your help and all the great recipes!
I divided the dough into 2 portions, instead of 4, and it made 2 -14-15” pizzas. I did bake them at 450°, for 15 minutes, as I was afraid they wouldn’t be cooked in the middle if I used the higher temperature, which I have experienced in the past.
They came out perfect! They were nicely browned, bubbly and crispy.
This was my first successful attempt at sourdough crust. I bake pizza, almost weekly, and the last recipe I used for a sourdough crust, was a complete fail.
My husband and son said this was the best crust they have ever had, so thank you again for sharing(:
OK, amazing! I’m so happy to hear this. Thank you for reporting back and apologies for the delay here.
Out of curiosity: Did you use a Baking Steel or pizza stone or a sheet pan? My concern with the 16-inch size was if you would have a peel and a steel big enough for this size pizza.
Your method sounds great! Thank you for sharing it 🙂
I used a 16” perforated pizza pan. I didn’t preheat the pan, but may next time and use a large cookie sheet or spare pizza pan as a peel.
I gently stretched and baked on parchment paper, although the pans are usually non stick, I didn’t want to chance it.
I did par bake one for 6 minutes, and the oven spring was even better, because the toppings didn’t weigh it down. I finished baking at 450° for 15 minutes, and it was delicious.
Thanks again, Ali
I baked at 450° for 15 minutes.
Awesome! Thanks for reporting back and sharing all of these notes, Shan. So helpful for others!