 →
→ Simple Sourdough Pizza Crust: A Step-by-Step Guide
This post may contain affiliate links. Please read my disclosure policy.
As far as sourdough pizza recipes go, this one is as simple as it gets: it’s made with all-purpose or bread flour, and there is no autolyse or preferment — everything gets mixed together at once. Ready? Wake up your starter! Read on to learn 5 secrets to sourdough pizza success.🍕🍕🍕

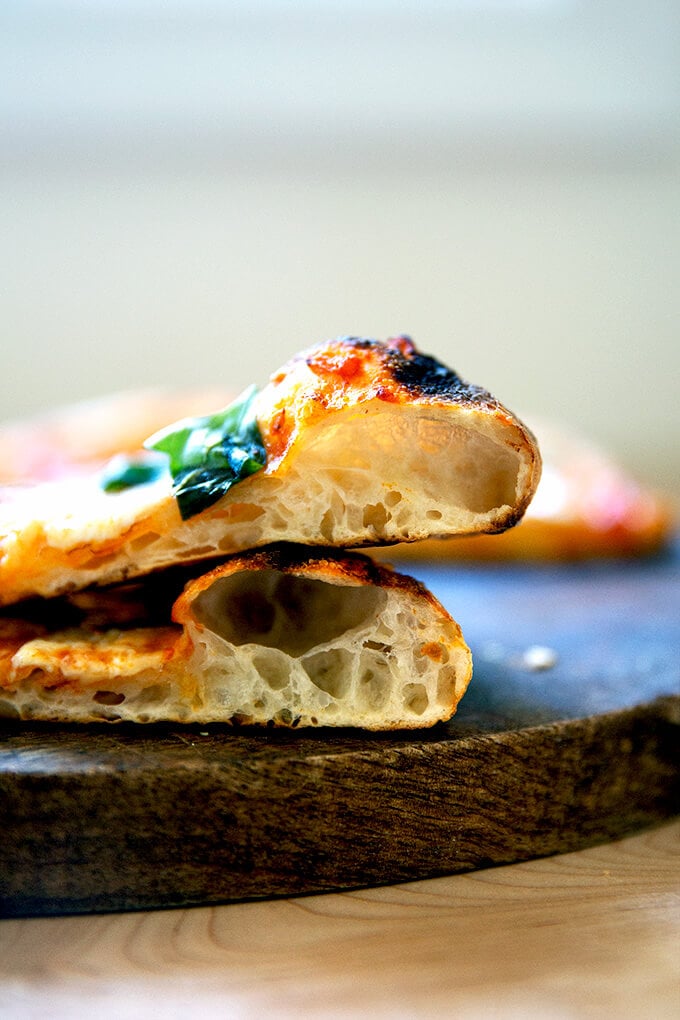
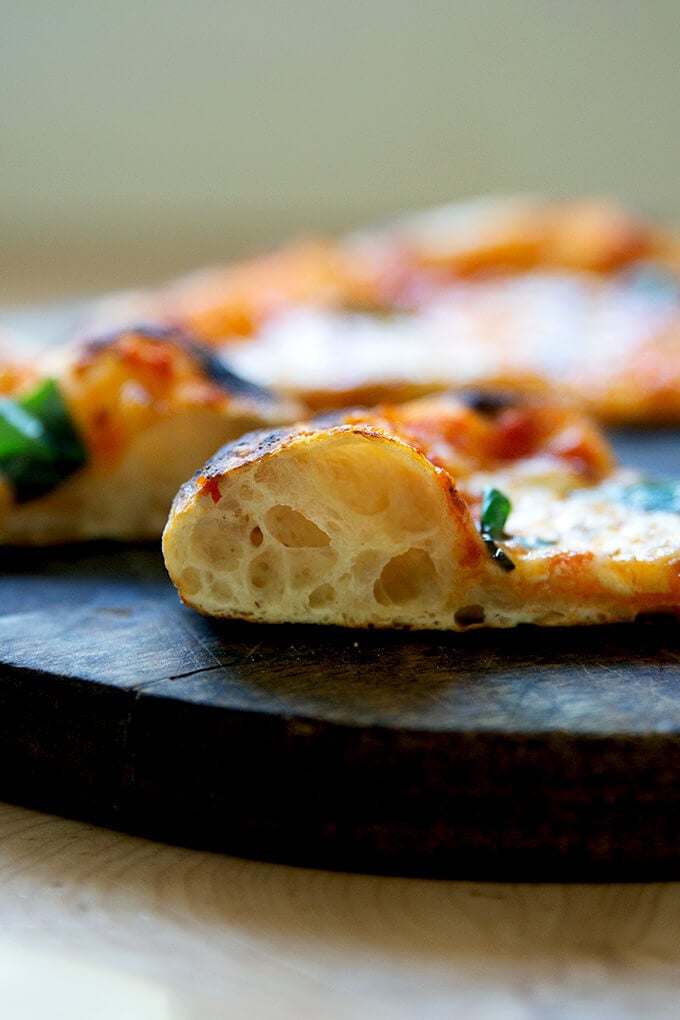
This sourdough pizza recipe produces a pizza with a ballooned, blistered edge and a crisp but pliable crust. The secret to achieving this texture in a home oven is to use a high-hydration dough (75%), proper fermentation (long and slow) at each phase, gentle handling of the dough, and a screaming hot oven (ideally outfitted with a Baking steel or pizza stone).
Let’s explore each in more detail:
5 Keys to Sourdough Pizza Success
- Use a high-hydration dough: Because home ovens rarely reach above 550ºF, it takes longer for pizzas to cook. In contrast, a 900ºF oven will cook a pizza in 60 seconds. To prevent pizza dough from drying out in a home oven, it is important that the dough has a lot of water in it — i.e., it is high-hydration. In contrast, outdoor oven pizza doughs can be much lower hydration.
- Ferment sufficiently: After the first long, slow rise, transfer the dough to the fridge for at least 12 hours and up to 3 days. Time further develops flavor, helps with browning, and improves the texture of the pizza dough.
- Proof sufficiently: If time permits, allow the dough to come to room temperature for at least an hour before baking (and up to 2), which makes it easier to shape — room-temperature dough stretches into a round more easily than cold dough.
- Handle the dough minimally: Using a delicate hand when shaping the dough preserves the air pockets created during fermentation.
- Invest in a Baking Steel: Steel is a better conductor of heat than stone — i.e., it transfers heat to the dough faster — which promotes great oven spring, which translates to glorious bubbles throughout the dough.
How to Make Sourdough Pizza, Step by Step
As always, a scale is essential for the best results. You need water, flour, salt, and a sourdough starter:
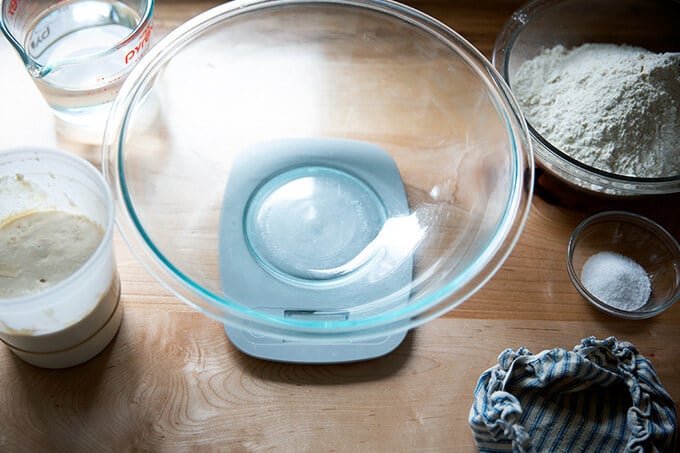
Combine 375 g water, 100 g sourdough starter, and 10 g salt in a bowl. (See notes in recipe box about using less water if you live in a humid environment.)
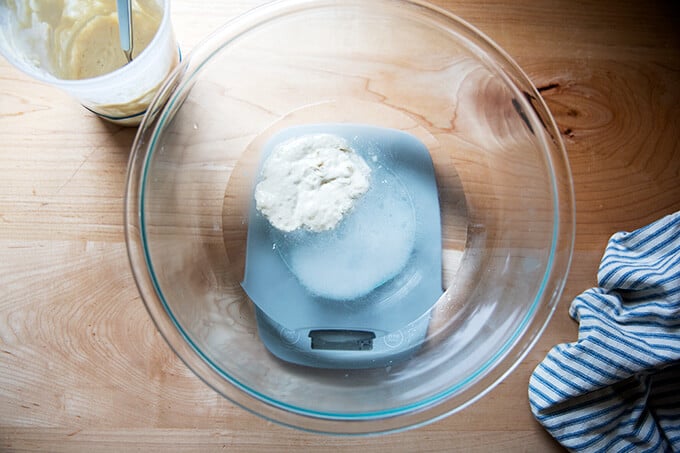
Stir to combine; then add …
… 500 g all-purpose flour.
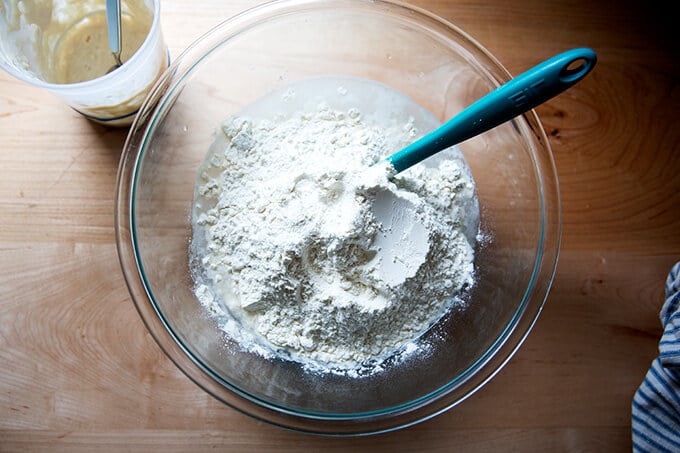
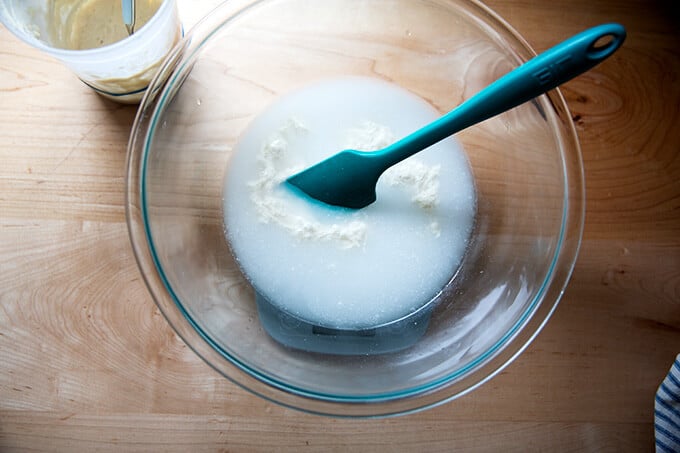
Stir until you have a sticky dough ball.
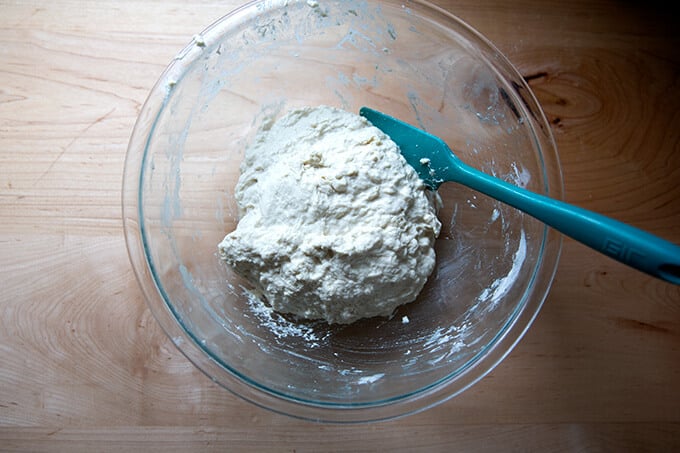
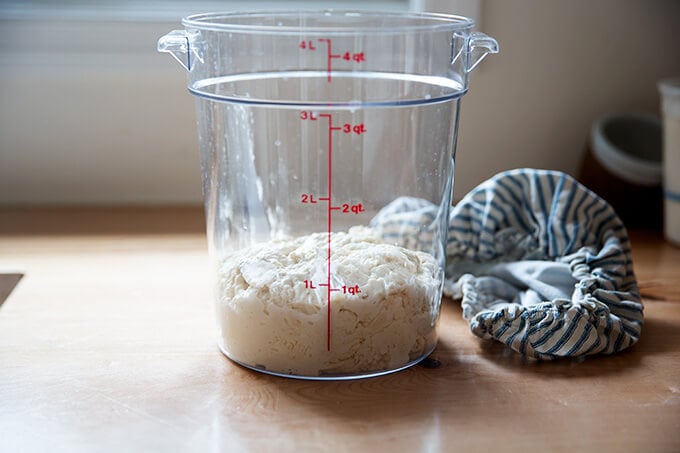
Transfer to a straight-sided vessel (if possible) and let rest for 30 minutes. Then, “stretch and fold” the dough (see video for guidance) 4 times at 30-minute intervals. Cover the vessel. Let it rest for 6 to 12 hours (see recipe notes for timing) or until the dough…
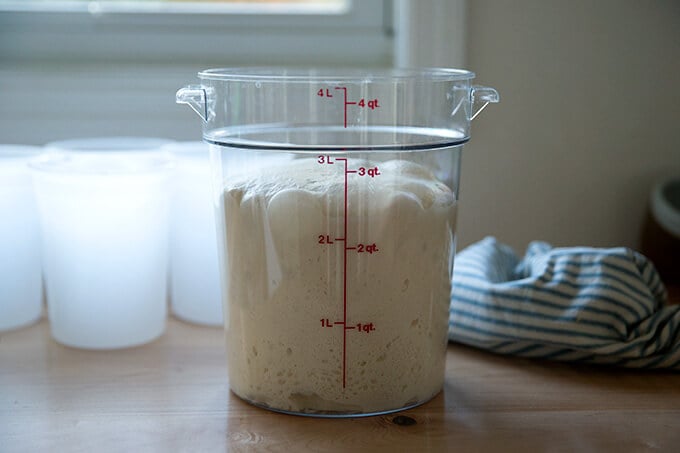
… has about doubled in volume. (Note: This is a little bit more than double. Ideally, you don’t want your dough to rise much beyond double. More recently, in fact, I stop the bulk fermentation when the dough has increased in volume by 50%.)
Turn the dough out onto a work surface. Use flour here as needed.
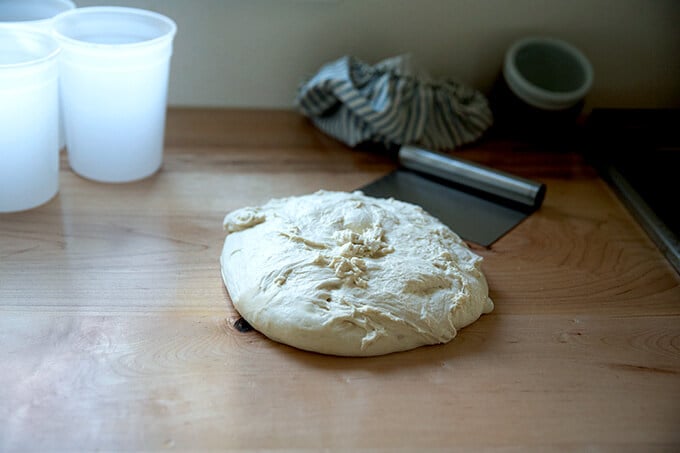
Portion into 4 equal pieces, again using flour as needed.
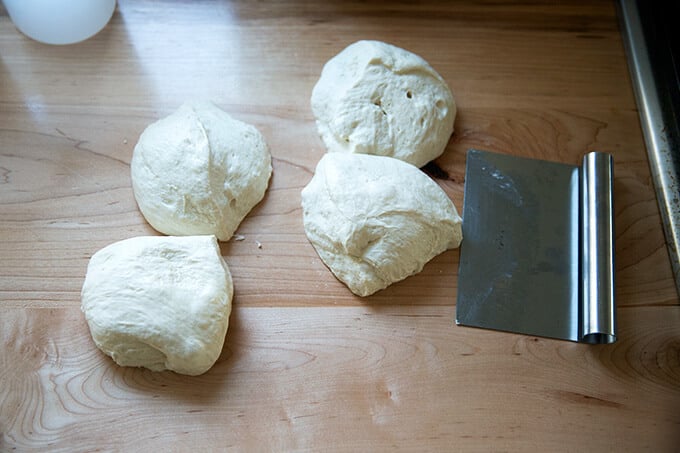
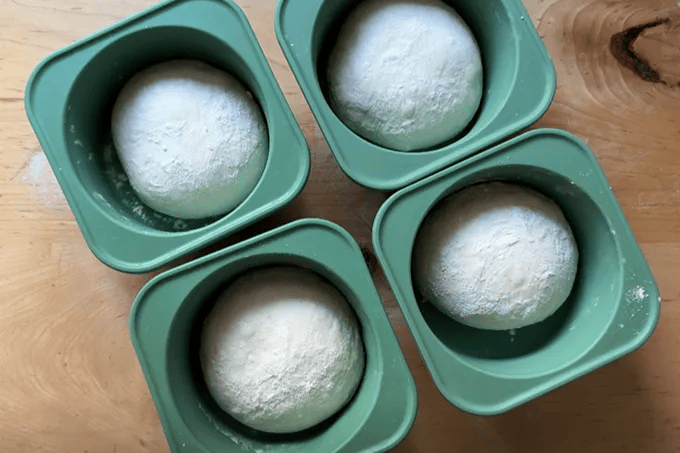
Ball up the dough, transfer the balls to storage containers, and stick them in the fridge. These Kevjes Dough Storage Vessels have become my favorite storage vessels for pizza dough balls:
An hour prior to baking, remove a round (or more) of pizza dough from the fridge, and transfer it to a lidded vessel such as a DoughMate or a 9×13-inch baking dish covered with plastic wrap (to prevent the dough from drying out). If you have a Baking Steel, place it in the upper third of your oven, and heat the oven to 550ºF convection roast. (See recipe for other options.)
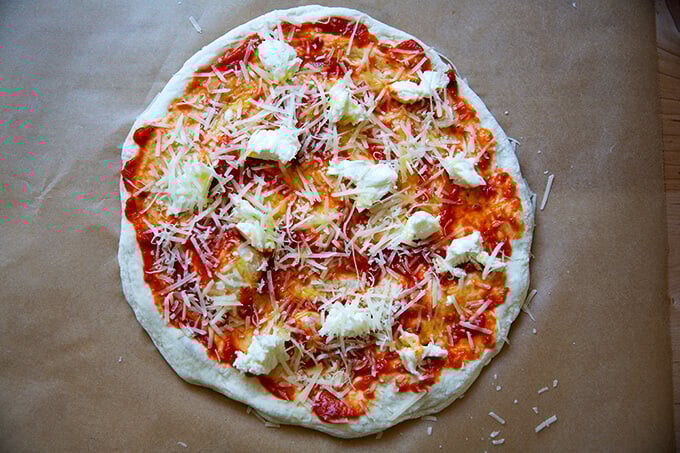
When the dough has proofed, delicately stretch it into a round, trying as best you can to preserve those air pockets.
Top as you wish. This one is spread with tomato sauce and topped with fresh mozzarella, parmesan, olive oil, and sea salt.
Transfer pizza, parchment paper and all, to a preheated Baking Steel or stone, using a peel — my favorite peel is the Epicurean Pizza Peel. Bake 5 to 6 minutes or until cooked to your liking.
Slice and serve.

A little fresh basil is always nice.

This is the beauty of the Baking Steel: oven spring!

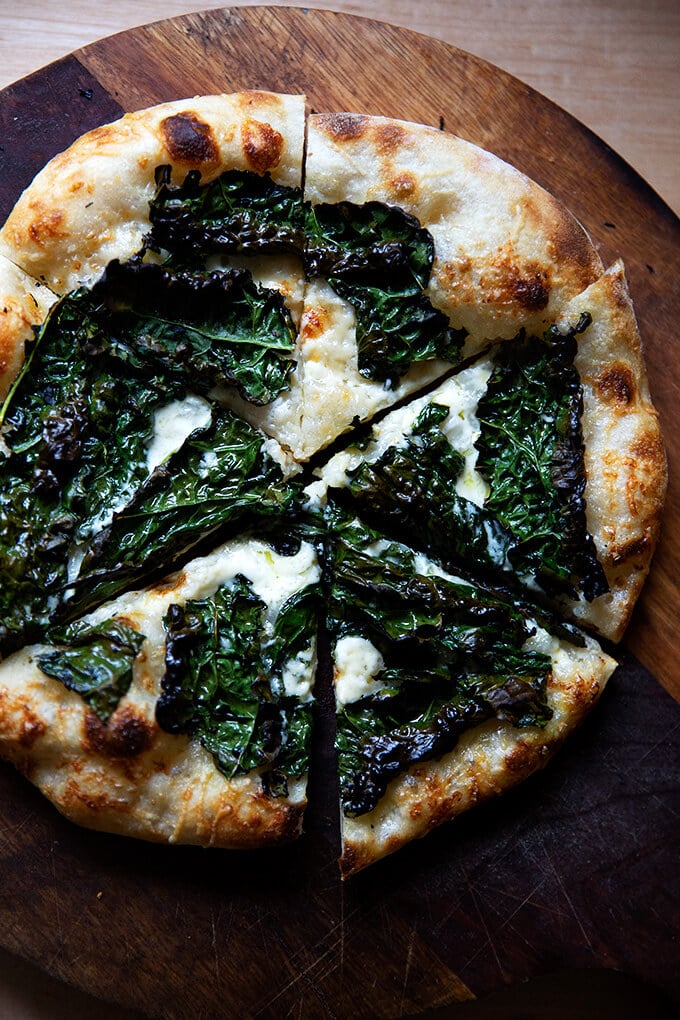
Another favorite: kale + crème fraîche:
Another favorite: “naked” + spicy scallion (or ramp) oil:

Looking for more pizza inspo? My cookbook, Pizza Night includes 52 pizza and 52 salad recipes, one pair for every week of the year, as well as five simple desserts 🍕🍕🍕


Simple Sourdough Pizza Crust
- Total Time: 1 day + 1 hour
- Yield: 4 pizzas 1x
Description
Here is my guide for making sourdough pizza crust at home. Made with all-purpose or bread flour and no autolyse or preferment, the dough comes together simply: everything gets mixed together at once, and you are on your way! 🍕🍕🍕
**Attention Pizza Fans**: My pizza cookbook, Pizza Night, is now available everywhere books are sold. Get your copy here: Pizza Night
What you need to make this recipe…:
- …a sourdough starter. Ideally, you want to use your starter 4 to 6 hours after you feed it, when it has doubled in volume and is very bubbly and active. You can build a starter from scratch in just about 1 week. Or you can buy one. Here are two sources:
- …time. Once your starter is ready to go, this recipe requires an initial 6 – 18 hour rise, followed by at least 6 hours in the fridge or up to 3 days.
Timing/Schedule:
The timing will depend heavily on the time of year and the temperature of your kitchen. In the summer, because it is warm and humid, the first rise (bulk fermentation) of all my sourdoughs takes between 6 – 8 hours; in the winter it will take longer, 10 to 12 hours.
It is best to rely on visual cues. For the bulk fermentation, you want the dough to double or less than double: I now end my bulk fermentation when the dough has risen by 50% to 75% in volume. This is why I cannot recommend using a straight-sided vessel (as opposed to a bowl) enough. It makes gauging the first rise easier.
If at any point you are worried the dough will over-ferment — say, for example, the bulk fermentation is nearly complete but you are tired and want to go to bed — stick the vessel in the fridge and pick up the process in the morning. (Note: If your dough rises above double, don’t despair … my dough has tripled in volume during an overnight rise, and the resulting dough still had plenty of strength and spring.)
Schedule: I like mixing this dough in the evening, performing 4 stretch and folds before I go to bed (if time permits), then letting the dough complete its bulk fermentation at room temperature (68ºF) overnight or in the refrigerator (especially in the summer, when my kitchen is much warmer). In the morning, it’s typically ready to be portioned (if it rose at room temperature), transferred to storage vessels, and stashed in the fridge. If I had let my dough spend time in the fridge for the bulk fermentation, I remove it in the morning, and let it complete its bulk fermentation at room temperature. Once complete, I portion the dough and stash it in the fridge. Sometimes I’ll use the dough that same evening; sometimes I’ll use it the following day or the next. I encourage using the dough within 3 days.
In short: If you want pizza for the weekend, mix your dough on either Wednesday or Thursday.
Troubleshooting: If you have issues with your dough being too sticky, please read this post: Why is my sourdough so sticky? The 4 common mistakes.
Water: If you live in a humid environment or if you are making this on a particularly humid day, consider starting with less water, such as 335 grams of water, which will bring the hydration down to 70%. This amount of water will still produce a light airy crust but the dough will be more manageable.
Flour choice:
- You can make this dough with all-purpose flour or bread flour, and it works beautifully. You can use Tipo 00 flour if you want, but you’ll likely need to reduce the amount of water. Start with 350 grams and adjust moving forward based on your results.
Can You Freeze Sourdough Pizza Dough?
Yes. But, in my experience, the pizzas made from frozen dough do not spring as high upon being baked. They will still taste delicious as long as the time spent in the freezer is relatively short: the more time sourdough spends in the freezer, the more air bubbles it loses. After 1 week in the freezer, my dough will bake up fairly well. After 3 weeks in the freezer, my dough will be less bubbly and will bake into a thinner and crisper crust.
To freeze sourdough pizza dough: make it through step 4 in the recipe below or until after you transfer the portioned rounds to quart containers. At this point, transfer the quart containers to the freezer. To thaw, remove a container (or more) and let thaw in the refrigerator for 1 day or thaw at room temperature for 8 hours. Then, proceed with the recipe.
Favorite Pizza-Making Tools:
- Baking Steel
- Pizza Peel
- Parchment Paper: I bake my pizzas on parchment paper on my Baking Steel. Parchment allows for easy transfer from peel to steel.
- Cast Iron Skillet: If you do not have a Steel or stone, you can use a cast iron skillet. Rub a half teaspoon of oil over its surface, transfer a stretched dough round to the skillet. Top as desired. Bake at 450ºF for about 15 minutes.
- I love these Kevjes containers.
Ingredients
For the dough:
- 375 g water (or less, see notes above)
- 100 g sourdough starter, active and bubbly, see notes above
- 10 g salt
- 500 g all-purpose or bread flour
For each Margherita pizza:
- 2 tablespoons tomato sauce
- 1 to 2 oz mozzarella
- handful of grated Parmigiano Reggiano (less than an ounce)
- drizzle olive oil
- pinch sea salt
For each kale and crème fraiche pizza:
- extra-virgin olive oil
- a couple handfuls of baby or Tuscan kale
- 1 to 2 cloves garlic
- Sea salt, such as Maldon
- 2 tablespoons crème fraîche
- grated Parmigiano Reggiano, about 1/4 to 1/3 cup
For each naked pizza with ramp or scallion oil:
- 1/4 cup olive oil
- 1/4 cup minced scallions or ramps
- 1 teaspoon crushed red pepper flakes
- 1 to 2 tablespoons crème fraîche
- handful grated Parmigiano Reggiano
- sea salt
Instructions
- Mix the dough. Place the starter, salt, and water in a large bowl. Stir with a spatula to combine — it doesn’t have to be uniformly mixed. Add the flour. Mix again until the flour is completely incorporated. Transfer to a straight-sided vessel (if you have one.) Cover vessel with tea towel or cloth bowl cover and let stand 30 minutes.
- Stretch and fold: after 30 minutes have passed, reach into the vessel and pull the dough up and into the center. Turn the vessel quarter turns and continue this pulling 8 to 10 times. See video for guidance. Let the dough rest for another 30 minutes; then repeat the stretching and folding. If possible, repeat this cycle twice more for a total of 4 stretch and folds. By the 4th cycle, you will notice a huge difference in the texture of the dough: it will be smoother, stronger, and more elastic.
- Bulk fermentation: Cover vessel with a tea towel or bowl cover and set aside to rise at room temperature (70ºF/21ºC) for 4 to 18 hours (the time will vary depending on the time of year, the strength of your starter, and the temperature of your kitchen; see notes above) or until the dough has roughly doubled in volume. (UPDATE: In the past I have recommended letting the dough rise until it doubles in volume. If you’ve had success with this, continue to let the dough double. Recently, I have been stopping the bulk fermentation when the dough increases by 50% in volume, and I feel my dough is even stronger in the end.) Note: Do not use your oven with the light on for the bulk fermentation — it is too warm for the dough. When determining when the bulk fermentation is done, it is best to rely on visual cues (doubling in volume) as opposed to time. A straight-sided vessel makes monitoring the bulk fermentation especially easy because it allows you to see when your dough has truly doubled.
- Portion and shape: Turn the dough out onto a work surface and shape into a rough ball, using as much flour as needed — the dough will be sticky. Using a bench scraper, divide the dough into 4 equal portions. Sprinkle portions with flour. With floured hands, roll each portion into a ball, using the pinkie-edges of your hands to pinch the dough underneath each ball. Transfer each round of dough to a plastic quart container, cover, and store in fridge for at least 6 hours or up to 3 days or transfer to the freezer for up to 1 week. (To thaw, remove a container (or more) and let thaw in the refrigerator for 1 day or thaw at room temperature for 8 hours. Then, proceed with the recipe.)
- Make the pizzas: Pull out a round (or more) of dough from the fridge one hour before you plan on baking. Dust dough with flour and place on a floured work surface. Let sit untouched for about an hour (a little longer or shorter is fine). Place a Baking Steel or pizza stone in the top third of your oven. Set oven to 550ºF. Heat oven for at least 45 minutes but ideally 1 hour prior to baking.
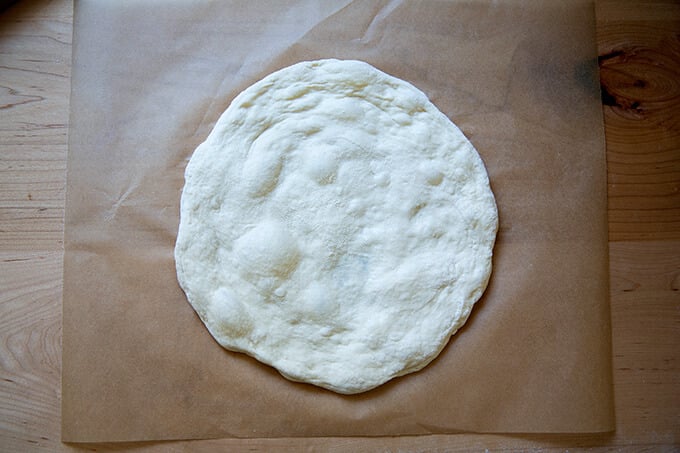
- Shape the dough: Gently shape dough into a 10-inch (roughly) round handling it as minimally as possible. (See video for guidance.) Lay a sheet of parchment paper on top of a pizza peel. Transfer the dough round to the parchment-lined peel.
Top and Bake
- To make a classic Margherita-style pizza: Spread 2 tablespoons of tomato sauce over the surface of the dough. Top with mozzarella to taste. Sprinkle with parmesan to taste. Drizzle with olive oil. Sprinkle lightly with sea salt. Shimmy the pizza, parchment paper and all into the oven. Bake pizza until top is blistered, about 5-6 minutes. Transfer to cutting board. Sprinkle with basil, if you have it. Cut and serve. Discard parchment paper.
- To make a kale and crème fraîche pizza: Place the kale in a small bowl, drizzle with olive oil, season with sea salt, and toss. Spoon crème fraîche over the dough leaving a 1/2-inch border or so—I use about a tablespoon per pizza. Sprinkle with minced garlic and a handful of grated Parmigiano Reggiano. Top with the kale. Shimmy the pizza, parchment paper and all into the oven. Bake pizza until top is blistered, about 5 – 6 minutes. Transfer to cutting board. Cut and serve. Discard parchment paper.
- To make a naked pizza with scallion oil: Heat 1/4 cup olive oil in a skillet with 1/4 cup of minced scallions (or ramps!) and 1 teaspoon crushed red pepper flakes. Keep it over low heat while you make the pizza. Spoon crème fraîche over the dough leaving a 1/2-inch border or so—I use about a tablespoon per pizza. Sprinkle with a handful of grated parmesan. Shimmy the pizza, parchment paper and all into the oven. Bake pizza until top is blistered, about 5 – 6 minutes. Transfer to cutting board. At this point, the scallions should be starting to “frizzle”. If they aren’t, crank up the heat until the oil is sizzling. Spoon a few tablespoons of the hot oil over the pizza (you’ll have extra oil). Sprinkle with a pinch of sea salt. Cut and serve.
- Prep Time: 24 hours
- Cook Time: 5 to 6 minutes
- Category: Pizza
- Method: Oven
- Cuisine: American, Italian
This post may contain affiliate links. Please read my disclosure policy.


1,553 Comments on “Simple Sourdough Pizza Crust: A Step-by-Step Guide”
I made this sourdough pizza dough. It turned out perfect. I cut the recipe in half and made 1 large pizza. It was delicious!
Great to hear, Sandy! Thanks for writing 🙂
How far is the Baking steel from your broiler?
Do you need to turn the broiler on to get the charred spots?
I do not turn on the broiler because the parchment paper will catch fire under the broiler. You can, however, slip out the parchment if you wish to use the broiler briefly. The rack is 4 inches from the broiler.
Absolutely delicious. <3
I started my sourdough journey about 2 months ago and so far made 7 breads, 1 happy accident (aka overproofed dough) foccacia, as well as discard crackers, bagels and cinnamon rolls.
As you can see, I am working on expanding my (sourdough) baking horizon and your pizza recipe will be on repeat. Easy to follow with a delicious result, thank you so much for sharing it.
Great to hear, Sophie! Thanks so much for writing and sharing this your sourdough experiences. It is a journey for sure! So glad this one was a success 🙂
I’ve tried a lot of pizza dough recipes and this one is by far the best I’ve tried. I used 00 flour and 350g water and it was perfect. Half the dough was just enough for a half sheet pan thin crust pizza. I split the other half to use with our pizza oven. Can always rely on Alexandra’s Kitchen for great recipes!
Great to hear, Kate! Thanks so much for writing and sharing your notes, and thank you for your kind words, too 🙂
Omg I love the taste, texture and simplicity of this recipe. It was a number of steps, but that’s what you gotta do to get that chewy texture. I made this with a overturned rimmed sheet pan left in the oven during preheating and it was perfect. Made with a little red sauce, sprinkle of mozzarella and cup and crisp pepperoni. Once out of oven, tore up a burretta cheese ball all over then covered with arugula and drizzled with hot honey (tablespoon Jones, teaspoon apple cider vinegar with pepper flakes. Heated in the microwave 20-30 seconds. Let sit while pizza is baking). Im making my 3rd batch of this dough, it’s anew staple for days i work late. Simple enough for my husband to pull it out prep and bake. Thank you!
Stacey, amazing! Great to read all of this. Thanks so much for taking the time to write and share your notes. I think I could finish every pizza with burrata + arugula + hot honey. Thank you for sharing your small batch hot honey recipe, too: genius!
Second time following another recipe of yours, and I love it! Turned out great!
Great to hear, Janet! Thanks so much for writing and sharing this 🙂
This is the recipe I used for my very first sour dough pizza crust and I have to tell you i was sour dough nervous I’m new to the SD world and had no idea what i was doing haha but the instructions were detailed and easy to follow. My dough easy very sticky and i worried about it not proofing correctly but i followed the directions and after my cold proof i saw i could add flour to the board and my hands and it was on from there my dough proof es perfect it shaped perfect rose perfect had a few big crusty bubbles which i love and the bottom was thin and crusty and flavorful will for sure make again I’m so excited and I made two pizzas from the four dough balls my husband added his toooings and made his pizza his way i did the same and it was a great time bonding in the kitchen I’m so proud of how it turned out thank you for such a great easy to follow recioe
Great to read all of this, Jessica! Thanks so much for writing and sharing all of this — so encouraging for others new to sourdough. Glad you and your husband had a great time in the kitchen, too… that’s what it’s all about. Happy Holidays!!
I love this pizza crust! Have made it several times. Recently got a spiral mixer. So you have suggestions how to mix using the mixer instead of stretch and folds?
Great to hear, Shea! I have never used a spiral mixer so I’m not sure how to advise. I would just advise not overdoing it… again, I’m not even really sure what that means. With sourdough, I find the gentle stretches and folds provide both strength but also a lovely, light airy dough. I don’t know how mechanically mixing will affect this character in the dough.
We have made this pizza crust many times. It is a family favorite. I always double or triple the recipe. We used to just freeze the extra dough to thaw for later use.
Lately we have been par baking all of the crust then using what we need for the night that we are having pizza. Then I freeze the remaining crusts. The next time we have pizza we just pull out a few crusts, top, and finish baking it. Either in the oven, if it is just a few, or in the pizza oven if it is more. That way we can have a spontaneous pizza night with a superior crust.
Thank you so much for sharing your recipe.
I’m so happy to read all of this, Jill! Thanks so much for taking the time to write and share all of these notes. I think parbaking is such a great and under-utilized tool for so many home cooks. Thanks for sharing your method — so helpful for others.
I wanted to make some premade crusts for the freezer as well but I’ve never par baked anything. Would you mind sharing how you did this?? Thanks so much! – Jenny
Oh my goodness!!!! I just tried this recipe for the first time and griped about the timings along the way… then I took a bite and HEAVEN. I had to watch each member of my family take a bite. As they did I saw their entire bodies relax. I just did a super simple pizza sauce (store brand!) and mozzarella slices then shredded mozzarella. So great. I’m ordering the book and making another batch tonight to be able to freeze for next week!!!
Awww, so nice to read all of this, Mandie! Thanks so much for writing and sharing your experience… it is definitely a lot of little steps/details to pay attention to, but one bite makes it all worth it 🙂 🙂 🙂
I started my sourdough journey last October and this recipe is by far my favorite sourdough pizza recipe!
I made it 3 times already, with different rest times in the fridge and freezer and it always comes out amazing.
Thank you for this straight forward, beautifully explained and delicious recipe.
Great to hear, Sophie! Thanks so much for writing and sharing this and thanks for your kind words, too 🙂
I just made a lot of this crust, excited to try it! Can I prebake the crust and freeze it, then add toppings later and bake again?
Yes!
This looks and sounds amazing. Going to start a batch today!
Question about the baking though. Is it safe to use parchment at such a high temperature? My box of parchment paper says it can be used up to 425F, so I’m not sure if using it at 550F would be ok?
It is safe! Every box of parchment cautions otherwise… I have used it at 550ºF convection roast with no issues. Do not, however, use it under the broiler, where it will catch fire 🙂
How many grams is each portion when you divide it up and how big of pizza does each one make – is it a personal size or ‘large’ size pizza?
Hi! Roughly 248 grams each. My 15-year old eats one pizza herself; the younger ones eat at least a half each (ages 13, 12, and 10). My husband and I split one pizza each. Hope that helps 🙂
Could I shape the round for baking, place toppings and then wait an hour or more before baking? And if so, could I leave it at room temp or should I refrigerate?
I have a class in the evening that’s right before my normal dinner time, so I’m thinking of how I can prep before I go to bake when I get home.
Hi! Sally, I think that’s a little long. You would definitely need to keep it covered, so maybe on the peel with a bowl overturned over it — you don’t want the dough to dry out. Fridge is probably the better option to slow down the proofing, but I do worry you’ll lose a bit of the oomph by waiting and hour to bake it. One option is to parbake the crust without anything on it for 60-90 seconds; then top it when you are home and finish the baking as usual.
With the updated suggestion of only allowing the dough to rise by 50% can I just cut the amount of time it will expect to take to get to that point by half? So, should I expect for it to take 2-9 hours instead of 4-18?
It all depends on the strength of your starter and the temperature of your kitchen. Also, dough rises more quickly at the end, so it’s not really a linear progression. Just rely on the visual cues: use a straight-sided vessel, and once the dough has increased by 50-75%, turn it out, and ball it up.
Hi there! I realize this is a few years old so hopefully you still see my comment. I prepped these to make with girlfriends over the weekend.
I have the dough balls in the fridge, however, I was wondering how many grams each dough ball typically weighs?
I only divided it into two balls because I thought they looked somewhat small. Just curious as to if there was a weight. Excited to try them tomorrow
Hi! I’m likely too late here, but each dough ball is roughly 248 grams. Dividing the dough in half is fine, but you’ll need to stretch the rounds into much larger circles before baking them.
Absolutely amazing, wicked easy to make and store! Delicious thin crust, the dough is so easy to work with and I found storing it the fridge in a container with a dash of olive oil for about 24 hours made for a perfect crust! I’ll be using this recipe for the foreseeable future, very reliable!
Great to hear, Isabella! Thanks so much for writing and sharing this 🙂
Great recipe! The dough turned out fantastic. However, my parchment paper did catch on fire when I was making my second pizza. Luckily I was watching very closely and pulled it out immediately. I think I will make without parchment paper next time!
Great to hear, Mariah! Bummer about the parchment… were you using the broiler? Or just the regular oven?
This recipe is great – made it 3 times now and gotten better at it every time!
Just mixed the dough to have another go at it and increased everything by about 1.25x – can any extra dough be used to make garlic dough balls?
Great to hear, Michael! Thanks so much for writing and sharing this. Yes, absolutely. Garlic dough balls will be delicious. Depending on how much dough you have left over, you could make monkey bread, too.
Hi, the dough didn’t raise in the oven…the pizzas was fairly dense and flat. It did double in volume when I let it rest overnight. Any ideas what might hace caused this and why I can do differently? Taste was great.
Hi Lisa, Questions for you:
Did you use a scale to measure?
What type of flour did you use?
Did you use a straight-sided vessel for the bulk fermentation?
How long did the dough rise overnight?
When you turned out the dough to shape it into balls, did if feel strong and elastic?
How many days did it spend in the fridge?
How long did it sit at room temperature before you stretched and baked it?
Hi is 4 days in the fridge okay?
That might be pushing it. I find the sweet spot to be 2 days. What kind of flour are you using?
I’m using bread flour
Bread flour is your best bet for a longer cold proof, because the higher protein will allow it to perform better over time. I do still worry that after 4 days, the gluten structure may weaken too much, and you might not get as great of a spring. That said, I have left dough in the fridge for as long as a week, and it has been fine — so much depends on your starter and how long the dough bulk fermented, etc. It won’t be ruined after 4 days but it may be past prime.
Do you use kosher salt or fine grain salt?
I always use Diamond Crystal kosher salt (which dissolves faster than Morton), and I always use a scale to measure it.