 →
→ Easy Sourdough Bread (Whole Wheat-ish)
This post may contain affiliate links. Please read my disclosure policy.
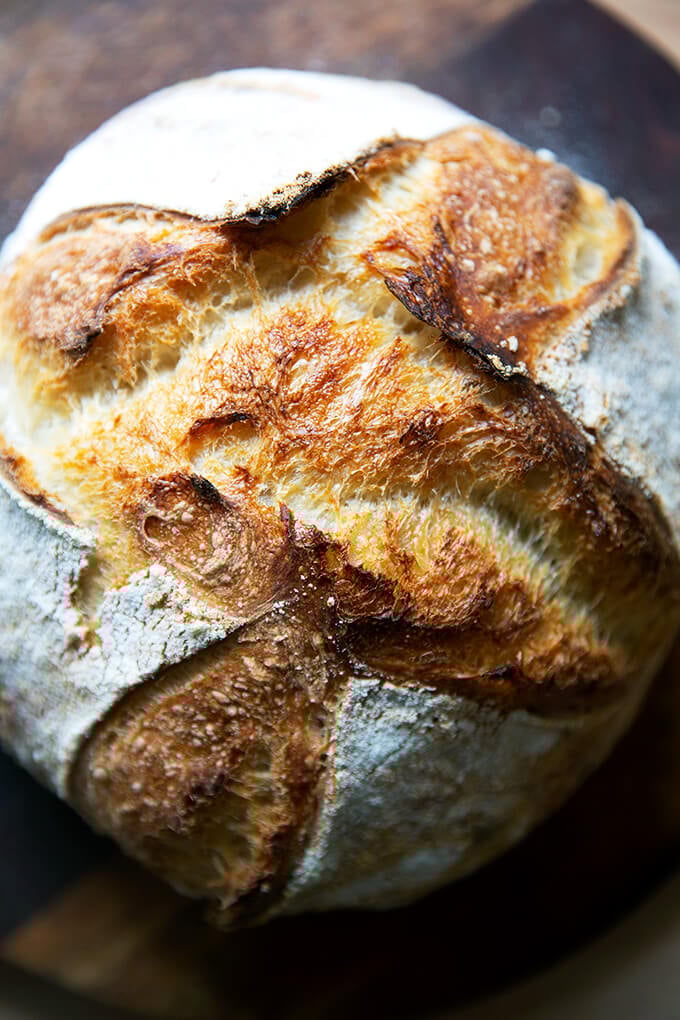
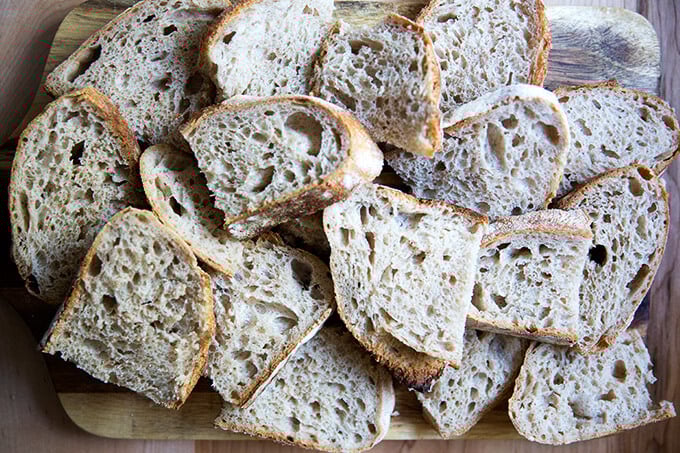
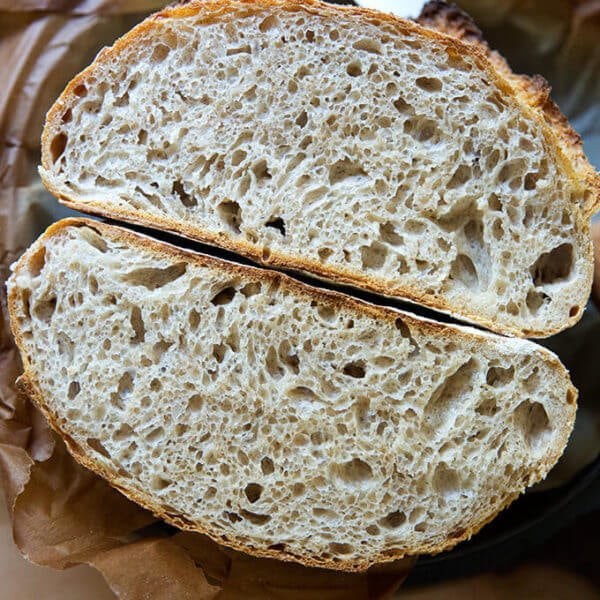
Made with a small portion of stone-milled whole wheat flour, this sourdough bread is so flavorful, aromatic, and tasty. Using a mix of both bread flour and whole wheat flour keeps the texture light while providing a nutritional boost and lovely flavor. 🍞🍞🍞🍞
If you are looking to add more nutrition to your bread, a logical first step is to replace some of the white flour with whole wheat flour. The trouble with this idea is that not all whole-wheat flours are created equal.
Let’s get straight to it. Most commercial flour (both white and whole wheat) is made from roller-milled wheat, meaning a roller mill has separated the wheat kernel into three parts: the endosperm, germ, and bran. White flour is made from the endosperm. Whole wheat flour is made from a combination of the endosperm, germ, and bran. Much research shows that as soon as the wheat kernel is separated into the various parts, much of the nutritional value is lost — even when the bran and germ are added in after the fact.
So what’s the solution? Seek out stone-milled flour, which is flour made from wheat that passes through a stone mill, the process of which keeps the endosperm, bran, and germ together. Much research shows that keeping the components together preserves the nutritional value.
What’s more, the bran and germ present in stone-milled flours lend so much by way of flavor, texture, aroma and hue:
The recipe below calls for a mix of both bread flour and stone-milled flour. Using a small amount of stone-milled flour gives your bread a boost of nutrition while preserving its light texture. Once you’ve made the recipe once, if you like what the whole wheat flour is contributing to your loaf, you can increase the proportion of stone-milled flour next time around.
How to Make Whole Wheat-ish Sourdough Bread, Step by Step
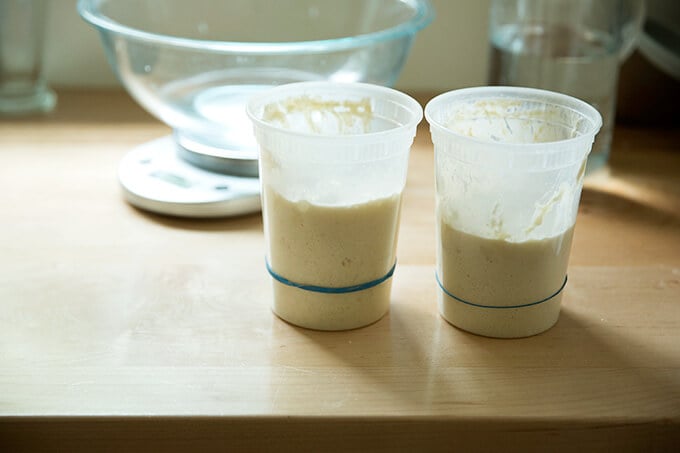
First, gather your ingredients: you need an active/fed sourdough starter:
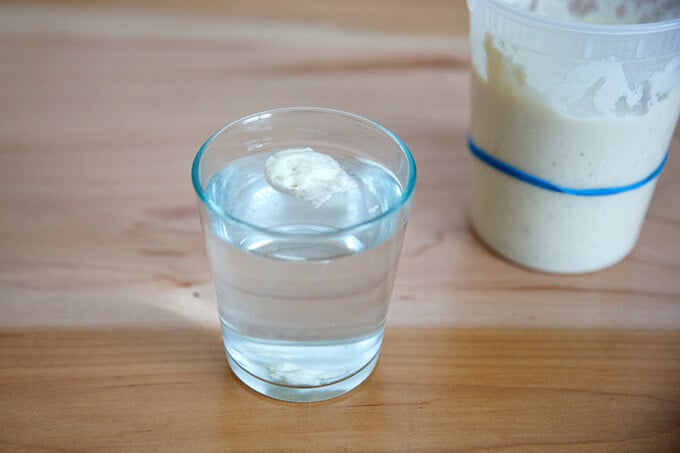
To ensure it is ready, drop a spoonful into a glass of water. If it floats, it’s ready:
Place 300 g of water, 100 g of starter, and 10 g of salt into a bowl.

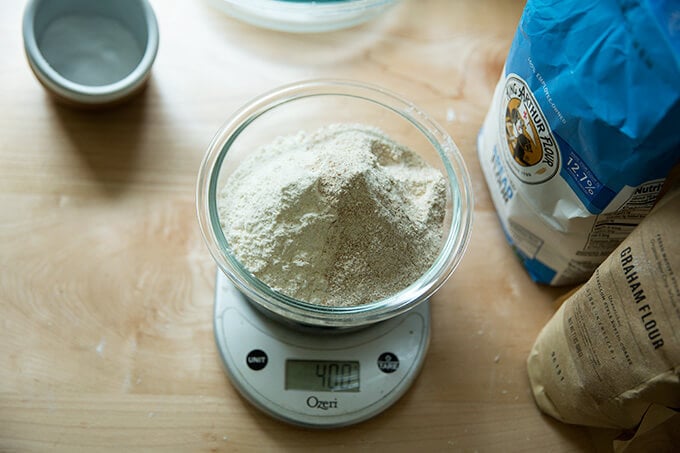
Next, weigh your flour: you need 400 grams of flour. For this whole-wheat-ish loaf, my preference is 350 grams of bread flour (King Arthur Flour) and 50 grams of stone-milled, freshly milled flour (I use a mix of Anson Mills rye and graham).

Mix until a sticky dough forms.
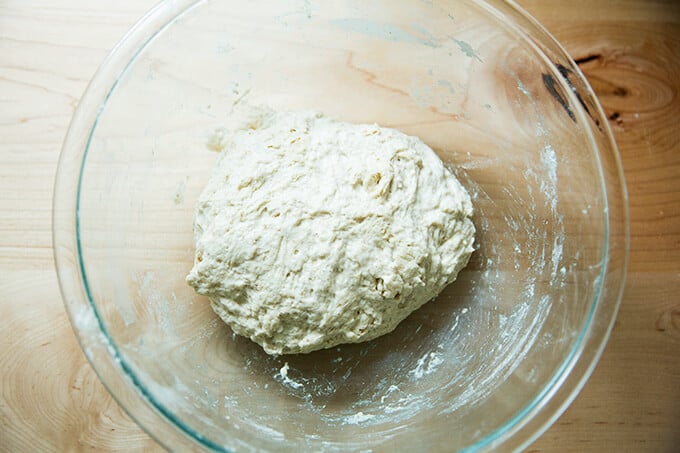
Then transfer to a straight-sided vessel for the bulk fermentation (the first rise).

After 30 minutes, stretch and fold the dough:
You’ll repeat this stretching and folding 3x at 30-minute intervals…
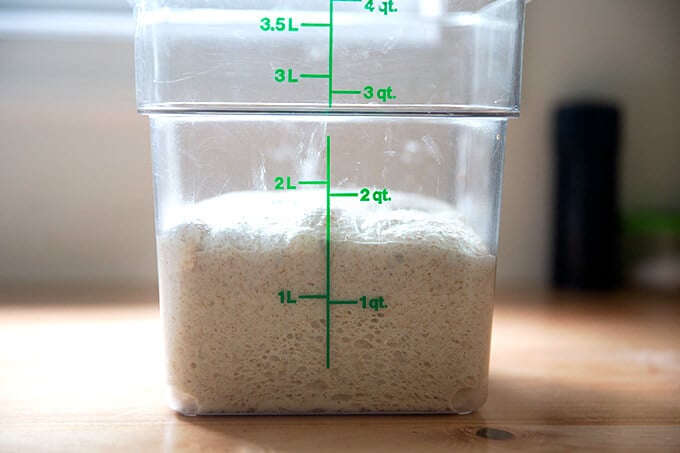
… then you’ll leave the dough to rise until it increases in volume by 50-75%:
Transfer dough to a clean work surface. I prefer to use no flour and minimal handling to shape it into a ball.
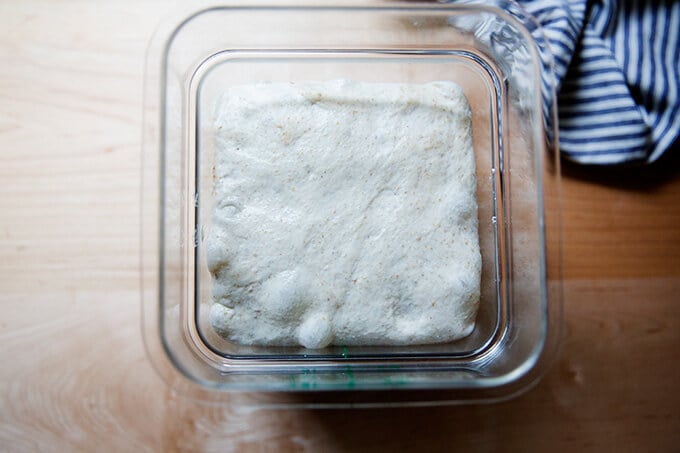
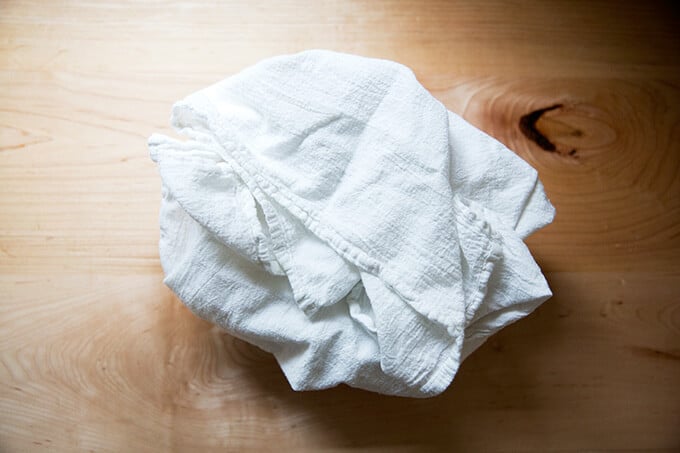
After the initial shape, let the dough rest for 20-40 minutes; then shape again and transfer to a flour sack-lined bowl.
Transfer bowl to fridge to proof (second rise) for 18 to 24 hours

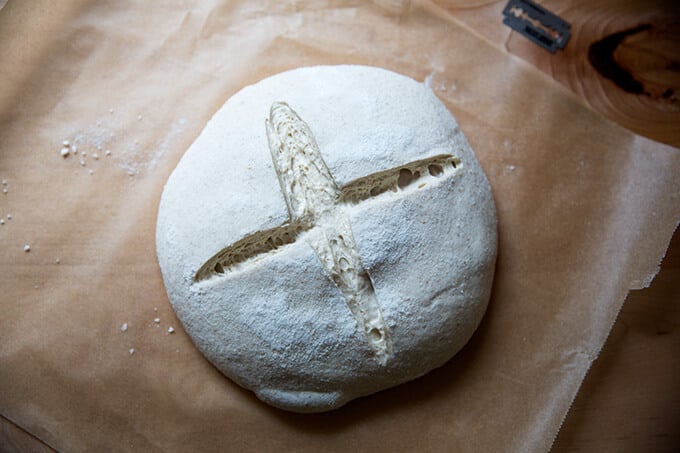
After 18 to 24 hours, transfer dough to a sheet of parchment paper. This video shows how:
Score as you wish; simple is fine.
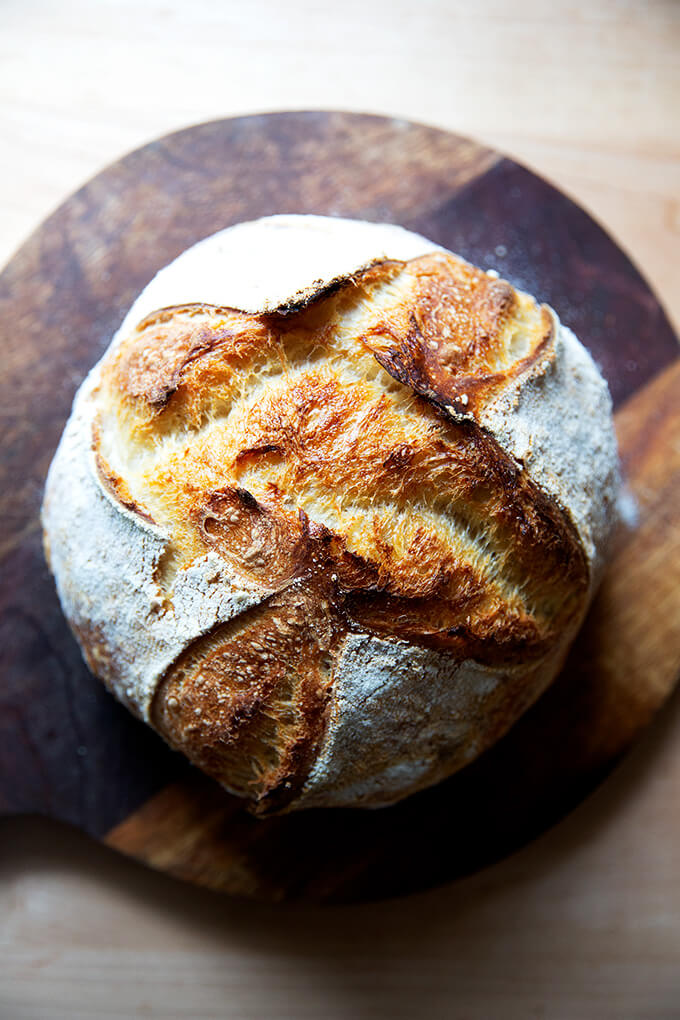
Transfer to a Dutch oven and bake, covered, at 450ºF for 30 minutes, then uncover and bake at 400ºF for 10 minutes.

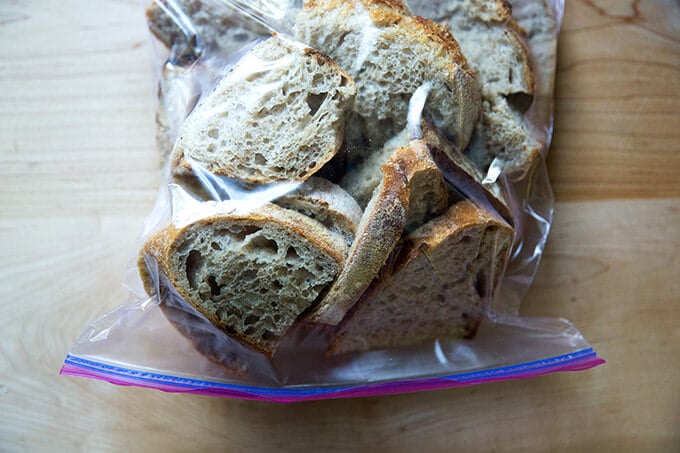
Store the bread at room temperature in a ziptop bag for 3 to 4 days or in the freezer for up to 3 months:
Easy Sourdough Bread (Whole Wheat-ish)
- Total Time: 48 hours 45 minutes
- Yield: 1 loaf 1x
Description
Made with a small portion of stone-milled whole wheat flour, this sourdough bread is so flavorful, aromatic, and tasty. Using a mix of both bread flour and whole wheat flour keeps the texture light while providing a nutritional boost and more flavor.
Notes:
Special equipment: Straight-sided vessel for the bulk fermentation, Dutch oven, flour-sack towel
Digital Scale: Do not attempt this recipe without a scale. This one costs $10. Troubleshooting what goes wrong with sourdough bread is impossible if you’ve measured with cups. They’re simply not accurate.
Troubleshooting: If you have issues with your dough being too sticky, please read this post: Why is my sourdough so sticky? The 4 common mistakes.
Flour:
-
- I prefer making this bread with 350g bread flour and 50g of freshly milled, stone-milled flour, which provides both flavor and color. I love using a mix of Anson Mills graham flour and rye flour, but there are many great stone-milled flours out there, and you may have a local source, which is even better.
- Where to buy stone-milled flour? In the past few years, it has become easier to find stone-milled flour, and if you are up for it, you should seek out locally, stone-milled flour. Why? Because if you’re buying locally milled flour, you likely can find out how recently it was milled. Because stone-milled flour perishes more quickly than roller-milled flour, it’s best if you can find a local source, which will ensure it will be fresh. Note: Store stone-milled flour in the freezer if you don’t bake regularly.
- I find locally milled stone-milled flours at a local co-op, Honest Weight Food Co-op, and I also order online from various sources. Here are a few I love: Cairnspring Mills, Anson Mills, and Community Grains
- 50g may seem like a tiny amount of stone-milled flour for this recipe, but I am constantly amazed by how much flavor this small amount of freshly milled flour adds.
Ingredients
*Please read notes above before proceeding. Watching the video is helpful, too.*
- 300 g water
- 100 g active sourdough starter
- 10 g kosher salt or sea salt
- 350 g bread flour, see notes above
- 50 g whole wheat flour, preferably stone-milled, see notes above
- rice flour, for dusting
Instructions
- Mix the dough. In a large bowl, combine the water, starter, and salt. Stir with a rubber spatula to loosely combine. Add the flours, and stir with a spatula to combine — it will be a wet, sticky dough ball. Transfer to a straight-sided vessel and cover with a tea towel or bowl cover for 30 minutes.
- Stretch and fold. After 30 minutes, grab a corner of the dough and pull it up and into the center. Repeat until you’ve performed this series of folds 4 to 5 times with the dough. Let the dough rest for another 30 minutes and repeat the stretching and folding action. If you have the time, do this twice more for a total of 4 times in 2 hours. [Video guidance here.] Note: Even if you can only perform one series of stretches and folds, your dough will benefit. So don’t worry if you have to run off shortly after you mix the dough.
- Bulk fermentation: Cover the vessel with a tea towel or bowl cover and let rise at room temperature (70ºF/21ºC) for 4 to 18 hours (times will vary based on the time of year, the humidity, and the temperature of your kitchen). The bulk fermentation will end when the dough has nearly doubled in volume, and you can see bubbles throughout the dough and on the surface. (Note: Do not use your oven with the light on for the bulk fermentation — it is too warm for the dough. To determine when the bulk fermentation is done, it is best to rely on visual cues (doubling in volume) as opposed to time. A straight-sided vessel makes monitoring the bulk fermentation especially easy because it allows you to see when your dough has truly doubled.)
- Shape: Gently transfer the dough to a clean work surface. I prefer to use no flour and a bench scraper at this step, but if you find an unfloured work surface to be difficult, feel free to lightly flour it. [Video guidance is especially helpful for this step.] Fold the dough, envelope style: top third over to the center; bottom third up and over to the center. Then repeat from right to left. Turn the dough over and use your bench scraper to push the dough up, then back towards you to create a tight ball. Repeat this pushing and pulling till you feel you have some tension in your ball. Place the dough ball top side down and let rest 30 to 40 minutes. (FYI: This is called the bench rest.)
- Proof. Line a shallow 2-qt bowl (or something similar) with a tea towel or flour sack towel. Flour sack towels are amazing because the dough doesn’t stick to them, and therefore, you need very little rice flour, but if you only have a tea towel, you will be fine. If you are using a tea towel, sprinkle it generously with rice flour. If you are using a flour sack towel, you can use a lighter hand with the rice flour. After the 30-to 40-minute bench rest, repeat the envelope-style folding and the bench scraper pushing and pulling till you have a tight ball. [Video guidance here.] Place the ball top side down in your prepared towel-lined bowl. Cover bowl with overhanging towel. Transfer bowl to the fridge for 12 to 24 hours. (Note: When you remove your dough from the fridge, visually it will likely look unchanged. This is OK. You do not need to let it then proof at room temperature before baking.)
- Bake. Heat oven to 500ºF. Remove your sourdough from the fridge. Open the towel. Place a sheet of parchment over the bowl. Place a plate over the parchment. With a hand firmly on the plate and one on the bowl, turn the dough out onto the parchment-paper-lined plate. [Video guidance here.] Carefully remove the bowl and towel. Carefully remove the plate. Brush off any excess rice flour. Use a razor blade to score the dough as you wish. I always do a simple X. Grab the ends of the parchment paper and transfer to the Dutch oven. [Video guidance here.] Cover it. Lower oven temperature to 450ºF, bake covered for 30 minutes. Uncover. Lower the temperature to 400ºF. Bake for 10 minutes more or until the loaf has darkened to your liking. Transfer the loaf to a cooling rack.
- Cool. Let the loaf cool for at least 30 minutes before cutting.
- Prep Time: 48 hours
- Cook Time: 45 minutes
- Category: Bread
- Method: Sourdough
- Cuisine: Global
This post may contain affiliate links. Please read my disclosure policy.


1,106 Comments on “Easy Sourdough Bread (Whole Wheat-ish)”
I have made a half loaf. Should I reduce the time of baking? I have a smaller dutch oven to fit the loaf and assume the same temperature. It has risen well and looks great. Rested in the refrigerator over night. Now I just don’t want to over (or under) bake it.
Thank you in advance.
Hi! I would cook it covered for 25 minutes; then uncover and cook until it’s nicely burnished … it may take roughly the same amount of time to achieve the right color. It’s a very high hydration dough, so it’s forgiving — the won’t overcook it.
Hi there, thanks for your easy no-knead recipe, it’s far less daunting than others i’ve come across!
My dough rose beautifully for the first proof (tripled in 12 hrs), but after shaping and the second proof, the dough is flat and hasn’t risen at all. I used a colander and cotton tea towel. How do I fix this?
Hi Kendra! The dough won’t change much at all in the fridge, so you should be able to bake it. But, if the dough over-fermented during the bulk fermentation — sometimes if dough more than doubles in volume, it can over ferment — it might be unsalvageable. When you shaped the dough, did it have strength and elasticity, or did it feel slack and without strength?
When I shaped it, it lost all it’s air. It was very elastic, but shrank right back down to where it did the first time. So would you recommend proofing it for a shorter time the first time? When it gets to double, then shape it?
Yes, I would try to shape it just before it doubles in volume. Are you using a straight-sided vessel to monitor the bulk fermentation?
How did it end up baking?
I didn’t end up baking it, because when I went to shape it, it went completely flat and didn’t rise again. I used a rectangle plastic container so I could see it rise. Sounds like I should have monitored the first rise more closely and shaped it earlier like you said.
I also wondered if I should have let it rise after shaping on the tray I would bake it on and covered it in plastic. the teatowel just soaked up all the moisture (I used regular flour initially as opposed to rice flour).
Hi
I have kept my dough for fermantation but to bake I don’t hv a dutchboven can you please tell me how can I go about thank you
Hi Thelma! Sorry for the delay here!
Do you have any oven safe pot? You can use a pot with a sheet pan on top.
Or, do you have a pizza stone or a Baking Steel?
Hi Alexandra, thank you for a detailed, clear recipe. I am new to sourdough, have made five loaves so far with other recipes and wanted to give whole wheat a go. I see now that more whole wheat = stickier, and I was wondering what tips you had for shaping a sticky dough.
I used 300g bread flour, 100g freshly milled whole wheat, and the starter/water proportions you gave. I think my starter is healthy since it doubled/bubbled nicely in 5 hours. Bulk fermented for 5 hours at room temp then 9 hours in the fridge. I live in Chicago, so it’s not very humid and in the low 80s. I don’t have a straight-edged container so I did eyeball the doubling, and the dough seemed plenty bubbly when I tipped it out to shape. The dough wasn’t completely slack but I had a hard time shaping it into a smooth boule that had a lot of tension, since it stuck to my fingers and the counter. (I did dust my counter with some flour anticipating that) I got it into a ball but it spread during the bench rest, and was harder to shape right before I put it in a bowl with a towel for second proof. Was it probably overproofed?
Just put the dough in my fridge for the second proof and I was wondering if there’s anything I can do to improve the tension now or if you could give pointers for next time. Thank you so much!
Hi Julia! So sorry for the delay here. So yes, whole wheat flour will make for a stickier dough. The first thing I would do is cut back the amount of whole wheat flour you are using, especially if you are new to sourdough. Start with 50 g. The dough will be more manageable and the freshly milled flour will still impart beautiful flavor, color, and aroma. Once you get the hang of handling these higher hydration, sticky doughs, you can introduce more wheat flour.
Great to hear your starter is healthy.
It is possible your dough over fermented during the bulk fermentation, but 5 hours does not seem too long at all even in these hotter, more humid months.
Again, I’m so sorry for the delay here, but how did it end up baking? If it was very dense, it’s possible you over fermented it. I do like to do a bit longer of a colder proof, but 9 hours is fine.
This recipe has been a great foundation for my sourdough experiments. The basic principles are presented clearly and I’ve been able to successfully tweak to my little heart’s content. Thanks!
Wonderful to hear this, Karlin! 💕💕💕
! question: if I live in the tropics, do I really need more than 6 hours for the first rise?
Probably not! Keep an eye on the dough and rely on the visual cues … a straight-sided vessel is a huge help for monitoring the bulk fermentation and seeing when the dough is about to double.
Alex,
I am baking at least a loaf a week now with this recipe. People are absolutely astounded at the quality of the bread that can be made at home. My mother, who is older, loves the toasty wheatiness of the loaf, and says it is much more digestible and healthy than any store bought loaf.
Quick question – I am looking to get a round banneton for proofing, what size do you think would work best 8, 9, or 10 inches. Thanks for the terrific recipe!
Hi Lee! So nice to hear this! Glad your mother approves, too. I have an 8-inch banneton that works well with this recipe. Thanks for writing!
Did not work post putting in refrigerator, dough did not recover. Not sure this method works.
Hi Jeffrey! Can you give me a few more details? How long was your bulk fermentation? When you shaped the dough, did it have strength and elasticity? Or was it slack and sticky? How long was the cold proof?
After resting overnite and nearly doubling, my dough was too wet, so I added flour gently over 15 min. to tighten it up. I added about a cup. Should I use less water next time?? I used 280 gms and next time I want to use only 225 gms. I live in Florida and its summer. I am ready to refrigerate the dough for 12-15 hours. I hope it will bake ok. HELP.
Btw, my bulk fermentation was 17 hours and did double in size.
Hi Dale! A few thoughts: 17 hours feels a bit long given your warm, humid environment. Is your starter healthy and strong? Does it double in volume within 4-6 hours of a feeding?
It’s possible your dough over fermented during the bulk fermentation, in which case it is unsalvageable. Next time:
1. Make sure your starter is active and bubbly.
2. Reduce the amount of water. Use between 225 and 250 g.
3. Reduce the bulk fermentation time.
Are you using a straight-sided vessel to monitor the bulk fermentation?
I made this recipe with 350 g all purpose and 50 g of hemp flour. It was slow to rise to double. After refrigeration, I let it get back to room temp before baking in preheated dutch oven. End product was great with lots of small bubbles throughout.
So interesting! I have never experimented with hemp flour. Thanks for the inspiration!
Thank you for this wonderfully clear recipe.
I just put my first attempt in the fridge for the second proof. It hadn’t quite doubled after 18 hours, but I didn’t want it to over-ferment. The top of the dough was quite dry and the rest was pretty sticky, so it was much harder to work with than yours in the video. I expect my finished loaf will be a little flat, but no way to learn except through mistakes!
Years ago I made my own starter out of local yeast and it grew like mad. I recently got this starter from a friend, and I wonder if it’s not fond of the very dry environment here. I will keep experimenting.
Hi Michael!
I think you were smart to put the dough in the fridge when you did to prevent over-fermentation. Regarding the dryness: as the days start getting a little cooler and the bulk fermentations get a little bit longer, consider slicking the top of your dough with a little bit of oil to prevent it from drying out when rising.
Keep me posted on how it turns out. If the dough was terribly sticky — as in without any strength or elasticity, it’s possible the dough over fermented.
In regard to your starter, does it double in volume within 4-6 hours of a feeding?
After talking with a friend and rereading, I realize I didn’t fold it nearly enough. I’m currently on the 5th fold of my second attempt, and it’s going so much better. Seems much bubblier and more elastic.
Thanks for the response!
Also, feeding the starter with whole wheat instead of white flour makes a world of difference.
Ok, wonderful to hear this, Michael! Let me know if you have any other questions. Good luck!
This is my go to recipe for sourdough bread. I have had great success with it. The only change I make is not to do the 2nd rise in the fridge. When I tried that, the surface of the dough dried out and not much oven spring when baked. I prefer to do the 2nd rise on the counter for 1 1/2 – 2 hours and then bake. It also seems to work better for me for timing. But I do love the addition of the whole wheat flour. It adds a nice bit of nuttiness.
Wonderful to hear this, Karen! Glad you’ve been able to adapt the timeline to work with your schedule … that’s half the battle with sourdough 🙂
Hiya, thanks for the recipe! This was the first loaf of sourdough I’ve made. I was wondering if I read the directions wrong. Was the 350 g of bread flour supposed to be white flour? I used whole wheat bread flour. It’s a little flat. The loaf tastes excellent and quite frankly since it’s my first loaf I feel lucky it wasn’t flat as a pancake. Just wondering if I did it wrong and if it’s possible to use all whole wheat bread flour and make a fluffy loaf of bread? Thanks!
Hi Jen! Yes, white bread flour. If you used whole wheat bread flour, it makes sense that your loaf was a little flat — whole wheat flour will make for a denser loaf of bread. So, yes, give it a go with white bread flour! Let me know if you have any questions along the way.
This is hands-down the best loaf of bread I have ever made, and I was a somewhat experienced baker of no-knead bread before I took up sourdough. This is my third sourdough loaf, each using different procedures. The first two were certainly edible and tasty, but for the first time I’ve gotten the really open crumb married to the right amount of chew that I was looking for.
Thank you for the clear explanations and especially the videos. Probably the most helpful thing was the assurance that bulk fermentation is done when the dough has nearly doubled. Since mine did that in 3 1/2 hours, it was an act of faith to call it ready at that point. And it was!
The only thing I will change is to add a baking sheet under the pot, because my loaf is too black on the bottom.
Considering my inexperience, the different kitchens, temperatures, humidity, flour, water, and starter, I’m impressed at how much my loaf looks like yours! Thank you thank you thank you!
Hi Lizzie! Wonderful to hear all of this. Thanks so much for writing. Bummer about the black bottom … I hope a sheet pan helps that. You also can bake the loaf directly on the oven rack after you uncover the pot … that might help, too. Let me know if the sheet pan works if you have time. Thanks for writing!
Thanks for a concise video and a very good recipe. I am new to bread baking, tried this recipe, and the results were just great. I think the double proofing / fermentation worked wonderfully, and resulted in a bread that would rival anything I’ve gotten from San Francisco flavor-wise. I still need to work on the technique and timing to get a bit more loft, but was still very happy with my first loaf. I’m making some more today, and using this recipe.
I am making this in Carson City, NV which is dry (<30% humidity), and at 4800 feet elevation.
Wonderful to hear all of this, Jeff! Thanks so much for writing. Timing and technique definitely come with practice. Some days, I uncover my pot to find a beautifully lofty loaf; other days they are flatter. But they always taste good 🙂 Good luck on your sourdough journey!
Thanks for the great tutuorial, I have been nursing my stater for over a month now, but I was daunted by most of the recipes, so I have yet to really make a loaf. I will be attempting this one soon. One question I have is the rice flour for the last rise, why rice flour over just AP? Is it important enough to go out and find some? Thank you.
Hi Josh! I don’t think you need it for your first bake, but I love it for a few reasons: it seems to create a better nonstick barrier between the towel and the dough. It also doesn’t burn the way wheat flour does and it doesn’t leave that uncooked flour flavor the way wheat flour can. Hope that helps!
Your sourdough starter in the video looks so firm. But the picture of it later on the page looks more bubbly, light and airy. How did you get it to be so firm before adding to water?
Hi Susan! I’m not sure! It’s honestly possible that the photos are a little misleading. I feel like my starter is always roughly the same texture: I always feed it with equal parts by weight flour and water, and I always use it roughly 4-6 hours after a feeding. I find that the longer I let my starter rise, the wetter it gets. So, you could try using your starter closer to the 4 hour mark, but you do want it to have roughly doubled in volume.
Hi. Could you give me the dimensions of your clear, straight-sided vessel? You mentioned it has 4 qt capacity. Thank you
Hi Cristina! This is the one I recommend now bc it is BPA-free: 4-qt Cambro. These are the dimensions according to Amazon: 8.19 x 8.19 x 8.56 inches (Not home at the moment, but will confirm tomorrow)
These are the dimensions of the other one (pictured in this post): 10.2 x 7.5 x 7.5 inches (Again, will confirm tomorrow).
Hi Alexandra! Is there any harm or benefit to repeating the steps from shape? I may have missed the bench rest part.
I think it will be totally fine. As far as I understand, the goal of the “bench rest” is to relax the gluten so that it will be easier to handle during the final shaping. To be honest, I question how necessary this step is — it’s one of those steps I’ve always done because that’s what the bread authorities seem to do. I have been meaning to bake a few loaves skipping this step to see if I notice anything materially different in the final bake. I’ll let you know if I make any discoveries, but in the meantime, I don’t think you should worry 🙂
I have just eaten my first slice of this and it’s delicious and SO almost perfect, but the crust turned out quite leathery. It was only a crisp crust on the bottom. What did I do wrong? I’d love to be able to fix this for next time because it was so easy and so delicious!
Hi Sophie! It sounds as though it just as the. “steamed” texture on top? Are you using a Dutch oven? If so, I wonder if the high sides are preventing the air from circulating. You could try placing the loaf directly on the oven racks for the final 15 minutes of baking… in other words, after you remove the lid, transfer the loaf to the racks.
I love making this recipe and it turns out great every time. How would you adapt your recipe to make a cinnamon raisin sourdough? Thank you.
Hi Carrie! Great to hear this. I would maybe start with a teaspoon or so of cinnamon — stir it right into the flour. I would add the raisins after you do one set of stretches and folds. Hope that helps!
Once you have done all 4 of the folds, do you return the dough to the straight sided vessel right away? or leave it in the glass Pyrex? Thank you!
Hi Kate! So, I actually transfer the dough to the straight sided vessel immediately after mixing the dough. I do the 4 sets of stretches and folds in the straight-sided vessel, and then I leave it there for the rest of the bulk fermentation.
I haven’t tried uour recipe but I bake sour dough a lot. Even before pandemic America got hooked. A couple notes – if you wet your hands fire you fold it makes the dough easier to handle.
You can start from a cold oven since preheating uses a lot of energy for nothing. Though I admit starting from a cold oven produces a slightly softer crust Turn oven to 475 and bake for 55 minutes covered though maybe if you baked it for 50 covered and 10 uncovered you might get that crispier crust.
Great tips, Jan! Thanks so much for writing and sharing!
This is my go-to sourdough bread recipe. I’ve tried several others but this is the easiest and the best! I’ve been making this recipe at least 2x/week for the past 6 months. One recent BIG improvement was to cut the rise time of both steps and skip the refrigerator. I now start a loaf in the morning, let it rise 4-5 hours, move to a cloth lined bowel, let it rise 2-3 hours (set in drawer below my oven during preheating for last 20 mins), bake 30 mins in covered 3 qt cast iron at 500 F, remove cover and bake 5 mins. I also have been adding 3 g of yeast for a little extra rise. With these changes my bread went from 2 inches tall to over 3 inches and is now tall enough to use for sandwiches and is no longer overly dense/heavy. This bread makes awesome BLTs using heirloom tomatoes, kale, and a little basil from my garden. I feed my starter only 2 oz whole wheat and 2 oz water daily (or every other day) to conserve flour after dumping about 4 oz starter. As my starter ages I may be able to go to the longer cold fermentation but it was producing bread with good texture and great taste that was heavier and shorter than desired. I plan to try adding 50 g whole wheat with the lightening steps but additional whole wheat exacerbated the heavy/short problem previously.
Oh Dana, I love all of this. What a great tip for people striving to get that loftiness while still maintaining that sour taste. And how nice to be able to shorten the time line, too. Thanks so much for writing and sharing all of this!
How many grams of starter to the 2oz of whole wheat flour and 2oz of water when feeding your starter?
Hello, I have never made a sourdough bread before but I have a starter that I have been working on and is not quite ready yet. I would like to make a boule like this with just normal instant yeast first to get my feet wet (I haven’t made too many artisan boules before). What would be the adapted recipe with normal yeast to make this artisan style bread in the dutch oven and would the process be the same? As well, what is the real difference between bread made with instant yeast and a sourdough bread, besides the tanginess and health properties? I have always wanted to know the difference. Lastly, what is the difference between this bread and your Peasant Bread, besides the fact that this one is sourdough, in terms of the resulting breads? Thank you for your help and for the amazing website. It really has improved my cooking/baking a lot.
Hi! Questions answered below:
What would be the adapted recipe with normal yeast to make this artisan style bread in the dutch oven and would the process be the same?
Simply stir instant yeast into the flour. Mix the dough. Let it rise till doubled. Then shape and proceed with the recipe.
As well, what is the real difference between bread made with instant yeast and a sourdough bread, besides the tanginess and health properties?
I don’t think there’s much difference apart from what you noted.
Lastly, what is the difference between this bread and your Peasant Bread, besides the fact that this one is sourdough, in terms of the resulting breads?
Slightly different proportions. Peasant bread is higher hydration. Peasant bread is not crackling crusted — it’s crusty, golden and buttery, but the crust is not thick.
Hi! Thank you for your responses! How much instant yeast would be appropriate for a recipe like this, and should I adjust the flour/water content in the recipe if i am not using a starter? for example , 100g of starter = 50g flour and 50g water to add , in absence of the starter? Hope all is well thanks again!
Sure thing!
How much instant yeast would be appropriate for a recipe like this?
2 teaspoons
And should I adjust the flour/water content in the recipe if i am not using a starter? for example , 100g of starter = 50g flour and 50g water to add , in absence of the starter?
Yes, good point!
I currently have a sourdough starter in the fridge and I’m not sure how to use it sucessfully. I see that you said within the comments that you use yours 4-6 hours after a feeding. Do i just take it out of the fridge, feed it while its cold, and then wait 4-6 hours before mixing it into the recipe? Thank you so much.
I take it out of the fridge, discard most of it, then feed it with equal parts by weight flour and water. Then I let it rise at room temperature for 4-6 hours. Please see this post for more details on maintaining a starter.
This bread is simply fantastic. I’ve been trying to master sourdough for some time now. The flavour, texture and rise in the loaf is what bread dreams are made of. And your recipe is so much easier than others that I have tried that are so over complicated and hard to follow. Keep persevering people. You will be rewarded. If you can get your hands on some mature starter by all means do. It makes life much easier. Also I reduce the water down a bit by 20grams as the first batch was hard to work. I now make wonderful bread EVERY TIME. In fact, I am now selling this bread to friends etc. happy baking.
So nice to hear this, Greg! Thanks so much for writing. And congrats on selling your bread, too 🎉🎉🎉🎉 That’s amazing.
Happy Sundaay and thank you for sharing your kitchen. I find your videos especially helpful–no audio enhances focus on the action, which i love. I have a great starter that is thriving and works very well with your “wheatish sour dough. ” i occasionally give it a boost with organic rye flour and the aroma is fabulous. I typically double the recipe to get 2 boules and spurged on a cloche baker. A cast iron dutch oven would have been more economical but the cloche is much lighter weight.
Hi Lorrine, so nice to hear all of this 🙂 Thanks so much for writing. If you get this, would you mind sharing which cloche you purchased? I think so many people would appreciate a lighter baking vessel. Thank you!
I have been making awesome sourdough with your recipe! Thanks!
Wonderful to hear this, Kelsey!