 →
→ Easy Sourdough Bread (Whole Wheat-ish)
This post may contain affiliate links. Please read my disclosure policy.
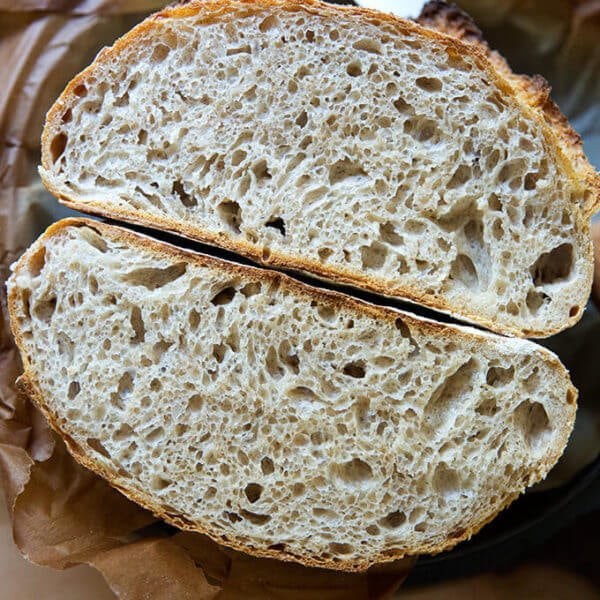
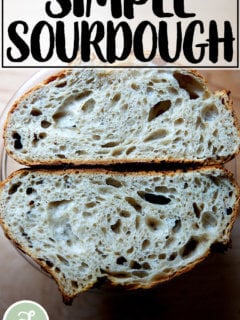
Made with a small portion of stone-milled whole wheat flour, this sourdough bread is so flavorful, aromatic, and tasty. Using a mix of both bread flour and whole wheat flour keeps the texture light while providing a nutritional boost and lovely flavor. 🍞🍞🍞🍞
If you are looking to add more nutrition to your bread, a logical first step is to replace some of the white flour with whole wheat flour. The trouble with this idea is that not all whole-wheat flours are created equal.
Let’s get straight to it. Most commercial flour (both white and whole wheat) is made from roller-milled wheat, meaning a roller mill has separated the wheat kernel into three parts: the endosperm, germ, and bran. White flour is made from the endosperm. Whole wheat flour is made from a combination of the endosperm, germ, and bran. Much research shows that as soon as the wheat kernel is separated into the various parts, much of the nutritional value is lost — even when the bran and germ are added in after the fact.
So what’s the solution? Seek out stone-milled flour, which is flour made from wheat that passes through a stone mill, the process of which keeps the endosperm, bran, and germ together. Much research shows that keeping the components together preserves the nutritional value.
What’s more, the bran and germ present in stone-milled flours lend so much by way of flavor, texture, aroma and hue:
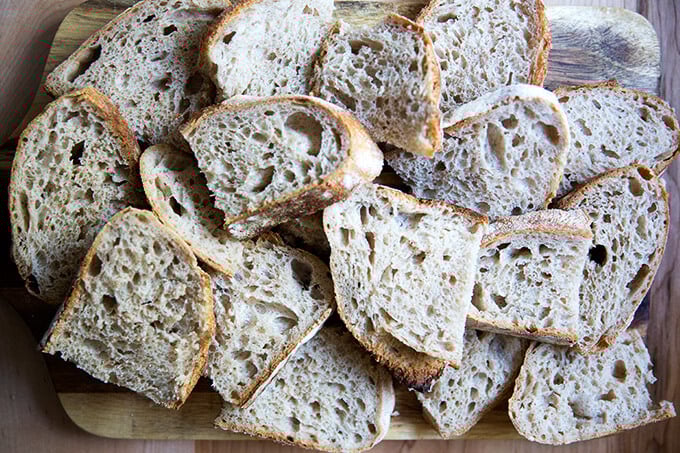
The recipe below calls for a mix of both bread flour and stone-milled flour. Using a small amount of stone-milled flour gives your bread a boost of nutrition while preserving its light texture. Once you’ve made the recipe once, if you like what the whole wheat flour is contributing to your loaf, you can increase the proportion of stone-milled flour next time around.
How to Make Whole Wheat-ish Sourdough Bread, Step by Step
First, gather your ingredients: you need an active/fed sourdough starter:
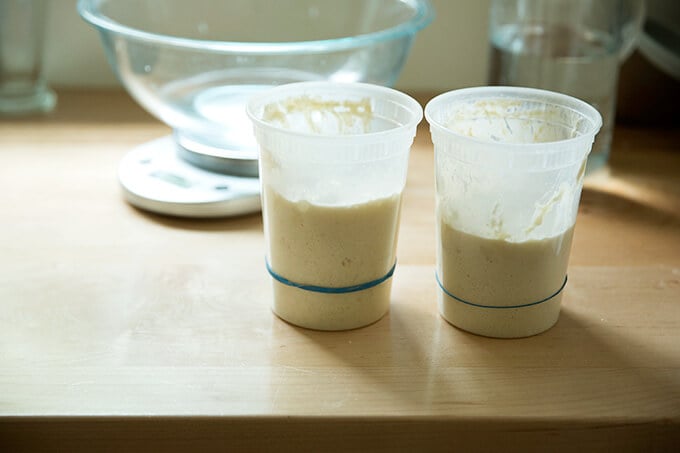
To ensure it is ready, drop a spoonful into a glass of water. If it floats, it’s ready:

Place 300 g of water, 100 g of starter, and 10 g of salt into a bowl.

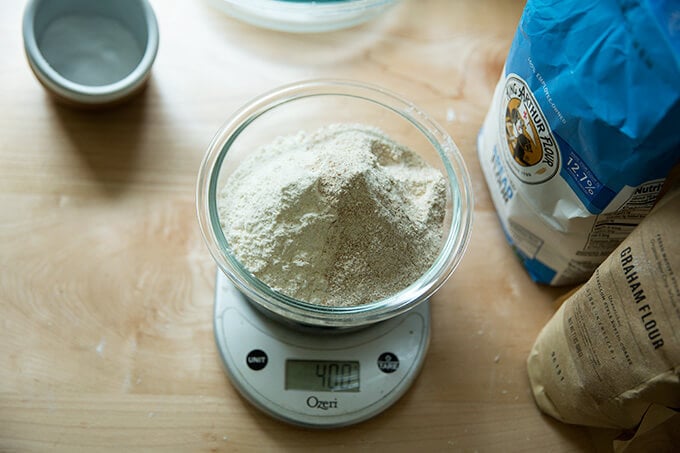
Next, weigh your flour: you need 400 grams of flour. For this whole-wheat-ish loaf, my preference is 350 grams of bread flour (King Arthur Flour) and 50 grams of stone-milled, freshly milled flour (I use a mix of Anson Mills rye and graham).

Mix until a sticky dough forms.
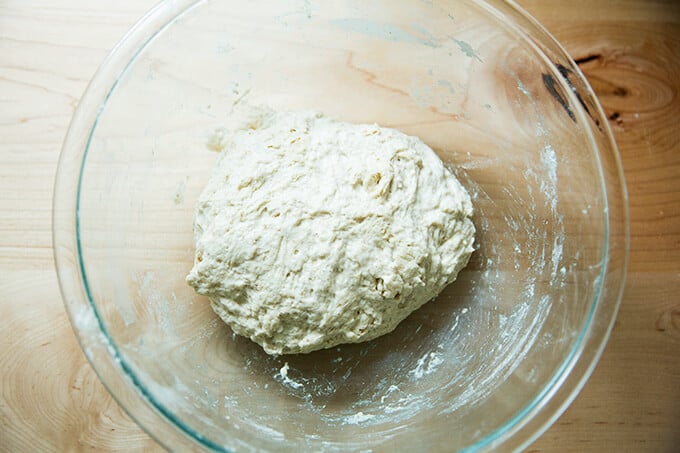
Then transfer to a straight-sided vessel for the bulk fermentation (the first rise).

After 30 minutes, stretch and fold the dough:
You’ll repeat this stretching and folding 3x at 30-minute intervals…
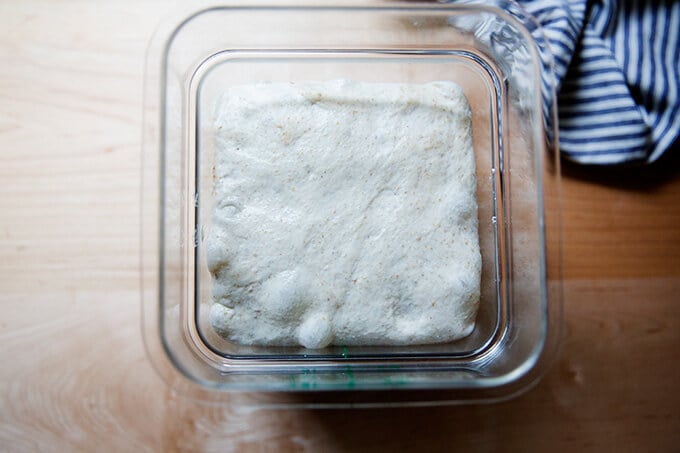
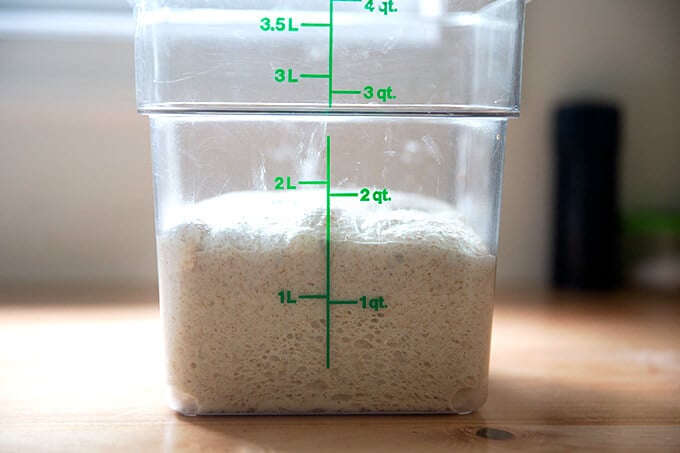
… then you’ll leave the dough to rise until it increases in volume by 50-75%:
Transfer dough to a clean work surface. I prefer to use no flour and minimal handling to shape it into a ball.
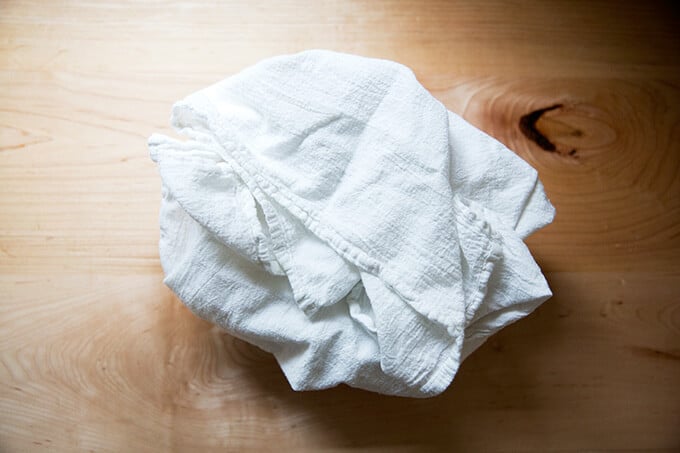
After the initial shape, let the dough rest for 20-40 minutes; then shape again and transfer to a flour sack-lined bowl.
Transfer bowl to fridge to proof (second rise) for 18 to 24 hours

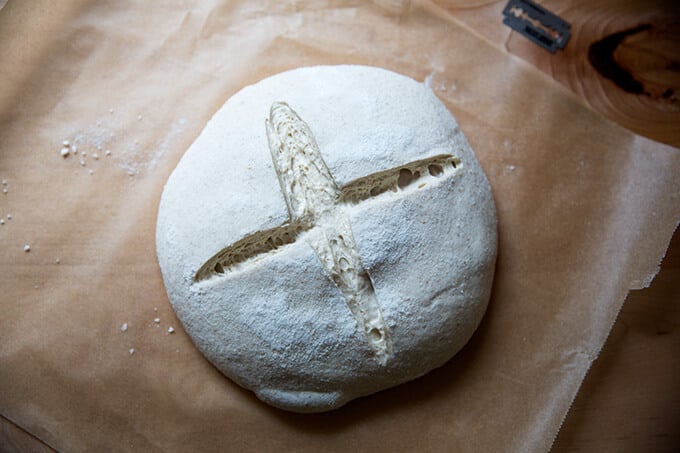
After 18 to 24 hours, transfer dough to a sheet of parchment paper. This video shows how:
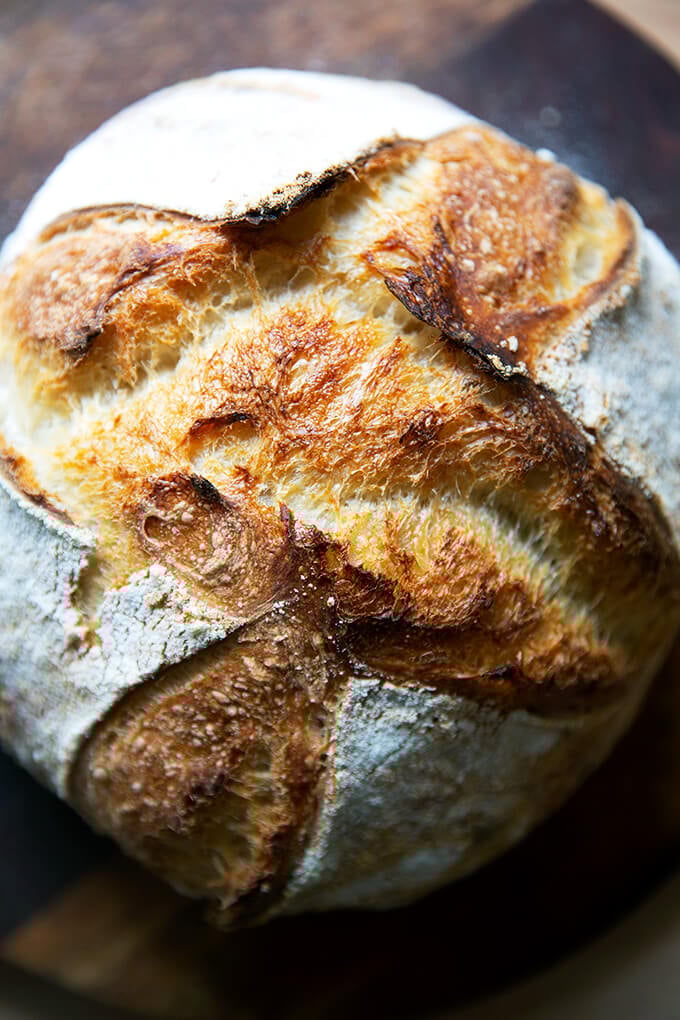
Score as you wish; simple is fine.
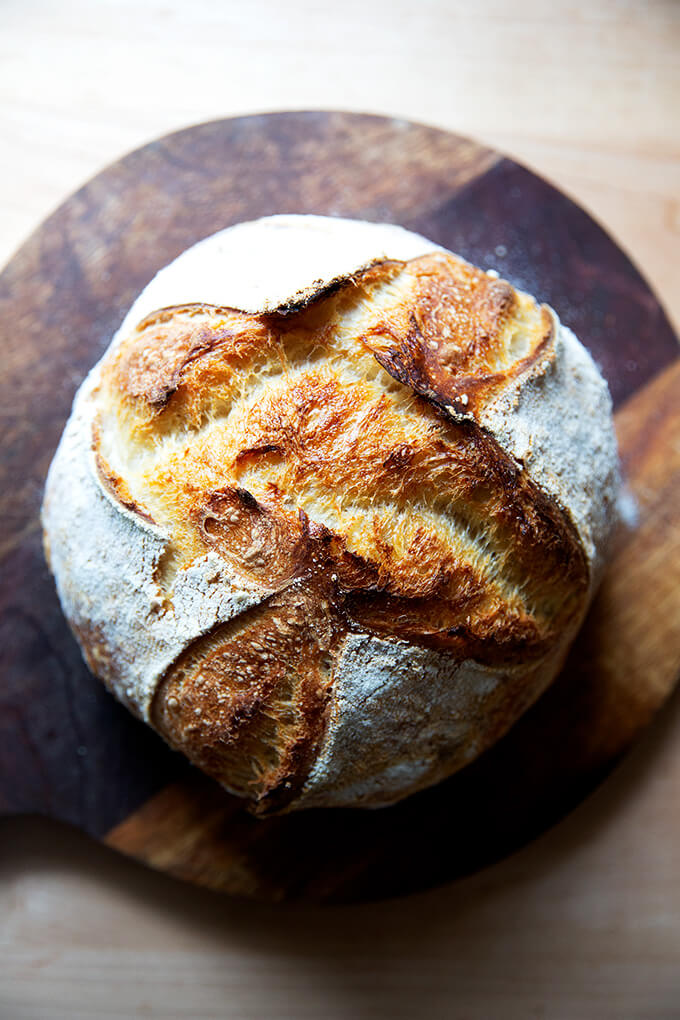
Transfer to a Dutch oven and bake, covered, at 450ºF for 30 minutes, then uncover and bake at 400ºF for 10 minutes.

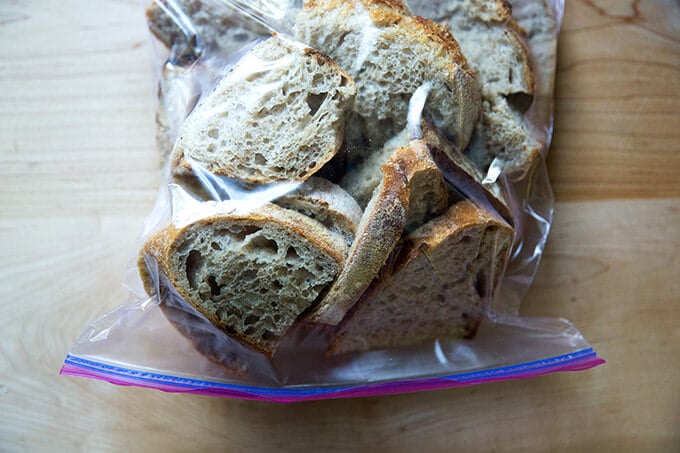
Store the bread at room temperature in a ziptop bag for 3 to 4 days or in the freezer for up to 3 months:
Easy Sourdough Bread (Whole Wheat-ish)
- Total Time: 48 hours 45 minutes
- Yield: 1 loaf 1x
Description
Made with a small portion of stone-milled whole wheat flour, this sourdough bread is so flavorful, aromatic, and tasty. Using a mix of both bread flour and whole wheat flour keeps the texture light while providing a nutritional boost and more flavor.
Notes:
Special equipment: Straight-sided vessel for the bulk fermentation, Dutch oven, flour-sack towel
Digital Scale: Do not attempt this recipe without a scale. This one costs $10. Troubleshooting what goes wrong with sourdough bread is impossible if you’ve measured with cups. They’re simply not accurate.
Troubleshooting: If you have issues with your dough being too sticky, please read this post: Why is my sourdough so sticky? The 4 common mistakes.
Flour:
-
- I prefer making this bread with 350g bread flour and 50g of freshly milled, stone-milled flour, which provides both flavor and color. I love using a mix of Anson Mills graham flour and rye flour, but there are many great stone-milled flours out there, and you may have a local source, which is even better.
- Where to buy stone-milled flour? In the past few years, it has become easier to find stone-milled flour, and if you are up for it, you should seek out locally, stone-milled flour. Why? Because if you’re buying locally milled flour, you likely can find out how recently it was milled. Because stone-milled flour perishes more quickly than roller-milled flour, it’s best if you can find a local source, which will ensure it will be fresh. Note: Store stone-milled flour in the freezer if you don’t bake regularly.
- I find locally milled stone-milled flours at a local co-op, Honest Weight Food Co-op, and I also order online from various sources. Here are a few I love: Cairnspring Mills, Anson Mills, and Community Grains
- 50g may seem like a tiny amount of stone-milled flour for this recipe, but I am constantly amazed by how much flavor this small amount of freshly milled flour adds.
Ingredients
*Please read notes above before proceeding. Watching the video is helpful, too.*
- 300 g water
- 100 g active sourdough starter
- 10 g kosher salt or sea salt
- 350 g bread flour, see notes above
- 50 g whole wheat flour, preferably stone-milled, see notes above
- rice flour, for dusting
Instructions
- Mix the dough. In a large bowl, combine the water, starter, and salt. Stir with a rubber spatula to loosely combine. Add the flours, and stir with a spatula to combine — it will be a wet, sticky dough ball. Transfer to a straight-sided vessel and cover with a tea towel or bowl cover for 30 minutes.
- Stretch and fold. After 30 minutes, grab a corner of the dough and pull it up and into the center. Repeat until you’ve performed this series of folds 4 to 5 times with the dough. Let the dough rest for another 30 minutes and repeat the stretching and folding action. If you have the time, do this twice more for a total of 4 times in 2 hours. [Video guidance here.] Note: Even if you can only perform one series of stretches and folds, your dough will benefit. So don’t worry if you have to run off shortly after you mix the dough.
- Bulk fermentation: Cover the vessel with a tea towel or bowl cover and let rise at room temperature (70ºF/21ºC) for 4 to 18 hours (times will vary based on the time of year, the humidity, and the temperature of your kitchen). The bulk fermentation will end when the dough has nearly doubled in volume, and you can see bubbles throughout the dough and on the surface. (Note: Do not use your oven with the light on for the bulk fermentation — it is too warm for the dough. To determine when the bulk fermentation is done, it is best to rely on visual cues (doubling in volume) as opposed to time. A straight-sided vessel makes monitoring the bulk fermentation especially easy because it allows you to see when your dough has truly doubled.)
- Shape: Gently transfer the dough to a clean work surface. I prefer to use no flour and a bench scraper at this step, but if you find an unfloured work surface to be difficult, feel free to lightly flour it. [Video guidance is especially helpful for this step.] Fold the dough, envelope style: top third over to the center; bottom third up and over to the center. Then repeat from right to left. Turn the dough over and use your bench scraper to push the dough up, then back towards you to create a tight ball. Repeat this pushing and pulling till you feel you have some tension in your ball. Place the dough ball top side down and let rest 30 to 40 minutes. (FYI: This is called the bench rest.)
- Proof. Line a shallow 2-qt bowl (or something similar) with a tea towel or flour sack towel. Flour sack towels are amazing because the dough doesn’t stick to them, and therefore, you need very little rice flour, but if you only have a tea towel, you will be fine. If you are using a tea towel, sprinkle it generously with rice flour. If you are using a flour sack towel, you can use a lighter hand with the rice flour. After the 30-to 40-minute bench rest, repeat the envelope-style folding and the bench scraper pushing and pulling till you have a tight ball. [Video guidance here.] Place the ball top side down in your prepared towel-lined bowl. Cover bowl with overhanging towel. Transfer bowl to the fridge for 12 to 24 hours. (Note: When you remove your dough from the fridge, visually it will likely look unchanged. This is OK. You do not need to let it then proof at room temperature before baking.)
- Bake. Heat oven to 500ºF. Remove your sourdough from the fridge. Open the towel. Place a sheet of parchment over the bowl. Place a plate over the parchment. With a hand firmly on the plate and one on the bowl, turn the dough out onto the parchment-paper-lined plate. [Video guidance here.] Carefully remove the bowl and towel. Carefully remove the plate. Brush off any excess rice flour. Use a razor blade to score the dough as you wish. I always do a simple X. Grab the ends of the parchment paper and transfer to the Dutch oven. [Video guidance here.] Cover it. Lower oven temperature to 450ºF, bake covered for 30 minutes. Uncover. Lower the temperature to 400ºF. Bake for 10 minutes more or until the loaf has darkened to your liking. Transfer the loaf to a cooling rack.
- Cool. Let the loaf cool for at least 30 minutes before cutting.
- Prep Time: 48 hours
- Cook Time: 45 minutes
- Category: Bread
- Method: Sourdough
- Cuisine: Global
This post may contain affiliate links. Please read my disclosure policy.


1,106 Comments on “Easy Sourdough Bread (Whole Wheat-ish)”
Wait a second… So many of my FAVORITE recipes for sourdough are from your website, and only in this post did I realize that we are practically neighbors! I also live in the capital region 🙂 maybe see ya around the co-op sometime! What a small world
Awwww so nice to hear this! I am at the Co-op ALL the time… don’t know what I would do without it 🙂
Hi Ali, it’s Rich Weisburgh. I wrote you in
January and I’ve continued to bake up a storm ever since! I’ve made most of the baked goods on your website and they’ve all come out beautifully. Regarding the wheatish sourdough recipe, I tried the different amounts of the stoneground whole wheat flour and I agree with you that 50 g gives the biggest bang for the buck. I found that 100g yeilded a denser loaf and not a noticeable difference in flavor. I’ve since scaled it up to make a 500 g loaf (like the regular sourdough recipe) so I’ve increased everything by 25% (63g stoneground whole wheat flour, 437 g KA bread flour, 375g water, 12g salt). I’ve made several loaves and they’ve come out beautifully. The 25% increase also includes the starter so instead of using 100 g I am using 125 g and again everything is coming out beautifully. What I’d like to know is, is 125 g of starter the preferred amount based on percentages and needed because the wheat yields a slightly denser loaf or should I stay with 100 g similar to the regular sourdough recipe? I also like a more sour taste, so would 100 g give me a slightly more sour loaf than 125 g (based on the less is more science)? My cool ferment is typically 40 to 50 hours to give me a nice open crumb and enhance the sour flavor. Thanks for your advice and stay well!
So nice to read all of this, Rich! THanks so much for writing and sharing your notes, especially the quantities for the scaled up version — so helpful for others. My guess is that you won’t actually see much of a difference in sour flavor when using 100 grams of starter verses 125 grams of starter. So, my first suggestion would be to use what you like: if 125 grams is producing loaves with a nice texture and flavor, keep doing that. Second, your less-is-more science is actually accurate when it comes to increasing sour flavor: it’s counterintuitive, but using less starter usually means your bulk fermentation will be longer, which means your starter will go through its food source at a slower rate and therefore produce more acetic acid along the way.That said, I think you’d need to cut back the starter to more like 50 grams to see a difference.
Hope that helps!
I love this recipe, it’s my go-to and is super easy.
Do you think it would work to use rye in place of wheat?
I do! Rye adds a lovely flavor.
can I proof for longer? will it enhance the sourness (this is what I want)?
Hi! Are you asking about cold proofing? I store the bread for as long as 48 hours in the fridge. After that it can be a gamble — you risk overproofing — but you can give it a shot.
thanks for sharing your recipes ideas. I am still fairly new to this sourdough world, so trying to get better… question. what is your process to double your starter? this recipe calls for 100g of starter, but when I do thee 1:1:1 ratio with 45g each, I don’t have enough to make 100g and have some starter left to feed it again. how do you go about that?
I screwed up the bulk fermentation and left it way too long (it tripled in size rather than doubled). I can tell it will be delicious when I get it right next time!
That’s OK… if the dough still had strength after the bulk fermentation, it might be fine… if it is a puddly mess, it’s not salvageable, but otherwise, just push on.
Hey Ali!
I made this a second time and didn’t let it rise past double like I did last time.
Unfortunately it felt just as overproofed. I did the envelope folds and it made it weaker and puddlier and all other folds (push/pulls, coil folds etc) made it more and more gooey. It got worse the more I tried and eventually I just threw it out. It didn’t even make it to the banneton this time
Bummer! What kind of flours were you using? And are you using a straight-sided vessel for the bulk fermentation? You may need to hold back some of the water, especially if you live in a humid environment. Finally, remind me:
Are you using a scale to measure?
Are you confident in the strength of your starter?
Thanks for your reply! I’m confident in my started and straight sided vessel. I can’t get King Arthur in Canada so I used Robin Hood Bread floor.
I have a concrete counter top and I can’t help but feel like the temperature change from container to cold countertop might be doing it? The dough feels perfect and strengthens nicely in the first stretch and folds but it seems to fall apart on the counter? Maybe?
And yes! I use a scale
Hi Ali, Thanks for clear and simple instructions to making a sourdough bread at home. My home made starter seems to have come out good, but since I live in a place in India called Chennai which has upwards of 70-80% humidity and I seem to have over fermented my dough during the bulk fermentation process, my first attempt can be confidently termed a failure 🙂 as the bread didnt even get cooked, and just didnt rise up either. I want to try again using your trouble shooting tips. 1, Hold back 50 gms water and see whether the dough needs it. 2, Ferment to only 50% volume increase. Please provide me with a clarificationn – you have two recipes. One which says 375 gms water, 500 gms flour and 11 gms salt (which is the one I used). In another, you say 300 gms water, 400 gms flour, 10 gms salt. Which is the one to be used for a beginner ? Many thanks
This is my favourite recipe I’ve used so far but I keep having an issue with the texture being ever so slightly gummy. I am sure it is something I’m doing wrong. I’ve tried longer bake but not much else as I love everything else about how the bread comes out so I don’t want to ruin it! Would love any tips.
Hi! It’s possible that you need to reduce the hydration slightly. Try holding back 25 grams of water next time around and see if it helps
A wonderful recipe and the videos make it so easy too!
I converted to cups and after a few loaves thought I’d share since I have no scale …
1/2 c starter
4 c unbleached flour
1.5 tsp salt
11/2 c warm water
Thank you for the great recipe and presentation . I love the flavor. Please let me know what size Dutch oven you use.? My 22 inch oven appears small .
Thank you
I use a 5-qt Double Dutch oven (Lodge) and this Challenger Bread Pan.
I use your recipe and everything turned out great thank you so much but I have a question about the size of your Dutch oven. Could you send that to me? Thank you.
Hi! It’s this 5 quart Double Dutch oven by Lodge.
I’ve made this bread a couple of times and it’s great. My question is, I would like sourdough buns/rolls. Could you make those from this recipe?
Hi! And yes. I’ve been meaning to post a roll recipe. Are you hoping to make pull-apart rolls or hard rolls? The baking part is what could be tricky… baking a lot of rolls in a Dutch oven doesn’t feel feasible.
Ok, great. I think you could divide this into 8 portions after the bulk fermentation, ball them up, let them rest for 30-60 minutes, hand stretch them into rectangles by pulling gently on each ball outward and transferring the rolls to a parchment lined sheet pan. Cover again with a tea towel or rub each with olive oil to prevent them from drying out and let them continue to proof at room temperature until they are puffed and feel light to the touch; then bake… something like this: Heat oven to 475ºF. Transfer pan to oven and bake for 10 minutes. Lower heat to 450ºF, rotate pan, and bake for 10 minutes more. Remove pan from oven. Transfer rolls to a cooling rack. Let cool for 20 to 30 minutes before slicing.
I’ll give it a try in the next few days.
Many thanks!
Hello again,
I apologize but I cannot access your reply to this. I read it originally but now the link I had to the reply just leads to the original comment. Pressing either the “1” or the “Previous” buttons (the only 2 options) does not show the reply. I’ve got the bulk-fermented dough ready to go but I don’t remember what to do with it – Yikes!
Jann, I can’t find the comment either… so beizarre! I’m likely too late here, but my suggestion was to divide the dough into 8-10 portions after the bulk fermentation. Ball them up. Place the balls on a parchment lined sheet pan. After 30 minutes to an hour or so, lift up each ball and gently stretch outward to shape the balls into more of an oblong roll or rectangular sandwich shape. Let proof again until the rolls have nearly doubled in volume or feel light to the touch (50-75% increase is probably fine, too). Then bake as follows:
Heat oven to 475ºF. Transfer pan to oven and bake for 10 minutes. Lower heat to 450ºF, rotate pan, and bake for 10 minutes more. Remove pan from oven. Transfer rolls to a cooling rack. Let cool for 20 to 30 minutes before slicing.
Can you save an overproofed dough? I let is proof overnight for about 9 hours and it doubled but there was a dry crust on the top. the dough inside is very bubbly but super wet and sticky so hard to handle. Can i seill save it during the final frige proof phase?
Hard to say! If the dough is so wet that there is no structure/strength/elasticity then it’s probably beyond salvageable. You could store it as discard, and you could use some of it in this recipe: Simple Sourdough Discard Toasting Bread or any of the other discard recipes on my site. You may need to reduce the salt slightly.
Thank you so much Ali. I always have freezer bags here. Will do that. We warm up the bread too. It’s the best. I rolled sesame seeds all over he outside and it was delish.
Yum! Love that idea!!
Good morning Ali. I bought the GIR spatula that you reccomended here. It arrived a couple of days ago. Love it. I was wondering if you ever mailed your sourdough and how did you package it if you did? I wanted to make a bunch of loaves for my son’s fraternity. I don’t know if it’s a good idea to do this but wanted to ask. Thank you.
Isn’t the GIR amazing? It really makes a difference when mixing dough. I have not mailed sourdough, but if I were to, I would stick it in a ziplock bag (2-gallon size) and then into a box, and then I would overnight it.
Great. Thx. I looked it up and that’s exactly why hat was suggested. Yes, love the sturdiness of the GIR. I bought a new non stick pan from Made In and this spatula is perfect too for flipping fish, pancakes. I bought it for the sourdough but so happy it’s great with other things. Thank you 🙂
Hi,
Can I use a glass bowl instead of a straight sided vessel?
I do not have anything straight sided or similar.
Thank you for your help!
You can, it’s just harder to gauge accurately how much your dough has risen and therefore when you should end the bulk fermentation. If you have a 2-quart food storage container, that works well. Some grocery stores sell these sorts of vessels. If not, a bowl is fine — just keep an eye on it, and end the bulk fermentation before the dough doubles in volume.
LOVE this recipe! It literally simplified my sourdough experience & now I have perfect sourdough each time. I really appreciate this recipe and you posting a video WITHOUT ads. Thank you so much Ali!!! 🙂
Great to hear, Carmen! Thanks so much for writing and sharing this 🙂 🙂 🙂
Hi Ali – I have been trying to make my own starter and sourdough bread for five years. I have never been able to pull both together to have a decent loaf. Today, that changed. Thank you so much for this recipe, and for the instructions, photos, and videos. I made a loaf of bread this morning that was excellent.
Hi Alexandra, Thanks for sharing the recipe n tips! I’m new to sourdough. Followed your recipe and managed to get a somewhat satisfactory result – encountered issue shaping the dough as it was really sticky. I did 2 folds and left and between 280 to 290g water as I live in a very humid country. The bread was yummy though 😃
Great to hear Joan! Thanks for writing and sharing your notes. Keep strengthening your starter and baking bread… you’ll learn something from each bake, and the more you bake, the better your loaves will be 🙂
Hi, i found it’s hard to know the cues of bulk fermentation, whether it’s 50% or 75% fermented. I live in Indonesia and it takes 8 hours since the last fold and the dough havent come with bubbles and it’s sticky even when i’m sure it’s 50% fermented. I used a strong whole wheat starter
Hi! Are you using a straight-sided vessel for the bulk fermentation? And are you using a scale to measure?
Yes i used scale to measure. I put the dough in a big rounded bowl because i have no straight side vessel
OK, I highly recommend investing in a straight-sided vessel because it’s so hard to gauge how much the dough has increased in volume using a bowl. You might be over fermeting your dough even when you think it is at 50% because it might actually have grown more than that.
It’s hard to find containers like that here. What are the visual cues? will a 50% increase in dough show bubbles on the surface as you mentioned?
Alex, what if it is rising during bulk fermentation, but I am not seeing the fluffy bubbles, or bubbles period? Do I stop at 50-75% rise or wait till I see bubbles?
Hi! If the dough is still rising and gets to 50-75%, then just proceed with the recipe.
Thanks! Once I started shaping, I saw more bubbles. It’s cold proofing and looking wonderful now.
Oh great! Hope it turns out well for you 🙂
I made your Whole Wheatish SD Bread (for maybe the 100TH time) and this time after the 50% rise I cut the dough into 3 parts, shaped it into baguettes and put them on a baguette pan in the fridge, covered, overnight. This afternoon I baked them at 450 degrees for 15 minutes (heavy steam,) then 10 minutes to brown. They are AWESOME. And the first time I made baguettes.
Amazing! So nice to read this, Karen! Can you share more about the baguette pan that you used when you placed them in the fridge? And when you baked them, did they go straight from the fridge to the oven or was there room temp time first? Finally, do you have a steam oven or did you use some sort of trick to create steam? I would love to get a sourdough baguette recipe on the blog!
What a great recipe and guidance! I’ve been struggling with my sourdough breads but finally had success after reading Ali’s tips. Turns out I needed to cut back on my water rather than blindly following whatever the recipe says. This loaf turned out beautiful and tasted great as well!
Great to hear, Brigitte! So glad the tips helped. Flour is funny… each variety absorbs water differently, and it’s hard to know how it will behave until you experiment. Adjustments to water levels are inevitable!
Hi Alexandra. Thank you for sourdough recipes. It’s life changing. I had my first success with your regular basic sourdough recipe. After that I have been making whole wheat sourdough, although it tastes good, the crust is good too, but it falls flat. I thought I will try this recipe, and still it falls flat. When I shape it and keep on the counter for few minutes, it immediately falls flat. The cold ferment gives it its shape, but as soon as it goes into oven it falls flat. I use a 5qt Dutch oven to bake it, following your technique. I don’t know what what I am doing wrong. Any idea how to fix the flatness? Any help would be appreciated.
Thanks
Zabin
Hi Zabin! Questions: are you using a scale to measure? What type of flour (brand included) are you using? And how much whole wheat flour are you using?
It sounds as though the dough might be over fermenting, and it’s possible you might need to reduce the amount of water.
Do you live in a humid environment? Are you using a straight-sided vessel for the bulk fermentation?
Hi Alexandra
Yes I use a messaging scale. I followed this recipe this week to the dot. The last few months I have been doing 200gm whole wheat, 200gm bread flour, 275gm water, 90gm starter, 10gm salt.
I have played around with water reducing it to 260 once.
I use royal brand whole wheat that I buy from Costco, bread four is King Arthur. The starter is a good starter, as I have had success previously with your regular sourdough recipe. I live in Massachusetts, so it gets cold here. I do bulk fermentation sometimes overnight as it’s cold and there is barely any movement in 6 hours. I am not sure if it is due to cold.
I have also retried mixing in mixed grains sometimes (oats, flax seed, quinoa etc). I use 100gm mixed grains soaked in 80 gm of hot water for 30 mins. The taste is very good, but the flatness is something very annoying.
At this point I am thinking of buying the lodge 3qt combo cooker or a bread baker.
Any help would be appreciated.
Thanks Zabin
Hi Zabin, I think the reality of using 50% whole wheat flour here is that your loaves are going to be on the dense side. The bran and germ present in wwf cuts through the gluten structure impeding it’s growth in the oven. My only suggestion at this point is to ensure you are using a straight-sided vessel for the bulk fermentation to make sure you are not letting the dough overferment during the bulk fermentation. Alos, if you are not doing a 24-48 hour cold proof following the bulk fermentation, try that. All of those additional seeds are going to contribute to the denseness/flatness, so I’d consider leaving those out until you get the texture of the loaf to where you want it to be. I don’t think the 3 qt combo cooker is going to make a difference, and I’d hate for you to spend your money unnecessarily.