 →
→ The Easiest French Apple Tart
This post may contain affiliate links. Please read my disclosure policy.
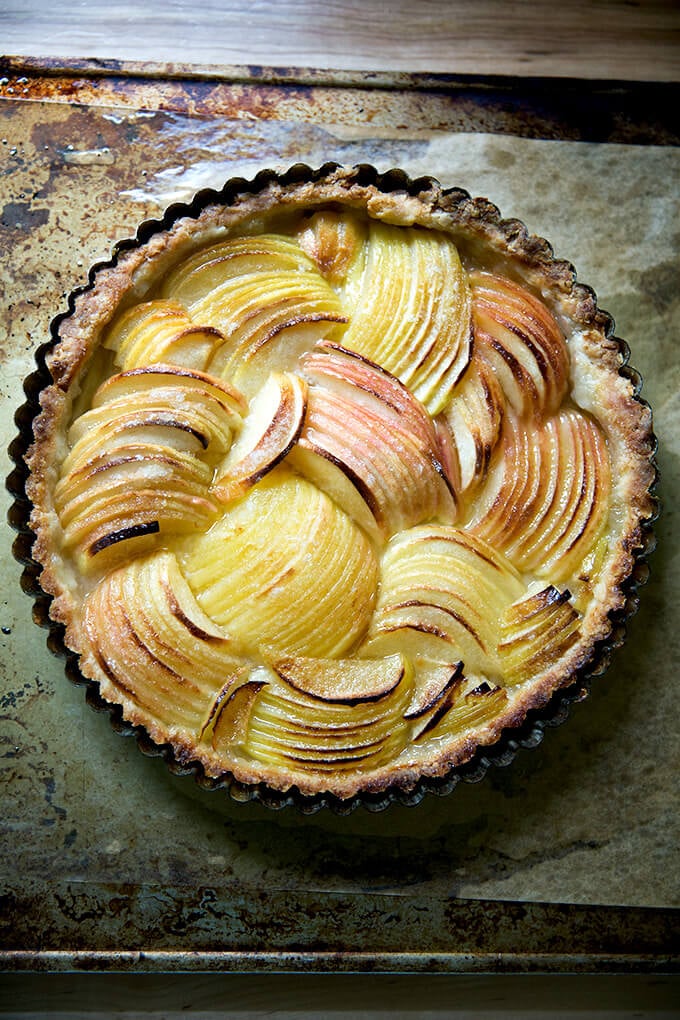
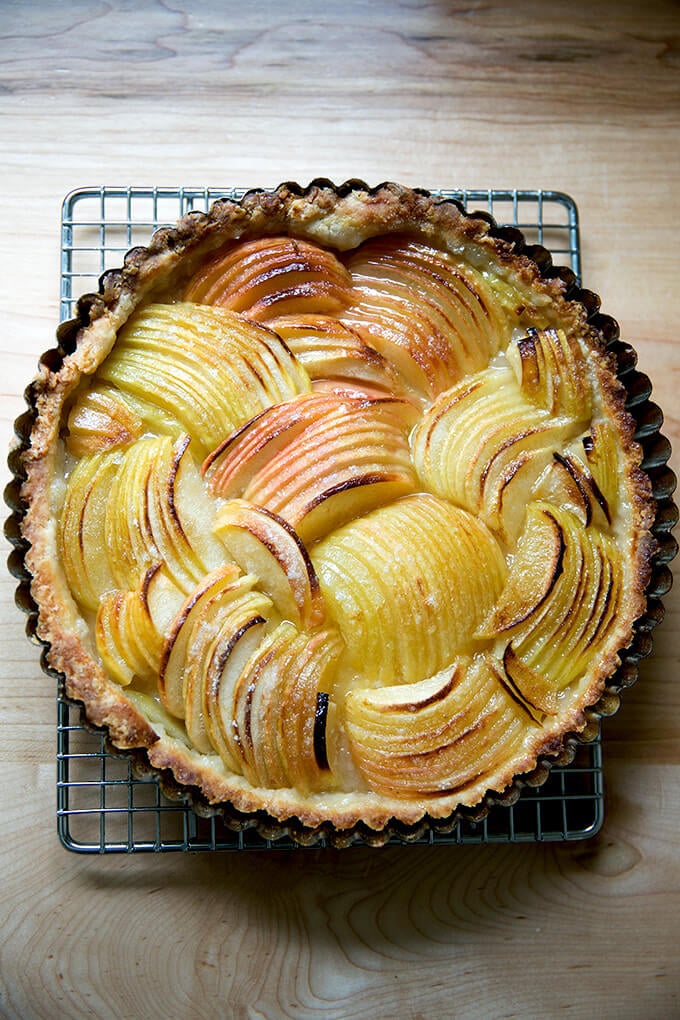
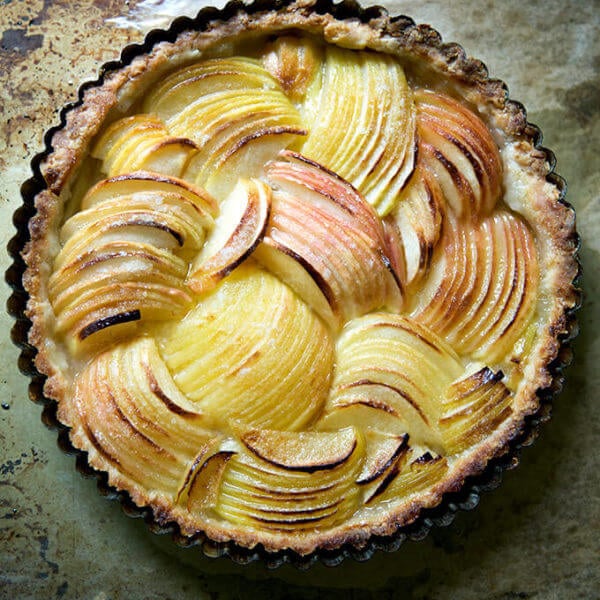
This French apple tart recipe is simplicity at its best: buttery pastry dough + unpeeled, thinly sliced apples + a sprinkling of sugar + a few pads of butter. That’s it! It’s so easy, so pretty, and so delicious.
A few weeks ago I came across a photo of an apple tart in Sarah Copeland’s Every Day is Saturday that stopped me in my tracks. For one, it was stunning. But two, the apples had their skins on!
I am ALWAYS peeling apples for pies, tarts, galettes, and the like, but: maybe, this photo had me wondering, I didn’t have to?
It turns out: I didn’t.
Last Sunday, for a local event, I made, as planned, two apple-frangipane galettes, one of my all-time favorite fall desserts. With the extra round of pastry I had on hand, I gave the unpeeled-apple tart a whirl.
The result? Where to begin?
The Beauty of A French Apple Tart…
… lies in its simplicity.
If you’ve been reading for a while, you know I’m always pushing the frangipane with these sorts of desserts — I find the combination of almond cream + flaky pastry + fruit to be irresistible.
But this tart, without the frangipane, is just as irresistible, just as difficult to pass on seconds, just as impossible to avoid slicing off teensy slivers every time you walk by. And it couldn’t be simpler: Apples. Sugar. Butter.
That’s it!
The hardest part about making this tart is slicing the apples thinly and keeping the apple “fans” together as you slice. I appreciated a note from Sarah in the recipe in regard to arranging the apple slices: “Don’t overthink it!” (A French apple tart I had made years ago, which called for creating apple “roses” drove me nearly mad.)
But Sarah’s right: the elegance of this presentation is in the union of random and uniform. It’s such a fun tart to assemble but an even more fun one to eat. I highly recommend whipping up some heavy cream and salting it just a touch more than you might normally. The sweet with the salty is, well… c’est parfait.
Note: The recipe below follows Sarah’s method for the filling but not the crust. Her “easier-than-pie-apple-tart” calls for making a gluten-free press-in-the-pan crust made with almond flour, which looks and sounds lovely. The recipe below calls for my favorite, foolproof, all-purpose, all-butter food processor pastry dough. It comes together in less than five minutes and yields the flakiest of flaky crusts. Bonus: no blind-baking (for this tart at least) required!
How to Make a French Apple Tart Ahead of Time
Last fall I learned you could freeze entirely assembled un-baked pies; then bake the frozen-solid pies directly from the freezer… no thawing required. This fall, I gave the method a go with this French apple tart.
The result? Five stars ⭐️⭐️⭐️⭐️⭐️
For this recipe, simply follow the process through step 5, stopping after you add the cubed butter. Transfer the tart to an airtight bag; then transfer to the freezer for up to 3 months. When ready to bake, proceed with the recipe, baking the tart directly from the freezer (i.e. no need to thaw in the fridge or on the counter overnight.
PS: 9 Apple Recipes to Make Right Now
How to Make a French Apple Tart: A Step-by-Step Guide
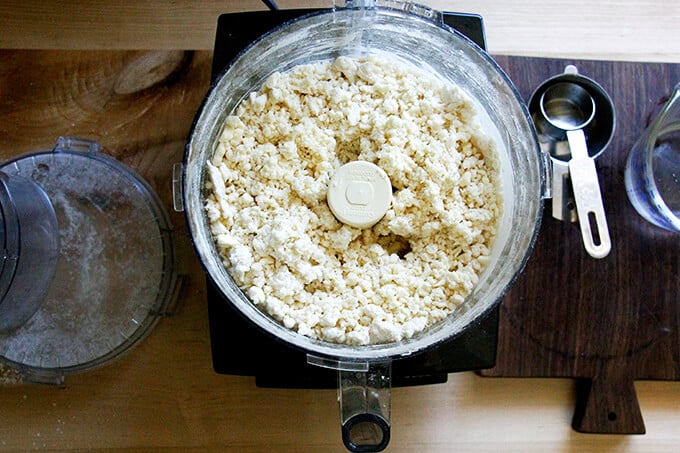
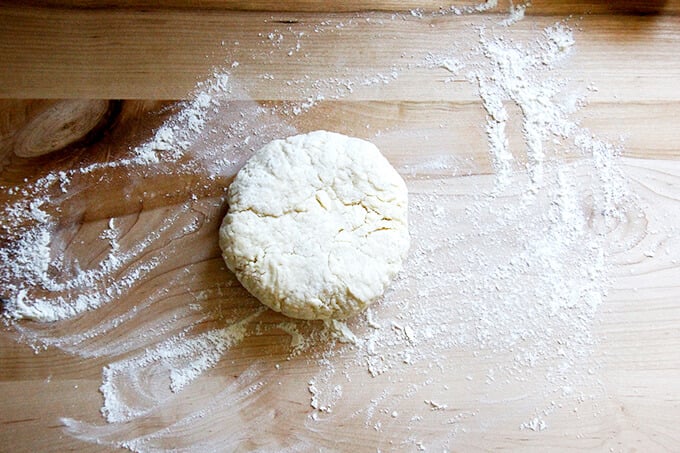
Make the dough. Gather your ingredients: flour, salt, sugar, butter, ice water. (Note: The pictures below show a double batch of dough being made; the recipe in the recipe box is for a single batch of dough.) First pulse the flour, sugar and salt together.

Add the butter and pulse 10 times (about).
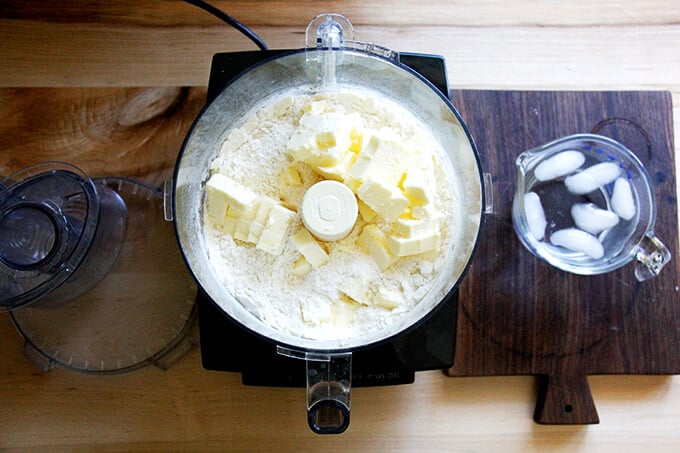
The butter should be the size of peas (about).
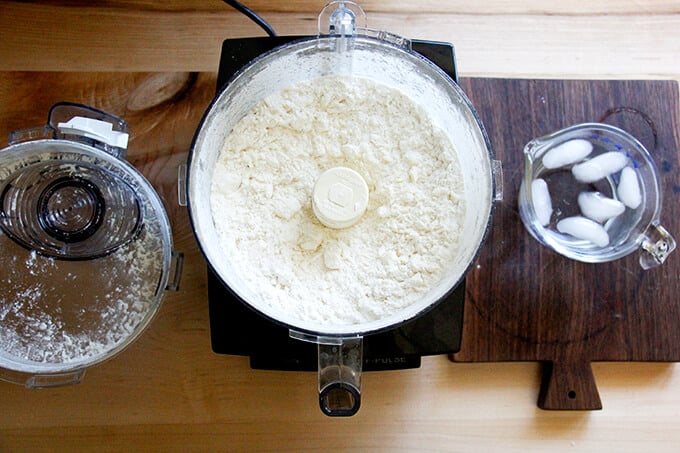
Add ice water.
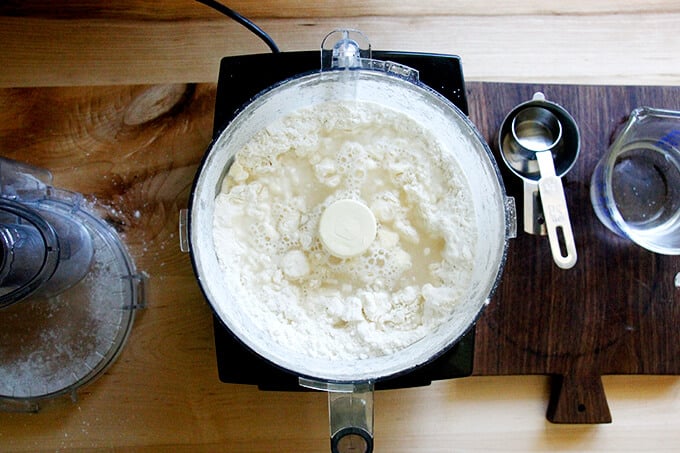
Pulse again about 10 to 15 times or until the dough is still crumbly, but holds together when pinched.
Divide dough between two clean tea towels. I love these tea towels by Now Designs.
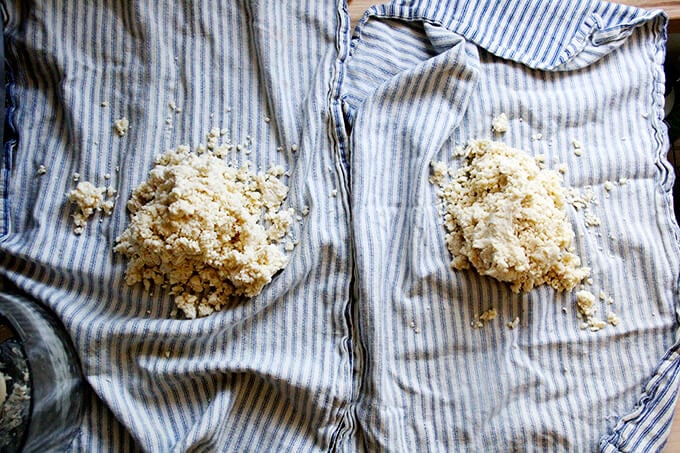
Gather towel into a beggar’s purse, and squeeze to form a round.
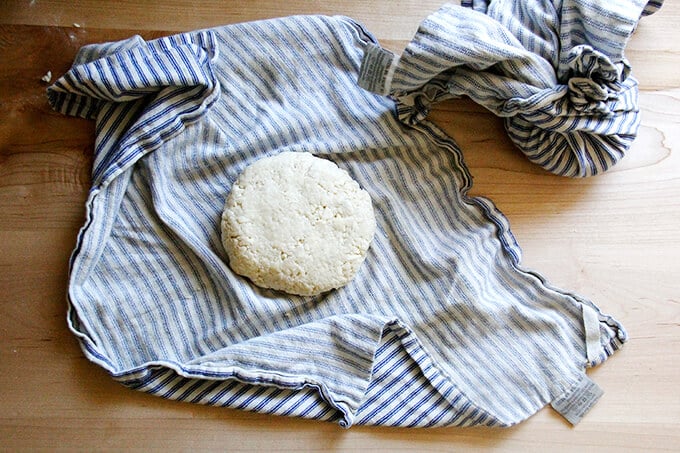
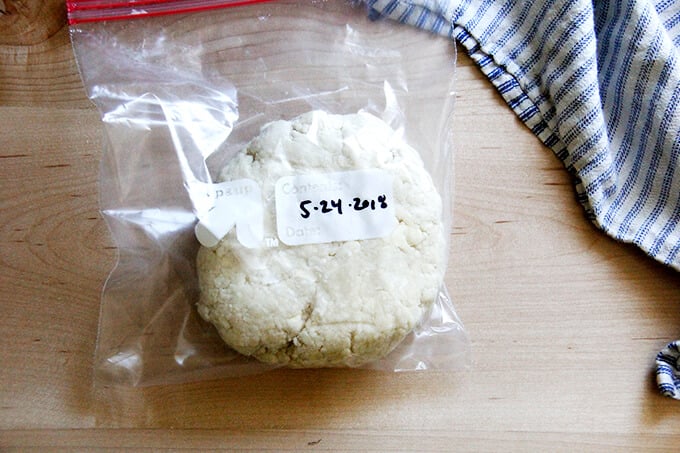
Transfer one to the freezer for a future use.
On a lightly floured surface, roll out the remaining round into a circle about 12- to 13-inches in diameter.
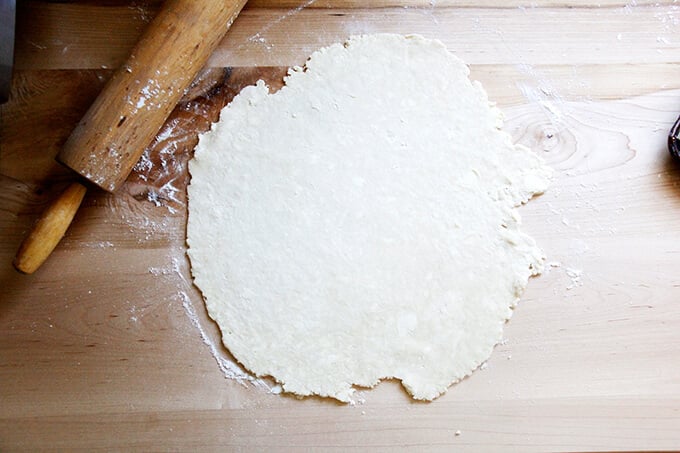
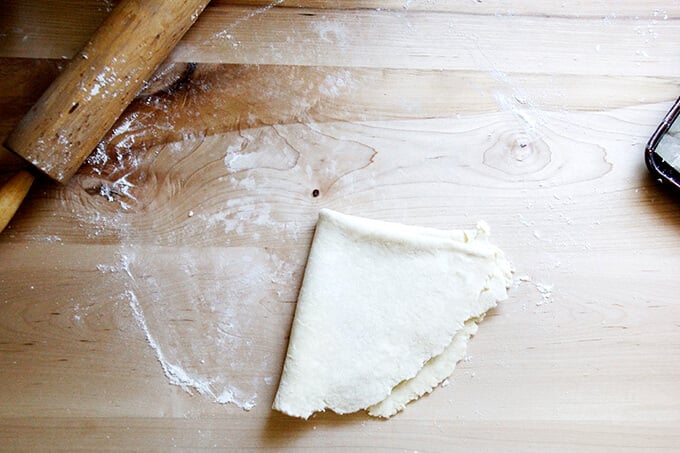
Fold dough into quarters for easy transfer to tart pan. Sorry no picture of the filled-in tart pan. At this point, the tart pan should chill in the freezer for 30 minutes.
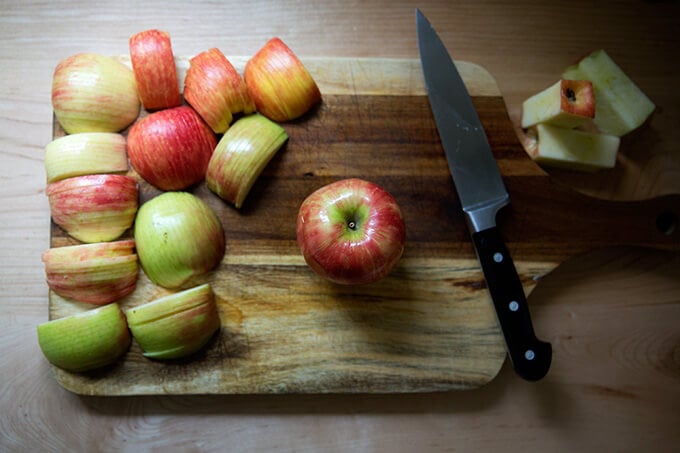
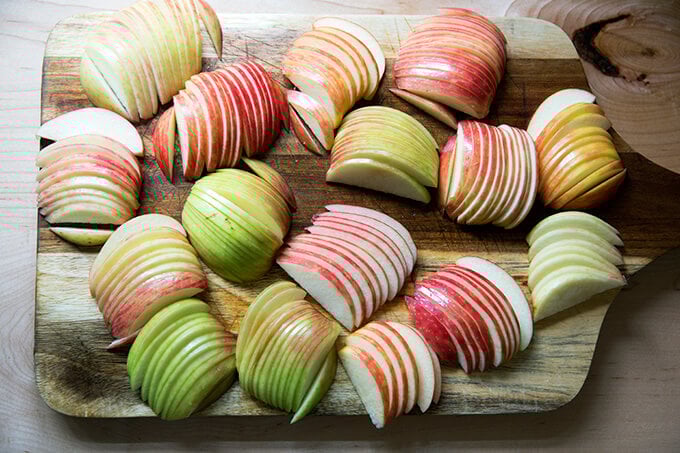
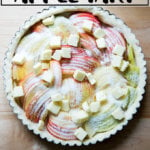
Meanwhile, cut 3 to 4 apples straight down around the core to create 4 “cheeks”. Then slice thinly, keeping the cheeks together.
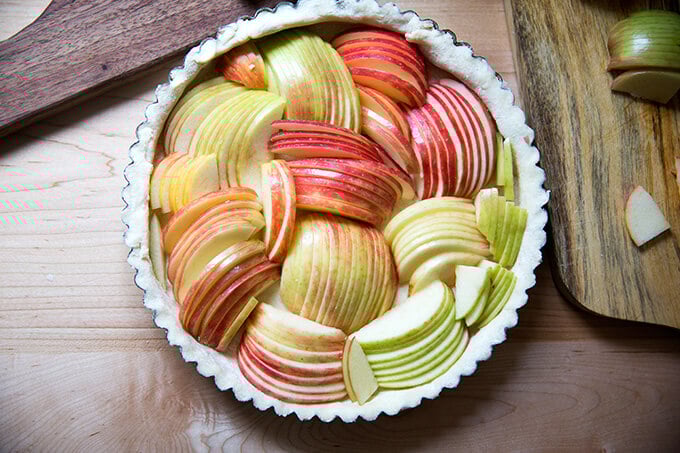
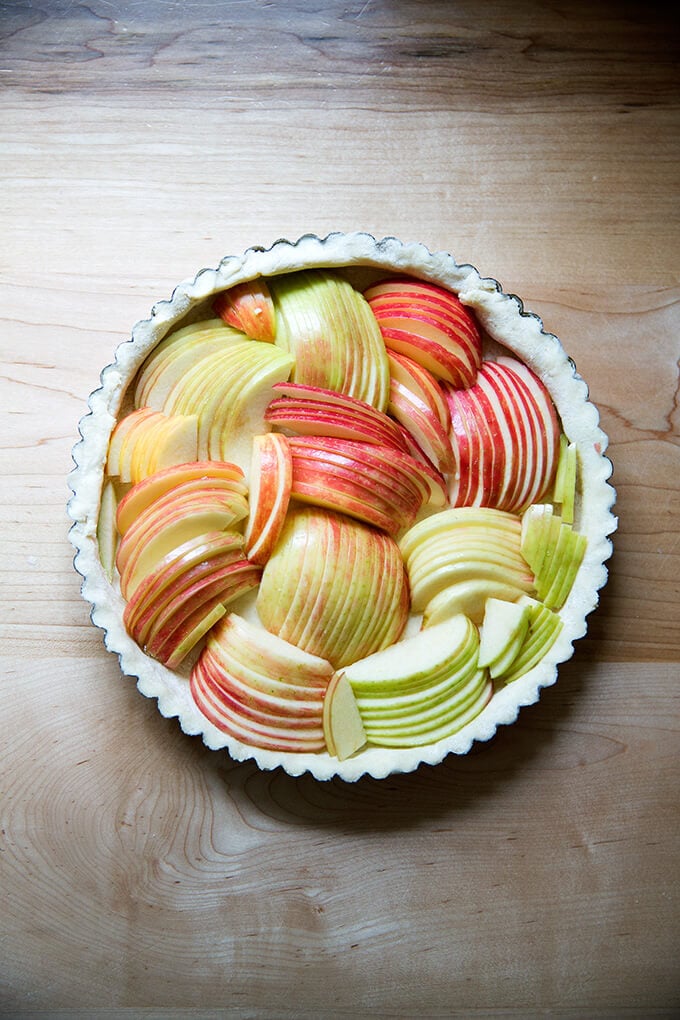
Fill your tart shell with fans of apples, cutting as necessary to fit.
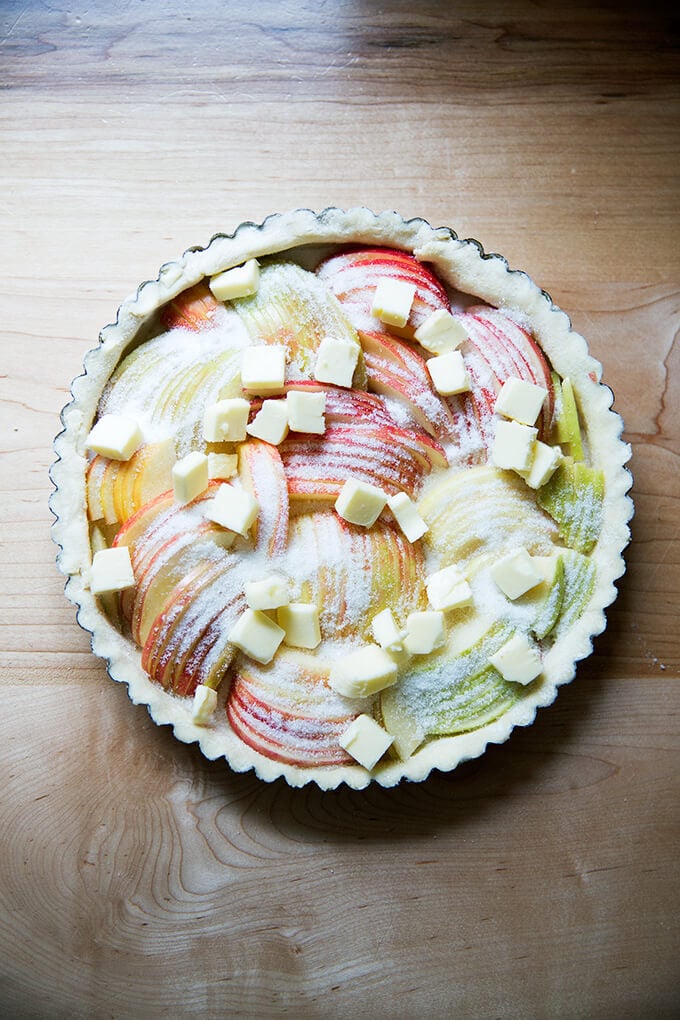
Sprinkle with 1/4 cup sugar.

Dot with 1/4 cup cubed butter.
Bake till slightly caramelized at the edges. Let cool before serving …
…or packing away to bring to a party! Any excuse to break out the Pie Box.


The Easiest French Apple Tart
- Total Time: 1 hour 45 minutes
- Yield: 1 tart 1x
Description
Dough recipe: This is the only pie dough, tart dough, galette dough, pastry I use. It’s foolproof. Here are five recipes I use it in.
Dough can be made up to 3 days in advance and stored in the fridge or made weeks in advance and stored in the freezer. I typically make a double batch and freeze one round for a future use, but I’ve written the recipe below to yield one pastry round.
The filling for this French apple tart recipe is inspired by Sarah Copeland’s Every Day is Saturday, in which there is a lovely gluten-free variation.
Save your pie dough scraps and make cinnamon snails.
Ingredients
For the tart dough:
- 1 1/4 cups (160g) all-purpose flour
- 1 tablespoon (14 g) sugar
- 1/4 teaspoon table or kosher salt
- 8 tablespoons (114 g) cold, cubed butter, salted or unsalted
- 1/4 C. + 1 T. (71 g) ice water
For the apple tart:
- 3 to 4 apples, I typically use Honey Crisp; use what you like
- 1/4 cup (57 g) butter, salted or unsalted
- 1/4 cup (61 g) sugar
For serving:
- 1 cup heavy cream
- confectioner’s sugar to taste
- flaky sea salt, such as maldon, if you have it, kosher or other salt if you don’t
Instructions
- Make the pastry: In the bowl of a food processor, pulse the flour, sugar and salt together. Add the cold, cubed butter to the food processor. Pulse at 1-second intervals until butter is the size of peas—should be about 10 quick pulses. Add the ice water and pulse again about 10 times until the mixture is crumbly but holds together when pinched. Lay a clean tea towel on a work surface. Dump the crumbly dough mixture into the center of it. Grab the four corners of the towel together and twist to create a beggar’s purse, pressing the dough into a round.
- On a lightly floured work surface, roll out the dough into a 12- or 13-inch round. Use as much flour as needed to prevent the dough from sticking, and every few rolls, flip the dough over. Transfer dough to a tart pan with a removable bottom. Fit the dough into the pan, trimming the edges. (Save the scraps; see notes above.) Transfer to freezer for 30 minutes.
- Preheat the oven to 425ºF and place a rack in the center of the oven.
- Prepare the apples. Cut the “cheeks” of the apples off the core into four pieces — each piece will have one large flat side. Lay each piece on its flat side and slice thinly, keeping the slices together as you go. Arrange the slices around the tart in any pattern you desire, fanning the apples as you go. You may need to cut some of the apple fans to fit.
- Sprinkle evenly with the 1/4 cup sugar and 1/4 cup cubed butter. Transfer to a rimmed sheet pan. (I like to line with parchment paper for easy cleanup.) Transfer to the oven for 35 to 40 minutes, checking after 15 minutes: if it is browning too quickly, lower the temperature to 400ºF. I find 425ºF works perfectly, and I actually will turn the oven to convection bake during the last 2 to 3 minutes to get some more caramelization on the apples. This is unnecessary — the uncaramelized apple slices taste delicious, too — but I find it visually appealing and tasty.
- Make the whipped cream. Place the heavy cream in the bowl of a stand mixer and whip until soft peaks begin to form. (You can do this by hand, too, with a bowl and whisk.) Add confectioner’s sugar — start with 1/4 cup and add more to taste. Add a big pinch of sea salt and beat to combine and until the peaks begin getting firmer. Taste — the mixture should be slightly sweet and the salt should be noticeable, though the whipped cream should not taste salty.
- Serve the tart warm or at room temperature with dollops of the whipped cream.
- Prep Time: 1 hour
- Cook Time: 45 minutes
- Category: Dessert
- Method: Oven
- Cuisine: American, French
This post may contain affiliate links. Please read my disclosure policy.


247 Comments on “The Easiest French Apple Tart”
Can you make this as little Bartlett? Your recipe looks so delicious, but I only have small tart pans fir individual tarts. Thank you so much.
Definitely! Go for it 🙂
Thank you! I’m new to your recipies, and I lovebthem! 😃
Thank you, Cherie 🙂
This was fairly easy for a non baker. I can’t rate it until I serve and try it though. I had a couple of questions. It wasn’t clear to me whether you cut the apple in thin slices all the way through? I read the instructions a few times over and it wasn’t clear. I did not cut them through which I think was a mistake as it made it difficult to fam them out. Also, you reference a note that says what to do with the leftover scraps of dough, but I couldn’t find it
Hi Deborah! Yes, you do cut the apples all the way through. I think the note must have been referring to making cinnamon snails:
To make Cinnamon Snails: Roll out pie dough scraps into a rectangle. Spread with a layer of butter. Sprinkle generously with cinnamon and sugar. Roll into a spiral. Cut crosswise into slices. Bake at 375º for 10 to 15 minutes — just keep an eye on them; they brown quickly at the end.
Hi there – I plan to make this in a ceramic tart pan. It does not have a removable bottom. Do I need to adjust cooking time or temperature? Can’t wait to try it!
It’s possible a ceramic pan might require a touch longer cooking time, but I wouldn’t adjust the temperature. Bake it as directed, and if necessary, keep it in the oven a little longer until it is properly browned — reference the photos for a visual. Good luck!
Hi Ali I’m so scared of pie doughs although I’m a successful baker otherwise. Dying to try this as you have changed my relationship to bread. All your recipes are amazing. One question—I’m in a hurry today. Could I use store bought frozen pie shells for this? Thanks
Thank you, Ania! Apologies for the delay here. What did you end up doing? I’m sure the store bought shell would be just fine 🙂
I ended up making a different desert! Now in a more relaxed way am trying your recipe which promises to be divine!
So easy, delicious and elegant. I made 2 for our Canadian Thanksgiving dessert. The dough was perfect and so easy to work with. I really appreciate your video tutorials as well. Many thanks!
So nice to hear this, Laura! I hope you had a wonderful Thanksgiving. Thanks so much for writing 🙂
Hi Alexandra, another great easy dessert! Simple and delicious. 425 temp worked for me. Your crust recipe is by far my favorite for my galettes! Thank you!
So nice to hear this, Di! Thanks so much for writing and sharing this 🙂
What size tart pan with a removable bottom do you recommend?
Thanks!
Hi! I’m not home at the moment otherwise I would measure mine… I believe it is roughly 10 inches. I’ll report back tonight 🙂
Thanks!
I have had and made a lot of tarte aux pommes as a French person and this is hands down the best recipe and so easy to make. The only slight change I make is to peel the apples as the skin makes it a bit more difficult sometimes to cut the slices but this is truly the best recipe and so worth it to take the extra few minutes to make your own crust. Thank you so much!
So nice to read this, Elodie! Thanks so much for writing and sharing your notes/experience.
Wow, so easy but it turned out really well and delicious with some icecream. This is my second recipe from this site and they’ve both been great (the pizza dough I have used dozens of times). I burnt the apples a little even before the 15 minute check so be aware if you’re not used to your oven, check even earlier.
So nice to read this, Tamara! Thanks so much for writing and sharing your notes/experience.
Hi, I previously asked you about the recommended size of the pie plate you used. You weren’t home at the time – so I’m asking you again!
I absolutely adore all of your recipes!!!
Thanks!
Emily
Thank you for circling back! The pan is 9.5 inches… I need to add these notes to the post 🙂
Could you add frangipane to this recipe and how would that change the process?
Yes! No change to the baking time or temperature. Simply spread a layer of frangipane over the dough before topping with the apples. I have a frangipane recipe in this post: Apple-Frangipane Galette
Sadly this didn‘t work out for me and I wonder what could have gone wrong. The crust and apples are well baked but there is a LOT of liquid left in the cake, basically all the melted butter (or maybe the apples gave off some liquid as well?). I used exactly the amounts indicated, no idea why this happened, but I had to throw it away. Such a shame because it looks wonderful otherwise and I was so excited about it. Will be using the crust recipe again though.
Hmmm… I’m not sure what went wrong. What type of apples did you use? Any other changes to the recipe?
This was so delicious and very easy. I will definitely be making it again. Can you please tell me the size of the metal tart pan used n the video?
Great to hear, Claudia! It’s 9.5 inches.
Sorry that I neglected to rate the recipe.
Thank you 🙂
Hi. Just wondering was size tart pan you used? I’m going to make this for Christmas. Merry Christmas 🎄
Hi! It’s 9.5 inches. Merry Christmas!
I made this for Christmas and it was a hit! It was so easy and this is the first time making a pastry dough for me. I can’t wait to make it again. I served with a tiny scoop of talenti vanilla caramel swirl ice cream. My brother wanted seconds but it was all gone. lol. It was also pretty to look at. 😊
So nice to read this, Suzanne! And bravo on making the pastry dough from scratch. I’m glad to hear you’re feeling inspired to make it again… your brother will be happy, too! Happy holidays!!
Just made this for friends and they all loved it!! Super easy, made it while letting two other cookie doughs for Christmas chill. After it baked I added an apricot glaze I made with jam and hot water.
Heated it back up at 350° the next day for 15 minutes, ended up perfect.
Great to hear, Jean! Thanks so much for writing and sharing your notes. The glaze sounds lovely, and I’m so glad it reheated nicely for you.
Very easy. I used a pie dough that I had made before. Flavor is great!
I found that it was a little tough to cut the pie with a fork because the skin was a little tough. I used honey crisp apples.
Should I peel them next time?
Sure, you can definitely peel the apples if you prefer.
The crust is so easy to make and it turns out flaky and crisp! My friends and family LOVE this dessert.
I am going to try freezing it, for the first time. Do I freeze it in the tart pan? I would prefer not to lose the use of my tart pan for a month. Or can I remove it from the tart pan after it is frozen hard? If I bake it in a regular pie dish after freezing, will it lose its fluted sides?
Thank you in advance for your advice!
Great to hear! You should be able to pop it out of the tart pan once it is frozen hard. And yes, unfortunately it will lose its fluted sides if you bake it in a regular pie dish after freezing it.
Thank you so much! I appreciate the fast response. I made the tart three times in a week, and plan to make 2 more! I forgot to rate the recipe last time but will do so now.
Great to hear, Madison! Thanks for writing 🙂
Hi I’ve just commented but I have missed some details. I’m planning to make it this weekend for guests, to use 2 smaller metal pans, and Granny Smith apples. Should I blind bake the tart crust first for 15 minutes to prevent soggy tart crust?
Then cool the crust, then add apples sugar butter and bake them with 15 minutes less time?
Your quick reply is much appreciated!
Thank you Sam
I do not blind bake the crust for this tart — it’s not necessary but also it will shrink too much. What size are the metal pans you are using?
Hi it’s Sam again, thanks for your prompt reply! To answer your question, am going to use 2 metal pans of about 8 inches diameter each.
Another question, in addition to blind bake, should I use a fork on the crust to make some holes, before baking? What’s this for anyway?
Thank you so much again !
Hi! You can definitely prick the bottom, though I don’t really think it’s necessary bc the fruit will keep the bottom crust weighted down. And again, no need to blind bake. My only concern right now is that I use a tart pan that is 9 inches, so I’m wondering if you need to double the crust for two 8 inch tarts.
I made the pie yesterday. I found the instructions easy to follow and the pictures useful, especially when it comes to how the thin apple slices should look on the pie! Not only is this tart delicious, light, and perfectly sweetened but it is quite pretty to look at too! Thank you for sharing this recipe!
Great to hear, Nancy! Thanks so much for writing and sharing this 🙂
I used honeycrisp apples and followed the recipe to the letter. The tart is really yummy, and the leftover pie dough made some very tasty cinnamon-raisin treats. My only issue was that the crust was a little wet on the bottom and there was some pooling liquid in the tart even after it cooled. I think next time, I would either par-bake the crust or put some breadcrumbs or ground almonds on the crust before layering on the apples. I’m still giving 5 stars because I almost always have issues in my oven with things not browning on the bottom, so I can’t really blame the recipe.
Great to hear, David! Thanks so much for writing and sharing your notes/experience. I would love to hear if parbaking or if any of your other ideas work if you make it again.