 →
→ Easy Sourdough Sandwich Bread
This post may contain affiliate links. Please read my disclosure policy.
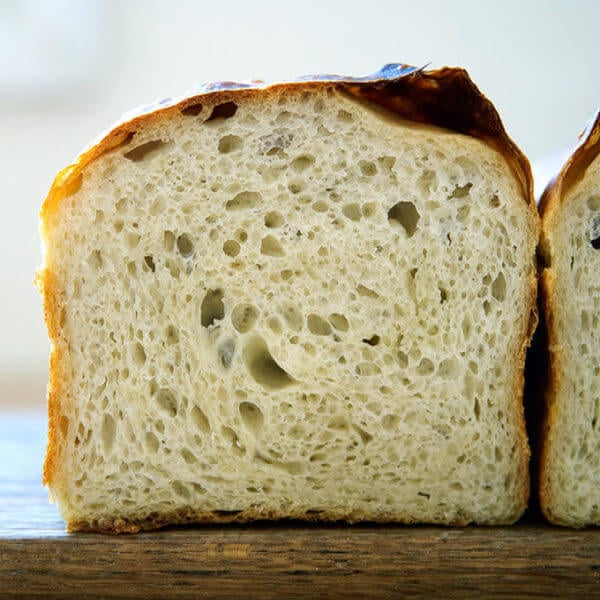
This 4-ingredient sourdough sandwich bread requires no complicated shaping, no scoring, and no preheated heavy Dutch oven. Grab your mixing bowl, pull out a spatula, and butter your loaf pan. This one is simple and delicious!
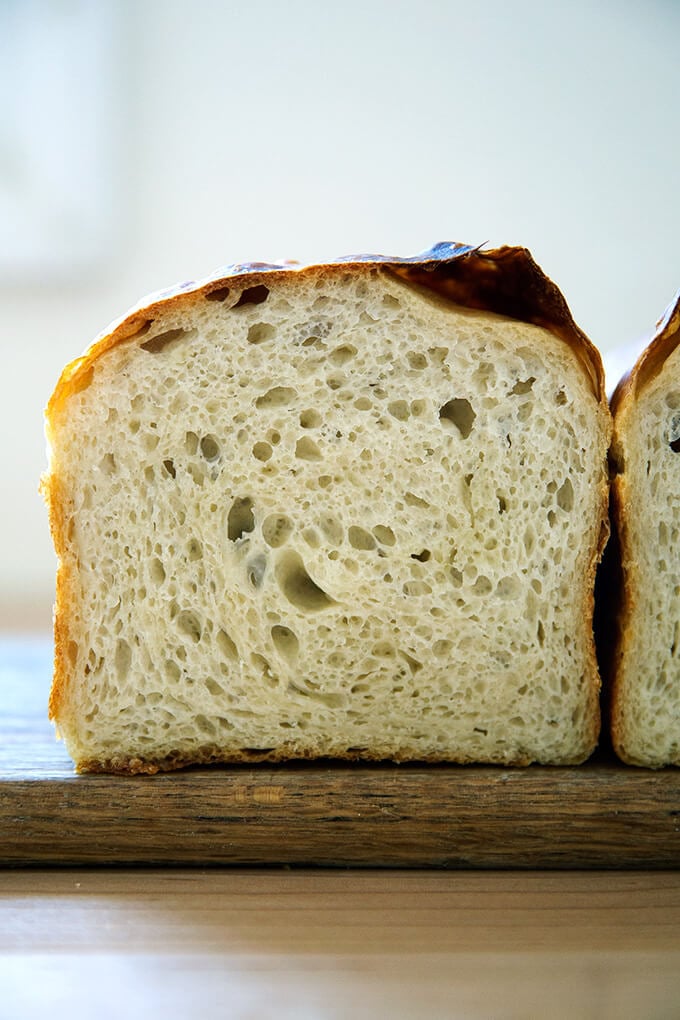
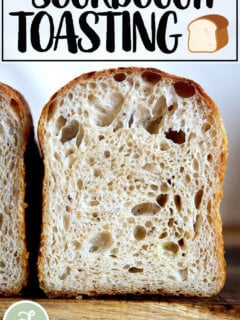
As its name suggests, this sourdough sandwich bread recipe is easy, a simple mix of flour, water, salt, and sourdough starter. In sum, it’s an adaptation of my mother’s peasant bread recipe with the sugar and yeast omitted and sourdough starter added. Like this sourdough focaccia, the dough is high-hydration, which yields a soft crumb, perfect for sandwiches when freshly baked and excellent for toast, too.
In the world of sourdough bread baking, crusty boules, open-crumbed rolls, and pillowy focaccia get all the glory. But I would argue a simple sandwich loaf deserves just as much praise, if not more, not only for its ease in assembly, but also its utility.
Find step-by-step instructions as well as video guidance below.
PS: How to Build a Sourdough Strater from Scratch
PPS: How to Activate, Feed, and Maintain A Sourdough Starter
How to Make Sourdough Sandwich Bread, Step by Step
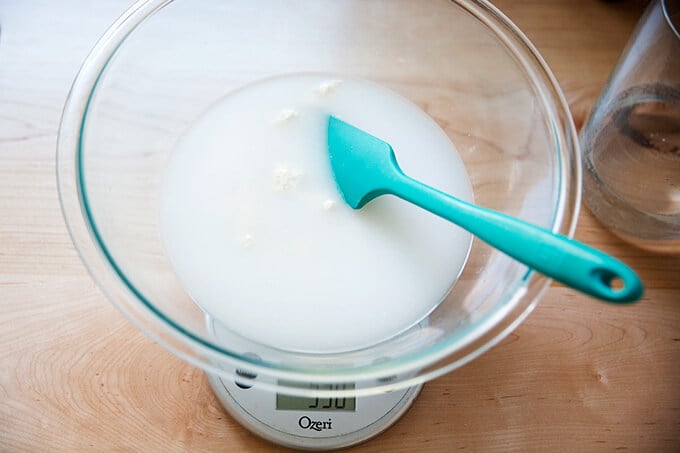
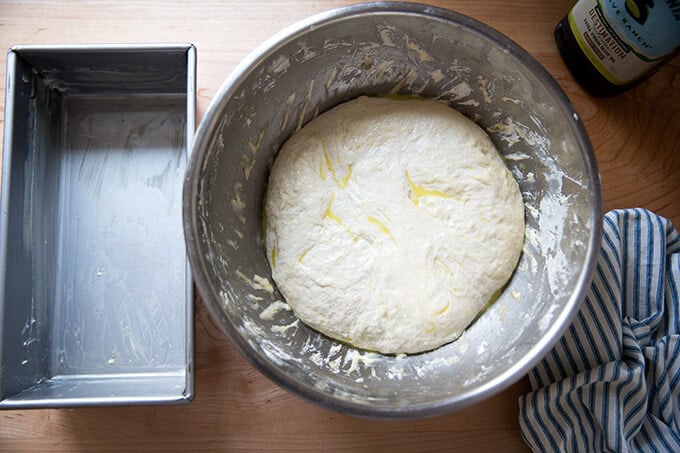
First, place 100 grams of starter in a large bowl. As always, for best results, please use a digital scale to measure.
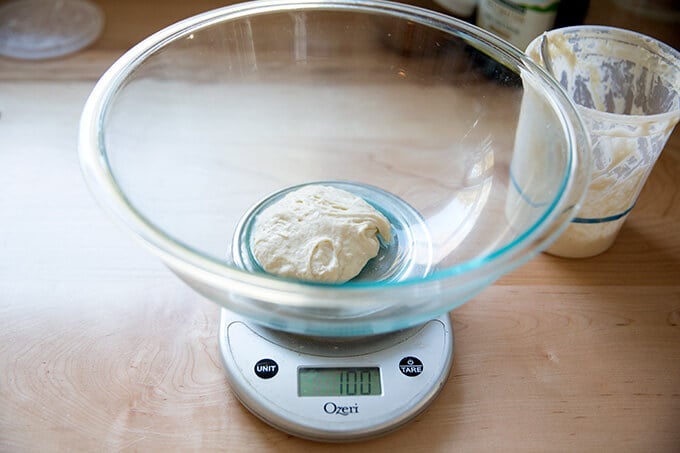
Add 10 grams of salt.
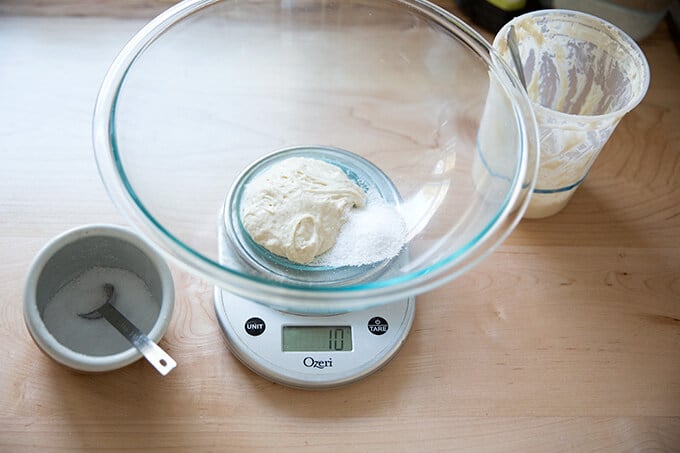
Add 430 grams of water. (You may need to use less water: see recipe box for notes.)
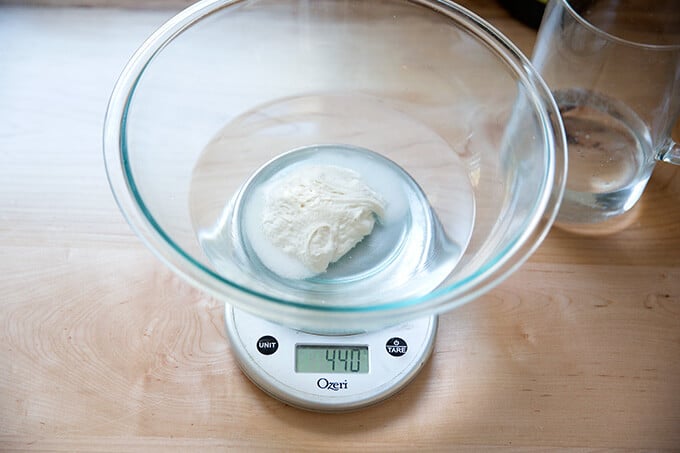
Stir to combine.
Then add 512 grams of bread flour.
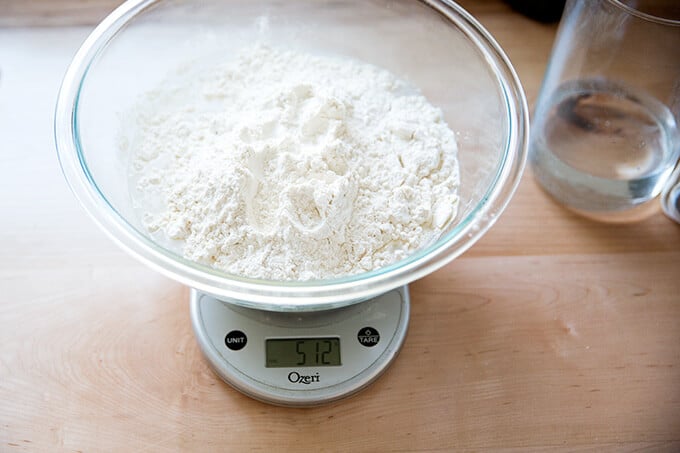
Stir to form a sticky dough ball.

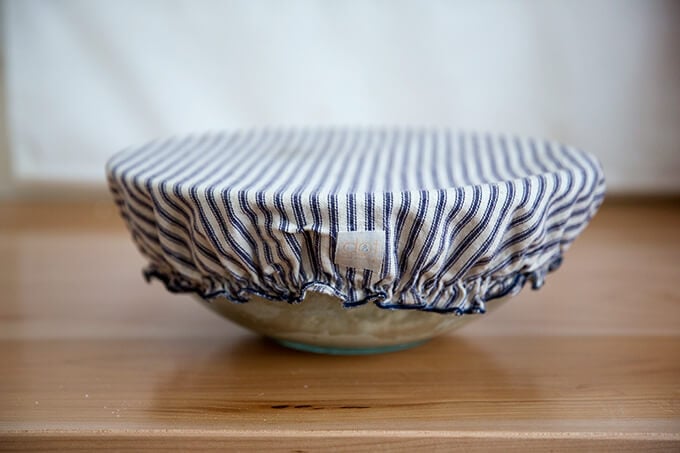
Cover with a towel or cloth bowl cover or, preferably, a lidded vessel, and let rest for 30 minutes.
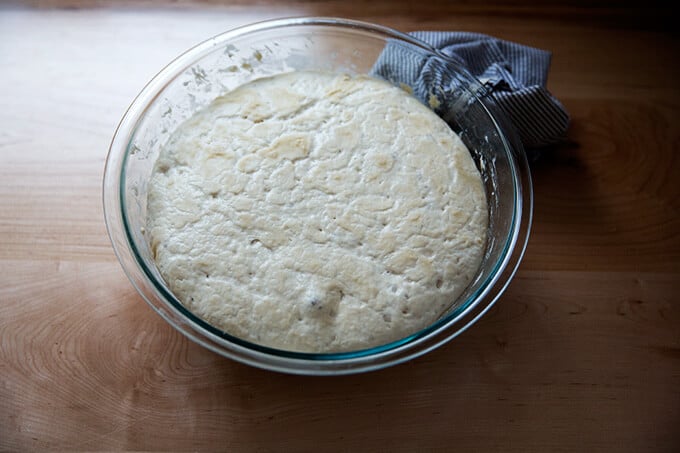
Then, perform a series of stretches and folds. See video for guidance (skip ahead to 1:13). Repeat this 3 more times for a total of 4 sets of stretches and folds during the first two hours. Then, let rise for 6 to 18 hours* (see recipe notes) at room temperature:
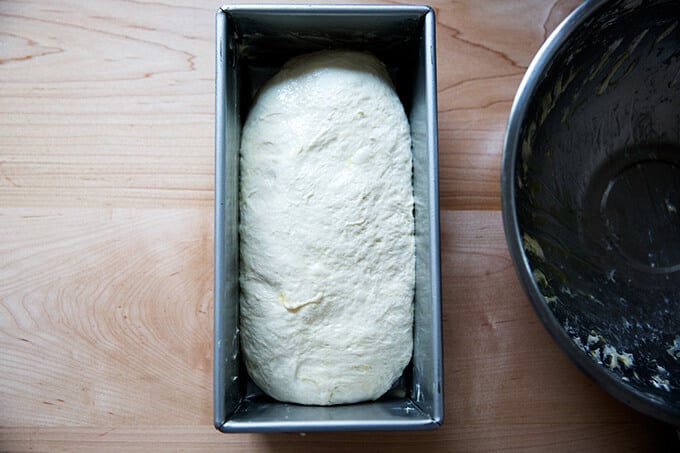
Drizzle the surface of the dough with a little bit of olive oil; then fold the dough inwards from the sides to deflate.
Transfer the dough to a large, buttered loaf pan. I use this 10 x 5-inch loaf pan but a 9×5-inch loaf pan will also work.
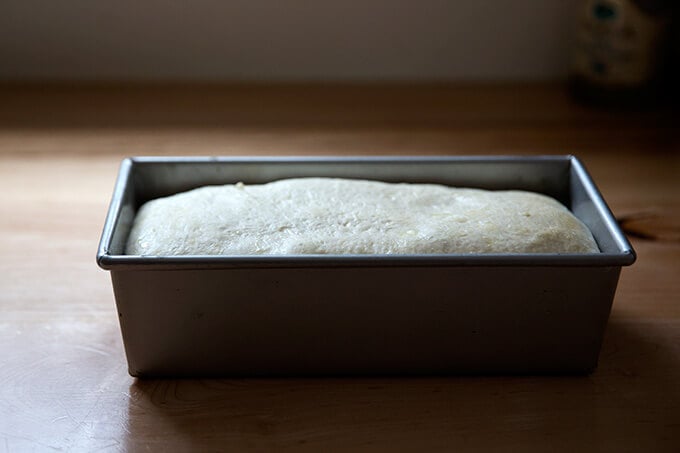
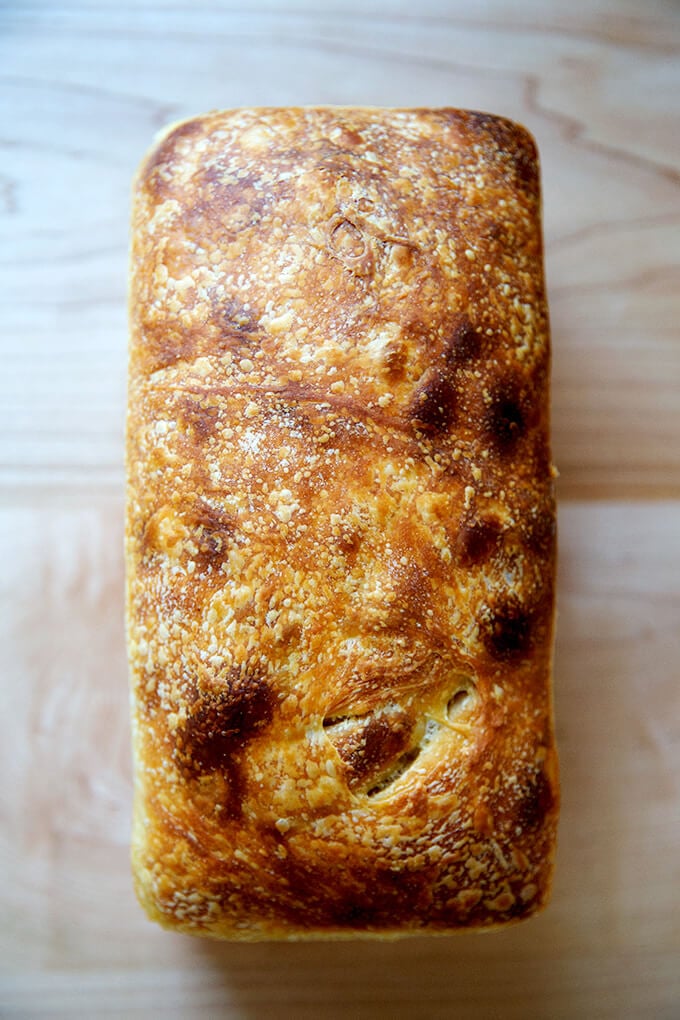
Let the dough rise just until it begins to crown the rim of the pan, about 6 hours.
Bake for about 45 minutes or until golden brown all around.
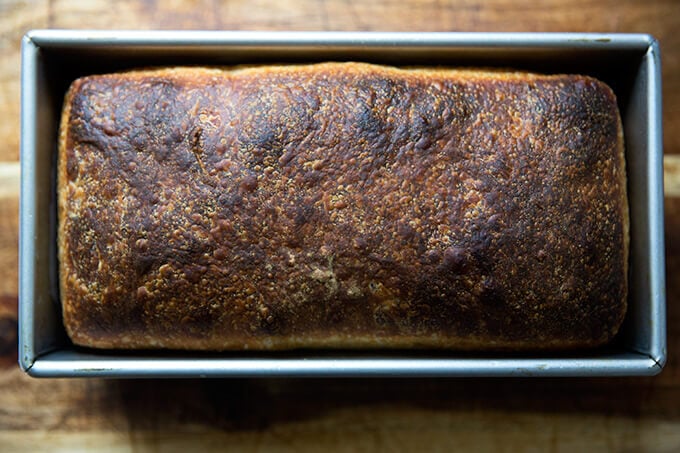
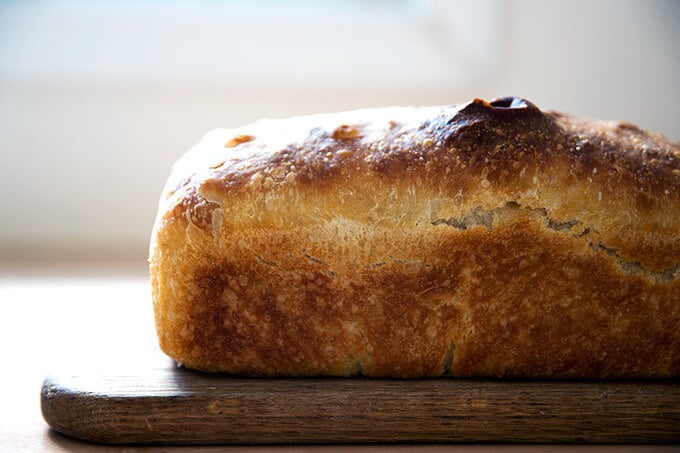
Let cool for at least 30 minutes before slicing.
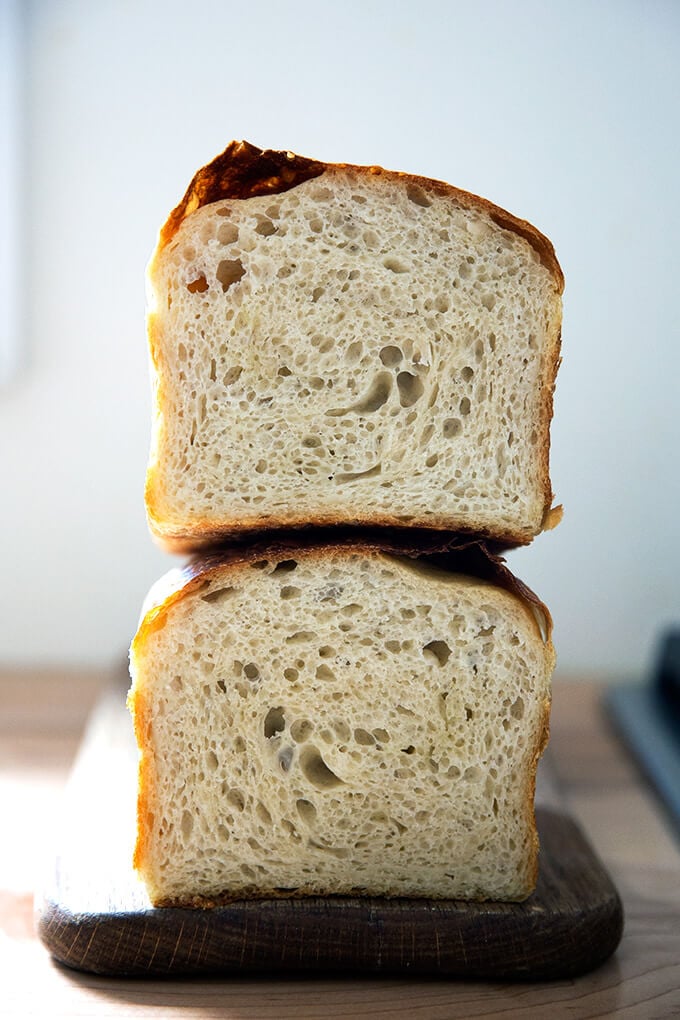
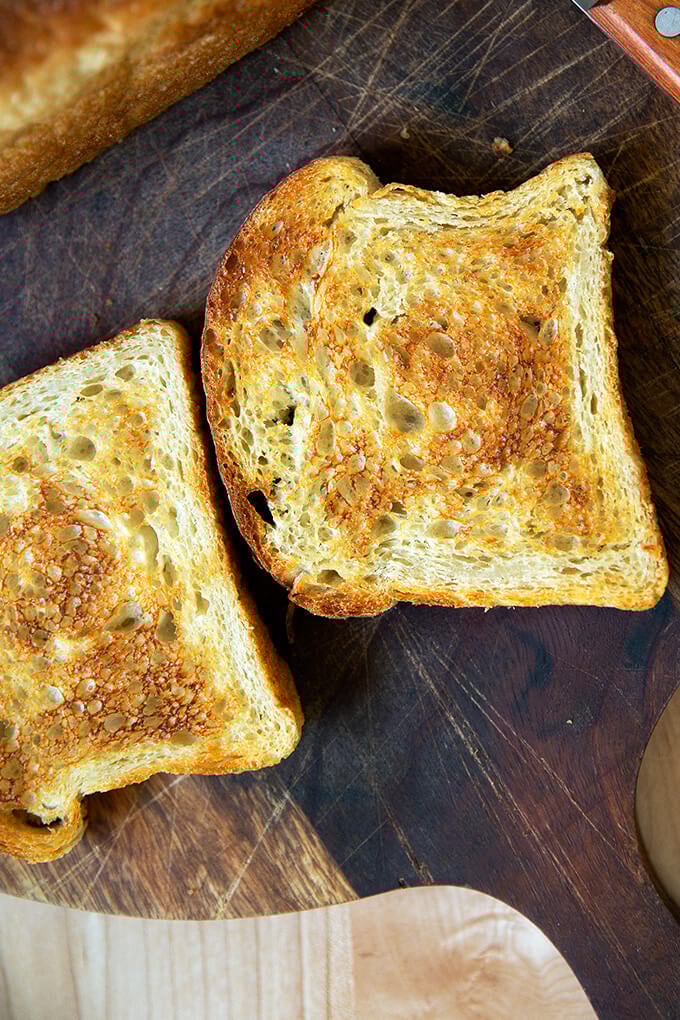
It makes excellent toast, too.

I love this tall-sided pullman loaf pan, too:

Easy Sourdough Sandwich Bread
- Total Time: 24 hours 40 minutes
- Yield: 1 loaf 1x
Description
This easy sourdough sandwich bread requires no complicated shaping, no scoring, and no preheated heavy Dutch oven. Grab your mixing bowl, pull out a spatula, and butter your loaf pan. This one is simple and delicious!
Notes:
Pan: You’ll need either a 10 x 5-inch loaf pan or a 9×5-inch loaf pan.
Plan ahead: This dough rises first for 6 to 18 hours (or less if it is super hot out or if you live in a humid area) or until the dough doubles in volume; then again for about 4 to 6 hours or until the dough crowns the rim of the baking vessel.
Troubleshooting: If you have issues with your dough being too sticky, please read this post: Why is my sourdough so sticky? The 4 common mistakes.
If you’re just getting started with sourdough, check out this post first. You’ll find tips there on procuring a starter as well as how to feed it and maintain it. If you’re up for making your starter from scratch, you can do so in just about 1 week.
Water: Chlorine in water can adversely affect sourdough. Leaving water at room temperature for 24 hours will allow most of the chlorine to escape. When I am in the habit of making sourdough bread, I fill a large pitcher with water and leave it out at room temperature. I use this for my sourdough breads and starter. Truth be told, I’ve used water straight from the tap and have not noticed a difference.
Water quantity: Also, depending on where you live and the time of year, you may need to cut the water back. If you live in a humid environment, for instance, I would suggest starting with 400 g or 420 g water. If you are not using bread flour, you also may need to cut the water back a bit. So much success with sourdough relies on getting the water quantity right.
Starter: I use a 100% hydration starter, meaning it is equal parts by weight flour and water. If you need guidance on how to maintain a starter, see this post.
Ingredients
- 100 grams (about 1/2 cup) active starter, see notes above
- 10 grams (about 2.5 teaspoons) kosher salt
- 430 grams water (or less, see notes above), room temperature
- 512 grams (4 cups) bread flour, such as King Arthur Flour
- a few tablespoons extra-virgin olive oil
- room temperature butter, for greasing
Instructions
- Mix the dough: Place the starter, salt, and water in a large bowl. Stir with a spatula to combine — it doesn’t have to be uniformly mixed. Add the flour. Mix again until the flour is completely incorporated. If you have a straight-sided vessel, transfer the dough to it — it really helps monitor the rise and allows you to see the true growth in volume of the dough.
- Perform one (or more) “stretches and folds”: 30 minutes after you mix the dough, reach into the bowl and pull the dough up and into the center. Turn the bowl quarter turns and continue this pulling 8 to 10 times. See video for guidance. If time permits, repeat this “folding” step every 30 minutes for the first two hours. (Note: even if you perform just 1 fold, your dough will be in good shape.)
- Let it rise. Drizzle with a splash of olive oil and rub to coat. Cover bowl with a tea towel, bowl cover, or a lidded vessel, and set aside to rise at room temperature (70ºF/21ºC) for 4 to 18 hours — if it is super hot out or if you live in a humid environment, it may only take 4-6 hours. When the dough has nearly doubled in volume (or UPDATE: increased in volume by 50%, which is when I now end the bulk fermentation), it is ready. (Note: Do not use an oven with the light on for the bulk fermentation — it will be too warm. It is best to rely on visual cues (increasing in volume by 50% or doubling if you’ve had success with doubling) as opposed to time to determine when the bulk fermentation is done. A straight-sided vessel makes monitoring the bulk fermentation especially easy.)
- Prepare the pan. When the dough has nearly doubled, grease a 9×5-inch loaf pan or 10 x 5-inch loaf pan with butter (or nonstick spray).
- Let it proof. Drizzle dough with a few tablespoons of olive oil. Rub your hands with a little bit of oil to coat. Use your hand to release the dough from the sides of the vessel, being careful not to completely deflate the dough. Video guidance here. Turn the dough out onto a work surface. Quickly, shape the dough into a rectangle — fold the dough envelope-style first; then use a bench scraper to shape the dough into a rough rectangle. Transfer dough, seam-side down to prepared loaf pan and gently stretch into an oblong shape. (At this point, you can transfer the pan to the fridge if it makes sense with your schedule: rub the dough with oil and cover with plastic wrap, or tuck the whole pan into a 2-gallon ziptop bag. Transfer to the fridge till the next day. Then proceed with the recipe.) Leave the pan alone for 5 to 6 hours, or until the dough reaches the rim of the pan — this may take less time when it is very warm out. Do be patient with this second rise: to get good height, the dough should be near the rim of the pan before you transfer it to the oven.
- Bake it. Heat oven to 425ºF. Transfer the pan to the oven and bake for about 20 minutes. Reduce heat to 375ºF. Bake for 20 to 25 minutes more or until golden all around. If you have an instant read thermometer, it should register 206-210ºF or so before removing. Remove the pan from the oven and turn the bread out onto a cooling rack. Cool for at least 30 minutes before slicing.
- Prep Time: 24 hours
- Cook Time: 45 minutes
- Category: Bread
- Method: Sourdough/Natural Leavening
- Cuisine: American
This post may contain affiliate links. Please read my disclosure policy.


1,405 Comments on “Easy Sourdough Sandwich Bread”
I’m confused. You do let it rise in the fridge and the. Straight into the oven ?
What a beautiful sourdough sandwich bread recipe!! And it is so much easier than others around. It is delicious and turned beautiful. Thank you Ali. You are a master. When I bake bread, I am only using your recipes.
So nice to read this, Madel 🙂 🙂 🙂 And thank you.
This sandwich bread is so delicious and light. I found that you really had to be patient for the second rise. I didn’t have the right size bread pan so I split it in two and used the smaller pans. Next time I will have the proper size. My two little loaves are a little small for sandwiches. We made it work though. I’ll never purchase bread again. Thank you for this recipe!
So nice to read this, Lisa 🙂 🙂 🙂 Glad you were able to make the smaller loaves work. Thanks for writing.
This is my go to recipe. Love it 💕 Thank you very much.
Great to hear, Natwara! Thanks for writing 🙂
This is the second time using this recipe I hope will turn out as great as last time. I wonder if I can double this recipe or how does it work doubling recipes with sourdough starter?
Yes, double away!
This is my 2nd Attempt, and while it looks great, my son feels it’s not cooked all the way, still feels dense and wet almost. Do I need to cook longer? Leave in oven for awhile turned off with door open?
Did you just remove it from the oven? Or have you already cut into it? I guess I’m wondering how you are determining it is dense and wet?
If you haven’t cut it, you can definitely leave it in the oven longer — 5 to 10 minutes should be fine… it’s forgiving! Next time around, you may need to hold back some water from the start.
Can this be baked in a bread maker after the second rise?
Not sure! I’ve never used a bread maker… I don’t see why it wouldn’t work, however.
I’ve had better luck with this recipe than any other sourdough bread recipe. Im wanting to experiment now with adding King Arthur’s ” Harvest Blend” to this recipe. Any suggestions on adjustments I might need to make. Also, do I need to make any adjustments if I use half wheat or rye flour and half bread flour? Thank you! This is a fantastic recipe! Does the higb hydration level of this recipe help with rising?
Great to read all of this, Stacey!
You may want to reduce the amount of water — you’ll find with rye flour the dough will be wetter/stickier because it won’t create as strong a gluten network. I have never used the “harvest blend” so I can’t speak to that, but what I do know is that all flours absorb water differently, so it may take a little bit of trial and error to get right. You can either start with the same amount of water and then adjust next time around; or you can hold back 50 or so grams of water, then add it back in slowly if the mixture looks dry.
To answer you question: yes, higher hydration doughs rise more quickly. Good luck!
Thank you so much! I should have clarified that the Harvest Grains Blend is a mixture of seeds and wheat berries and flakes that can be added to dough.
Awww I see! You shouldn’t have to adjust the water. Sounds delicous! I want some 🙂
I made your loaf recipe. I started it last night and baked it today. All I have to say is that it turned out amazing. It really is easy and fool proof. I had a slightly smaller loaf pan so it rose over the edge but when I baked it it looks beautiful and lots of air pockets. I will definitely make this again and again 🙂
Oh fun! Great to hear, Mariella. Thanks for writing 🙂
Obsessed with this recipe- thank you!! How long does it keep and what’s the best way to store it?
I store it at room temperature in an airtight bag. And I always toast it or heat it on days 2 and beyond.
Great to hear!
I’ve been baking artisanal sourdough for a while, but despite wanting to, never got around to making an easy sandwich loaf. This was my first attempt and it’s perfect! Very easy. Loved the way the dough came together, rose, formed, then rose again, even in my 61-degree house. I split the flour 200g WW, 312g bread.
Great to hear, Henry! Thanks so much for writing 🙂 🙂 🙂
Great recipe! I made it yesterday and it is delicious!
Quick question- if I wanted to use the refrigerator for proofing can you confirm if that should be done in the original bowl or the loaf pan? Just want to make sure I understand. I plan on going that route today because I don’t want to bake until tomorrow 🙂 thanks!
JK I just watched the video! All good! I’m wondering if these will be overproofed possibly by tomorrow morning but hopefully not!
Hi! They shouldn’t be… sourdough doesn’t grow that much in the fridge. Would love to know how it turns out! Good luck 🙂
Is this really supposed to be an 84% hydration dough? 430g of water to 512g of bread flour? Followed the measurements and the dough is a wet lump. No strength or shape. Just got it into the pan for 2nd rise. We’ll see how it turns out.
That is correct. It’s possible you need to reduce the water given your environment. Do you live in a humid environment? What brand bread flour are you using?
I used Bob’s Arisan Bread flour. I love in Southern California, no not too humid, but I do tend to have dough proof on the quick side.
The load turned out pretty good. Had a real nice tangy flavor, but it did have a tacky feel. Could that be overproofung?
It’s possible that you do simply need to reduce the amount of water. I use King Arthur Bread flour, and I have learned over the years that different brands absorb water differently, so it’s possible that Bob’s just absorbs less water leaving you with a wetter dough. I would hold back 25-50 grams of water next time around.
Thank you. I use KA as well as Bob’s. I’ll give it a shot. As I said, the taste was excellent. Texture was just a bit tacky.
I love this recipe! The bread I made is better than any I could get in a bakery. It’s light and moist with a delicate sourdough flavor. I just made a sandwich with it, and can’t wait to make toast in the morning. Thank you, Ali!
Great to hear, Helen! Thanks so much for writing 🙂
Hi Ali
I’ve been relying on you for all breads that I tried to bake. They are easy to follow and delicious. Thank you so much ..
I just baked my first sourdough sandwich bread and it turned out beautiful and yummy. I am not too sure though about the fermentation time so I wanted to check with you. First bulk fermentation was only approx 4 hours (it was probably around 91F) and second was much shorter – nearly 2 hours (evening, about 79F). Any tips if I should be making bread at night or something? Any ideal temperature to bake?
Wow, that’s great! Your warm environment is definitely helping the bulk fermentation and second proof move right along. If you want to slow down the fermentation, after the bulk fermentation you could shape the dough and get it into the pan. Tuck the whole pan into a ziplock bag (you’ll need a 2-gallon bag or you can use one of those grocery produce bags and tie it with a know) and stick it in the fridge, then proceed in the morning. There’s no ideal temperature to bake! It’s just when the dough is ready 🙂
This is the absolute best sandwich bread! I saw your comment reply about doubling the recipe but was curious if you would divide into two bowls/pans before or after the first bulk fermentation?
Hi Briana! I would divide after the first bulk fermentation.
Another great recipe Ali. I have to say, I twitch a bit when I see the salt going in with starter but it works and I’m going to have a go!
I know! It feels all wrong but it all works out 🙂
This is my go-to sourdough sandwich bread recipe. I’ve been experimenting with different additions- last night, I baked one with gouda, rosemary, and crushed garlic added during the stretch and folds. Also great with dates and cinnamon/sugar added during shaping. So good! Thank you for this recipe!
Oh fun! Love these ideas so much. Thanks for sharing 🙂 🙂 🙂
I have made this recipe twice so far and absolutely LOVED the bread the texture and light airy taste. So different from other recipes. I just have just one issues with it that I am looking to perfect.
1) it is winter here now and temperature is about 23 degrees Celsius in my home. Quite warm I find shaping to be very difficult with such a high hydration loaf and I literally plop the dough into the bread pan. Is there any tips on how I can shape it better or tighter. Am I meant to deflate it as I haven’t been and that makes it ever more so difficult for me.
Hi! It is definitely a wet, tricky dough to handle, but as you can see from the video, I don’t severely deflate it, but I do deflate it somewhat after the bulk fermentation. I’d suggest two things: 1. You could try holding back some of the water to make the dough more manageable for you. 1. Practice using minimal but swift movements — plopping the dough into the bread pan is actually fine! It’s a very forgiving recipe.
What a great recipe! Can this be used for a boule as well?
I worry it’s a little too high hydration. Try this recipe: Homemade Sourdough Bread, Step by Step
Thank u!
This bread is amazing and foolproof! It makes the best bread for grilled cheese, french toast and even just plain toast! Thank you for this recipe!
Great to hear, Jeanna! Thanks for writing 🙂
1) how would I. Need to alter recipe to fill a 13x4x4 Pullman pan. as I’m baking one now and it has completely filled pan.
2) the loads have been not crispy enough on outside to hold shape when I cut into them.( unless a day or two old )
Should I remove the Pullman lid during second half ?
Hi. To clarify, you need to scale back the recipe to fit your pan? Regarding the crispness, it’s possible you need to reduce the amount of water to make for a sturdier loaf. Are you using a scale to measure?
I have not made a pullpan loaf with the lid on in years… if you leave the lid on the entire time, does the top get brown? Does the loaf cook all the way through?
Hi. Sorry. I meant it did not completely fill the 13x4x4.
I am using a scale to measure
It was slightly gummy on the inside, but it does brown on the top. Perhaps removing the lid for 10 or 15 minutes will help fix that.
I think doubling the recipe might be too much, so I’d suggest doing 1 1/3 times the recipe.
Thank you for the recipe! This is the third sourdough sandwich recipe I’ve tried and definitely my best success so far. Love all your sourdough recipes!
Great to hear, Julie! Thank you for writing 🙂
I’ve been making this bread weekly for the past 2 month. It is so easy to make and so delicious
Great to hear, Mary Ann!
I am new to sourdough baking. This is the first bread I tried after reading the reviews. Reduced the water to 400gm. I had a smaller pan so divided the dough in two after the bulk rise and made the focaccia as well. Both came out perfect! I’m really pleased and have another one in the making already.
Great to hear! Thanks for writing 🙂
I am new-ish to Sourdough and heritage loafs. My starter was brough from Macedonia by my mother when she was a young girl–very hearty! I typically make boules, but I really wanted to try a sandwhich friendly bread. THIS WAS INCREDIBLE. Stay the course, though!–it looked so wet and had absolutely no shape until the very end of the second proof when it EXPLODED (in the best way).
I do live in Miami Beach so I “reversed” the instructions and after 3 hours did an overnight proof in the fridge. I then let it sit on my counter for about 5 hours before transfering to the loaf pan for a 6 hour second proof. I have nothing to compare it to but, boy, is it delicious. Will be using this recipe again!
Wonderful to read all of this, Moriah 🙂 🙂 🙂 Thanks so much for writing and sharing your notes… very helpful for others!
Absolutely fantastic recipe. Made it 3 times now – perfect. Doubled the recipe, made 4 loaves (smaller pans. Long overnight rise, and then long second rise in pans – on counter, then fridge. My lanta – the flavor is on point !
Great to hear, Terra! Thanks so much for writing 🙂
I’m confused; I’m a newbie at this and am just now proofing the dutch oven sourdough in the fridge, which makes it take much longer before baking. However, this sourdough recipe does not require the fridge proof. Why do I need to fridge proof the dutch oven recipe? What is the difference? Thank you!
I just find adding a cold proof (i.e. more time) with the Dutch oven breads improves the crumb (i.e. makes it lighter and airier). With this one, I’m not looking for as many of those open holes in the crumb — it should still be light, but not necessarily as open.
This was a HIT. Definitely going to be using this for our household!
Great to hear, Lili!
Hi! Is it possible I need to add more water? My dough after mixing feels really firm and tight and I’ve been finding this with other recipes too. Is this normal? Or should I add more water? My sourdough starter thrives on a 1:3:3 ratio. I’m still fairly new to sourdough so I’m not too sure what is normal or not.
Hi! Are you using a scale to measure?
No, have yet to grab one!
I think that’s where you should start… it’s so hard to ensure you are measuring accurately without one, and in turn, it’s so hard to make meaningful adjustments based on your results. Until you get a scale, I would reference the video to see what the texture of the dough should look like and use a little more flour or water accordingly.
Can I use parchment paper when proofing in the tin and when baking? as this is easier for washing and prevent it from sticking in the tin.
Sure!
I might like this better than the original boule style sourdough. In my opinion this has a more pronounced “sourdough” flavor. The dough is trickier to work with and I folded it wrong before putting in the loaf pan but it still rose and came out great. I like that the crust is not as hard-core as a loaf baked in a Dutch oven while the interior still has that nice sour dough texture. I used a 12.5×4.5×3.5 loaf pan and it worked very well with this recipe and makes a nice small sandwich sized slice.
You can also have bread in 1.5 days vs 3-4 days 🙂
I look forward to making again with the correct envelope folding technique.
Great to read all of this, Dierdre! Thanks so much for writing and for sharing your notes/thoughts. I tend to agree about the crust — I don’t love it when it’s super crusty.