 →
→ Simple Sourdough Focaccia: A Beginner’s Guide
This post may contain affiliate links. Please read my disclosure policy.
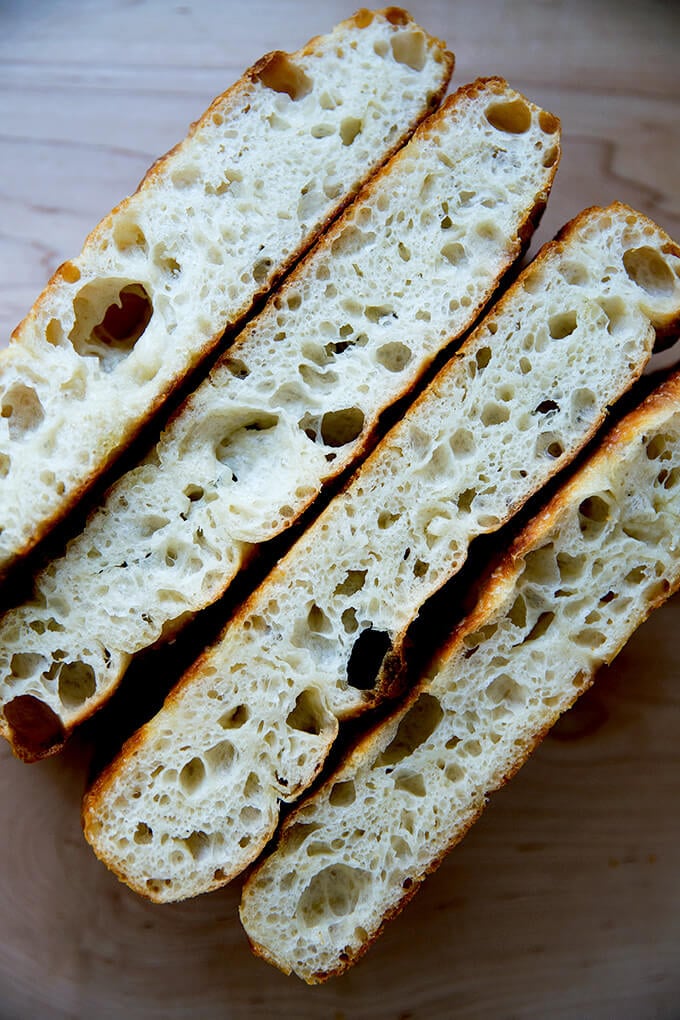
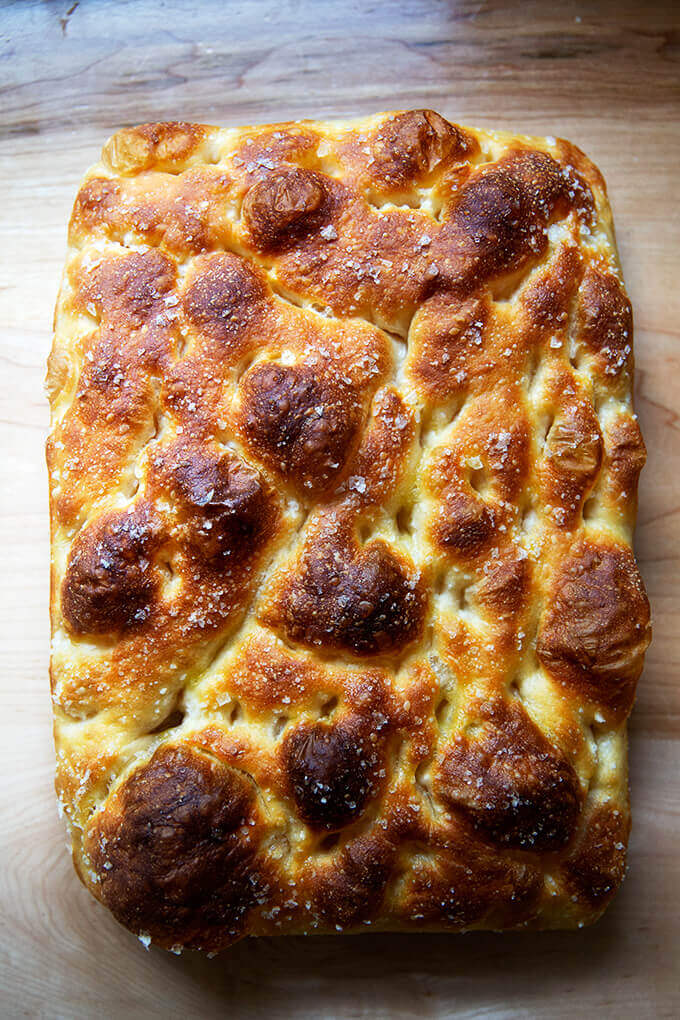
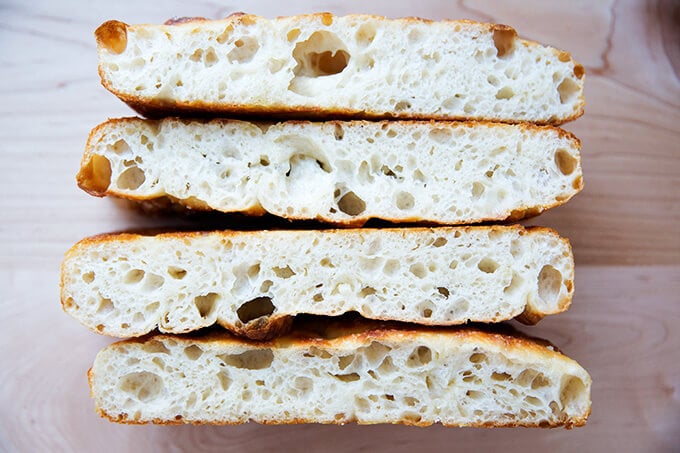
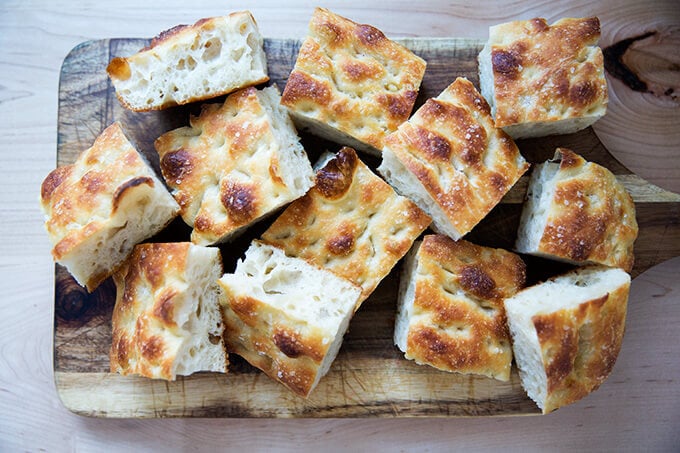
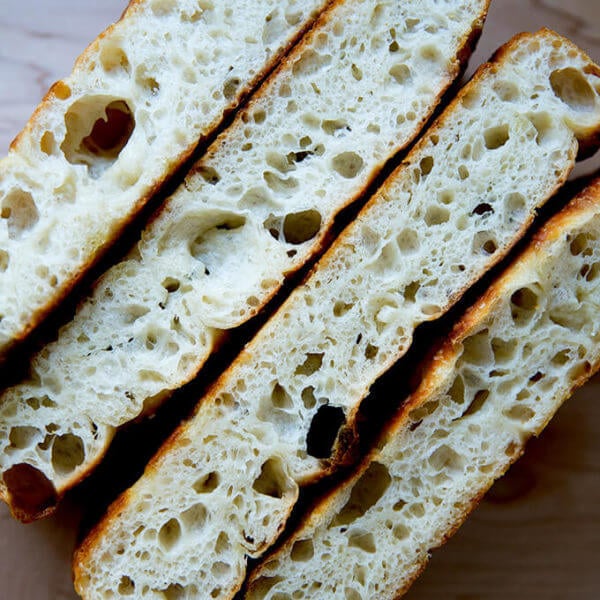
With its oil-crisped crust and light, bubbly crumb, sourdough focaccia is a delicious and versatile bread, perfect for sandwiches but also great as an appetizer and dinner bread. It’s also one of the easiest breads to make. Find step-by-step instructions on how to make this wildly popular bread below!
Adapted from my favorite yeasted, slow-rise focaccia recipe — overnight refrigerator focaccia — this sourdough focaccia recipe replaces the yeast with a sourdough starter. If you are interested in getting started with sourdough, focaccia is the ideal place to start.
Why? First, it requires no special equipment — not a Dutch oven or a Baking Steel. All you need is a 9×13-inch pan, which you likely own. Second, unlike sourdough boules, which require practiced shaping, sourdough focaccia requires nothing more than whisking, stirring, and sliding the dough into a pan. Third, it requires no scoring. With focaccia, you don’t need a razor-sharp lame — you use your fingers to dimple the dough.
Focaccia, sourdough or otherwise, is my favorite bread for so many reasons, namely its versatility — sandwiches, appetizers, dinner — but also its flavor and texture: the oil-crisped crust, the generous amount of salt, the chewy crumb. Learn to make it at home by following the simple guide below.
How to Make Sourdough Focaccia, Step by Step
First, wake up your starter by feeding it. If you don’t have a starter and don’t have a friend who can lend you one, I recommend buying one. When you are ready to feed your starter, discard most of it, down to a tablespoon or two, then add about 45 g flour…
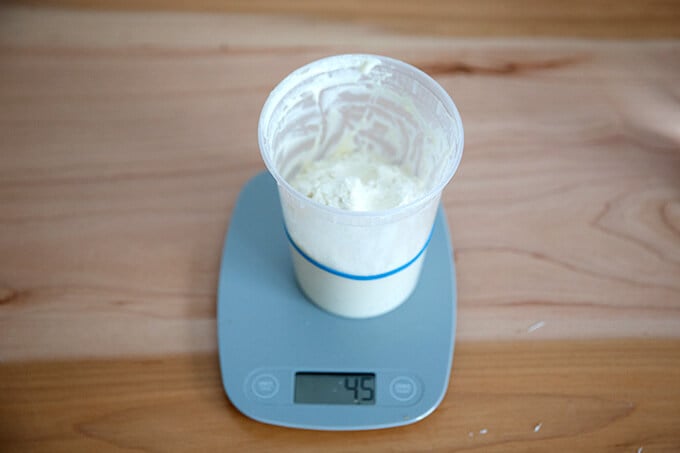
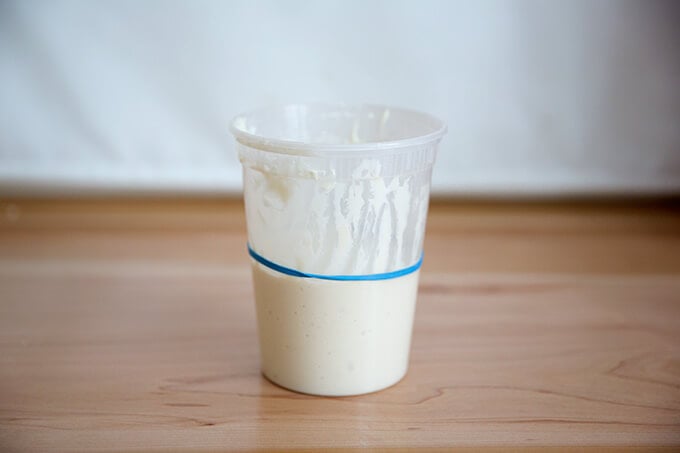
… and 45 g water. You don’t have to be exact, but when you’re getting started, I think it’s helpful to weigh both the water and flour. Depending on how long the starter has been in the fridge, it may need one or two feedings before use.

If you stick a rubber band around your starter vessel, you’ll know when …
… it has doubled and is ready for use.
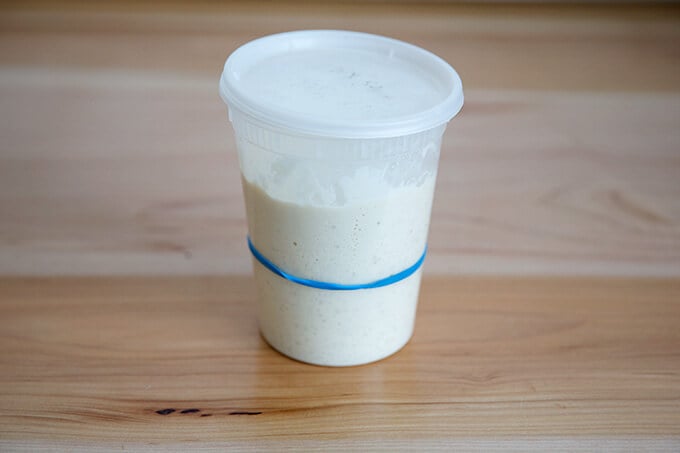
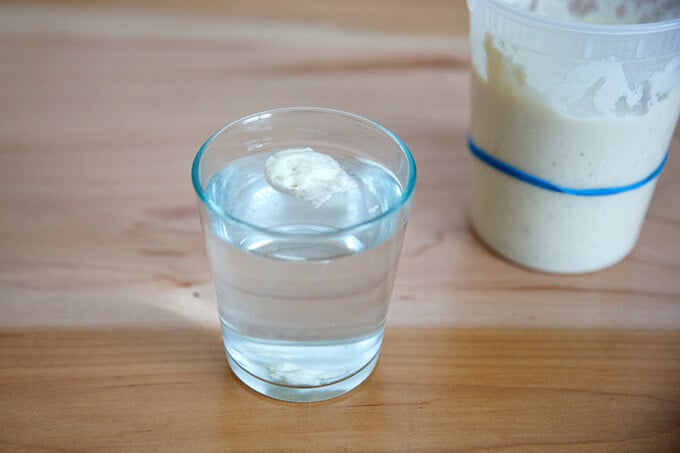
If you need reassurance as to if it’s ready, you can do the float test: drop a spoonful of starter into a glass of water. If it floats, it’s ready.
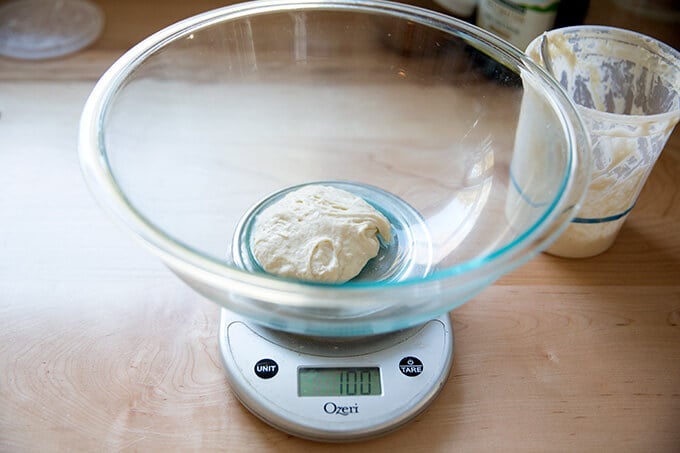
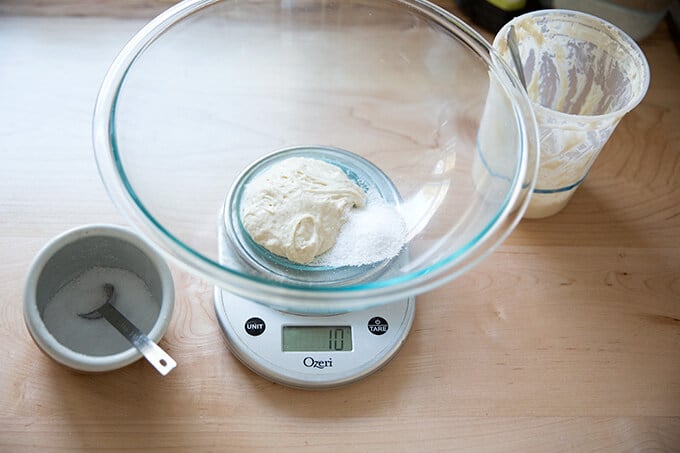
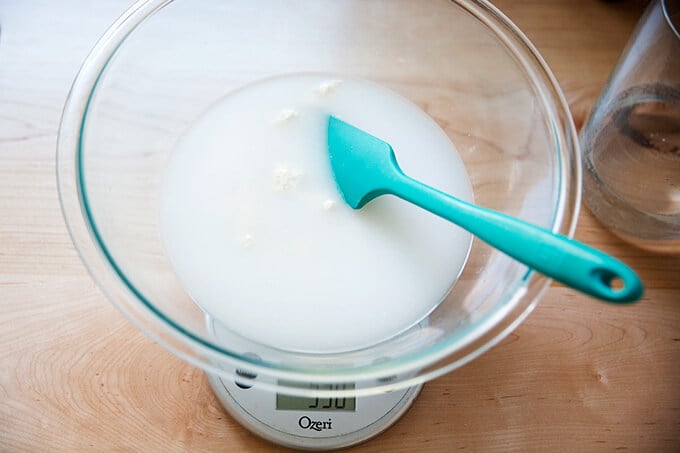
As with all bread, when mixing sourdough doughs, it’s best to weigh everything with a digital scale. Start with 100 g starter.
Add 10 g kosher (or other) salt.
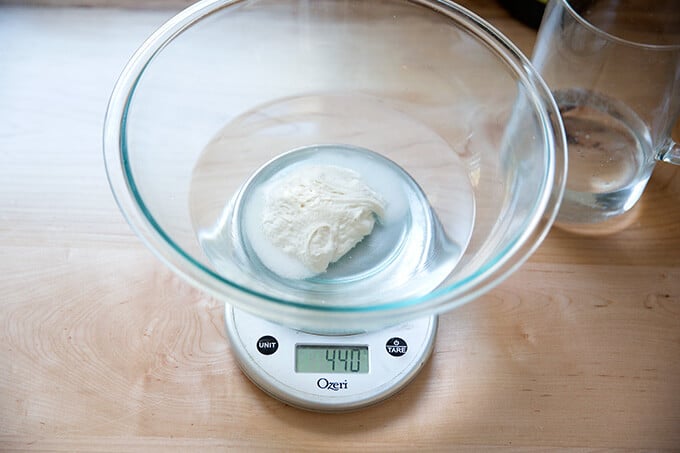
Add 440 g water. (See recipe notes: If you live in a humid environment, you may want to use less.)
Stir to combine.
Add 512 g bread flour.
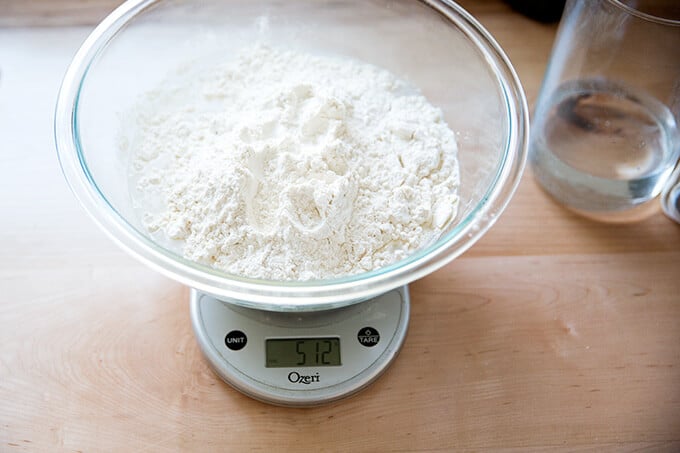
Stir to form a sticky dough ball.

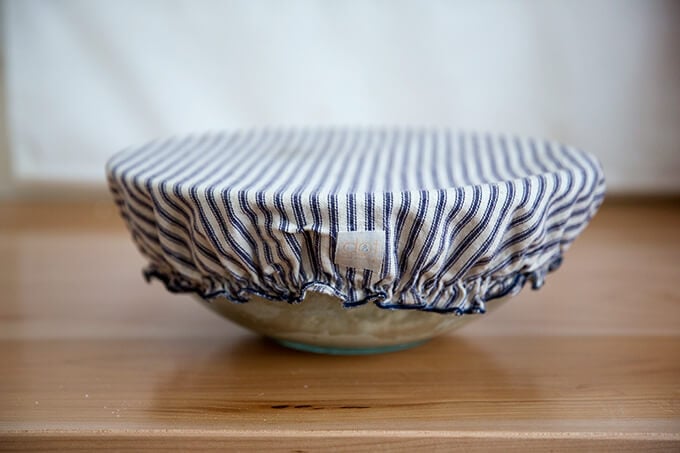
Cover with a towel or bowl cover, and let rise for 8 – 18 hours at room temperature (times will vary depending on the time of year and how warm your kitchen is … in the summer, this may take only 4 hours):
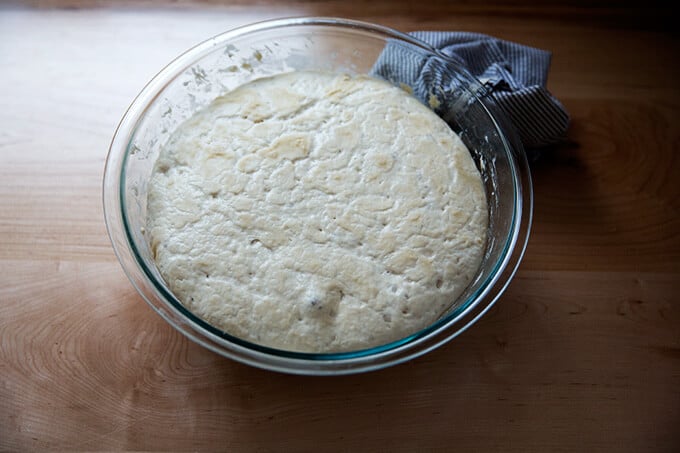
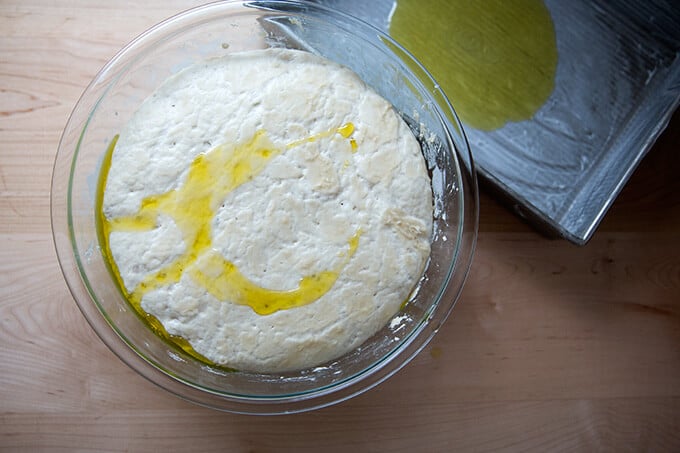
When it doubles …
… drizzle it with some olive oil.
Deflate the dough by pulling the sides into the center.
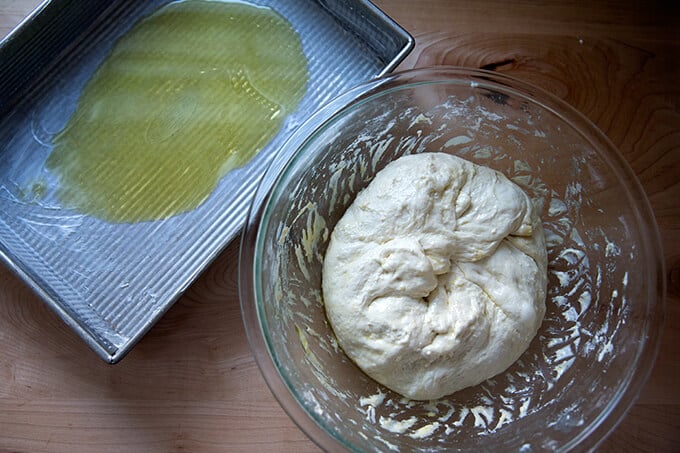
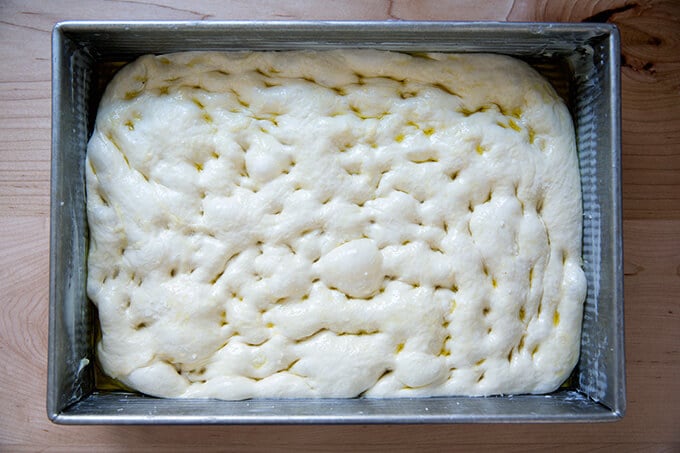
Dough, ready to make it’s second rise, which will take 5-6 hours. Love this USA Pan.
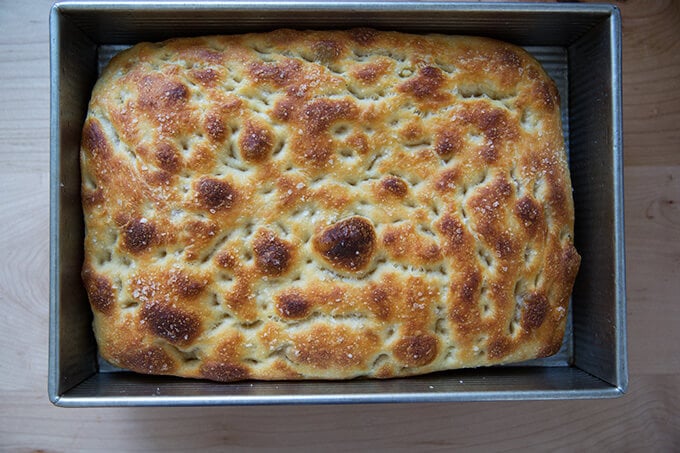
After 5-6 hours, the dough is ready to be dimpled and stretched and salted. Bake at 425ºF for 25 minutes.
Just-baked sourdough focaccia:
Simple Sourdough Focaccia
- Total Time: 24 hours 25 minutes
- Yield: 1 loaf 1x
Description
With its oil-crisped crust and light, bubbly crumb, sourdough focaccia is a delicious and versatile bread, perfect for sandwiches but also great as an appetizer and dinner bread. It’s also one of the easiest breads to make. Find step-by-step instructions on how to make this wildly popular bread below!
Notes:
Adapted from my favorite yeasted, slow-rise focaccia recipe — overnight refrigerator focaccia — this recipe replaces the yeast with a sourdough starter. Find video guidance and step-by-step instruction below.
What you need to make this recipe…:
- …a sourdough starter. You can buy one (from places like Breadtopia or King Arthur Flour) or you can make it yourself from scratch (a one- to two-week process).
- …time. Once your starter is ready to go, this recipe requires an initial 4- to 18-hour rise, followed by a second 4- to 6-hour second rise. After the initial rise (depending on the time of year and temperature of your kitchen), you can deflate the dough, and stick it in the fridge for 8 to 10 hours (maybe longer), which might help you regarding your schedule. Keep in mind, when you remove the dough from the fridge and transfer it to a pan, it will still need to rise for another 5- to 6- hours.
- …water. Chlorine in water can adversely affect sourdough. Leaving water at room temperature for 24 hours will allow most of the chlorine to escape. When I am in the habit of making sourdough bread, I fill a large pitcher with water and leave it out at room temperature. I use this for my sourdough breads and starter. Truth be told, I’ve used water straight from the tap and have not noticed a difference.
- …mixing/rising vessels. I love this 4-quart bowl + lid set for mixing and rising all sorts of dough. With sourdough, I love using a straight-sided vessel for the bulk fermentation, which allows me to see precisely how much my dough has increased in volume.
Water quantity: Depending on where you live and the time of year, you may need to cut the water back. If you live in a humid environment, for instance, I would suggest starting with 430 g water. If you are not using bread flour, you also may need to cut the water back a bit.
Timing:
The more I make sourdough, the more I realize so much depends on the time of year and the temperature of my kitchen. In the summer, because it is so warm, the first rise (bulk fermentation) takes between 4 – 6 hours; in the winter the first rise takes 12 – 18 hours.
This recipe’s key is to ensure the first rise doesn’t go too long — you want the dough to nearly double. A straight sided vessel (as opposed to a bowl) makes gauging the first rise easier. (Note: If your dough rises above double, don’t despair … recently my dough tripled in volume during an overnight rise, and the resulting focaccia was still delicious, light, airy, etc.)
A few thoughts: If you are making this focaccia in the summer (northern hemisphere), use 50 g of starter and check the dough every couple of hours. If you are making this in the winter, use 100 g of starter, and plan for a long first rise.
Troubleshooting: If you have issues with your dough being too sticky, please read this post: Why is my sourdough so sticky? The 4 common mistakes.
Flour choice:
- I’ve been using King Arthur Flour’s special patent flour — bought a 50-lb. bag of it at Restaurant Depot. Its protein content, 12.7%, is the same as the protein content of its bread flour. I also have used all-purpose flour (11.7%) with success, but I recommend bread flour, which seems to be more reliable for people especially those living in humid climates. If you only have ap flour on hand, you may consider reducing the water a bit — bread flour absorbs slightly more liquid than all-purpose flour.
Ingredients
- 50 g – 100 g (1/4 to 1/2 cup) active starter, see notes above
- 10 g (about 2.5 teaspoons) kosher salt
- 430 – 440 g water (1.75 cups – 1.75 cups + 2 tablespoons), room temperature, see notes above*
- 512 g (about 4 cups) bread flour, see notes above
- 3 tablespoons extra-virgin olive oil, divided, plus more for drizzling
- Nice, flaky sea salt, such as Maldon
Instructions
- Place the starter, salt, and water in a large bowl. Stir with a spatula to combine — it doesn’t have to be uniformly mixed. Add the flour. Mix again until the flour is completely incorporated.
- If time permits, perform one “fold”: 30 minutes after you mix the dough, reach into the bowl and pull the dough up and into the center. Turn the bowl quarter turns and continue this pulling 8 to 10 times. See video for guidance.
- Drizzle with a splash of olive oil and rub to coat. Cover bowl with a tea towel or bowl cover and set aside to rise at room temperature (70ºF/21ºC) for 4 to 18 hours (the time will vary depending on the time of year, the strength of your starter, and the temperature of your kitchen — in summer, for instance, my sourdoughs double in 6 hours; in winter, they double in 18 hours. Do not use an oven with the light on for the bulk fermentation — it will be too warm. It is best to rely on visual cues (doubling in volume) as opposed to time to determine when the bulk fermentation is done. A straight-sided vessel makes monitoring the bulk fermentation especially easy because it allows you to see when your dough has truly doubled.).
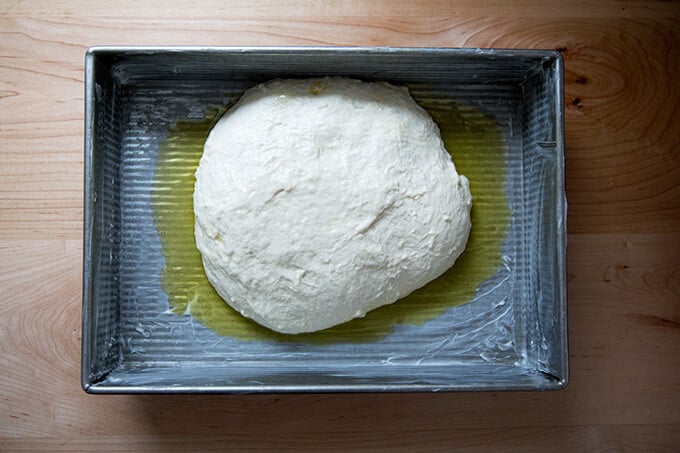
- When dough has doubled, place 2 tablespoons of olive oil into a 9×13-inch pan. (I have been using this USA Pan, which I love. I have had no sticking issues. If you are using a glass pan, you may, as a precaution, want to butter it it first — I have had disasters with bread sticking when I’ve used oil alone with other baking vessels.)
- Drizzle dough with a tablespoon of olive oil. Use your hand to gently deflate the dough and release it from the sides of the bowl. Gently scoop the dough into the center of the pool of oil in your prepared pan. Fold dough envelope style from top to bottom and side to side to create a rough rectangle. Turn dough over so seam-side is down. Video guidance here.
- Rub top of dough with oil. Leave alone for 4 to 6 hours, uncovered, or until puffy and nearly doubled.
- Heat oven to 425ºF. Rub hands lightly with oil, and using all ten fingers, press gently into the dough to dimple and stretch the dough to nearly fit the pan. Sprinkle generously with sea salt. Transfer pan to the oven and bake for about 25 minutes or until golden all around. Remove pan from oven and transfer bread to a cooling rack. Cool at least 20 minutes before slicing.
- Prep Time: 24 hours
- Cook Time: 25 minutes
- Category: Bread
- Method: Oven
- Cuisine: Italian
This post may contain affiliate links. Please read my disclosure policy.


1,672 Comments on “Simple Sourdough Focaccia: A Beginner’s Guide”
I cannot tell you how many times I have made this.
It’s turned out great every single time.
I guess I’m a rebel because I’ve actually used starter that is not active. Yup. Discard. I have even used discard that hadn’t been fed in 3 or 4 days. It still turned out amazing!
Thank you for such a great, easy recipe!!
Amazing! So nice to read all of this, Sylvia. Thanks so much for writing and sharing this. I will try soon.
I have made this recipe countless times, and I am not someone who usually repeats recipes. I really love it! The only change I’ve needed to make has been to increase the baking time by 5 minutes or so (even though my oven runs hot), so it browns a bit on the top. Thanks so much for this recipe, and for the detailed instructions!
Great to hear, Jen! Thanks for writing and sharing your notes 🙂 🙂 🙂
I’ve been making this recipe once a week. It’s a great pot luck dish, ‘cause who doesn’t love Focaccia?
Super easy and VERY delicious!
Can I refrigerate the dough in the morning, after rising all night and before shaping into a 9×13 pan? I won’t have time to bake before work so I was hoping to be able to toss in the fridge then shape, rise again and bake after work?
Yes! Absolutely 🙂 Sorry for the delay here.
Making this for the second time today. Just as good as more complicated recipes I’ve made. I def go for 100g of starter. Fantastic with carmelized onion 🧅 on top. I also increase the temp to 450 for better browning.
Great to hear! Thanks so much for writing and sharing these notes 🙂
Instruction #3 says to drizzle with olive oil during the 1st rise but the video doesn’t show the addition of oil. During rise #2 in the pan, do you cover it? If so what do you use. Thanks!
It’s not essential! I like to drizzle the dough with oil just to give it a little more protection as it rises. And it adds flavor. No need to cover it for the second rise.
Thanks for the reply. I made it and it turned out wonderful. Dipped in some EVOO and Balsamic with a Greek salad in the side. 😋
Yum!! Sounds so good 🙂
Great recipe! Enjoyed by all, it does not last long in the house.
Great to hear, Anne! Thanks for writing 🙂 🙂 🙂
I have made your sourdough bread and focaccia…….OUTSTANDING! EASY RECIPES AND DELICIOUS! THANK YOU!
JOANN
Great to hear, JoAnn! Thanks for writing 🙂
Easy to follow
Great to hear, Kelly! Thanks for writing 🙂
Easy to make, and dangerously delicious.
Great to hear, Lesley!
Yikes i guess my previous comment didnt post. .
Ok so ive made this a few times already with great success. I live in California so no humidity at all.
Its 72° in my kitchen. I used a good quality digital scale with new batteries. And bread flour. I only used 430g of water, 512g of bread flour (king arthur) 10g of salt, & 100g of SD starter. And i keep my starter on the thicker side not stiff, but just a little thicker, so no extra water throwing things off in my starter.
So weird this time it’s super wet. When i did the turns, it was really hard bc it was sticking to me like glue.
Any idea what it might be?
It has always come out beautifully when i made it before, exactly the same way. Lol. It’s a mystery 🤔
It’s the bread im using with a caprese dip for a party tomorrow & kinda freaking out that it isnt going to work 😬
It’s bulk fermenting right now…
Thanks a million, Ali!
All the best to you!
Cherish 😘
Ok nevermind.. i think i got it. I added about 25g extra flour during the first 30min of BF. and it helped. Still sticky. But i can see yours is, too.
I think i forgot because it’s been a few months since i made it.
I think when it’s really sticky, maybe very, very lightly coat your hand with olive oil when you do the turns so it doesnt stick to your hands.
Anyway, i think it’ll be ok. Weather is so crazy even in Calif & it affects everything. Because ive made this with no prob before. You just need to adjust and work with what is going on.
Thanks again, Ali! Xoxo
OK, glad you’ve figured it you! Yes, it’s definitely very wet and sticky. If you are still worried about it turning out, you could make the fast variation of this yeasted focaccia as a backup.
hi alex- i am your recipe fan from T-ride that sent you all the photos of all the your recipes i cooked- fangirl. anyway, i just started w/sodo this feb when my sister gifted me her starter… so i am now learning about all things baking. i have the foccacia in the oven and have an active starter so am searching… is there a place to see how to use this recipe for pyrex bowls like peasant bread?
many thanks
Hi! And great to read all of this 🙂 I do not have a tutorial on sourdough peasant bread but essentially you would make this focaccia recipe, then after the bulk fermentation, divide it between the two buttered bowls and let it rise again — the second rise will take much longer because of the nature of sourdough. You may want to slick the dough with olive oil, too, when it’s rising in the bowls so that it doesn’t dry out.
I have loved this recipe and have been successfully making it for almost a year. It’s always a winner and I LOVE IT.
However, please help! As it’s gotten warmer outside, the temperature is affecting the second rise. It now rises too fast and not properly and deflated at the lightest touch. My bread is now sadness and I’m sad.
Please help – can I put the dough in the fridge? If so, at what point and for how long?
Thank you!! Xx
Yes, definitely place the dough in the fridge after the bulk fermentation. You can do this for as long as needed: a few hours or 24 hours or longer.
Question: what type of flour are you using?
You could also try reducing the water slightly.
I use all purpose flour, but a weird European version as it’s all I can get.
The flour seems to have worked fine so far, the bread has always turned out great until now – the summer heat has definitely affected the rise.
Thanks for the response!!
OK, interesting! European flours do tend to create wetter doughs, so I often suggest reducing the water. But it is strange that you haven’t had trouble till now — the weather/change of seasons no doubt is playing a role here.
Just made it for the first time. Fantastic bread, so delicious and worked a treat. Will definitely be making more of this. Thank you.
Great to hear! Thanks for writing 🙂
Made this recipe before and worked great! Coming back to it to ask if I wanted to make this recipe with garlic/butter, at what point would you recommend mixing these in? I’ve seen a couple recipes (not sourdough) that recommend doing it after the first rise, is this when you would recommend?
Gosh, I’m not sure… are you adding cubes of garlic butter? or is it melted? If it’s cubes, I’d add them during the stretches and folds phase: perform one set of stretches and folds, let rest 30 minutes, scatter the cubes over the dough, then perform another set. Consider adding a third set of stretches and folds to ensure the butter is incorporated.
Hi, it’s me again, heartbroken. I was struggling with the second rise due to the summer heat (I made this recipe throughout winter on a weekly basis and it always turned out beautifully). You suggested I let the second rise happen in the fridge – I’ve tried this a few times now and it’s not working. The dough swells a little.but not enough to get the nice air pockets or eventual fluffiness. I’m sorry to bother but do you have any other tips? We miss our bread 😕 thank you!!
Hi! After your remove it from the fridge, are you letting it rise at room temperature again until it doubles in volume?
Yes but perhaps not long enough? I will keep trying!
Yeah, I think letting it rise at room temperature for 4-5 hours or until it doubles (covered so that it doesn’t dry out) will help.
Love this recipe. I want to be able to bake the day before I take to a party due to timing.
How should I store and warm up?
Jumbo ziplock bag (2-gallon size). Let it cool completely before storing it. Re-heat at 350ºF for 10-15 minutes or until heated through.
Great to hear 💕
Thanks! Am a beginner.No cold proofing needed for this recipe?
Nope!
Is there nutritional information available for this recipe?
Hi. I’m wondering if it matters having a much longer second rise- like 12 hour’s on the bench …?
You run the risk of the dough overproofing, which would mean it would completely deflate when you go to dimple it. You also run the risk of it overfermenting, which would mean in addition to deflating completely, you wouldn’t be able to re-ball it and let it rise again. You also run the risk of the dough drying out, so if you attempt this, be sure to slick the dough with lots of oil and cover it with plastic wrap. If your kitchen is very cool, you could potentially make a long second rise work, but I do worry that 12 hours is a bit too long.
Is the starter supposed to be room temperature?
Yes!
This was incredible! I used half bread flour and half AP flour and ended up having to add quite a bit extra flour which I kind of expected. It was still a little tacky but didn’t want to error on the side of too much flour. I made some garlic confit and sprinkled the garlic infused oil on it to dimple etc. and shoved the garlic cloves in the dimples of dough. Oh my WORD. so excellent. Thank you! It was perfect with some Alaskan salmon and grilled veggies.
Yum! Love the sound of all of this. Glad the dough wasn’t unmanageable — it definitely is wet and sticky. Thanks for writing and sharing your notes 🙂
I LOVED this recipe. I made it yesterday. Quick question on doubling after the first stretch n fold . My dough temp is usually 80 degree …yesterday I let it proof until 50% I let it rise unt it was 1.5 L
Per your instructions double meaning once I transfer to proofing vessel mark lets say it’s one IL should I let it go until it’s 2L?
If you were happy with the results at 1.5 L, then keep doing that! I don’t have any issues when I let the dough double in volume, but for some people, doubling is too far, and their dough overferments. So I caution against doubling. 50-75% is a safer range.
I cannot claim the same success with this recipe that others have had. 😔 It just does not turn out as it should, even after following the recipe exactly. I allowed a long first rise til dough doubles, the second rise has taken longer than 4-6 hours to achieve but the bread bakes dense and flat with a very tough crust.
Any suggestions are appreciated! Should I bake after 4 hours of the second rise regardless of dough puffiness or volume?
Thanks for the help! Hoping I can realize some success with another try
Hi! Questions for you:
Are you using a scale to measure?
What type of flour are you using?
Are you using a straight-sided vessel for the bulk fermentation?
Are you new to sourdough?
Hi Ali!
Yes, I use a digital scale to measure. I allow for a fold 30min after mixing the dough and then transition to a straight sided, clear container. I use a rubber band around the outside of the vessel so I can mark the starting point of my dough level and see when the dough has doubled.
I have used white lily bread flour all four times I’ve made the recipe. I’ve been making country loaves in a Dutch oven and maintaining a starter since January of this year, so yes, relatively new to sourdough but ready to try new recipes with my starter. Yesterday/today I had a better turnout with the rides and shaping of the dough but after baking the bread still seems dense on the outside instead of light and airy. Perhaps 3 tablespoons of oil is too much for my baking environment (summer in the south).The crust just seems completely saturated with oil. And maybe next time I’ll use King Arthur bread flour; it’s what I use for my country loaves.
I’ll keep trying!
I think you’ll get much better results with King Arthur Bread flour!
Great to hear re scale, vessel, and sourdough experience.
It’s also possible you may need to reduce the amount of water. I don’t think it’s the oil — 3 tablespoons of oil for focaccia is actually on the lower end. You could try holding back 25-50 grams of water at the start or you could try with KAF first without making any changes.
I have bakers quarter sheet. 13″L x 9.6″W x 1.1″H
https://a.co/d/fl7IAlg
Do you think it will work with this recipe because sides are not high enough like your pan or should I cut down the recipe 25% down and still get some height and not totally be flat if I cut down the recipe in half ..I tried with half of the Re Joe it was like a flat bread still the great taste .
Are you planning on splitting the recipe between the two sheet pans? Or baking the entire batch of dough on one quarter sheet pan?
I tried splitting it in two sheets last time and it was very thin and hard…wanted to experiment if I can use the entire batch on quarter sheet.
Worth a shot! I think it will be very thick, but maybe that’s what you’re going for. I say go for it 🙂
Thanks I will try to see if I can cut the recipe by 25% based on the sheet pan I have ….I don’t want too thick or too thin . Thanks is much for your quick responses back. Really appreciate it. Once again love this recipe.
Hi there! First timer here. I didn’t see here to turn dough after 30 minutes but I did on your YouTube video. I totally missed it. It did rise a little overnight. After 13 hours I turned it and just waiting to see if it will rise.
Any suggestions would be much appreciated.
Thank you so much.
Should be fine! How did it turn out… I’m likely too late here. Are you using a straight-sided vessel for the bulk fermentation? Did the dough continue to rise after you turned it? It likely deflated a little bit once you turned it, which is fine.
Every recipe I make from this website instantly becomes the best thing I’ve baked, but this recipe is truly a highlight. Thank you so much for sharing these:)
So nice to hear this, Amy! Thanks so much for writing 🥰🥰🥰🥰
This recipe is amazing! I have been using sourdough for about three years now, and I wish I had seen this recipe and videos when I first started. Very easy and delicious. My husband said it was better than my original sourdough bread!
So great to hear this, Taylor! Thanks so much for writing 🙂
So the difference between making sourdough focaccia and yeast focaccia is that the first rise for the sourdough should be done at room temperature? Is it because sourdough takes longer time to rise?
Yes! Sourdough needs a room temperature environment to grow 🙂