 →
→ Easy No-Knead Brioche Rolls
This post may contain affiliate links. Please read my disclosure policy.
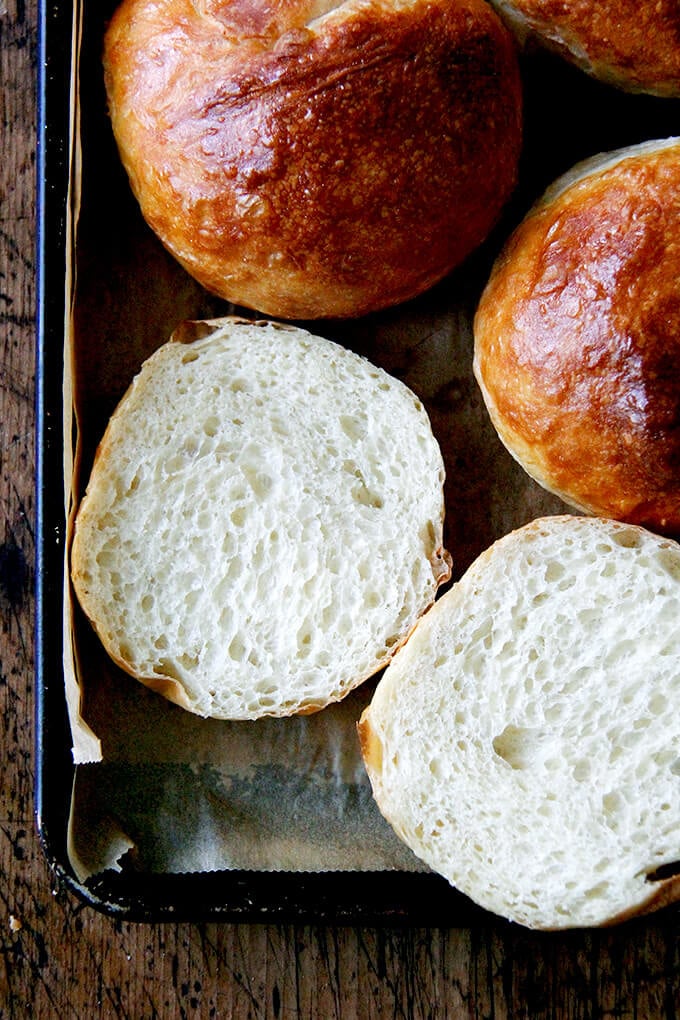
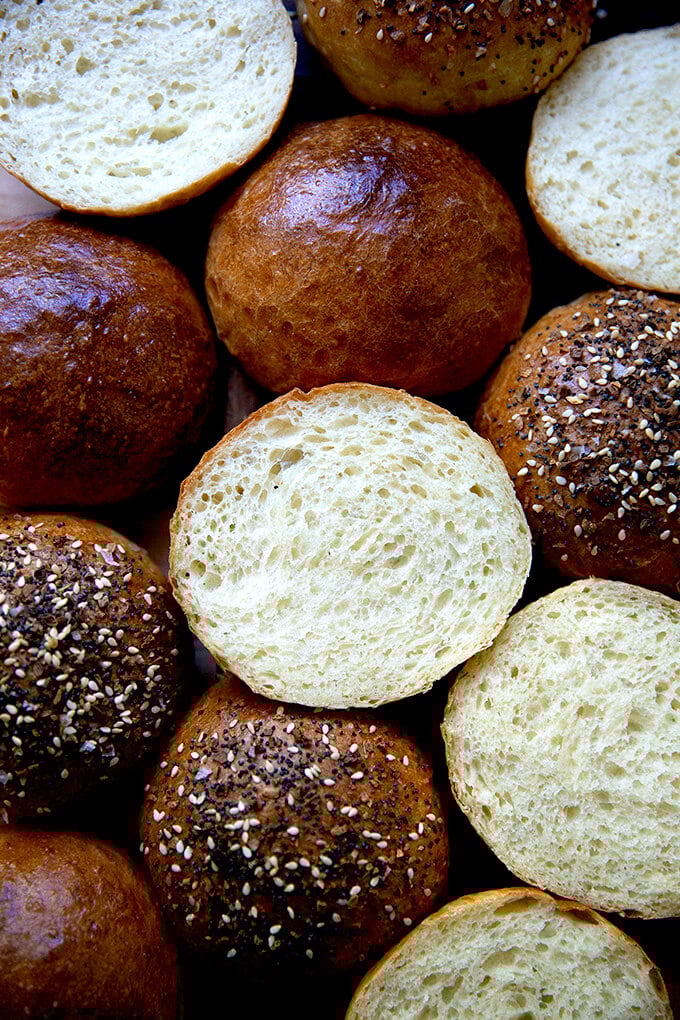
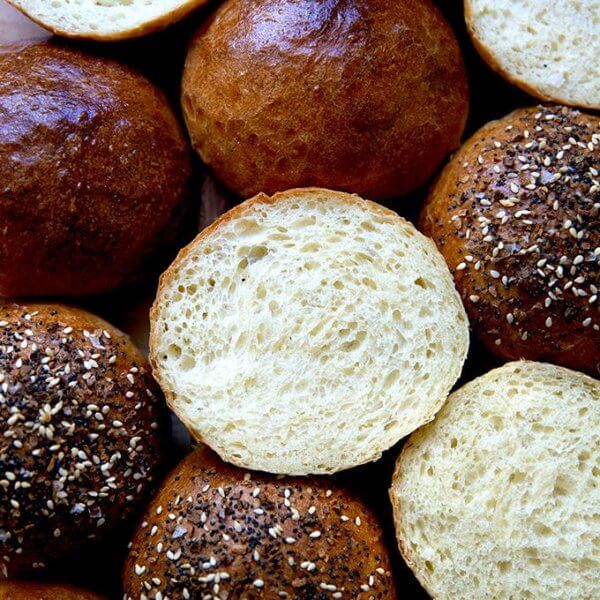
The no-knead dough for these brioche rolls comes together so quickly, and the rolls emerge from the oven light and airy, perfect for burgers or sandwiches of all kinds. Find step-by-step instructions and video guidance below 🍔

Making brioche rolls at home requires neither a stand mixer nor a complicated process nor kneading. It’s surprisingly easy, in fact, calling for basic ingredients you likely have on hand.
The secret to making light and airy brioche rolls is to use a high-hydration dough, meaning a dough with a high amount of liquid relrative to flour. Upon mixing, this high-hydration dough will look wet and sticky, making you think you’ll need to knead it, but you shouldn’t: kneading would require adding a lot more flour to the dough to make it manageable, which is what we don’t want.
The high-hydration dough makes for a light, airy crumb. Find step-by-step instructions as well as video guidance below. 🍔🍔
How to Make Brioche Rolls, Step by Step
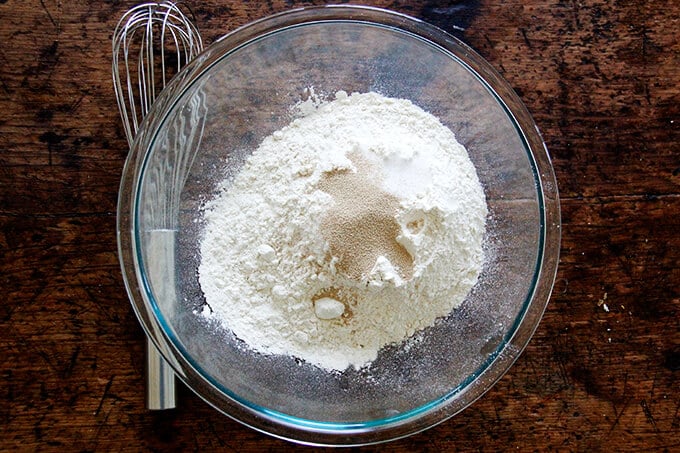
First, whisk together the dry ingredients: flour, salt, sugar, and instant yeast. As always, for best results, please use a digital scale to measure.
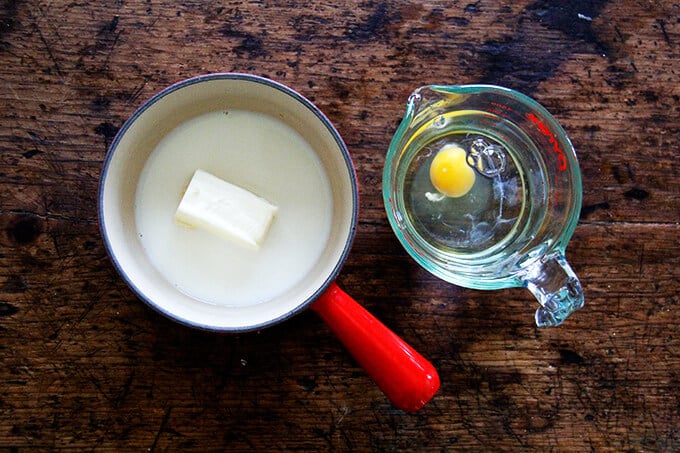
Next, whisk together the cold water and the egg, then, in a small pot, heat the milk and butter together until the butter is melted. Whisk the milk-butter mixture into the water-egg mixture. The combined mixture should be perfectly lukewarm.
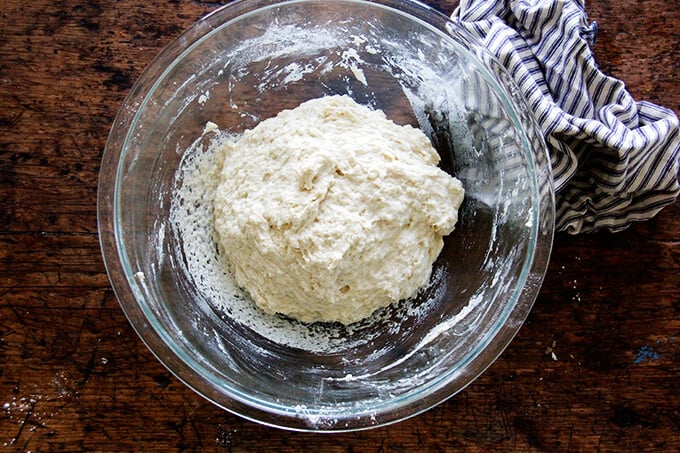
Combine the wet and dry ingredients.
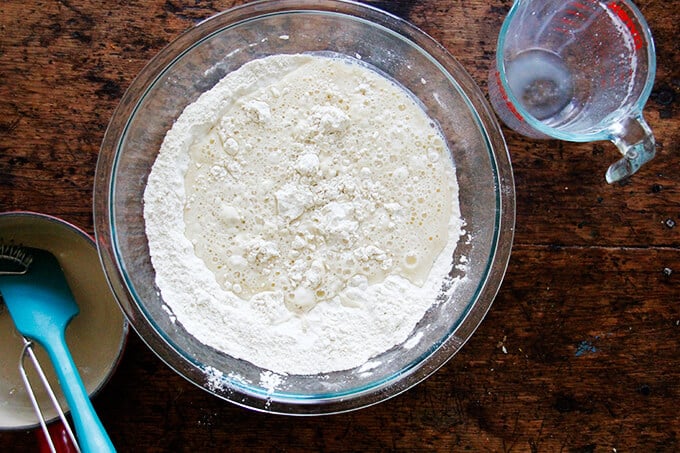
Mix with a spatula, stirring just until a sticky dough ball forms:
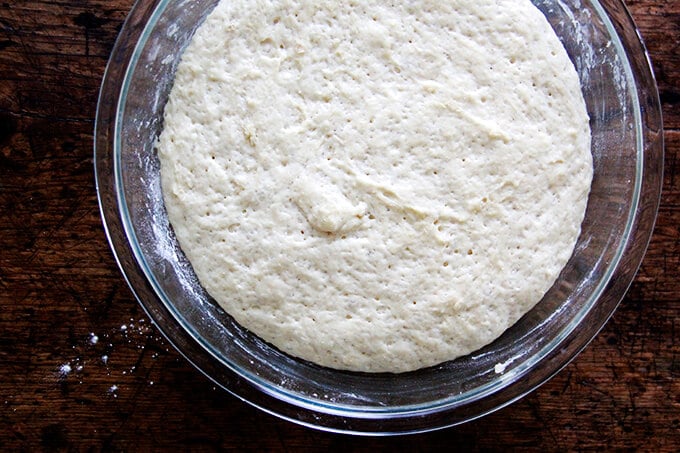
Place in a warm spot to rise (see the tip in the recipe box below for creating a warm spot to rise), and let rise till doubled.
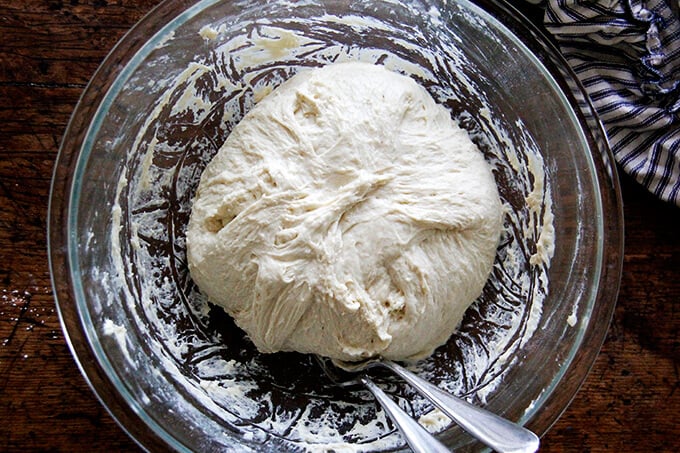
Punch the dough down using two forks.
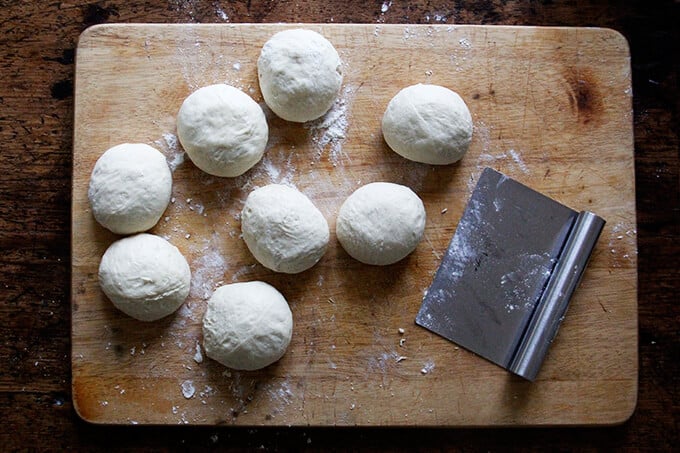
Portion the dough into 8 to 10 pieces.
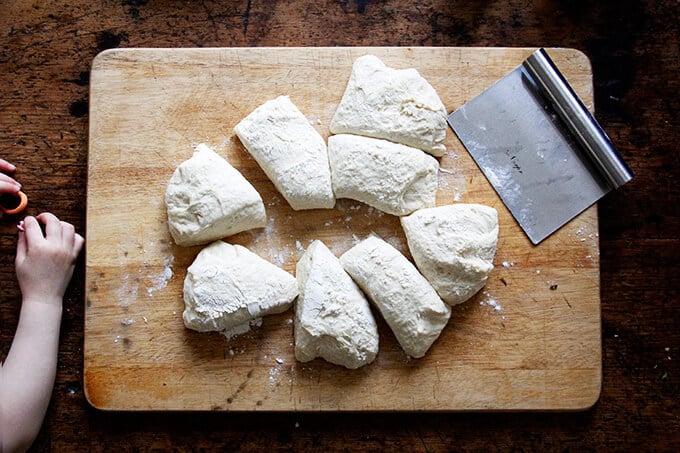
Using flour as needed, shape each portion into a ball, using the pinky edges of your fingers to tuck the dough under and create tension. See video for guidance.
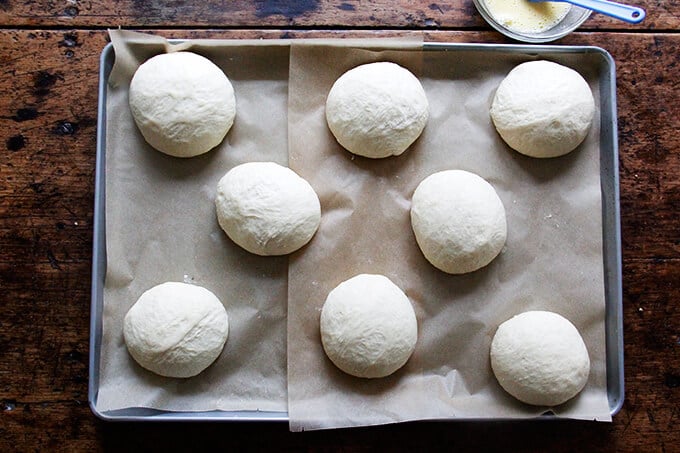
Depending on the time of year and the temperature of your kitchen, the second rise here will take more or less time. The rolls likely won’t double in volume, but they’ll look considerably puffed, and they’ll feel light to the touch.
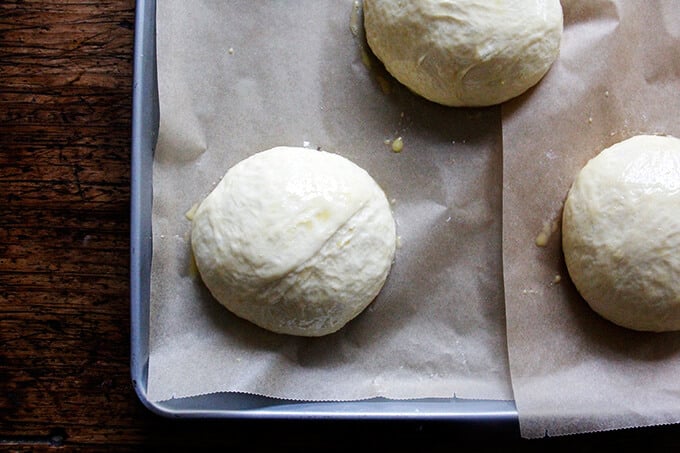
Brush each bun with an egg wash.
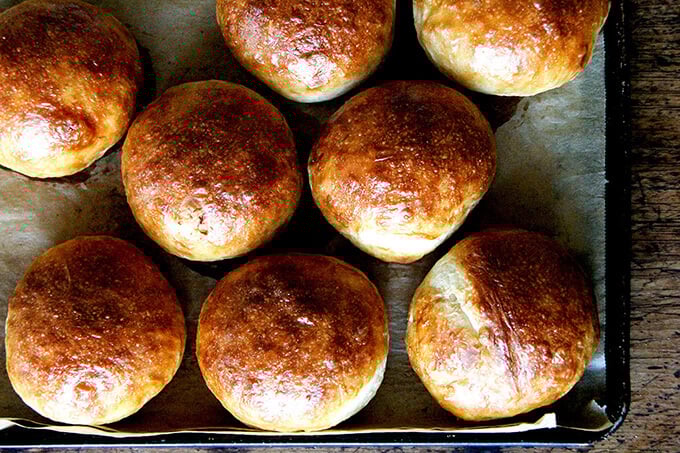
Transfer the pan to the oven, and bake for about 15 to 20 minutes or until the rolls are evenly golden.
These brioche rolls are perfect for burgers, pulled pork, and sandwiches of all kinds, but I especially love them with egg sandwiches:

You can sprinkle the rolls with seeds or everything bagel seasoning, too:
Easy No-Knead Brioche Rolls
- Total Time: 3 hours 20 minutes
- Yield: 8–10 rolls 1x
Description
The no-knead dough for these brioche rolls comes together so quickly, and the rolls emerge from the oven light and airy, perfect for burgers or sandwiches of all kinds.
Adapted from the light brioche recipe in Bread Toast Crumbs.
Notes:
- As always: for best results, use a digital scale to weigh the ingredients.
- To create a warm spot for your bread to rise, turn your oven on for one minute, then shut it off. That brief blast of heat will create a cozy place for your bread to rise.
- Water: Some people find this dough very wet and tricky to work with. If you live in a humid area, I would consider cutting some of the water back. If you are measuring with cups, hold 1/3 cup water. If you are using a scale, hold 75 g. You can always add the water back in when you are mixing if it seems dry. Reference the photos above and the video for how sticky/wet the dough should appear.
- Yeast: I prefer using instant yeast, SAF being my preference but if you are using active dry yeast: Whisk the egg with the water. Add the heated milk-butter mixture. Stir to combine. The mixture should be lukewarm. Sprinkle the yeast over top and let stand for 15 minutes or until it gets foamy; then proceed with the recipe.
- A Fun Variation: After brushing with the rolls with the eggwash, sprinkle the rolls with seeds or everything bagel seasoning.
- Timing:
- Mix the dough, let it rise for 2 to 3 hours, then shape and bake.
- Or you can mix the dough at night, store it in the refrigerator, and shape and bake in the morning.
Ingredients
- 4 cups (512 g) bread or all-purpose flour
- 2 teaspoons (10 g) kosher salt
- 2 teaspoons (8 g) instant yeast, see notes above if using active dry yeast
- 2 tablespoons (28 g) sugar
- 1 1/3 cups (300 g) cold water, or less, see notes above
- 1 egg
- 1/3 cup (78 g) milk
- 4 tablespoons (57 g) butter
- for the egg wash: 1 egg beaten with 1 tablespoon water
Instructions
- Whisk together the flour, salt, yeast, and sugar.
- In a medium bowl, whisk together the cold water and the egg.
- Heat the milk and butter together until the butter is melted. Pour this hot mixture into the cold water-egg mixture. The combined mixture should be perfectly lukewarm. Add it to the flour bowl and stir with a spatula till you have a sticky dough ball. Drizzle a teaspoon or two of olive oil over the dough and rub to coat — this prevents a crust from forming on the dough during the rising.
- Cover bowl and let rise in a warm area (see notes above) for 2 to 3 hours or until doubled. Alternatively, stick bowl in the fridge immediately and let it rise overnight or for 12 to 18 hours.
- Cover a work surface lightly with flour. Deflate dough, turn out onto work surface, and divide into 8 to 10 equal portions (use a scale and weigh each roll if you want perfectly even rolls: about 128 g each for 8 rolls and 102 g for 10 rolls). Using as much flour as necessary, roll each portion into a ball, and place on a parchment-lined sheet pan or two. I have an extra-large sheet pan (15x21x1) that I use to fit all 8 or 10 rolls on at once. (Note: If you refrigerate the dough, you can deflate it immediately after taking it out of the fridge … no need to let it come to room temperature first.)
- Let rise until the rolls puff and feel light to touch — 30-45 minutes roughly. Preheat the oven to 425ºF.
- Brush rolls with egg wash. Bake 15 to 20 minutes or until golden all around. Transfer rolls to wire rack to cool completely.
- Prep Time: 3 hours
- Cook Time: 20 minutes
- Category: Bread
- Method: Oven
- Cuisine: French, American
This post may contain affiliate links. Please read my disclosure policy.


669 Comments on “Easy No-Knead Brioche Rolls”
Easy and clear recipe. Amazing results. Thanks so much Ali.
Great to hear, Hilla! Thanks for writing 🙂 🙂 🙂
I weighed all my ingredients and my dough had a much higher hydration compared to yours. However, I floured liberally while forming the dough balls and used a dough scraper to tighten them up. When all was said and done my buns looked just like yours, both inside and out. This is such a forgiving recipe and produces excellent results with no kneading. I’m completely sold on your technique!
Great to hear, Sherry! Thanks so much for writing 🙂 🙂 🙂
Honestly great end product. As someone who does not make doughs often because I find it difficult to know when it’s done kneading, this overnight proof makes it so easy for me. I added a bit of whole wheat flour to the bread flour and it was great still. I did need to add some time to the bake for my oven but it didn’t change the end product, the inside was super moist still.
Great to hear Nick! Thanks so much for writing and sharing your notes. A little bit of whole wheat flour here sounds nice 🙂
Hi Ali! I’ve just built my sourdough starter with your help, I was wondering if I could use it for these burger buns? Instead of the yeast. Can we make these sourdough? And how? Thank you!
Hi! I have not used starter here but others have with success. Here is what they’ve done:
Hi Ali!
I wanted to drop you a quick note to tell you that I ‘Frankenstein-ed’ this recipe of yours by adding 100g of sourdough discard (and subtracted 50g of flour and 50g of water from the original recipe). Then I divided the dough into regular loaf pans instead of making buns. It made the perfect little sandwich loaves! So delicious! Thanks again for the recipe!
If there is only one recipe book that I buy, it will be yours. Your recipes are so easy to understand and execute. your directions are clear and uncomplicated. I have made your peasant no knead rolls and focaccia many many times. Thank you thank you thank you. I like to wait and try many recipes from an author before I actually purchase a book. Today, I am buying yours.
Awww Lorraine… this means the world 🙂 🙂 🙂 Thanks so much for taking the time to experiment and write and share all of this. Happy Baking! Hope you love the book.
Hi, I am in the process of making this right now. I couldn’t find Diamond kosher salt, so I used Morton’s does that make a big difference? I did use 1/3 less water. So far so good!
Should be fine! Typically, you’d use half as much Morton kosher salt by volume (or the same by weight) as Diamond Crystal, but honestly in this recipe, it will be fine.
These were so easy and scrumptious!! I did the 2 hour rise and they were amazing. Thanks for another great recipe!
Great to hear, Debi! I am making a batch of these today. It’s burger night!
I made these over the weekend to use for pulled pork. They were so delicious and held up well to the juicy pork. Can I freeze the dough? If so, how would I proceed after freezing?
You can freeze the dough after you ball it up into rolls. Freeze them on a sheet pan; then once solid transfer them to an airtight bag. Thaw them on a sheet pan in the fridge overnight covered in plastic wrap, them let them proof at room temperature until they are nearly doubled in volume before baking.
I’m a bread baking beginner, and admittedly don’t enjoy spending a great deal of time with proofing, temperature, moisture, kneading, multiple rises, etc. etc. but I loooove homemade bread. So I’m always on the hunt for bread recipes that are foolproof & quick.
All that said, this recipe is great! I love that I can prep the dough the evening before and tuck it into the fridge to use in the morning, and the resulting bun was very delicious and hearty enough for a big burger + toppings. I will definitely be keeping this one in my back pocket.
Great to hear Grace! Thanks so much for writing and sharing this. I love an overnight-bread method, too 🙂
Absolutely love all of the recipes I’ve followed. You’re the best! For the buns, what type of milk do you use? (Whole, 1%, 2%)…Would it even matter? Thanks!
Hi! And thank you 🙂 Shouldn’t matter… I always use 2% because that’s what I always have on hand.
Made these today, followed the recipe exactly and the rolls are delicious! Was a bit nervous when making the balls but they puffed up nicely. Going to be great with burgers tonight!
Great to hear, Pam! Thanks for writing 🙂
Prepared the dough yesterday; I doubled the ingredients. Proofed perfectly overnight in the fridge. Baked as instructed, delivering 16 light and fluffy buns ready to be filled for a very relaxed family gathering. I used strong bread flour for the first time, and the results were significantly better when previously using all purpose plan floor. Alex, your video helped enormously in the prep. Marco (London, UK).
… Plain Flour… predictive spelling is a serious irritant! All the best 🙂
These rolls were simple to make and delicious for our Memorial day burgers! Thank you!!
Great to hear, Annie! Thanks for writing 🙂
Thank you for another easy and forgiving recipe.
I tried this yesterday, but it is so hot here (North Aegean) that the dough almost tripled in an hour. It was a very wet dough but I could shape it, and then they were very puffy in half an hour. I think I could decrease the yeast to control timing but roughly how much ? I always use sd and I am new to yeast.
My buns do not smell yeast but still I feel like they would be much better it I could ferment them longer.
Like many others here, I think your recipes are great. Yours is the first page I go when I want to bake something, always very clear and easy to handle.
And the natural, peaceful environment of your kitchen with your kids around ♥️.
Thank you.
So nice to read all of this, Fusun 🙂 Thanks so much for taking the time to write, and thank you for your kind words.
I think you could cut the yeast back to 1/2 teaspoon. That should slow down the rise considerably. Let me know if that works out for you!
Hi there! I love this recipe and have great success with it. However recently my oven broke down. I’m wondering if I can bake these in the air fryer? If so, what temperature and timing would you recommend? Thank you!
I image you could — I’d bake them at the same temperatures recommended in the recipe. I have never used an air fryer, so I can’t say for sure.
I’ve made this recipe twice (doubled it the 2nd time to give away to family). It is an easy & delicious recipe! Not as easy as your focaccia recipe, which I’m pretty sure I’ve made 100 times because it’s so easy, has a nice fluffy spongy texture, is delicious and can be made thin or thick. Your recipes are practical, versatile and taste great. I’ve also taught a number of people how to make your focaccia recipe to get them excited about baking bread, because… who doesn’t love freshly baked home made bread! Now instead of asking me to make bread, they make it themselves. Keep the recipes coming.
So great to hear this, Jaklin! Thanks so much for writing and sharing all of this, and thanks for becoming a teacher/bread evangelist yourself… teaching is the best gift 💕💕
Hi Ali, followed this recipe to the letter and loved the result! However, if I want it to be more “buttery”, do I just increase the amount of butter? Thanks!
You could try that! You may need to reduce the water slightly, too.
Will try that and keep you posted. FYI – most of the family’s basic breads at home I learned to make from you – I love your ciabatta, focaccia and pizza dough recipes and the family love the results!
Awww, it’s so nice to read this, Karlo! Thanks for writing. Good luck with the buttery brioche 🙂
It was a success! Doubled the butter, and reduced the water to just 1 cup.
Ohhhh I’m going to try this!
Hi Ali: Love your recipes. I want to make the buns ahead of time for a family lunch. I would make the dough and stick it in the fridge. Next day allow 2 hours for the 2nd rise. Is that correct?
Also if I decide to bake one day ahead, how should I store the buns? At room temperature in a covered container? Thank you in advance.
Hi! So sorry for the delay here… I’m likely too late. Yes, that sounds like a good plan. When you remove the dough from the fridge, if it hasn’t risen at all, give it some time at room temperature to rise before you shape the dough into buns. Otherwise, simply remove the dough, divide it, ball up the buns, etc. and proceed. Giving yourself 2-3 hours is a good idea to shape and let the buns rise again, etc. Yes, an airtight vessel or bag at room temperature is perfect. You can toast them in the oven before serving if you want to freshen them up a bit.
Thanks Ali for information and instructions. Not late at all. 😊👍 I just hope for cooler weather as it’s not fun baking in humid heat.
Great to hear, Christina! Hope they turn out well for you!
These were amazing!!! So easy to make. Made them for homemade sloppy joes and they went so well. Will be making these for burgers and pulled pork in the future!
Great to hear, April! Thanks for writing 🙂
Can you substitute GF bread flour?
Possibly… the thing that is tricky with gf baking is that all gf flours absorb liquids differently, so this dough might be a soupy mess if you sub in gf flour 1:1 for the wheat flour. It’s worth a shot bc this recipe has an egg + milk + butter, all of which are great with gf baking, but I can’t promise a 1:1 swap of the flour will work.
Made these for 4th of July – used red and blue powdered food dye, and shaped into hot dog and burger buns. So easy peasy to make, so fluffy inside, so delicious! Great recipe, it’s a keeper!
Fun! What a great idea. Thanks for writing and sharing 🙂
Yum! Made a batch yesterday to go with chopped cheese sandwiches and they were perfect. I used 226g of white whole heat flour and 240g of bread flour, proofed in my oven with the light on for 2 hrs. I weighed and divide the dough into 6 balls to fit into my bun pan, and baked for 20 mins. Oversized and sturdy, they held the mighty sandwiches perfectly! Thanks for another great recipe.
Oh fun! Love the sound of all of this! Thanks so much for writing and sharing all of these notes.
Hi Ali, I’m making the brioche buns and I want to be clear that you can either let rise for 2-3 hours or overnight in the fridge?
Correct!
Followed the overnight method but found the buns rather bland. Anyone else find this otherwise the recipe was great
Hi Ali!
Love your recipes! You have me hooked on baking bread. Your challah recipe has made me a household hero!
I would like to try making these into jalapeño cheddar buns. Should I make any adjustments to the liquids in the recipe?
Thanks!
Apologies for the delay here! Great to read all of this. No need to make adjustments to the liquids. Sounds delicious!
Ah, Ali. You have done it again! Last night as I thought of making burgers I realized I had NO buns and the last time I tried to find anything brioche it was challenging and expensive. So I thought, maybe I can make those ones Ali has on her site. I was absolutely stunned by how easy they were to make (other than the stickiness which I figured out). Turned out AMAZING, the texture is just so lovely and they were golden and beautiful… I will make larger ones next time but I was so impressed that I was able to make such lovely buns and in short time!! I will do the overnight proof next time just for comparison but I doubt these could be any better. Thank you. You are a lifesaver!!!
So nice to read all of this, Judi! The dough is indeed sticky 🙂 So glad you liked them. Thanks for writing!
Texture 4/5
Taste 3/5
Very easy! Humid day so had to add more flour to shape them so next time I’ll use more salt and less water to see how it works. Added 2% Gluten and some semolina to my plain flour which was great!
Made a chicken sandwich and held together soo well!
Not sure. For me, no kneading means flat and buns after rising, this time, with this recipe as well. Besides the recipe results in a super hydrated dough, very difficult to work with. Adding as much flower as needed doesn’t really allow to arrive at a specific hydration.
Hi! Are you using a scale to measure? What kind of flour are you using?