 →
→ Easy No-Knead Brioche Rolls
This post may contain affiliate links. Please read my disclosure policy.
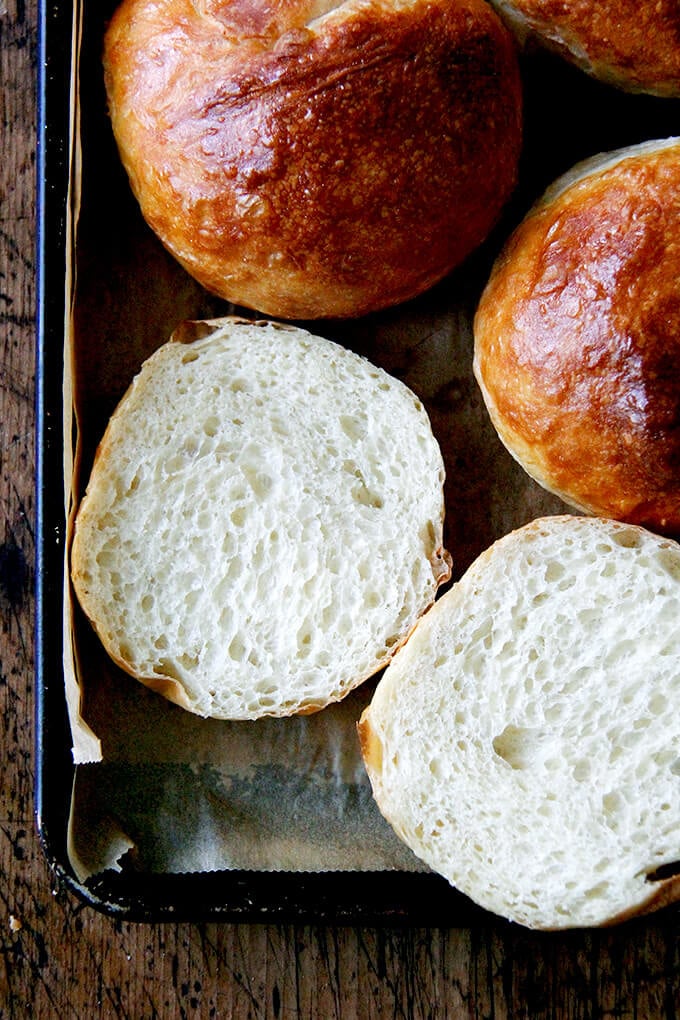
The no-knead dough for these brioche rolls comes together so quickly, and the rolls emerge from the oven light and airy, perfect for burgers or sandwiches of all kinds. Find step-by-step instructions and video guidance below 🍔

Making brioche rolls at home requires neither a stand mixer nor a complicated process nor kneading. It’s surprisingly easy, in fact, calling for basic ingredients you likely have on hand.
The secret to making light and airy brioche rolls is to use a high-hydration dough, meaning a dough with a high amount of liquid relrative to flour. Upon mixing, this high-hydration dough will look wet and sticky, making you think you’ll need to knead it, but you shouldn’t: kneading would require adding a lot more flour to the dough to make it manageable, which is what we don’t want.
The high-hydration dough makes for a light, airy crumb. Find step-by-step instructions as well as video guidance below. 🍔🍔
How to Make Brioche Rolls, Step by Step
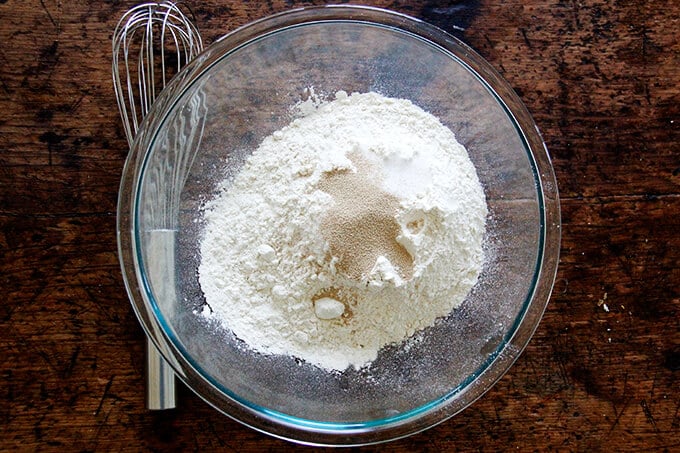
First, whisk together the dry ingredients: flour, salt, sugar, and instant yeast. As always, for best results, please use a digital scale to measure.
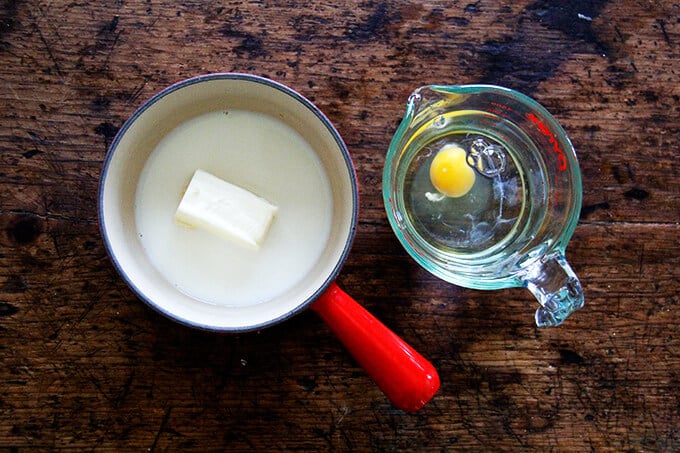
Next, whisk together the cold water and the egg, then, in a small pot, heat the milk and butter together until the butter is melted. Whisk the milk-butter mixture into the water-egg mixture. The combined mixture should be perfectly lukewarm.
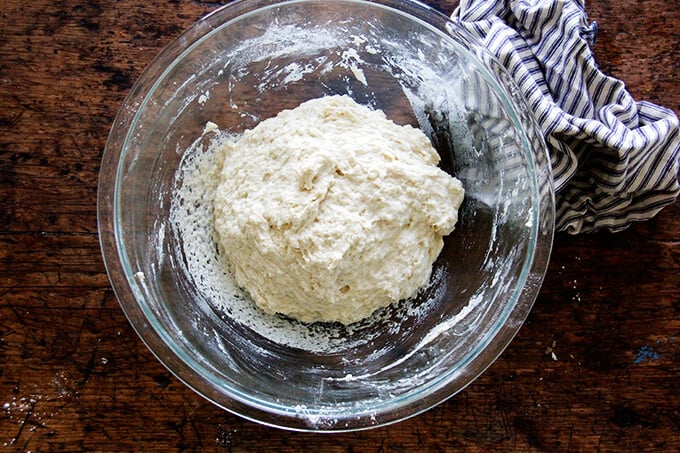
Combine the wet and dry ingredients.
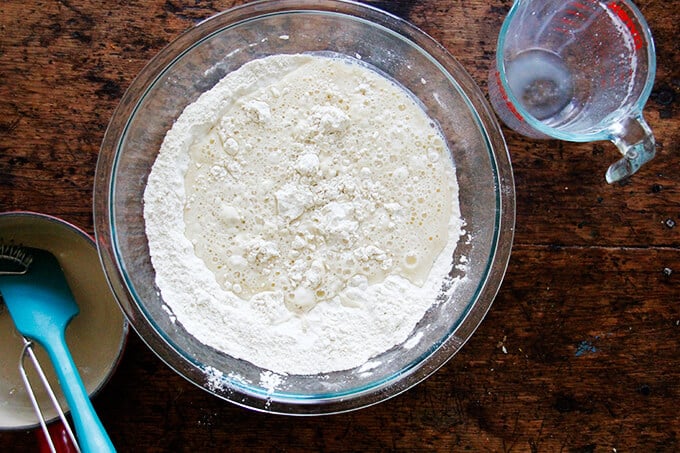
Mix with a spatula, stirring just until a sticky dough ball forms:
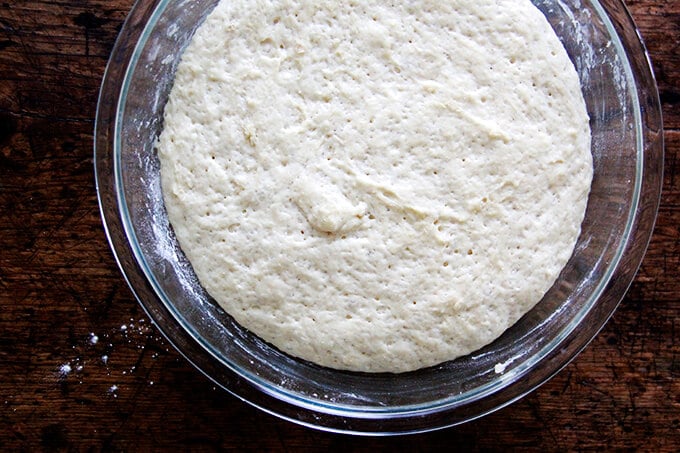
Place in a warm spot to rise (see the tip in the recipe box below for creating a warm spot to rise), and let rise till doubled.
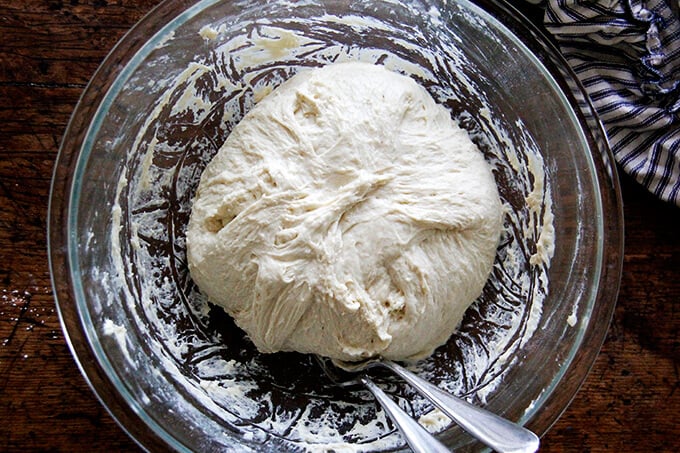
Punch the dough down using two forks.
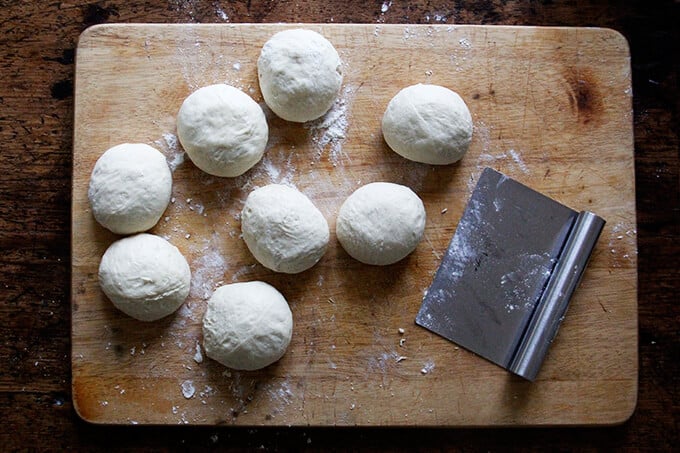
Portion the dough into 8 to 10 pieces.
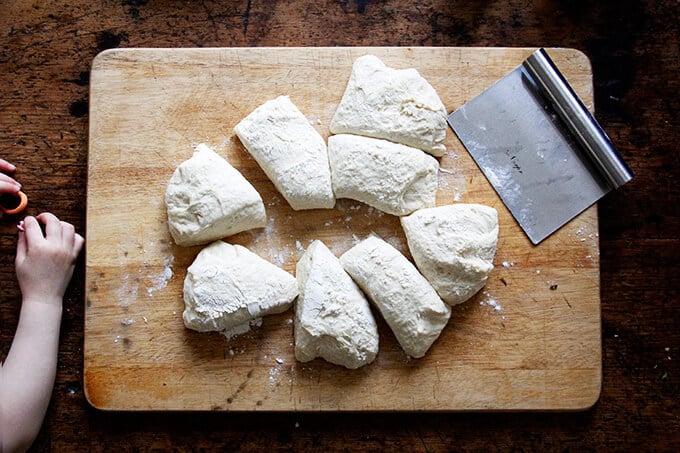
Using flour as needed, shape each portion into a ball, using the pinky edges of your fingers to tuck the dough under and create tension. See video for guidance.
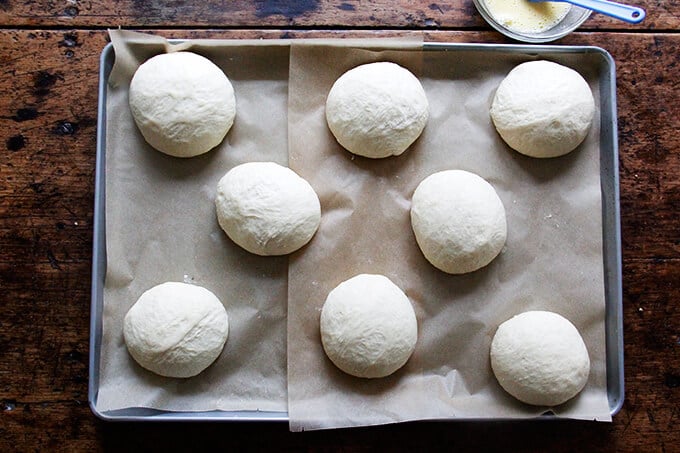
Depending on the time of year and the temperature of your kitchen, the second rise here will take more or less time. The rolls likely won’t double in volume, but they’ll look considerably puffed, and they’ll feel light to the touch.
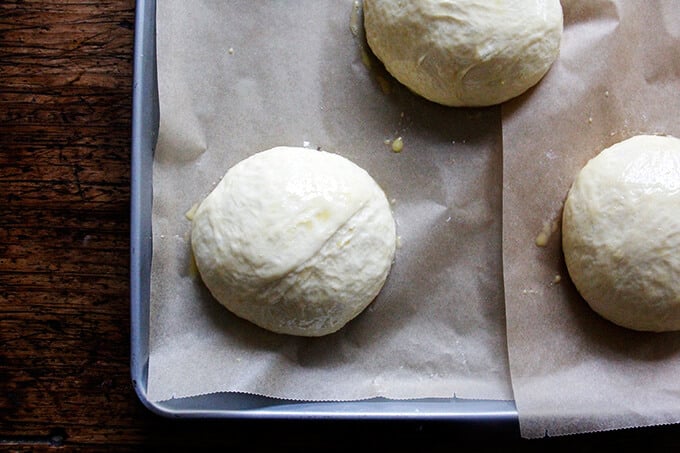
Brush each bun with an egg wash.
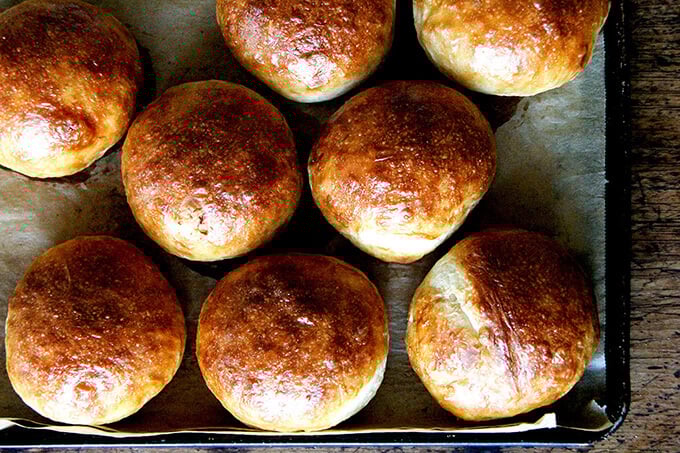
Transfer the pan to the oven, and bake for about 15 to 20 minutes or until the rolls are evenly golden.
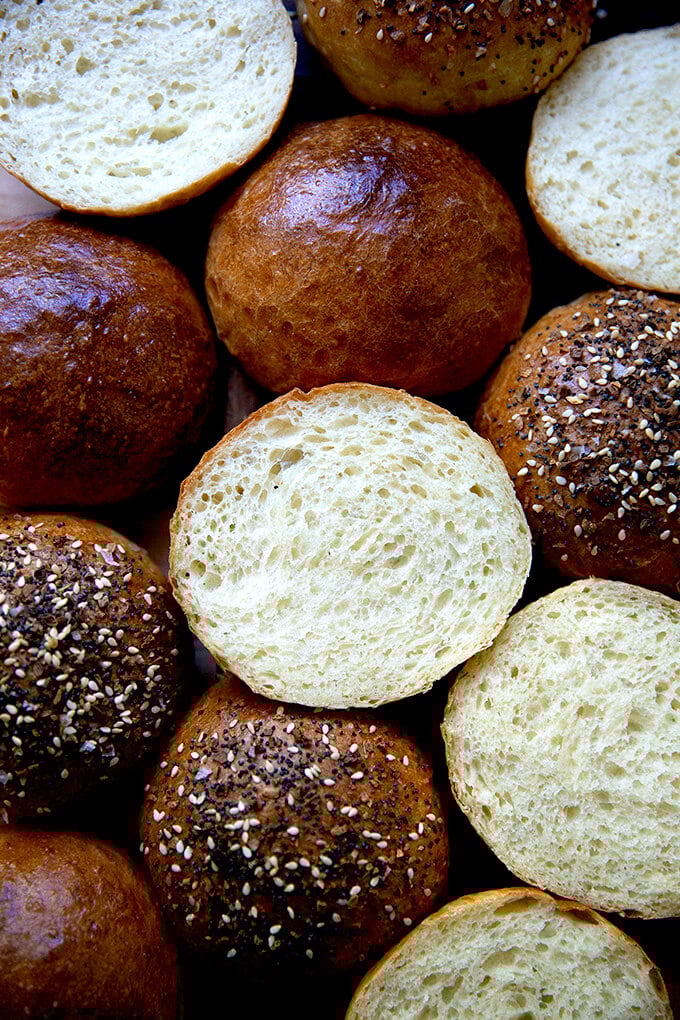
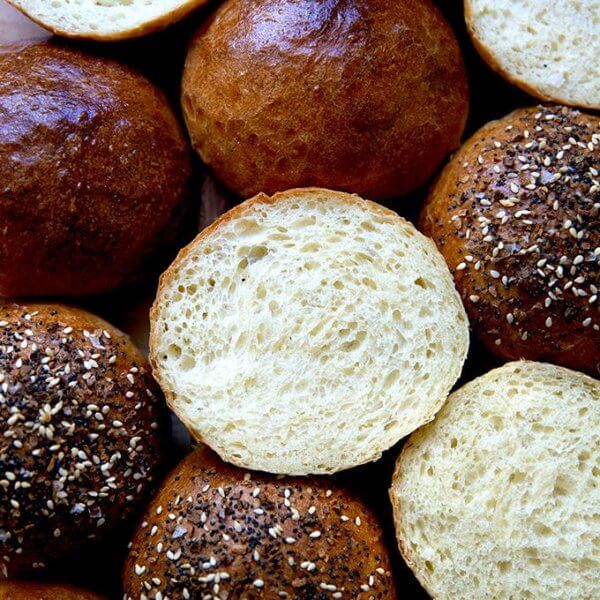
These brioche rolls are perfect for burgers, pulled pork, and sandwiches of all kinds, but I especially love them with egg sandwiches:

You can sprinkle the rolls with seeds or everything bagel seasoning, too:
Easy No-Knead Brioche Rolls
- Total Time: 3 hours 20 minutes
- Yield: 8–10 rolls 1x
Description
The no-knead dough for these brioche rolls comes together so quickly, and the rolls emerge from the oven light and airy, perfect for burgers or sandwiches of all kinds.
Adapted from the light brioche recipe in Bread Toast Crumbs.
Notes:
- As always: for best results, use a digital scale to weigh the ingredients.
- To create a warm spot for your bread to rise, turn your oven on for one minute, then shut it off. That brief blast of heat will create a cozy place for your bread to rise.
- Water: Some people find this dough very wet and tricky to work with. If you live in a humid area, I would consider cutting some of the water back. If you are measuring with cups, hold 1/3 cup water. If you are using a scale, hold 75 g. You can always add the water back in when you are mixing if it seems dry. Reference the photos above and the video for how sticky/wet the dough should appear.
- Yeast: I prefer using instant yeast, SAF being my preference but if you are using active dry yeast: Whisk the egg with the water. Add the heated milk-butter mixture. Stir to combine. The mixture should be lukewarm. Sprinkle the yeast over top and let stand for 15 minutes or until it gets foamy; then proceed with the recipe.
- A Fun Variation: After brushing with the rolls with the eggwash, sprinkle the rolls with seeds or everything bagel seasoning.
- Timing:
- Mix the dough, let it rise for 2 to 3 hours, then shape and bake.
- Or you can mix the dough at night, store it in the refrigerator, and shape and bake in the morning.
Ingredients
- 4 cups (512 g) bread or all-purpose flour
- 2 teaspoons (10 g) kosher salt
- 2 teaspoons (8 g) instant yeast, see notes above if using active dry yeast
- 2 tablespoons (28 g) sugar
- 1 1/3 cups (300 g) cold water, or less, see notes above
- 1 egg
- 1/3 cup (78 g) milk
- 4 tablespoons (57 g) butter
- for the egg wash: 1 egg beaten with 1 tablespoon water
Instructions
- Whisk together the flour, salt, yeast, and sugar.
- In a medium bowl, whisk together the cold water and the egg.
- Heat the milk and butter together until the butter is melted. Pour this hot mixture into the cold water-egg mixture. The combined mixture should be perfectly lukewarm. Add it to the flour bowl and stir with a spatula till you have a sticky dough ball. Drizzle a teaspoon or two of olive oil over the dough and rub to coat — this prevents a crust from forming on the dough during the rising.
- Cover bowl and let rise in a warm area (see notes above) for 2 to 3 hours or until doubled. Alternatively, stick bowl in the fridge immediately and let it rise overnight or for 12 to 18 hours.
- Cover a work surface lightly with flour. Deflate dough, turn out onto work surface, and divide into 8 to 10 equal portions (use a scale and weigh each roll if you want perfectly even rolls: about 128 g each for 8 rolls and 102 g for 10 rolls). Using as much flour as necessary, roll each portion into a ball, and place on a parchment-lined sheet pan or two. I have an extra-large sheet pan (15x21x1) that I use to fit all 8 or 10 rolls on at once. (Note: If you refrigerate the dough, you can deflate it immediately after taking it out of the fridge … no need to let it come to room temperature first.)
- Let rise until the rolls puff and feel light to touch — 30-45 minutes roughly. Preheat the oven to 425ºF.
- Brush rolls with egg wash. Bake 15 to 20 minutes or until golden all around. Transfer rolls to wire rack to cool completely.
- Prep Time: 3 hours
- Cook Time: 20 minutes
- Category: Bread
- Method: Oven
- Cuisine: French, American
This post may contain affiliate links. Please read my disclosure policy.


669 Comments on “Easy No-Knead Brioche Rolls”
Hi Jeremy! The humidity most definitely will affect your dough, so using less water next time around will be key. In the notes section, you will see I suggest holding back 75 grams of water from the start… are you using a scale to measure?
I did not see that about holding neck water! And yes I always use a scale! It’s the only way! Definitely going to try these again because even though I had to add more flour and it was sticky they turned out very delicious. Thank you for the reply!
Great to hear! Yeah, try with 225 grams of water next time around… you shouldn’t have to add as much flour during the shaping. Great to hear they were still delicious 🙂
I made these for the first time this weekend. My favorite bread recipes are all on Alexandra Cooks, so I decided to make it with the full amount of water listed in the recipe (it was dry and cool weather, no humidity), after all, it was a high hydration dough. That was a mistake. My dough was like thick soup. I did manage to save it by adding a few tablespoons of flour (I lost track of how much because I think I was in slight panic mode), and apparently this recipe is forgiving. I did the overnight rise and made the next day. They rose great, they baked up light and fluffy and tasted great too. I can’t wait to make again following the suggestions for holding back some water regardless of the humidity! Thank you for another really good recipe!
Getting the water right depending on where you are and what flour you are using is always a little tricky, I find especially so as the seasons change. Hope the next round is more foolproof!
Love this recipe! Turns out every time. Do you have a recipe for gluten free buns?
Great to hear, Jennifer! I do not have a gluten-free bun recipe unfortunately.
Can you make rolls in individual brioche pans
Sure! What pan do you have?
Silicone. Tray holds 6
OK, I worry that this might be too much dough for 6. Sometimes I divide this dough into 12 portions to make 12 buns for sandwiches, and that’s still a nice big-ish size. That said, dividing the dough into 6 portions might give you some nice sized mini loaves. It all depends on what you are hoping to use the brioche for.
Thanks. Forgot to say I have 2 6 well trays. I’ll keep you posted 🙄
Great! Good luck 🙂
Will the second rise take longer if the dough was in the fridge overnight!
Thanks for an amazing, easy recipe!
Possibly! But not much. You can divide the dough immediately, and once the dough is portioned and balled up, it will get to room temperature pretty quickly. The second proof shouldn’t be much more than 1 hour.
Hi! I’ve made this before with milk but I find myself with only half and half today. I read some recommendations that say cut the fat in half if you’re using half and half so I’m planning to cut the butter down to 2 tbsp and use 1/3 cup half and half in place of regular milk. Not sure if you’ll be able to get to this question since I’m cooking now but thought I would run it past you. Thanks!
Hi! Sorry just seeing this! I think you probably could have subbed in the half and half for the milk without making any other changes, but I’m sure your changes were fine. I hope they turned out well and Happy Thanksgiving 🙂
No worries! As it turns out I cut the butter down to two tablespoons and they turned out great! Also cut a few calories out in the process! Have you ever made these in dinner sized rolls? What turned out for me was really big for Thanksgiving so I was wondering if there was a way to make these smaller and make about 20 of them?
Great to hear, Karen! Thanks so much for circling back and sharing your notes. I think if you divided the dough into 50 gram portions you would get 20 rolls.
I’ve been using this recipe for a couple of years, and it’s just great. Sometimes as buns, sometimes as small braids. Very forgiving dough, but can attest that it is imperative to hold back some liquid.
My only frustration is that sometimes they become too ’round’ as buns. I have tried shaping them flatter, but today will experiment with actually rolling them lightly with a pin. I would welcome other suggestions.
Great to hear, PJ. Out of curiosity, do you hold back 75 grams of water as suggested? Or more? Or less?
Regarding your question, recently I’ve been been dividing the dough into 12 portions, which makes for just lightly smaller buns and so therefore less round (as in less vertically tall), and I like the smaller size. I like your rolling pin idea. If it works, please report back 🙂
Hi – first successful recipe I have tried! I was curious if I wanted to substitute the flour for whole wheat flour, do you know how the ratios would need adjusted?
Great to hear, Daryn! Thanks for writing. Typically with when substituting in whole wheat flour for ap or bread flour, you have to increase the hydration bc ww flour tends to be thirstier. That said, this is such a high hydration dough, I don’t think you’d need to do that here. It may take some trial and error to get right. You can make the recipe as written subbing ww flour for the bread or ap flour, and depending on your results, you can up the water the next time around. Also, keep in mind, the more ww flour you use, the denser/heavier/less lofty your rolls will be. So if you use 100% ww flour here, don’t expect to get the same results texture-wise in your rolls. Good luck!
I’ve made these quite a few times, love them.
Could I use the same recipe to make brioche dinner rolls? Portion them into balls and bake them in my 9×13 USA pan, like pull apart dinner rolls?
Yes, absolutely! I’ve done this before. Depending on how big you want the rolls, you could divide the dough into 12 portions (for a 4×3 arrangement) or 15 portions (5×3) or 18 (6×3) or 20 (5×4). I wouldn’t go smaller than 20 portions 🙂
We make these buns all the time and absolutely love them. I always use activated dry yeast and haven’t ever had any issues with the recipe. The buns do usually look a bit wet after rising but shaping them with a little dust of flour solves the problem.
Great to hear, Madison! Thanks so much for writing 🙂
Hi Ali,
These brioche rolls were absolutely delicious. Your instructions were easy to follow, and I felt like a superhero when these beauties emerged from the oven 😃
I look forward to trying more recipes. Next on my list: your ricotta orange pound cake, and homemade sourdough starter 🤗
So great to hear this, Donna! Thanks so much for writing and sharing this. Hope you love the pound cake (a favorite!) and hope you enjoy the sourdough starter from scratch process (a fun winter project!) .
These came out beautifully! Thank you for this recipe! I made 12, about 82 grams each in a 9×13 pan.
Great to hear, Pamela! Thanks so much for writing and sharing your notes — so helpful to have the gram amount for 12 rolls 🙂
Amazing find and recipe my buns turned out great first time. Quick question – Can i replace the butter with organic ghee? I used Ghee in my first batch and never had any issues but read i need to reduce it?
Yep, go for it! If you had no issues the first time around, do that again 🙂 Great to read this.