 →
→ Overnight, Refrigerator Focaccia = The Best Focaccia Bread Recipe
This post may contain affiliate links. Please read my disclosure policy.
Cold, refrigerated dough is the secret to making delicious focaccia! Allowing the dough to rest 18 to 48 hours in the fridge will yield extra-pillowy and airy focaccia, though if you are pressed for time, you can make this start-to-finish in 3 hours. This 4-ingredient recipe requires only 5 minutes of hands-on time. Video guidance below!
⭐️⭐️⭐️⭐️⭐️ Review:
“Love this recipe! I’ve made this so many times that I’ve lost count. Super simple and delicious. My family loves it. Whenever someone asks me for a focaccia recipe, I always show them this one. This recipe is awesome. Thank you for sharing!” — Lucy
It’s hard to beat focaccia in the effort-to-reward category. If you are intimidated by bread baking, this is the recipe I suggest making first, both for its simplicity and flavor. Why?
- It’s a no-knead, 4-ingredient dough that takes 5 minutes to mix together.
- It requires no special equipment, no tricky shaping technique, and no scoring.
- If you have a 9×13-inch baking pan and your fingertips (for dimpling), you’re good to go.
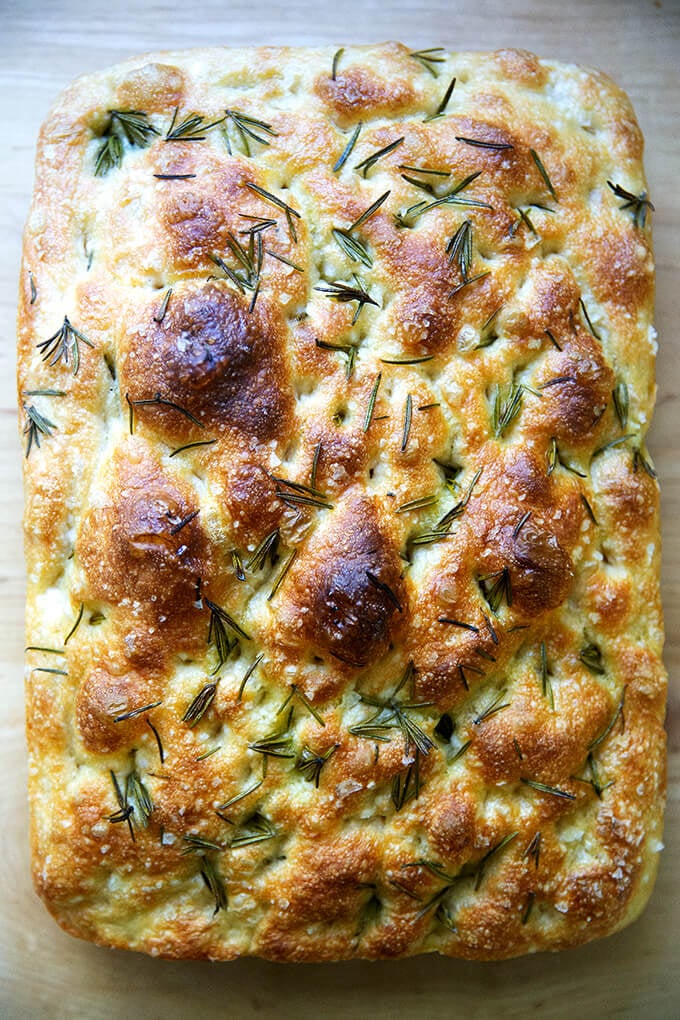
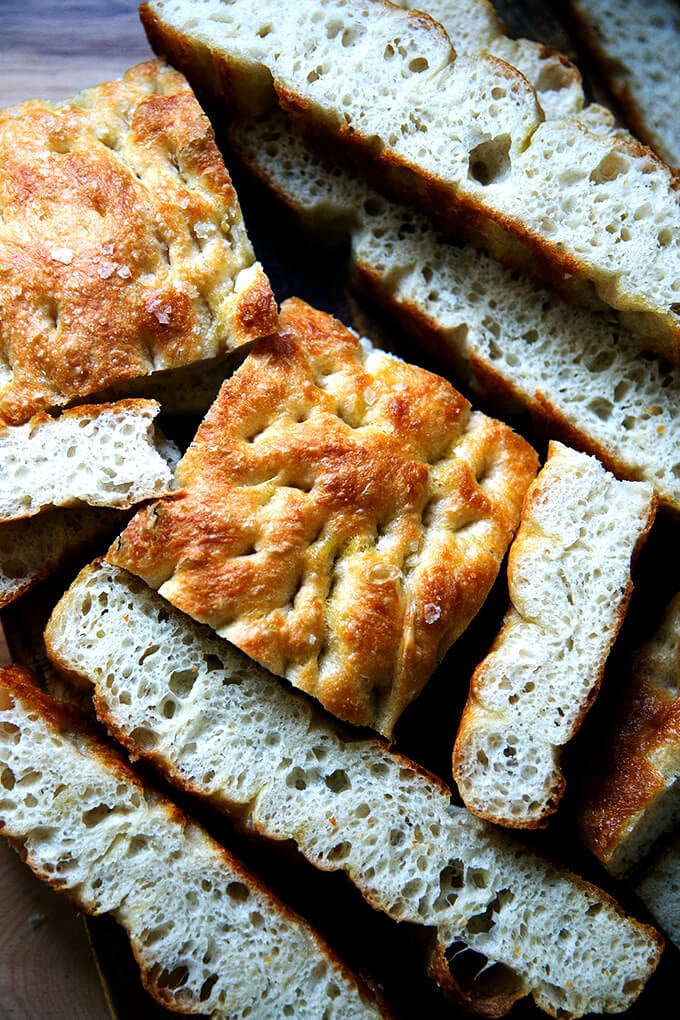
- It emerges soft and pillowy, olive oil-crusted, golden all around, and it’s completely irresistible.
Two Secrets for the Best Focaccia
This focaccia emerges from the oven golden all around and pillowy inside, its surface dimpled with deep crevices, namely for two reasons:
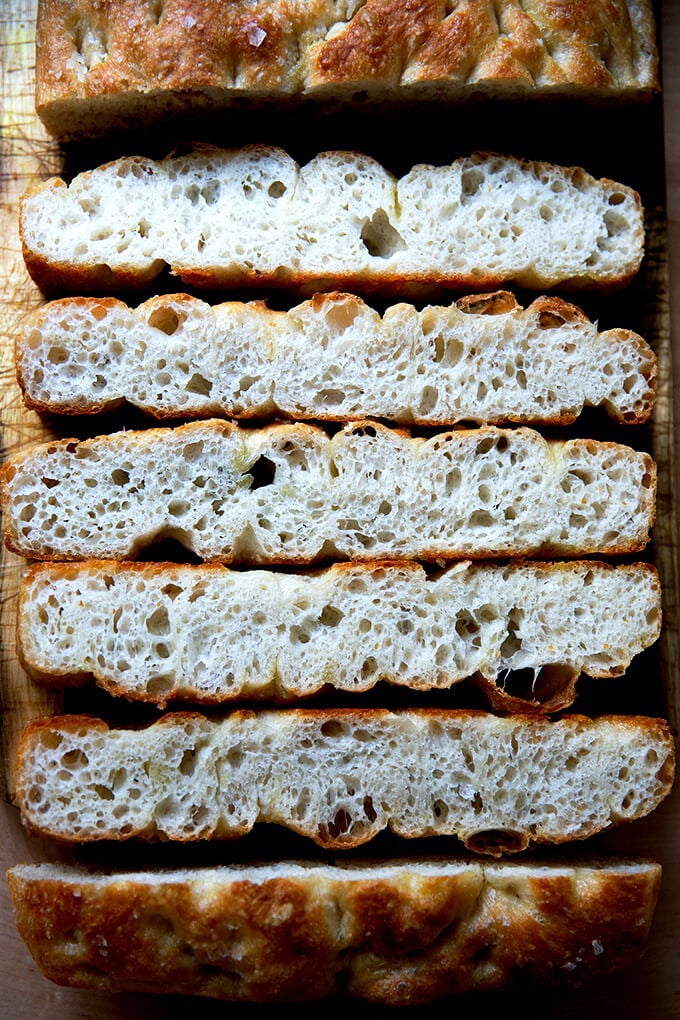
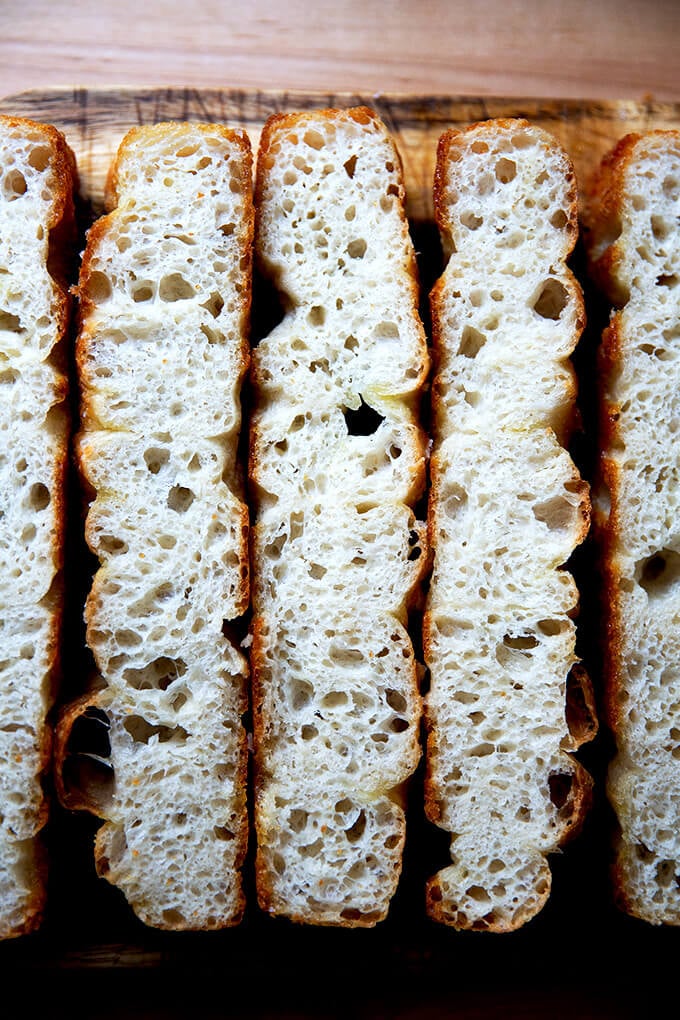
- High hydration dough. This focaccia is 88% hydration.
- Long, cold, slow fermentation. This dough ferments in the fridge for at least 18 hours or for as long as three days.
Let’s explore each reason:
A high-hydration dough is a dough with a high proportion of water relative to the flour. A high proportion of water will create a light and air dough and ultimately a focaccia with beautiful air pockets throughout. (Incidentally, this is the secret to making excellent pizza dough, too.)
A long, cold fermentation is beneficial to dough because during a slow fermentation allows enzymes in both the flour and the yeast to break down the starches in the flour into simple sugars. These sugars contribute both to flavor and to browning. Cool, right?
Furthermore, a long slow fermentation strengthens gluten, which will further promote a crumb structure with lots of air pockets throughout.
How This Focaccia Recipe Differs from Others
There are lots of focaccia bread recipes out there, so why make this one? This one differs from many of the recipes out there in two ways:
- The long, cold, refrigerator rise.
- The absence of sugar or honey or any sort of sweetener.
Why isn’t there any sweetener in this recipe? Simply stated, a sweetener is just not needed — the yeast, contrary to popular belief, does not need sugar to activate or thrive. Sugar will speed things up, but when you’re employing a long, slow rise, speed is not the name of the game.
As noted above, during the long, cold fermentation, enzymes in both the flour and the yeast will break down the starches in the flour into simple sugars, which will contribute both to flavor and to browning, rendering sugar unnecessary.
PS: Once you master this simple focaccia, try your hand at this simple sourdough bread recipe, another recipe that requires minimal effort but yields spectacular results.
How to Make Focaccia Bread, Step by Step
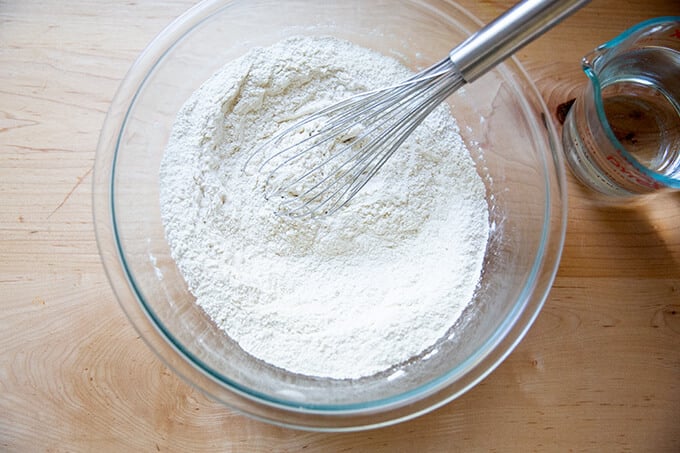
Gather your ingredients: 4 cups (512 g) flour, 2 teaspoons (12 g) salt, 2 teaspoons (8 g) instant yeast (SAF is my preference), 2 cups (455 g) water:
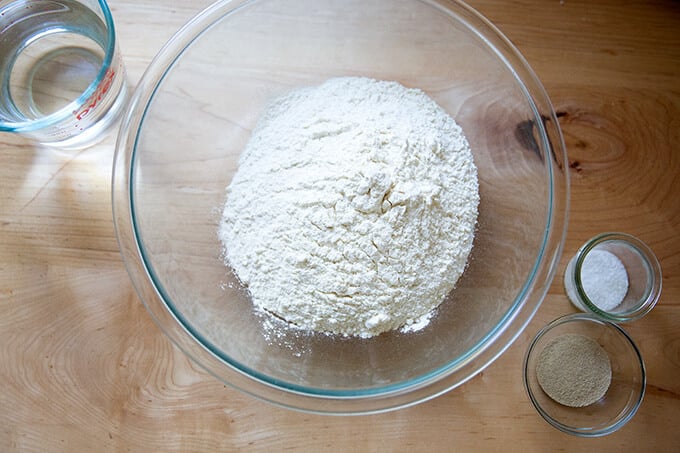
Whisk together the flour, salt, and yeast first:
Add the water:
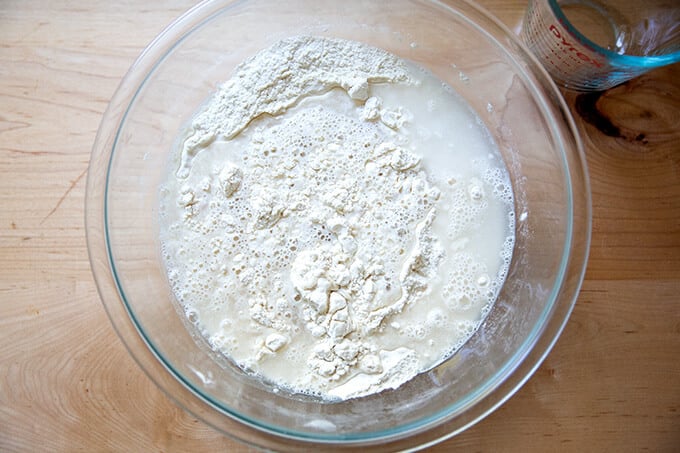
Use a spatula to stir the two together.
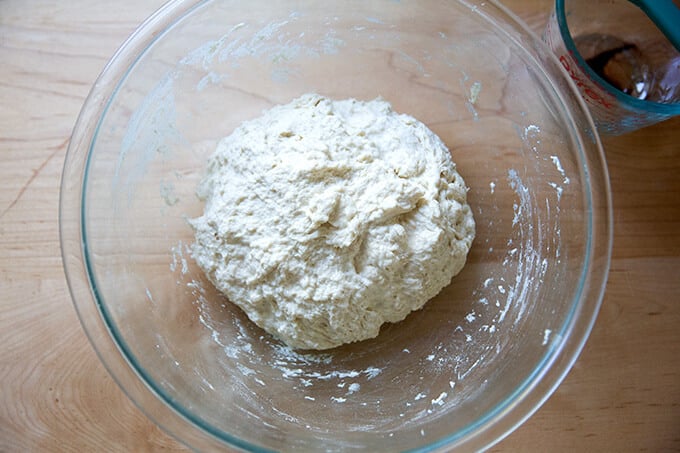
Slick the dough with olive oil…
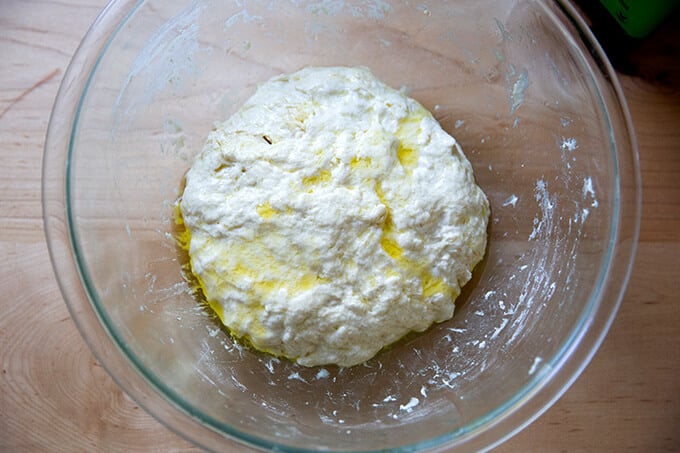
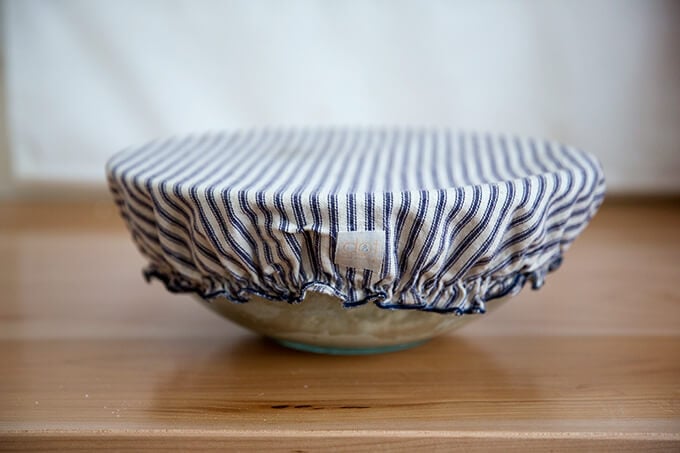
… then cover the bowl preferably with a lid. or a cloth bowl cover. Stick the bowl in the fridge immediately; leave it there to rise for 12 to 18 hours (or for as long as three days).
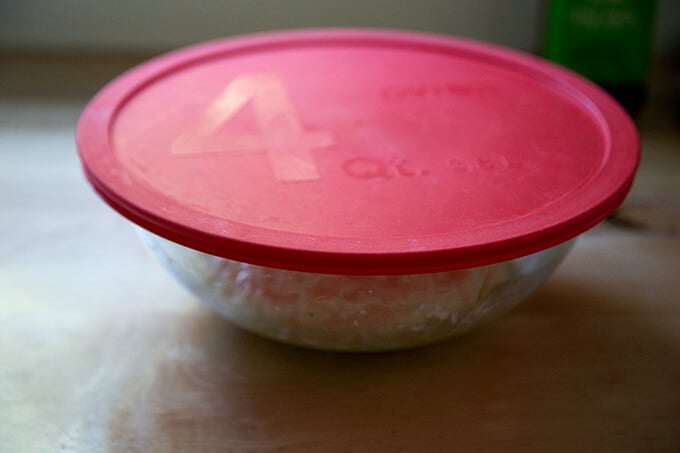
NOTE: It is important the dough really be slicked with olive oil especially if you are using a cloth bowl cover or tea towel as opposed to plastic wrap or a lid. If you are using a tea towel, consider securing it with a rubber band to make a more airtight cover. If you do not slick the dough with enough oil, you risk the dough drying out and forming a crust over the top layer.
Remove from fridge, and remove the cover:
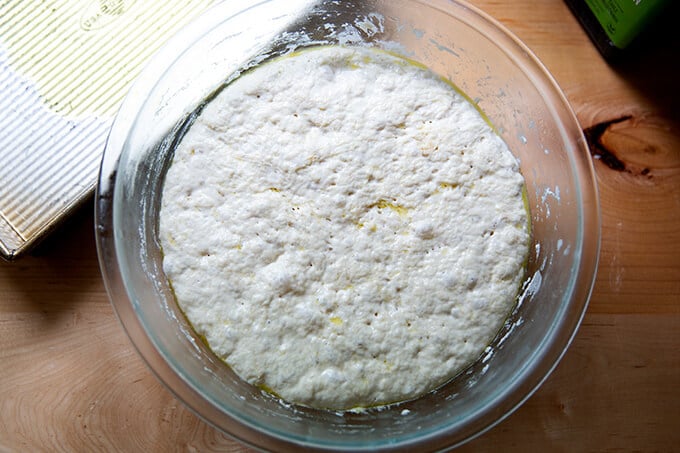
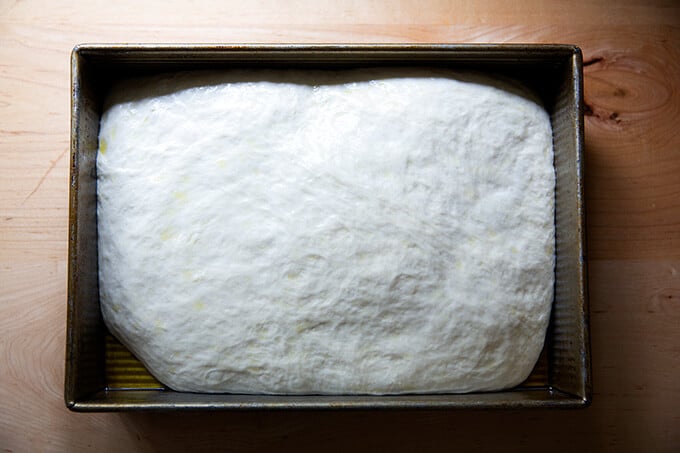
Deflate the dough and transfer to a prepared pan. I love this 9×13-inch USA pan. If you don’t have one you can use two 8- or 9-inch pie plates or something similar. If you are using glass baking dishes be sure to grease the dishes with butter before pouring a tablespoon of olive oil into each. (The butter will ensure the bread doesn’t stick.) Don’t touch the dough again for 2 to 4 hours depending on your environment.
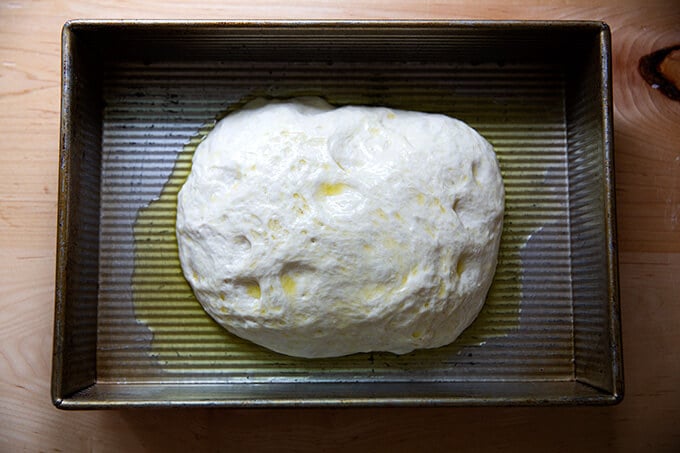
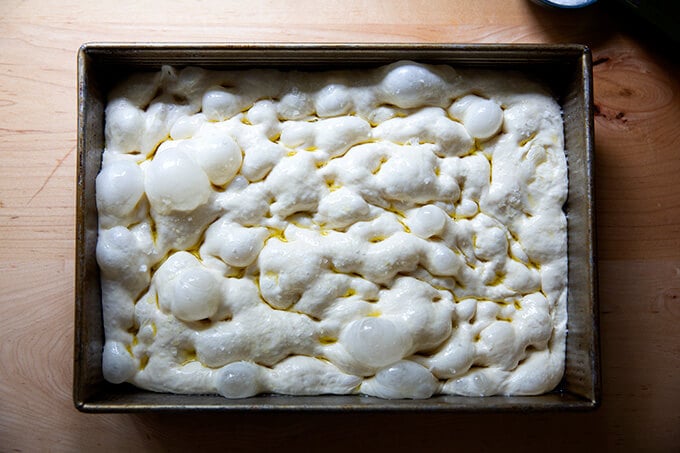
After two to four hours, or when the dough looks like this…:
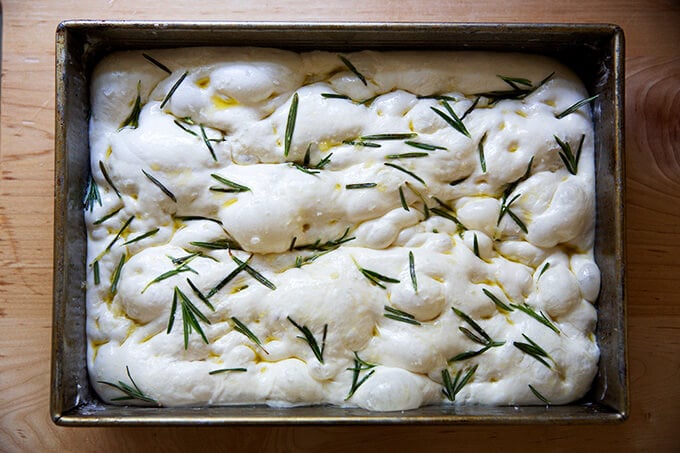
… it’s time to dimple it! You can simply use olive oil and salt — I recommend good, flaky sea salt for this. Note, the dough in the photo below spent three days in the fridge, and the dough was super bubbly!
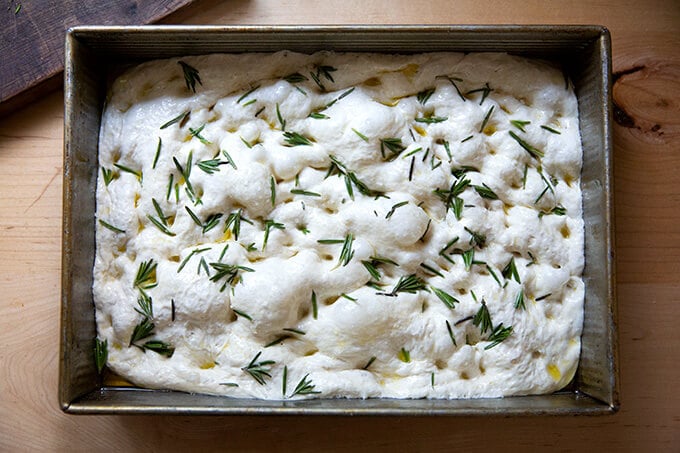
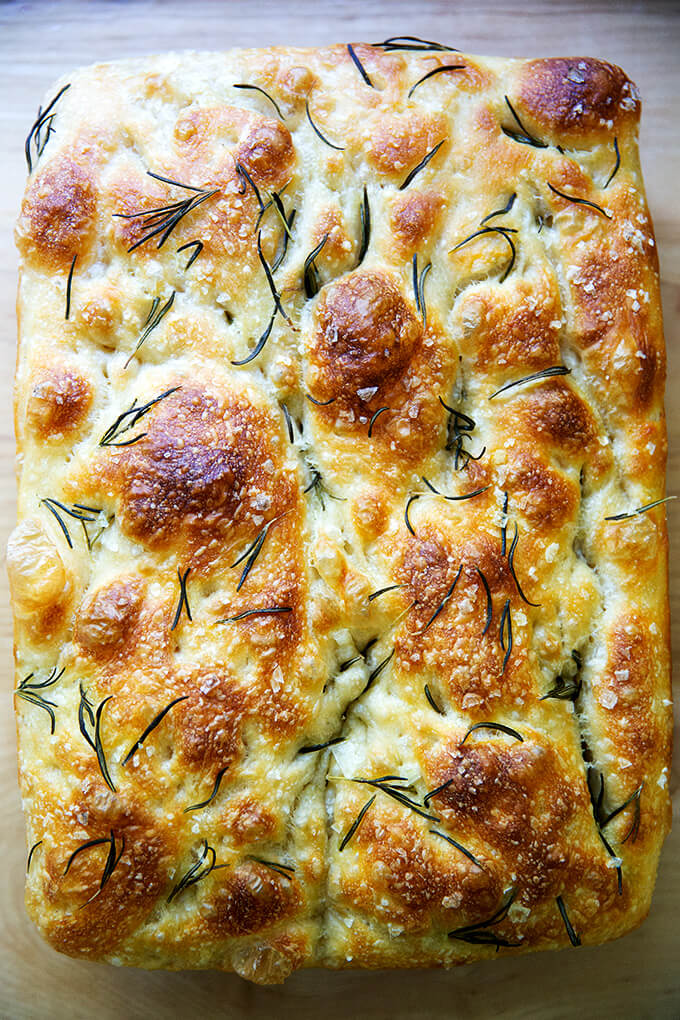
if you are using rosemary, sprinkle it over the dough. Then pour two tablespoons of olive oil over the dough, and using your fingers, press straight down to create deep dimples. Sprinkle with flaky sea salt — again, something like Maldon is great here.
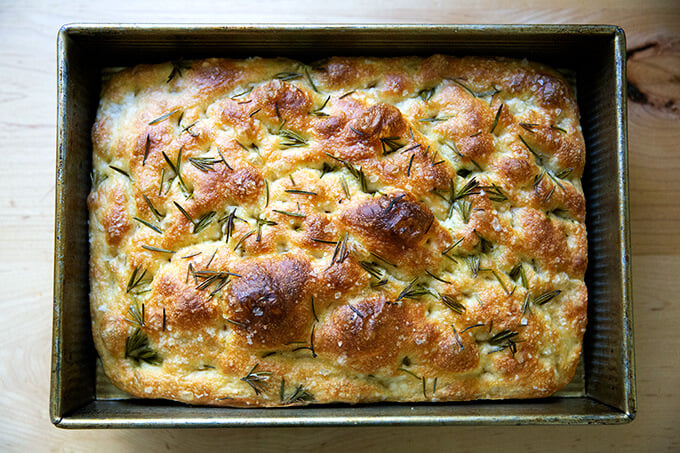
Transfer to oven immediately and bake at 425ºF for 25 minutes or until golden all around. Remove focaccia from pans and place on cooling racks.

How to Incorporate Rosemary, Herbs, and Other Ingredients & Toppings into Your Focaccia Dough
One of the most frequently asked questions I get is: How can I add other toppings or ingredients to my focaccia bread? You can do this in two ways:
- Add them on top as you would rosemary or other herbs. The key is to make sure the ingredients are slicked lightly with olive oil to ensure they do not burn in the oven. I like to sprinkle the rosemary over top of the dough, then drizzle it with olive oil, then dimple the dough.
- You can add them directly to the dough. In step one, when you whisk together the flour, salt, and instant yeast, add your ingredients — chopped olives, sun-dried tomatoes, roasted garlic — to the flour and toss to coat; then add the water.
PS: How to Make Focaccia Slab Sandwiches

Can I Make this Overnight Focaccia Without the Overnight Rise?
Yes, you can. In fact, in my cookbook, Bread Toast Crumbs, I do not employ an overnight rise. Start-to-finish it can be made in about three hours. The finished bread will not be as pillowy, but it will still be light, airy, and delicious.
To skip the overnight rise, simply let the mixed dough rise at room temperature until doubled, about 1.5 to 2 hours. Then proceed with the recipe, knowing the second rise will only take about 30 minutes.
Print
The Best, Easiest Focaccia Bread Recipe
- Total Time: 18 hours 30 minutes
- Yield: 2 loaves 1x
Description
Cold, refrigerated dough is the secret to making delicious focaccia! Allowing the dough to rest for a minimum of 18 to 24 hours (or up to 3 days) in the fridge will yield extra-pillowy and airy focaccia. However, if you are pressed for time, you can make this from start to finish in 3 hours. This 4-ingredient recipe requires only 5 minutes of hands-on time. Video guidance below!
Adapted from the focaccia recipe in Bread Toast Crumbs.
A few notes:
- Plan ahead: While you certainly could make this more quickly, it turns out especially well if you mix the dough the day before you plan on baking it. The second rise, too, takes 2 to 4 hours.
- If you are short on time and need to make the focaccia tonight: Let the mixed dough rise at room temperature until doubled, about 1.5 to 2 hours. Then proceed with the recipe, knowing the second rise will only take about 30 minutes.
- You can use various pans to make this focaccia such as: two 9-inch Pyrex pie plates. (Use butter + oil to prevent sticking.) One 9×13-inch pan, such as this USA pan — do not split the dough in half, if you use this option, which will create a thicker focaccia . A 13×18-inch rimmed sheet pan — this creates a thinner focaccia, which is great for slab sandwiches.
- As always, for best results, use a digital scale to measure the flour and water.
- Salt: The rule of thumb with bread dough is that the weight of the salt should be 2 to 3% the weight of the flour. For this recipe, that is 10 to 15 grams. Do keep in mind that you sprinkle sea salt over the dough before baking, which adds to the saltiness. If you are sensitive to salt use 1o grams. If you are not, use 12 to 15 grams salt. I use Diamond Crystal kosher salt.
- I love SAF instant yeast. I buy it in bulk, transfer it to a quart storage container, and store it in my fridge for months. You can store it in the freezer also.
- If you are using active-dry yeast, simply sprinkle the yeast over the lukewarm water and let it stand for 15 minutes or until it gets foamy; then proceed with the recipe.
- Flour: You can use all-purpose or bread flour here with great results. If you live in a humid environment, I would suggest using bread flour. If you are in Canada or the UK, also consider using bread flour or consider holding back some of the water. Reference the video for how the texture of the bread should look; then add water back as needed.
Ingredients
- 4 cups (512 g) all-purpose flour or bread flour, see notes above
- 2 to 3 teaspoons (10 to 15 grams) kosher salt, see notes above
- 2 teaspoons (8 g) instant yeast, see notes above if using active dry
- 2 cups (455 g) lukewarm water, made by combining 1/2 cup boiling water with 1 1/2 cups cold water
- butter for greasing
- 4 tablespoons olive oil, divided
- flaky sea salt, such as Maldon
- 1 to 2 teaspoons whole rosemary leaves, optional
Instructions
- Make the dough: In a large bowl, whisk together the flour, salt, and instant yeast. Add the water. Using a rubber spatula, mix until the liquid is absorbed and the ingredients form a sticky dough ball. Cover the bowl, and let rest for 30 minutes, then stretch and fold the dough — this is an optional new step (9/17/2025), but if time permits, do it: I find it makes for an especially bubby focaccia. Fill a small bowl with water. Using a wet hand, grab an edge of the dough and pull it up and towards the center. Repeat this stretching and folding process, 8 to 10 times, moving your hand around the edge of the dough with every set of stretches and folds. As you stretch and fold, you should feel the dough transform from being sticky and shaggy to smooth and cohesive. Find video guidance here.
- Cold proof: Rub the surface of the dough lightly with olive oil. Cover the bowl with a lid (ideally) or plastic wrap and place in the refrigerator immediately for at least 12 hours or for as long as three days. (See notes above if you need to skip the overnight rise for time purposes.) NOTE: It is important the dough really be slicked with olive oil, especially if you are not using a hard lid. If you do not slick the dough with enough oil, you risk the dough drying out and forming a crust over the top layer.
- Line two 8- or 9-inch pie plates or a 9×13-inch pan (see notes above) with parchment paper or grease with butter or coat with nonstick cooking spray. (Note: This greasing step may seem excessive, but with some pans, it is imperative to do so to prevent sticking. With my USA pans, I can get away with olive oil alone; with my glass baking dishes, butter is a must.)
- Pour a tablespoon of oil into the center of each pan or 2 tablespoons of oil if using the 9×13-inch pan. Using two forks, deflate the dough by releasing it from the sides of the bowl and pulling it toward the center. Rotate the bowl in quarter turns as you deflate, turning the mass into a rough ball. Use the forks to split the dough into two equal pieces (or do not split if using the 9×13-inch pan). Place one piece into one of the prepared pans. Roll the dough ball in the oil to coat it all over, forming a rough ball. Repeat with the remaining piece. Let the dough balls rest for 3 to 4 hours depending on the temperature of your kitchen (Note: no need to cover for this room temperature rise).
- Set a rack in the middle of the oven and preheat it to 425°F. If using the rosemary, sprinkle it over the dough. Pour a tablespoon of oil over each round of dough (or two tablespoons if using a 9×13-inch pan). Rub your hands lightly in the oil to coat, then, using all of your fingers, press straight down to create deep dimples. If necessary, gently stretch the dough as you dimple to allow the dough to fill the pan. Sprinkle with flaky sea salt all over.
- Transfer the pans or pan to the oven and bake for 25 to 30 minutes, until the underside is golden and crisp. Remove the pans or pan from the oven and transfer the focaccia to a cooling rack. Let it cool for 10 minutes before cutting and serving; let it cool completely if you are halving it with the intention of making a sandwich.
- To store the focaccia: When it has completely cooled, transfer it to an airtight bag or vessel and store it at room temperature for up to 3 days. Otherwise, freeze it for up to 3 months. Always reheat it on subsequent days to revive its crust: 350ºF for 15 minutes.
Notes
To Make Muffin Tin Focaccia:
- Make the focaccia through step 3.
- Butter a muffin tin + 2 small ramekins or a crème brulée dish.
- Drizzle oil into each muffin well.
- Deflate the dough, then use two forks to portion it into small pieces, dropping the pieces into each well — each well will be 3/4 to nearly full. Drizzle with more oil. Turn each piece to coat in the oil.
- Let the dough rise again until it puffs above the rim, 30-45 minutes. Drizzle with more oil, then dimple. Sprinkle with sea salt and fresh rosemary.
- Bake at 425ºF for roughly 20-25 minutes. If necessary, brush with more oil out of the oven.
- Prep Time: 18 hours
- Cook Time: 30 minutes
- Category: Bread
- Method: Oven
- Cuisine: Italian
This post may contain affiliate links. Please read my disclosure policy.


6,816 Comments on “Overnight, Refrigerator Focaccia = The Best Focaccia Bread Recipe”
Hi, you said if you live in a humid climate to use bread flour. Is this a typo, did you mean arid?
Also, how would you adapt your recipe for baking at altitude? I’m at 4400’ and in an arid climate.
Hi! No, not a typo. Humid climates tend to create wetter doughs because of the added moisture in the air. Bread flour (as opposed to all purpose flour) soaks up a little more water, so your dough won’t be as sticky.
You shouldn’t have to make any adjustments for high altitude baking.
Oh my goodness
That is the best focaccia bread I have ever eaten.
I added roasted garlic, rosemary, and parmesan
So good, it is worth the 24 hrs
100% gonna make again and again. Family will insist
Thank you for sharing
Yum! That sounds delicious!!
Thanks so much, this is heaven! Just made this second time in one week. I used bakers flour, and Celtic sea salt as I didn’t have flaky sea salt, I was heavy handed on the olive oil, and I also used spray oil on both ceramic dishes before olive oil -it didn’t stick! Topped with chopped fresh parsley, sundried tomatoes and Kalamata olives. Highly recommended!! 10/10
Great to hear, Kelli! Thanks for writing and sharing all of these notes 🙂
Can you use the fleshmans traditional yeast packs or does it have to be instant yeast?
The traditional actually should work fine here. You can also follow the instructions in the notes for blooming it over the lukewarm water first just to ensure it is activated.
I did 72 hour fermentation, it turned out good, light, airy and taste good . Baked in 13×9 pan. Added few toppings as foccacia art with red bell pepper, green onions, toasted garlic , onions, shredded pecorino cheese and tomatoes.
Yum! Great to hear. Thanks for writing 🙂
I have quick rise yeast — can I use that in this recipe? Thanks.
Yes!
This really is the best focaccia bread recipe I’ve found. It’s crispier if you do the overnight which I prefer. But still great if you don’t have the time. I finish if off with garlic butter and add pepper jack cheese just before taking out of oven. Love this bread great with everything. Thank you🙂
Great to hear, Sandy! Thanks for writing 🙂
❤️
I was in a rush and went with the quicker version of the recipe. My bread was super dense. Not sure what I did wrong
Did you use a scale to measure?
Hey!
Found your recipe and i am trying it on! Have made the dough and have rested it in the refrigerator for about 48 hours…
Just curious!
Can i use it as a pizza base once it is done baking??
Or do i put the pizza sauce, cheese vegetables on it while it goes in!!
Would love to hear from you!
Hi! And apologies for the delay here. Yes! You can do this two ways. This recipe is essentially the base of this Homemade Sicilian-Style Pizza recipe. You’ll need to parbake it. Or you could do something like this: How to Make Pissaladière
Oh my gosh this was delicious! I was so nervous to try making bread but I followed the directions to a T and YUM! Thanks for sharing this incredible recipe!
Great to hear, Erin! Thanks for writing 🙂 🙂 🙂
Hi Ali, your focaccia recipe is my favorite and I have shared it time and time again. But my question today is about a blog entry you sent about using over-risen pizza dough. I think you made a slick sandwich out of it. I need it. I have dough that is needing transformation. I can’t seem to bring up your instruction no matter how I search. Where is it on your site? Can you help me? Thanks.
Jeanne De Ianni
HI! Here’s the post: https://pizzaeveryfriday.substack.com/p/the-best-thing-to-make-with-overproofed
So nice to read all of this 🙂
Very easy to make and it is delicious!!!
Great to hear, Lin! Thanks for writing 🙂 🙂 🙂
The absolute best focaccia I have ever had! This was my first time making Focaccia and with such simple instructions and pictures to follow it came out perfect!!! Completely obsessed! The whole family loved it!
Great to hear, Mona! Thanks so much for writing 🙂 🙂 🙂
This was my first time making any kind of bread and I was so nervous! The recipe was so easy I felt like I was doing something wrong but the bread turned out DELICIOUS. My partner and I almost ate the whole thing in one evening! Will definitely make again! Thank you!!!
Great to hear, Meg! Thanks so much for writing 🙂 🙂 🙂
This is a really good, very easy Focaccia recipe – so simple to make and very impressive if you have guests. Biggest plus point is dough can be made in advance and left in fridge for up to 2 days and I can use Rosemary from Garden.
Great to hear, Josephine! Thanks for writing 🙂
Looking forward to trying this recipe, looks great. Wondering how much fresh yeast to use and how to incorporate if that’s the yeast I’ve got? Thanks Ali!
Hi Lina, you use 2-3x the weight of dried yeast when using fresh yeast, so here you’d use 16-24 grams of fresh yeast.
I never baked anything EVER, but recently tried to do so and tried this recipe. It turned out perfect. Now Im excited to bake more and explore recipes to try 🙂
Thank you so much.
Love from Indonesia.
So nice to read this, Ti! Thanks for writing 🙂
How can you know if bottom is crisp?
You kind of have to lift it up with an offset spatula.
Easy and so delicious!
I made this once before, and it was fantastic, so I decided to try again. I buttered and oiled the pan for the second rise and, two hours in, realized I forgot to roll the ball of dough in the oil. Will the focaccia still be okay?
I would drizzle it with some olive oil — does it look as though the top is drying out? Regardless: pour a little bit of olive oil over the top and gently rub it evenly over the top to coat.
Thank you for getting back to me! I’m happy to report that I did exactly that while waiting, and the bread was just as good as last time.
Great to hear! Thanks for reporting back 🙂
This is the perfect recipe. I have been making the bread about once a week. Do I need to make any adjustments for high altitude?
You shouldn’t have to! Many people have success with it at high altitude without making changes — I think the long, slow rise + high hydration make it ideal for high altitude baking 🙂
Hi,
My gamy and I love this recipe. Easy and delicious. Unfortunately my son was just diagnosed with Celiac Disease and we must now go gluten free. Do you have any experience with gluten free flour. I’ve found the Mc Arthur’s gluten free bread flour and it states 1:1 with reg flour. Would you know if the weight of any of the other ingredients would need to change if using gluten free flour. Sry for the questions just trying to make the best of this new situation my family is in. Thanks for any advice!
Hi! The weight of the other ingredients shouldn’t change. My one experience with gluten-free bread baking is this gluten-free peasant bread recipe: Gluten-Free Peasant Bread Recipe. I’d reference that recipe … might help you out with adapting this one to being gluten free.
easy recipe to follow and came out beautifully!
Great to hear, Alex!
perfect!
Made this today (your quick version) and it came out amazing!!
Great to hear, Ashley! Thanks for writing 🙂
This was my first time making focaccia and OH MY DAYS, after scouring the internet and seeing so many complicated and tedious tutorials, finding this recipe was like a breath of fresh air. What’s better is that the bread turned out INCREDIBLE. I wasn’t expecting it to turn out so well. It was filled to the brim with flavour and did NOT disappoint. The texture too was absolutely awesome – crispy, crackling too with a soft interior. Definitely going to make this again – whether as a present or a meal, because it’s that simple and that amazing!! Thank you so much for this recipe!
Great to hear, Mei! Thanks so much for writing and sharing all of this 🙂
I’m making focaccia for the first time, and beginner tips?
I just made this easy refrigerator-rise focaccia bread and it is truly fantastic! Results were absolutely perfection! It was also super-easy – lots of bang for minimal effort. Thank you for such a great recipe and for all the tips and tricks!
Great to hear, Sharon! Thanks so much for writing 🙂 🙂 🙂
yuh
I love this bread. I always add tomato’s and fire blistered Pablonos!!! I also add dehydrated pepper powder (made from the mix of peppers I grew last year) to the dough. I also add a little honey or sugar to the recipe. My dough is always way looser than this recipe but the end product is amazing!!!!
Great to hear! Thanks so much for writing, Desirae!!