 →
→ My Mother’s Peasant Bread: The Best Easiest Bread You Will Ever Make
This post may contain affiliate links. Please read my disclosure policy.
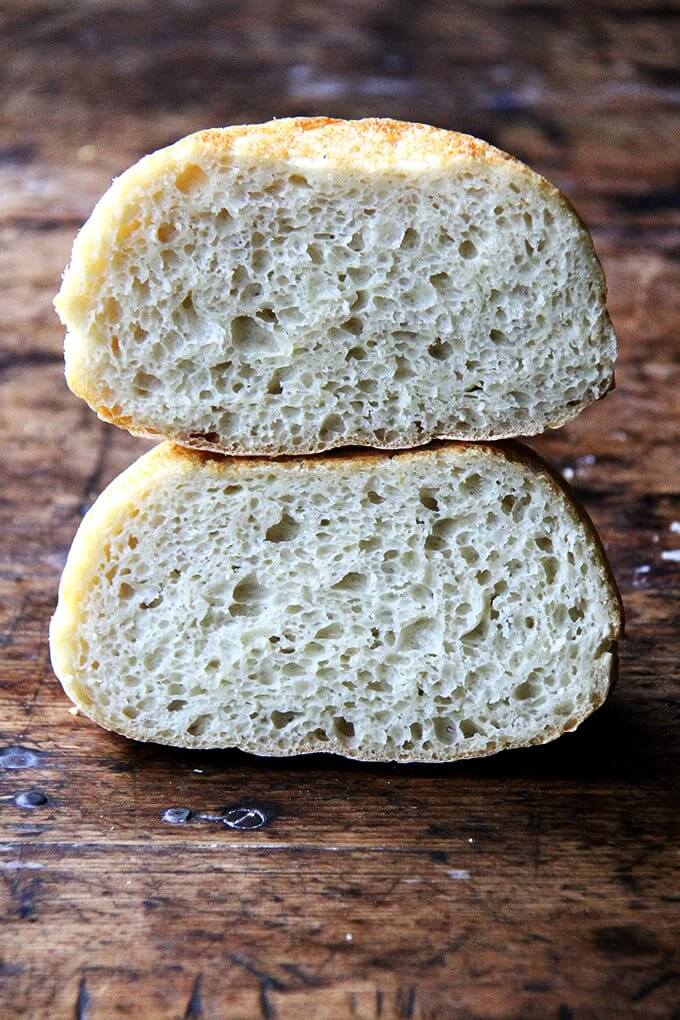
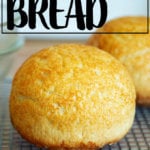
This is the no-knead bread recipe my mother has been baking for 45 years. Start to finish, it can be ready in three hours. It bakes in well-buttered Pyrex bowls — no need to preheat a baking vessel for this recipe — and it emerges golden and crisp with a soft, tender crumb. 🍞🍞🍞🍞🍞

When I tell you that, if forced, I had to pick one and only one recipe to share with you that this — my mother’s peasant bread — would be it, I am serious. I would almost in fact be OK ending the blog after this very post, resting assured that you all had this knowledge at hand. This bread will change your life.
The reason I say this is simple. People go insane over homemade bread. Not once have I served this bread to company without being asked, “Did you really make this?” And questioned: “You mean with a bread machine?” But always praised: “Is there anything more special than homemade bread?”
So what makes this bread so special? For one, it’s no-knead. But unlike other no-knead breads, you can start this one at 4:00 pm and turn it out onto the dinner table at 7:00 pm. It bakes in well-buttered Pyrex bowls — there is no pre-heating of the baking vessels in this recipe — and it emerges golden and crisp without any steam pans or water spritzes. This is not artisan bread, nor is it trying to be. It is peasant bread, spongy and moist with a most delectable buttery crust.
Genuinely, I would be proud to serve this bread at a dinner party attended by the bread Gods: Jim Lahey, Mark Bittman, Peter Reinhart, Chad Robertson, Jeff Hertzberg, and Zoe Francois. It is a bread I hope you will all give a go, too, and then proudly serve at your next dinner party to guests who might ask where you’ve stashed away your bread machine. And when this happens, I hope you will all just smile and say, “Don’t be silly. This is just a simple peasant bread. Easy as pie. I’ll show you how to make it some day.”
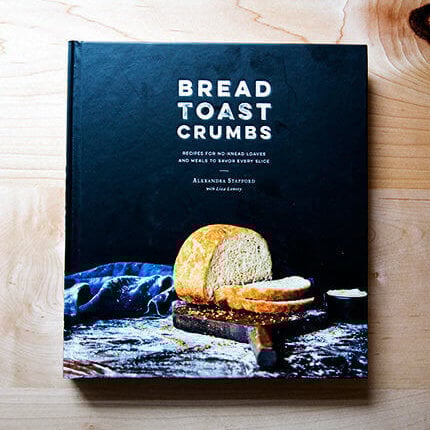
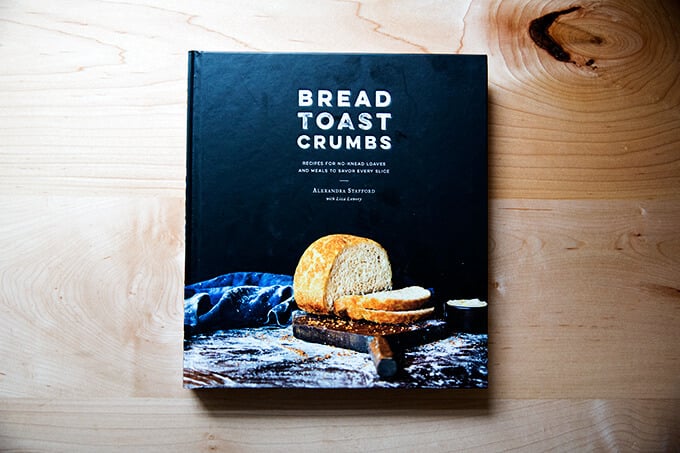
Bread Toast Crumbs
Love the peasant bread? There’s now a book filled with 40 simple bread recipes plus 70 recipes to use up every crumb of every loaf you bake.
How to Make Peasant Bread, Step by Step
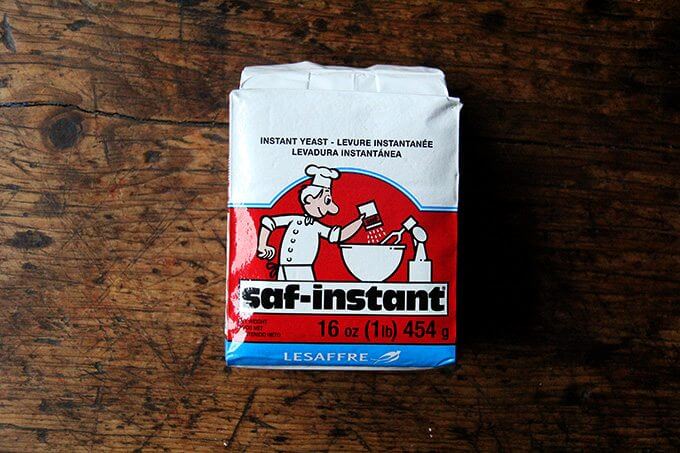
First: You need yeast. I love SAF Instant Yeast. Instant yeast can be whisked directly into the flour without blooming or proofing. If you want to stick to active-dry yeast, there are instructions in the recipe notes on how to do so. Red Star yeast is great.
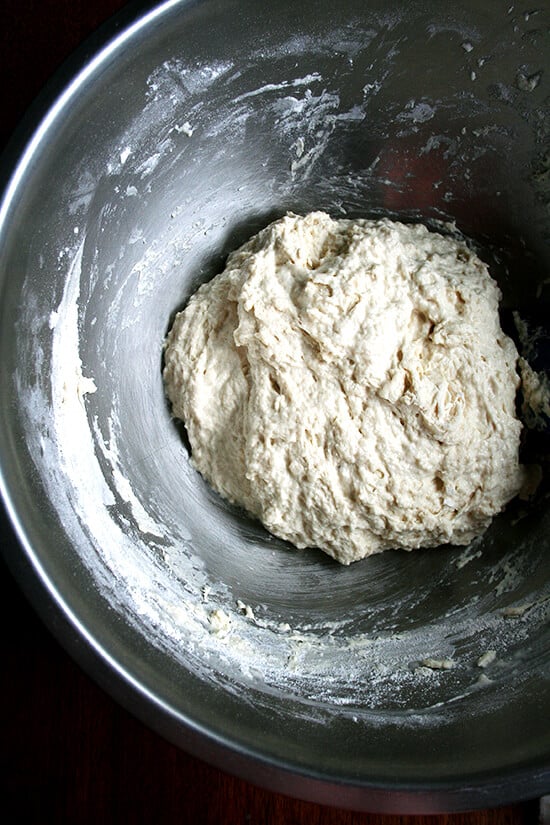
Whisk together flour, salt, sugar, and instant yeast. Add lukewarm water.

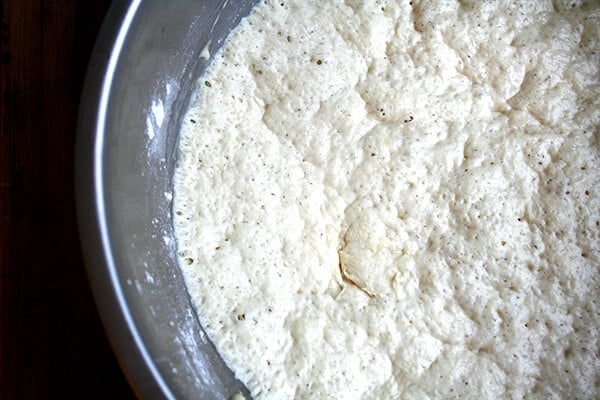
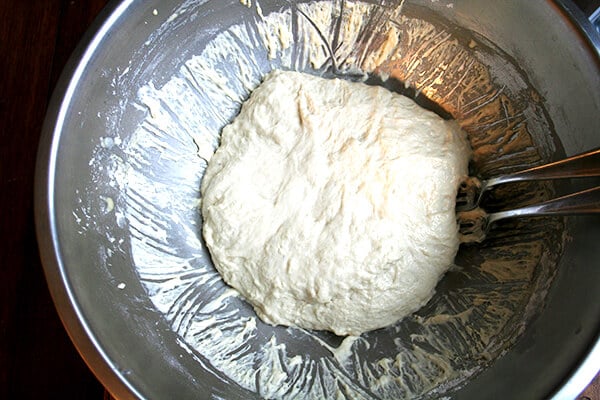
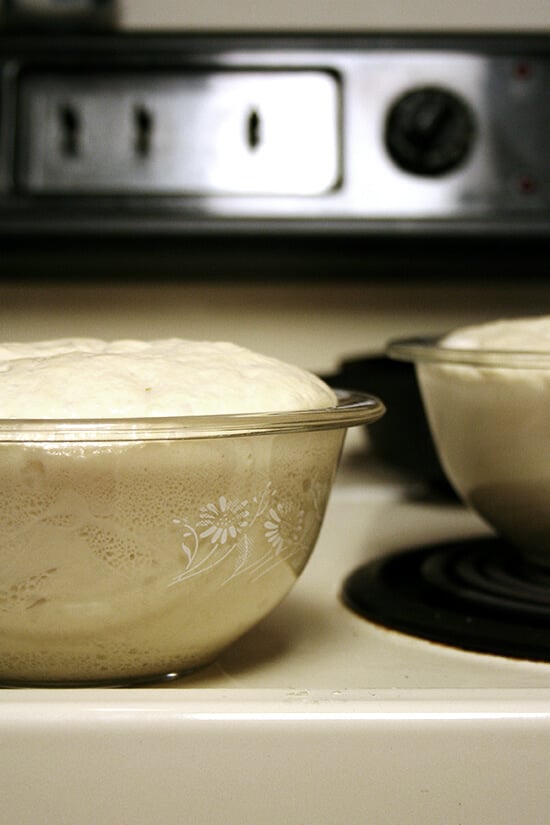
Mix until you have a sticky dough ball. Let it rise for 1.5 to 2 hours…
… or until it looks like this:
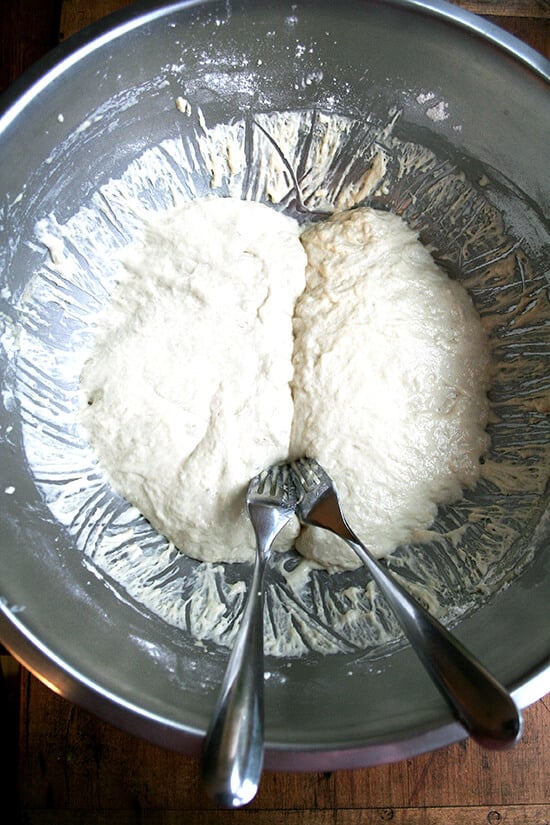
Punch down the dough using two forks.
Then split the dough down the middle again using the two forks.
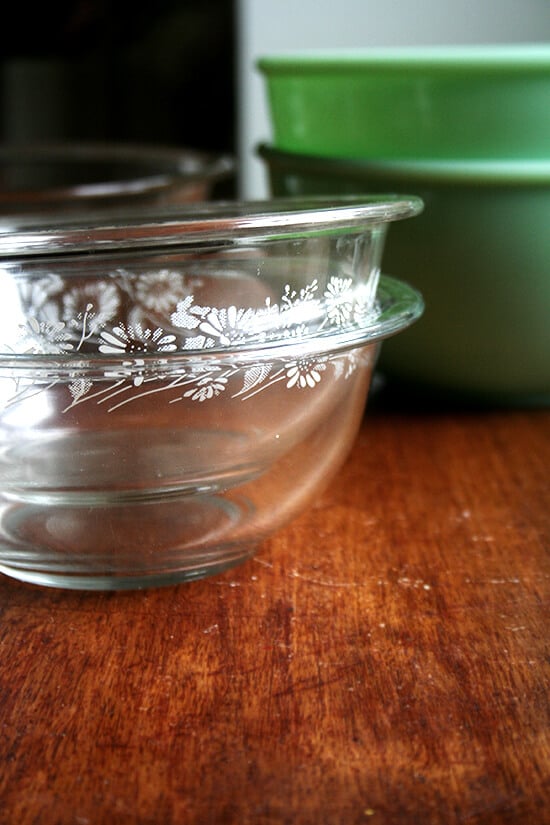
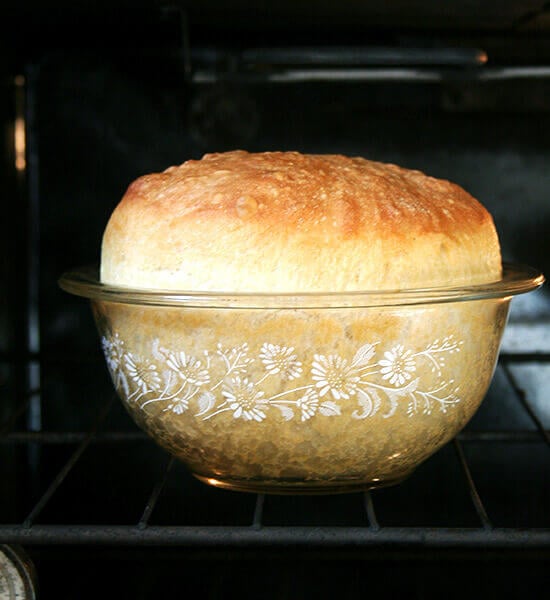
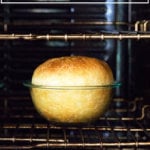
Because this is a very wet dough, it must be baked in an oven-proof bowl. I am partial to the Pyrex 1L 322 size, but any similarly sized oven-proof bowl will work.
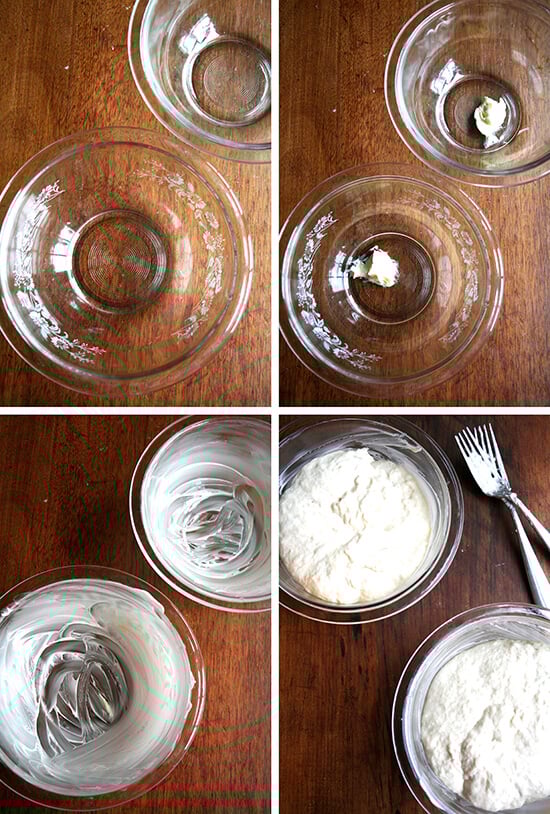
Butter the bowls well; then transfer half of the dough to each prepared bow.
Let the dough rise again until it crowns the rim of the bowl, about 30 minutes.
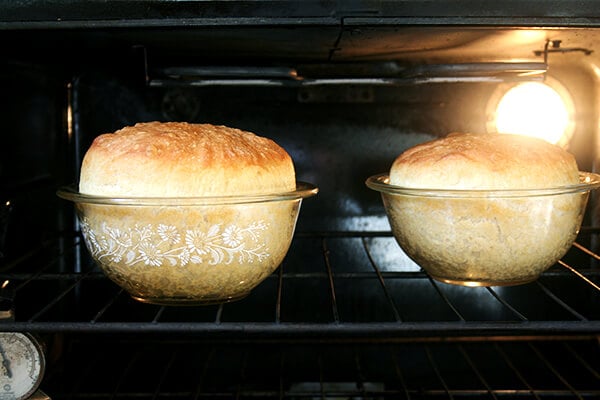
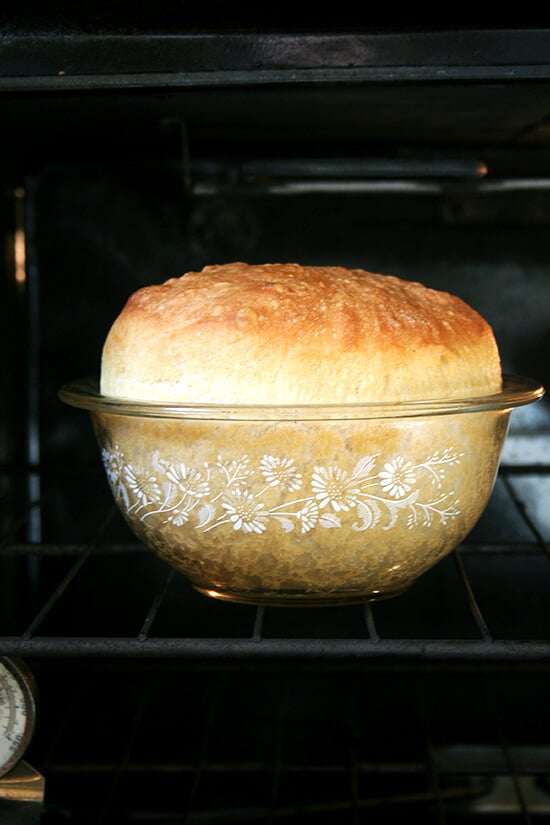
Transfer the bowls to the oven to bake:
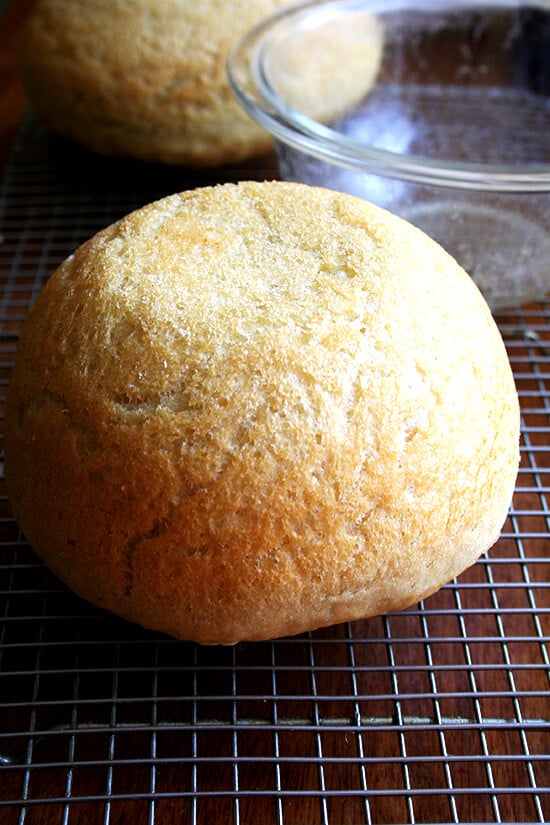
This bread is irresistible when it’s freshly baked, but it also makes wonderful toast on subsequent mornings as well as the best grilled cheese and sandwiches of all kinds.
My Mother’s Peasant Bread: The Best Easiest Bread You Will Ever Make
- Total Time: 2 hours 27 minutes
- Yield: 2 loaves 1x
Description
Notes:
This is a sticky, no-knead dough, so, some sort of baking vessel, such as pyrex bowls (you need two 1-qt bowls) or ramekins for mini loaves is required to bake this bread. See notes below the recipe for sources. You can use a bowl that is about 2 qt or 2 L in size to bake off the whole batch of dough (versus splitting the dough in half) but do not use this size for baking half of the dough — it is too big.
Peasant Bread Fans! There is a book: Bread Toast Crumbs, a loaf-to-crumb bread-baking book, filled with tips and tricks and answers to the many questions that have been asked over the years. In the book you will find 40 variations of the master peasant bread recipe + 70 recipes for using up the many loaves you will bake. Learn more about the book here or buy it here.
Ingredients
- 4 cups (512 g) unbleached all-purpose or bread flour
- 2 teaspoons (10 g) kosher salt
- 2 cups (454 g) lukewarm water (made by mixing 1.5 cups cold water with 0.5 cup boiling water)
- 2 teaspoons (8 g) sugar
- 2 teaspoons (8 g) instant yeast, I love SAF Instant Yeast, see notes below
- room temperature butter, about 2 tablespoons
Instructions
- Mixing the dough: In a large mixing bowl, whisk together the flour, salt, sugar, and instant yeast (I love SAF Instant Yeast). Add the water. Mix until the flour is absorbed. (If you are using active dry yeast, see notes below.)
- Let it rise. Cover bowl with a tea towel or plastic wrap and set aside in a warm spot to rise for at least an hour. (In the winter or if you are letting the bread rise in a cool place, it might take as long as two hours to rise.) This is how to create a slightly warm spot for your bread to rise in: Turn the oven on at any temperature (350ºF or so) for one minute, then turn it off. Note: Do not allow the oven to get up to 300ºF, for example, and then heat at that setting for 1 minute — this will be too hot. Just let the oven preheat for a total of 1 minute — it likely won’t get above 100ºF. The goal is to just create a slightly warm environment for the bread.
- Preheat the oven to 425ºF. Grease two 1-qt or 1.5-qt oven-safe bowls (see notes below) with about a tablespoon of butter each. Using two forks, punch down your dough, scraping it from the sides of the bowl, which it will be clinging to. As you scrape it down try to pull the dough toward the center (see video below for guidance). You want to loosen the dough entirely from the sides of the bowl, and you want to make sure you’ve punched it down. Then, take your two forks and divide the dough into two equal portions — eye the center of the mass of dough, and starting from the center and working out, pull the dough apart with the two forks. Then scoop up each half and place into your prepared bowls. This part can be a little messy — the dough is very wet and will slip all over the place. Using small forks or forks with short tines makes this easier — my small salad forks work best; my dinner forks make it harder. It’s best to scoop it up fast and plop it in the bowl in one fell swoop. Some people like to use flexible, plastic dough scrapers for this step.
- Let the dough rise again for about 20 to 30 minutes on the countertop near the oven (or near a warm spot) or until it has risen to just below or above (depending on what size bowl you are using) the top of the bowls. (Note: Do not do the warm-oven trick for the second rise, and do not cover your bowls for the second rise. Simply set your bowls on top of your oven, so that they are in a warm spot. Twenty minutes in this spot usually is enough for my loaves.)
- Bake it. Bake for 15 minutes. Reduce the heat to 375º and bake for 15 to 17 minutes longer. Remove from the oven and turn the loaves onto cooling racks. If you’ve greased the bowls well, the loaves should fall right out onto the cooling racks. If the loaves look a little pale and soft when you’ve turned them out onto your cooling racks, place the loaves into the oven (outside of their bowls) and let them bake for about 5 minutes longer. Remove from oven and let cool for 10 minutes before cutting.
Notes
- The bowls: The cheapest, most widely available 1-qt bowl is the Pyrex 322. Update: These bowls are becoming harder to find and more expensive. Here’s another option: the Pyrex 3-piece set. You can split the dough in half as always (see recipe) and bake half in the 1-quart bowl and half in the 1.5 quart bowl. The loaves will not be the same shape, but they will be delicious nonetheless. This Anchor Hocking set is another great option.
- Yeast: I buy SAF Instant Yeast in bulk from Amazon I store it in my fridge or freezer, and it lasts forever. If you are using the packets of yeast (the kind that come in the 3-fold packets), just go ahead and use a whole packet — It’s 2.25 teaspoons. I have made the bread with active dry, rapid rise, and instant yeast, and all varieties work. The beauty of instant yeast is that there is no need to “proof” it — you can add the yeast directly to the flour. I never use active-dry yeast anymore.
- If you have active-dry yeast on hand and want to use it, here’s how: In a small mixing bowl, dissolve the sugar into the water. Sprinkle the yeast over top. There is no need to stir it up. Let it stand for about 10 to 15 minutes or until the mixture is foamy and/or bubbling just a bit — this step will ensure that the yeast is active. Meanwhile, in a large bowl, whisk together the flour and salt. When the yeast-water-sugar mixture is foamy, stir it up, and add it to the flour bowl. Mix until the flour is absorbed.
- Troubleshooting: You can find step-by-step video instruction here.
- Several commenters have had trouble with the second rise, and this seems to be caused by the shape of the bowl they are letting the dough rise in the second time around. Two hours for the second rise is too long. If you don’t have a 1-qt bowl, bake 3/4 of the dough in a loaf pan and bake the rest off in muffin tins or a popover pan. The second rise should take no more than 30 minutes.
- Also, you can use as many as 3 cups of whole wheat flour, but the texture changes considerably. I suggest trying with all all-purpose or bread flour to start and once you get the hang of it, start trying various combinations of whole wheat flour and/or other flours.
- The single most important step you can take to make this bread truly foolproof is to invest in a digital scale. This one costs under $10. If you are not measuring by weight, do this: scoop flour into the measuring cup using a separate spoon or measuring cup; level off with a knife. The flour should be below the rim of the measuring cup.
- Here’s a printable version of this recipes that’s less wordy: Peasant Bread Recipe, Simplified
- How to Bake the Peasant Bread in a Dutch Oven: Preheat a Dutch Oven for 45 minutes at 450ºF. Dust a clean work surface with flour. After the first rise, turn the dough out onto the floured surface and shape it into a ball: I like to fold it envelope style from top to bottom, then side to side; then I flip it over and use the pinkie edges of my hands to pinch the dough underneath and create some tension. Transfer the dough to a sheet of parchment paper. Let rest for 20 minutes. If you feel your dough is spreading too much you can lift up the sheet of parchment paper, dough and all, and place it in a bowl of a similar size. After the 20 minutes, transfer the dough, parchment paper and all to the Dutch oven. Carefully cover it. Bake 30 minutes. Uncover. Bake 15 minutes more.
- To bake the peasant bread in a loaf pan: If you are using an 8.5×4.5-inch loaf pan or a 9×5-inch loaf pan, you can bake 3/4 of the dough in it; bake off the rest of the dough in ramekins or other small vessels … the mini loaves are so cute. You can also make 1.5x the recipe, and bake the bread in 2 loaf pans. If you have a large loaf pan, such as a 10×6-inch loaf pan, you can bake off the entire batch of dough in it. For loaf pans, bake at 375ºF for 45 minutes.
- How to Bake at Hight Altitude:
- First try the original recipe as written (preferably with a scale). You may not need to make any adjustments. One commenter, who lives at 9200 ft finds the original recipe to work just fine as is.
- If the original recipe doesn’t work, try adding a little bit more water because it rises fast and it is so dry: about a quarter cup for every 512 g of flour.
- Try decreasing the yeast to 1.5 teaspoons.
- If your dough is especially gooey, try decreasing the water by 1/4 cup. But, if you aren’t using a scale, my first suggestion would be to buy a scale and weigh the flour, and make the bread once as directed with the 2 cups water and 512 grams flour, etc.
- Punch the dough down twice before transferring it to the buttered Pyrex bowls. In other words, let it rise for 1-1.5 hours, punch it down, let it rise again for about an hour, punch it down, then transfer it to the buttered bowls.
- Variations:
- #1. Cornmeal. Substitute 1 cup of the flour with 1 cup of cornmeal. Proceed with the recipe as directed.
- #2. Faux focaccia. Instead of spreading butter in two Pyrex bowls in preparation for baking, butter one 9×9-inch glass baking dish and one Pyrex bowl or just butter one large 9×13-inch Pyrex baking dish. If using two vessels, divide the dough in half and place each half in prepared baking pan. If using only one large baking dish, place all of the dough in the dish. Drizzle dough with 1 tablespoon of olive oil (if using the small square pan) and 2 tablespoons of olive oil (if using the large one). Using your fingers, gently spread the dough out so that it fits the shape of the pan. Use your fingers to create dimples in the surface of the dough. Sprinkle surface with chopped rosemary and sea salt. Let rise for 20 to 30 minutes. Bake for 15 minutes at 425ºF and 17 minutes (or longer) at 375ºF. Remove from pan and let cool on cooling rack.
- #3. Thyme Dinner Rolls
- #4 Gluten-free
- #5. Everything Bagel Seasoning Bread. Simply coat the buttered bowls with everything bagel seasoning. Other seeds and seed mixes work, too, like sesame seeds and dukkah.
- #6: Whole Wheat Peasant Bread. Use as much as 50% whole wheat flour.
- Prep Time: 5 minutes
- Cook Time: 32 minutes
- Category: Bread
- Method: Baked
- Cuisine: American
This post may contain affiliate links. Please read my disclosure policy.


7,129 Comments on “My Mother’s Peasant Bread: The Best Easiest Bread You Will Ever Make”
On TikTok, you have this recipe except for the loaf pan. I can’t seem to find that one to print out. This recipe wants to print out 7 pages and I’m not doing that. Plus my Pyrex bowls are currently holding leftovers, lol Thank you for any help.
Hi Terry! Find that recipe over on Cup of Jo: https://cupofjo.com/2022/02/found-easy-same-day-peasant-bread-recipe/
I saw the recipe, but I don’t see print! Argh, been one of those weeks! 🥴
Hi Terry! It’s in the recipe box for future reference. Here is the direct link to the print button: https://vector-hatch.live/2012/11/07/my-mothers-peasant-bread-the-best-easiest-bread-you-will-ever-make/print/51440/%3C/a%3E%3C/p%3E
Hello, Happy Valentines Day! The link is to the original recipe. I’m wanting to print for the recipe that only makes enough for a loaf pan…lol Thanks!
Awww I see! I don’t think they have a print recipe function over there, unfortunately. I’m sorry!
I made it for the first time today & it turned out perfectly except for a little sticking to the bottom of the bowl after baking. I went back & reviewed your video & saw that you had used much more butter, so will definitely make again & be more generous with buttering my bowls.
I also used flat bottom 4 C glass storage bowls-all I could find & it made a nice round loaf.
So nice to hear this, Deb 🙂 🙂 🙂 Buttering generously definitely makes a difference. Thanks for writing and sharing your notes!
I’ve made this bread several times and am about to make it again!!! I LOVE IT! My husband will cut a piece for me and butter both sides and fry it!!! WONDERFUL ❤️❤️❤️❤️
That sounds AMAZING!! Love this idea. Thanks so much for writing 🙂
I made this tonight and it was delicious. The only issue I has was that the top of the bread was thick and dense. Any idea why?
Hi Bea! Questions: did you use a scale to measure? And what type of flour did you use? Also: what baking vessel?
Thank you for the reply.
I used a scale and the 1L Pyrex bowls. The flour I used was in bleached artisan bread flour from Trader Joe’s.
Great to hear! My only thoughts are that you could potentially increase both of the rise times: try extending the first rise for about 3 hours. With the second rise, really be patient letting the dough crown the rim before placing the bowls in the oven to bake. Not sure else what to suggest?! Also be sure to let the bread cool before slicing.
Hello! I have yet to make this recipe but I will be giving it a try soon! I intend on making 1.5x the recipe for two loaf pans. I only have 1 loaf pan though so while one is cooking can the other dough just rest on the counter or should I place it in the fridge?
Hi Ashley! You can leave the dough on the counter while the other one bakes. If your kitchen is super warm, the fridge is a good idea, but otherwise, the counter is fine. You’ll find that the dough will rise while it sits in the bowl, so you’ll have to deflate it a bit before transferring it to the loaf pan; then let it rise again.
Made it this afternoon and it turned out so beautiful! Can’t wait to slice into it. Do you have any recipes for a basic bread like this one that you knead? I find it therapeutic kneading bread and would love to try one!
Great to hear, Ashley! I have a honey whole wheat bread recipe in this post that you knead: https://vector-hatch.live/2011/10/05/when-people-come-to-visit/%3C/a%3E%3C/p%3E
We have made this many times and love it toasted with a fried egg. Yum.
My husband said it’s too spongy and different than the store bought bread. Is it more spongy because we don’t kneed it? I’m a bread newbie and I want to tell him why it’s spongy bit don’t know enough.
Spongy is a good way to describe it! It’s spongy partly because it’s no-knead but also because there is such a high proportion of water relative to the flour.
Mine doesn’t rise as much during baking. Any idea why?
What size bowls are you using?
Loved this recipe! My dough was ready to split too soon as I wanted warm bread for our guests, so I simply “punched” it down and waited for the next rise. Worked perfectly.
Great to hear, Paula! Thanks so much for writing and sharing.
I’ve made this recipe 4-5 times and every time it comes out perfectly! I do the two loaf pan version and at the end I paint a little melted butter on top and stick them under the broiler to give a nice brown crust. Huge hit with everyone who comes over!
Wonderful to hear Catherine! Great tip. Thanks so much for sharing.
Super easy and delicious! I use a Dutch oven with no problems. Great for everything – especially delightful warm with butter. I’ve also baked with everything bagel topping.
Will continue to make this bread. <3
Great to hear all of this! Thanks so much for writing 🙂 🙂 🙂
Hi! Thank you for your wonderful recipes! I do have a question about the yeast amount for this bread. In your book it calls for 2 1/4 teaspoons and here I need only 2 teaspoons. Why?
Thank you, Gina
Hi Gina! Most people use the packets of yeast that contain 2.25 teaspoons of yeast, so this is what I recommend in the book, and you can use that amount here as well. I buy SAF yeast in 1-lb blocks, and for this reason I use 2 teaspoons for simplicity. There really isn’t much of a difference between using 2 teaspoons or 2.25 teaspoons in a recipe. Hope that clarifies!
I’ve made this a few times now and it’s never wet? The dough it’s spongy. What am I doing wrong? It’s too dry
Hi Anna! Are you using a scale to measure? If not, you’re probably measuring too much flour. If you don’t have a scale, try using scant cups of flour.
I am making this bread now, and accidentally switched the temps on the water amounts: boiling 1.5 c and adding .5 c cold. How will this affect the bread?
Hi Stefanie! Apologies for the delay here! It’s possible that the water is too hot and will kill the yeast … what did you end up doing? Or rather, how did the bread turn out?
I did google it and came to that conclusion, so made a second batch. Good thing, too, as the first one did NOT rise all that well. Second one turned out better, and I used regular yeast using your tip to ensure it was active, and it worked.
OK, great to hear, Stefanie! So glad you Googled it.
Seriously it is over-the-top the crust is fantastic the texture is perfect well done mom
So great to hear this, Marvel 🙂 🙂 🙂 Thanks so much for writing.
Any suggestions for preparing this ahead of time, like the night before to bake the next day?
Hi Liz! You can mix the dough; then stick it in the fridge until you are ready to proceed with the recipe. You also can let the dough rise once, deflate it; then transfer it to the fridge. Just be sure the dough is in a lidded vessel with room to grow so that it doesn’t dry out.
This is my go to recipe for EVERYTHING !
I find myself experimenting so mucch with flavors and textures i absolutely love it .
I’m wanting to try switching to Honey instead of sugar …. Would the ratio be different ?
Great to hear, Crystal! No need to change the ratio: 2 teaspoons of honey will do the trick. Thanks for writing!
If you bake in one 2qt bowl, does your baking time change? Just put the dough together and it’s rising. Seemed wetter than it should be.
Hi Leah! I’m likely too late here. I would do: 15 minutes at 425ºF, 30 minutes at 375ºF. Hope it turned out OK! The dough definitely is on the wet side.
Thank you! I searched through comments and finally found someone who had the same question. This bread is without a doubt the best no kneed bread I’ve made and eaten!
Wonderful to hear, Leah! Thanks so much for reporting back and sharing your results 🙂 🙂 🙂
This rivals sour dough.
Great to hear, Barbara 🙂 🙂 🙂
The best and easiest bread I’ve ever made! It’s a hit with the whole family. But I’m curious how long the bread can stay good for at room temperature vs refrigeration?
Hi Sydney, Great to hear 🙂 I would say 5-7 days depending on the time of year in an airtight bag or vessel.
How do you store the bread? Assuming it’s not going to be eaten in one sitting. 🙂
🤣🤣🤣🤣🤣
I store in ziplock bags… I know this is unpopular, but I find it keeps the crumb the softest for the longest. I always reheat day-old bread: either in the toaster or the oven: 350ºF for 15 minutes or so.
Hi! What can I use instead of the pyrex bowls? Does it has to be a bowl? . I’ll appreciate your suggestions. Thanks.
Hi Paola! See the notes below the recipe box for using other vessels.
Hi- I love baking with glass dishes, but I questioned Pyrex Co. and they do NOT recommend baking BREAD in them- explained about their glass not tolerating such high heat.
Just wondering your thoughts.
Think I’ll try my longer loaf pan- thanks!
Hi Connie! Very interesting. I have never had an issue with baking at 425ºF with the Pyrex bowls. I’ve also used my Pyrex loaf pan without any trouble. I also use my Pyrex bowls in my Instant Pot when I do the pot-in-pot recipes in which you cook rice in a bowl in the IP with all of the other things. Totally understand your concern! Just want to assure you, my mother has been doing this for about 45 years now, and I’ve been doing it for about 25 years now, and we’ve never had an issue 💕
Just wondering if I only want to make one loaf can i halve the recipe?
Yes! Apologies for the delay here!
I absolutely love this recipe!!! I’ve been making the everything bagel & the reg one they are awesome!!! I can’t keep my husband out of it !!!! Everyone I’ve let try it wants more !!! Thank you
Wonderful to hear this, Donna! Thanks so much for writing 🙂 🙂 🙂 I love the everything bagel one, too.
Thank you for your clear and
DETAILED instructions! My first try came out wonderfully!
Great to hear, Susan! Thanks for writing 🙂 🙂 🙂
I love this recipe.
I found 2pyrex glass bowls at Goodwill. I have made 4 loaves this past week. I gave a loaf to my kids and they gave me 👍 up and said make us at least 1 loaf a week. Thank you for sharing this recipe!
So great to hear this, Jacque! Love your kids’ enthuasiasm. Thanks for writing 🙂
AMAZING taste, texture and easy instructions. It reminds me of my Italian mom’s fried pizza dough without the frying, it’s so good!! Thank you SO much for sharing Alexandra 🙏
Great to hear this! Thanks for writing!
Your bread is amazing.. so fool proof for a beginner like me! When increasing the recipe 1.5 how much do I increase the yeast? I’m using two 1.5 bowls now so my bread is a little flatter but that’s ok with me.. fits in the toaster better when sliced! So awesome toasted! But I have an extra bowl so I want to make 3 bowls. Is 3 teaspoons of yeast to much when increasing to 1.5 recipe? Any tips on dividing wet dough in thirds..LOL.. I have your book and I’m giving more as Christmas gifts! If I could give you more than 5 stars, I would!
Awww thanks so much, Sandra 🙂 🙂 🙂 So nice to read all of this.
Honestly, with 1.5X the recipe, you can still get away with 2 teaspoons of Instant Yeast — it’s so powerful. But you could also do 2.25 teaspoons or 2.5 if you wanted the assurance of a speedy rise.
Regarding splitting it into thirds, I would just imagine a peace sign, and try to divide it into thirds that way … it will be messy, but the dough is very forgiving!
Good luck 🙂
Thank you so much for your speedy reply! I’m trying it today! Can’t begin to tell you how much I like your bread and book! Have a blessed day!
Wonderful! And thank you so much 🙂 🙂 🙂 Means a lot.
I know I must have missed it, but at what temperature do I bake at? I even looked at your TT video but no mention there. Thank you!
Barb
425ºF for 15 minutes; lower the temp to 375ºF and bake for 17 to 20 minutes more. You can also simple bake at 425ºF the entire time, if your loaf isn’t getting too brown.
The best bread ever! Everyone loves it!
Great to hear, Debra! Thanks so much for writing 🙂 🙂 🙂
How can i make Peasant Bread yeast free please