 →
→ Jim Lahey’s No-Knead Bread
This post may contain affiliate links. Please read my disclosure policy.
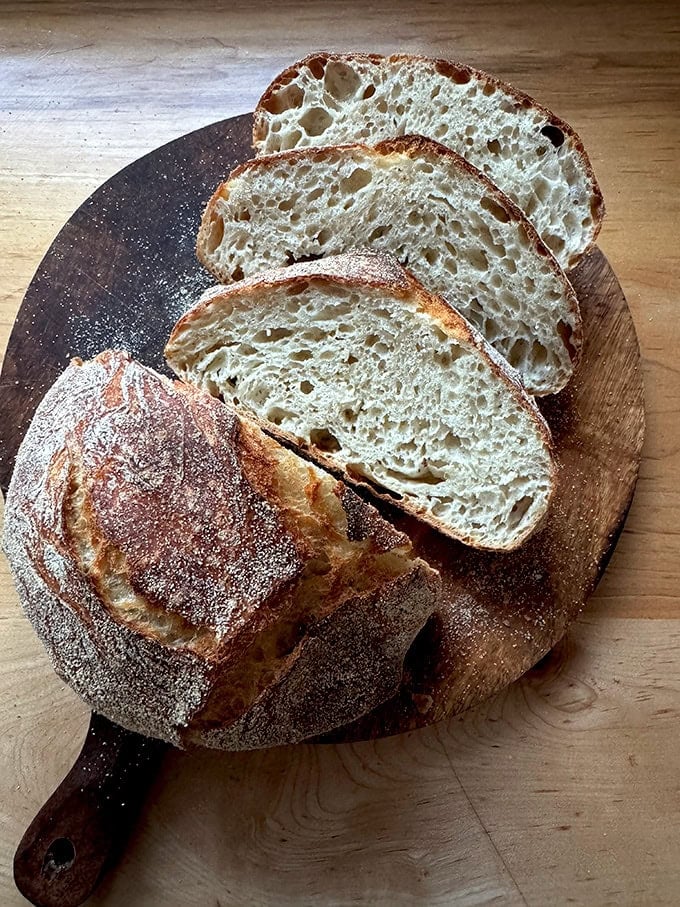
Crusty, airy, bakery-style bread in your home kitchen? Yes. You. Can. This dough takes 5 minutes to stir together, and from there, time does the work. If you love a rustic boule for dipping in your soup or toasting and slathering with butter and jam for breakfast, this recipe is for you.
If you’ve spent any time toiling over a loaf of sourdough bread, making Jim Lahey’s no-knead bread will feel like a breath of fresh air. This recipe calls for a very simple mixing and shaping process, requiring little equipment and skill.
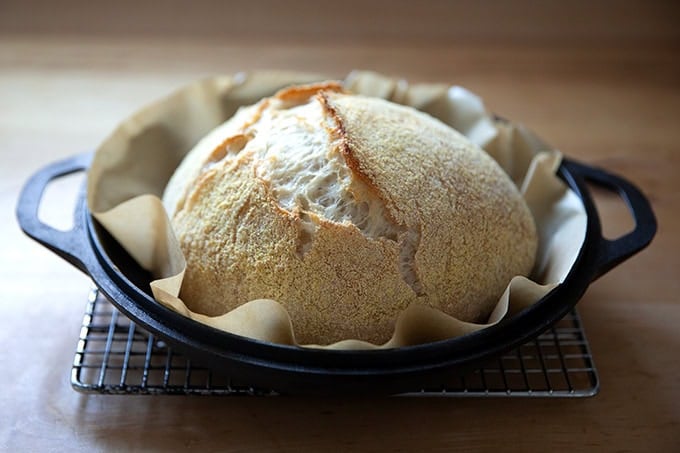
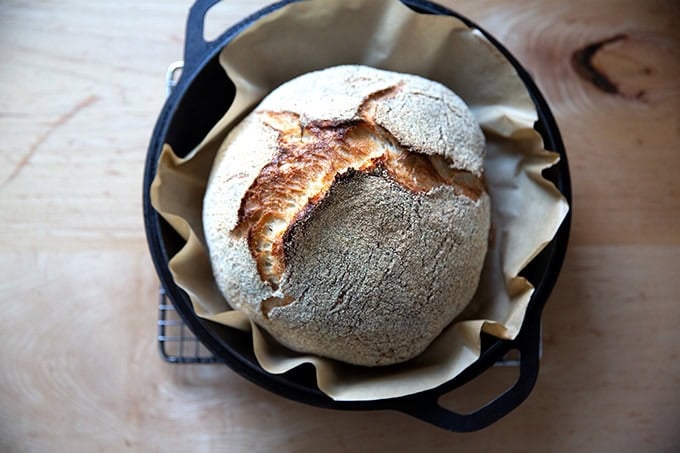
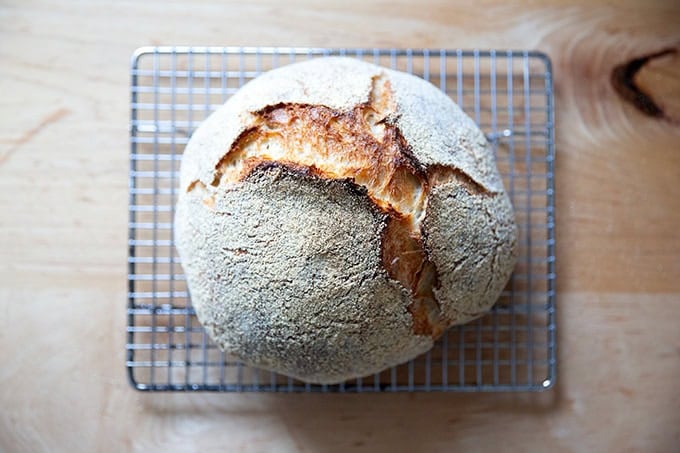
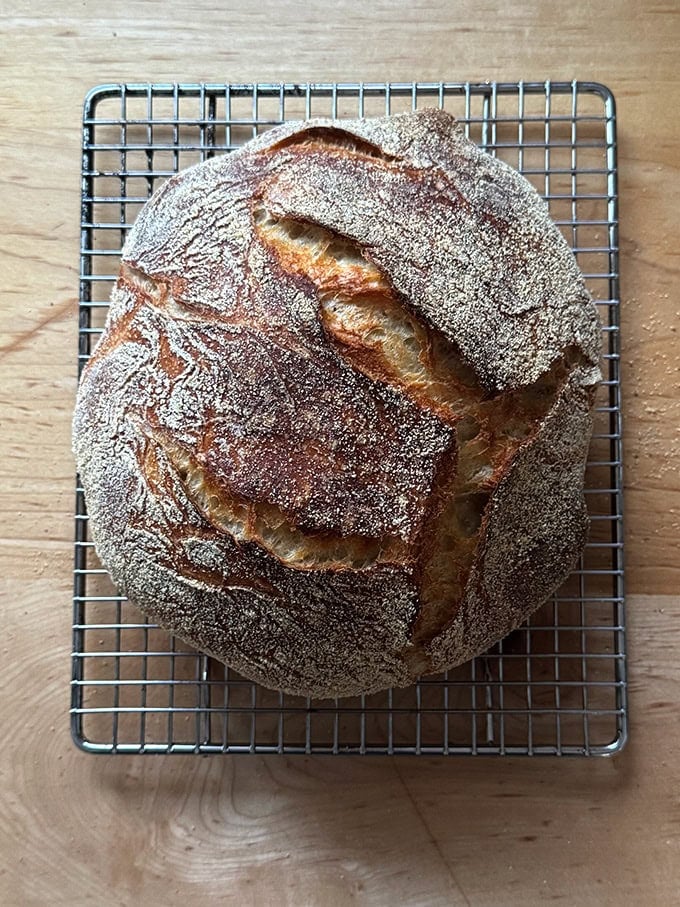
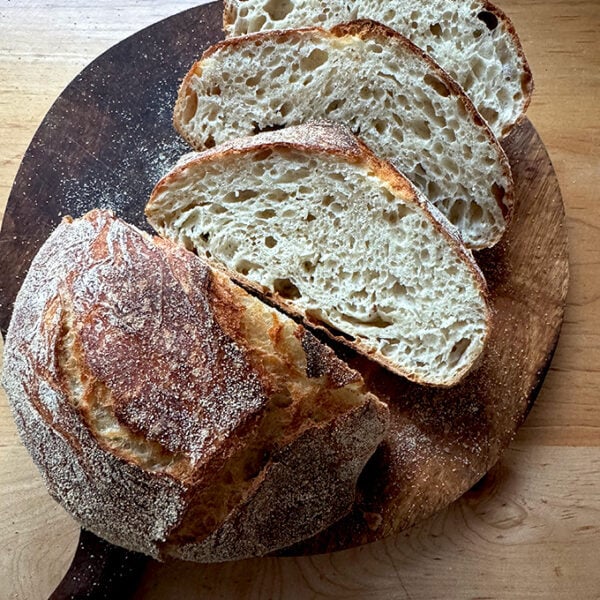
The bread emerges crusty and cornmeal-dusted, with a light, airy crumb. Why does this recipe work?
First: time. During the long, slow rise, both gluten and flavor develop.
Second: the baking method. This dough bakes in a Dutch oven, covered first, then uncovered. When the pot is covered, water in the dough evaporates and transforms into steam. Both the carbon dioxide gas in the dough and the steam push against the gluten structure, causing the dough to spring. During the last 15 minutes of baking, when the lid is removed, and the bread is exposed to dry heat, the gelatinized surface of the dough dries out, forming a crackly crust. The cornmeal further promotes a crunchy exterior.
How to Make Jim Lahey’s No-Knead Bread, Step by Step
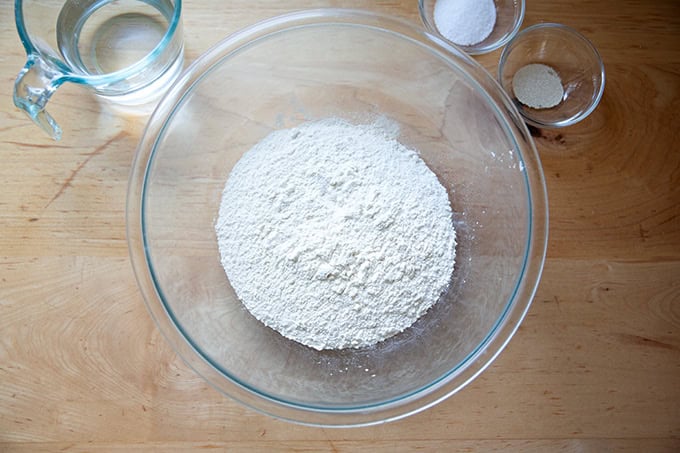
First gather your ingredients: flour (bread or all-purpose), salt, instant yeast (SAF is my preference), and water:
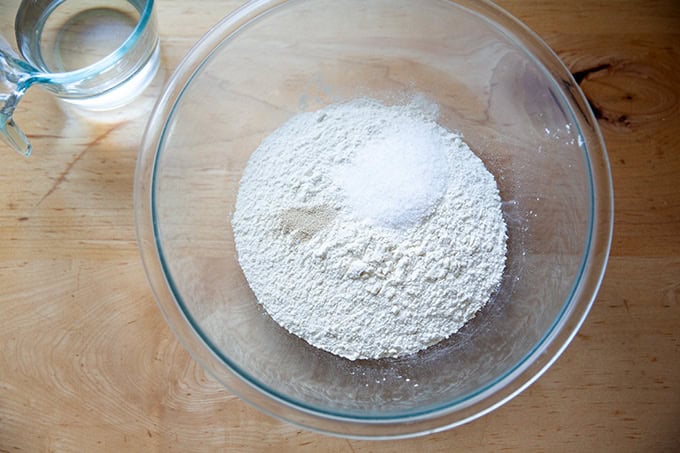
Combine the flour, yeast, and salt:
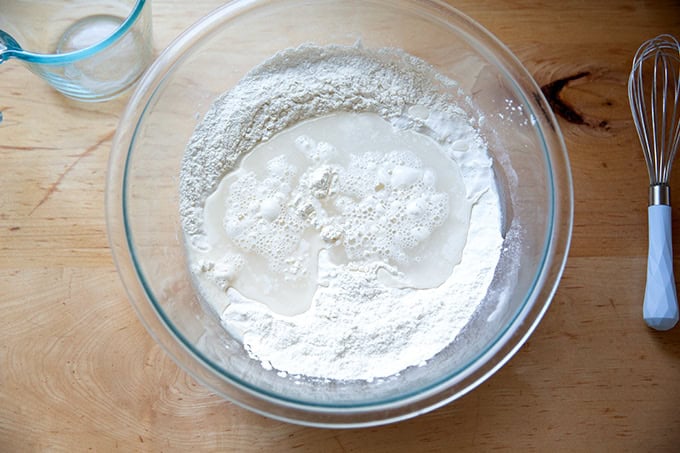
Whisk to combine, then add the water:
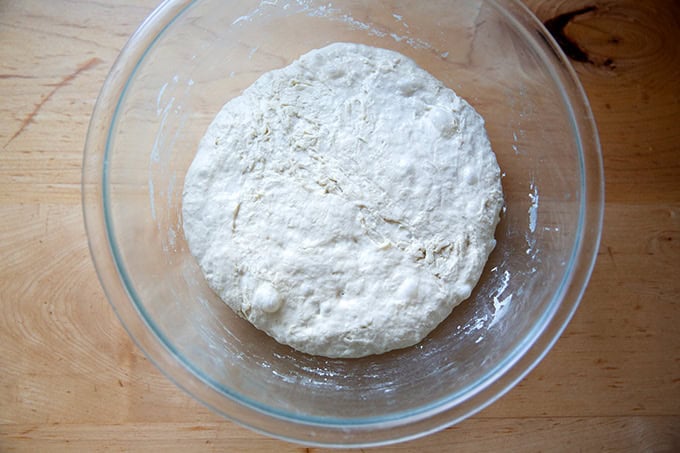
Stir until you have a sticky dough ball:

Cover the bowl. At this point, you can leave the dough untouched for 18 hours. Or, if time permits, in 15 to 20 minutes, you can perform one set of stretches and folds: simply grab an edge of the dough using a wet hand and stretch it up and in. Repeat this 8 to 10 times, grabbing a different edge each time. I find even performing just one set of stretches and folds gives my dough the teensiest bit more strength and ultimately a bit more loft.
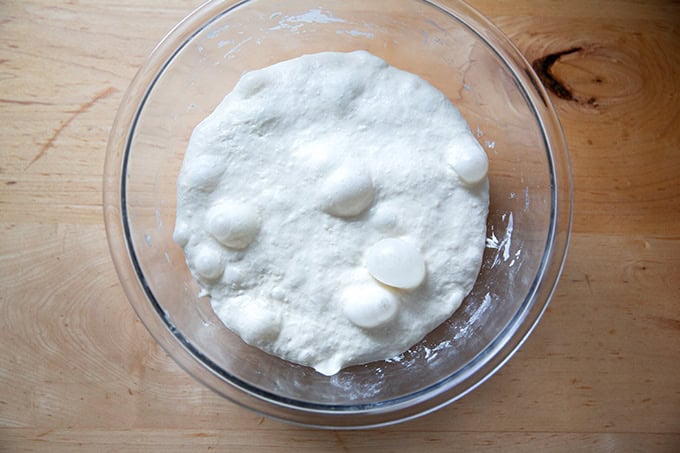
Compare the difference between this dough after 18 hours, which experienced no stretches and folds:
And this dough, also after 18 hours, which experienced one set of stretches and folds:
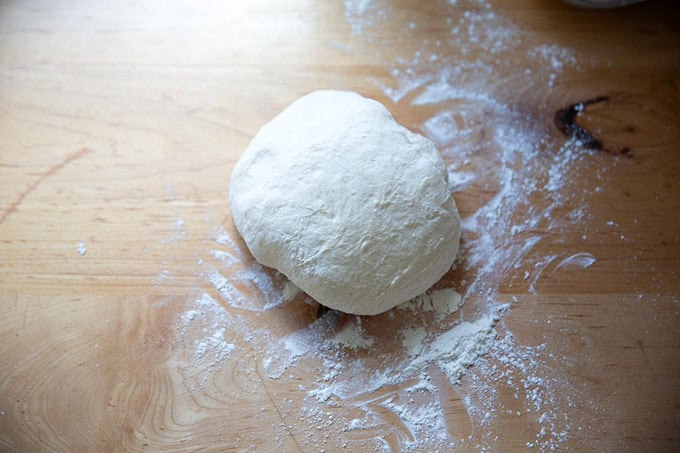
Turn the dough out onto a lightly floured work surface:
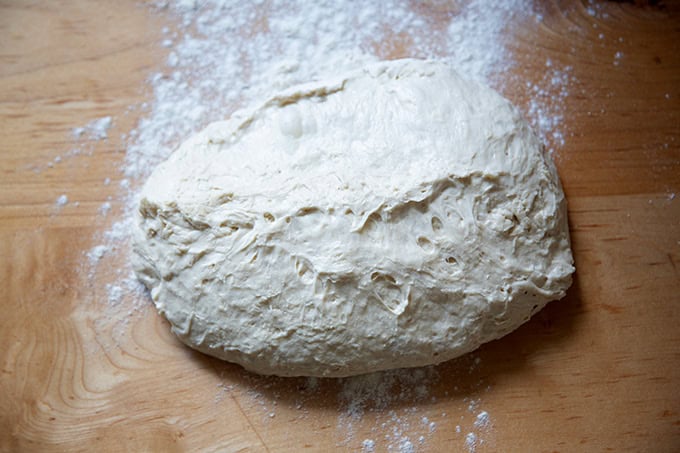
Then fold it into a rough ball:
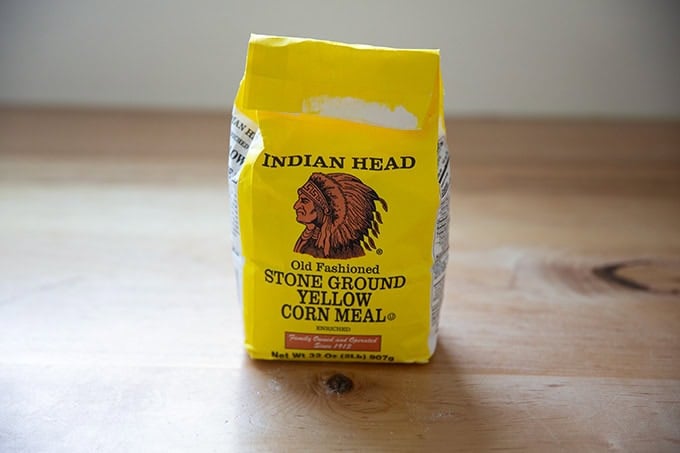
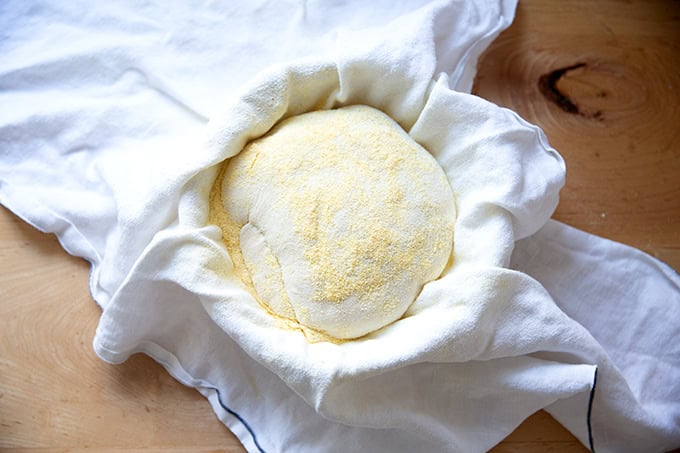
Lightly dust a tea towel or flour sack towel (I love these Flour Sack Towels) with cornmeal and place the shaped round cut side down on the towel. Sprinkle with more cornmeal:
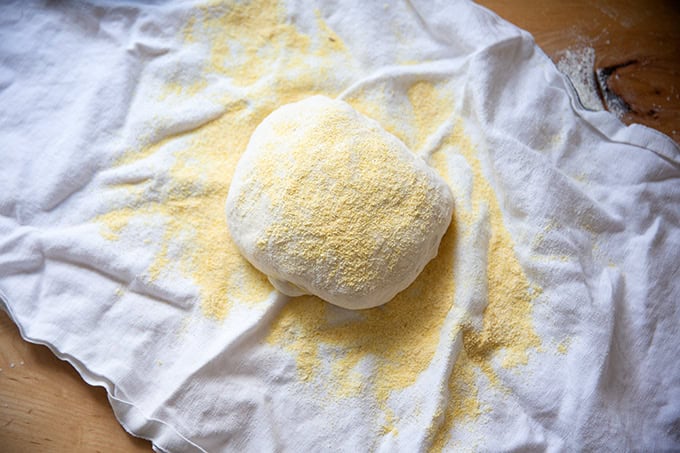
Incidentally, this is the cornmeal I buy:
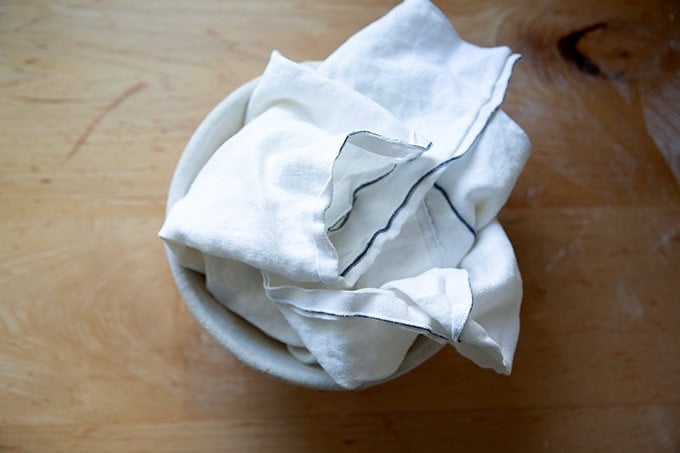
Wrap into a bundle and set in a small bowl (an 8-inch banneton or Pyrex bowl or anything similar) will work. Set aside to rise for 2 hours.
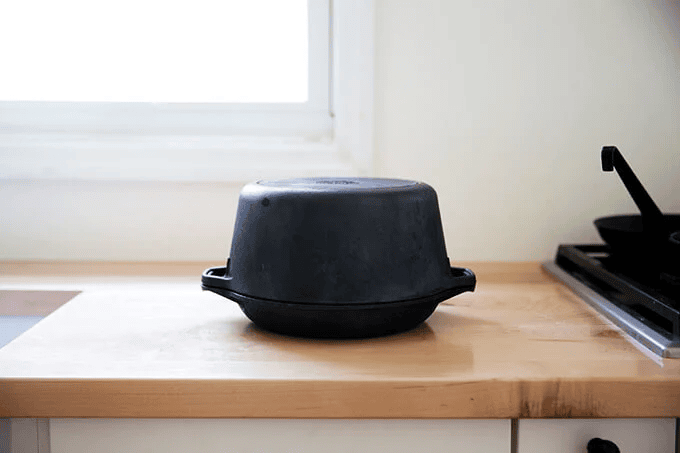
Forty-five minutes before you plan on baking, place a Dutch oven in your oven and preheat it to 450ºF. I’ve used my 5-Qt Lodge and my Challenger Bread Pan here with success.
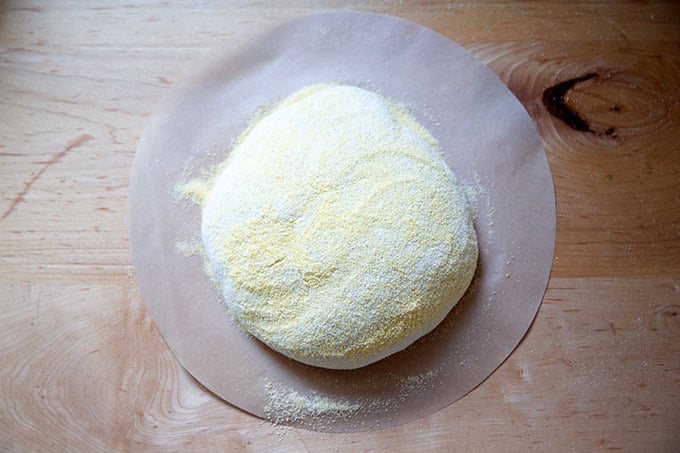
When you are ready to bake, open the towel, and remove the bowl.
Lay a round of parchment over the top of the dough and lay one hand on top; then slide your other hand underneath the towel, and carefully flip the round onto the parchment, so that the seam side is up. (Note: The seam will be hard to see, but it will open up in the oven.) This will make a mess of cornmeal everywhere… simply sweep it away. I love these parchment rounds for both pizza and this bread.
Remove the Dutch oven from the oven and set it on a cooling rack. Remove the lid and carefully lower the bread, parchment paper and all into the pot:
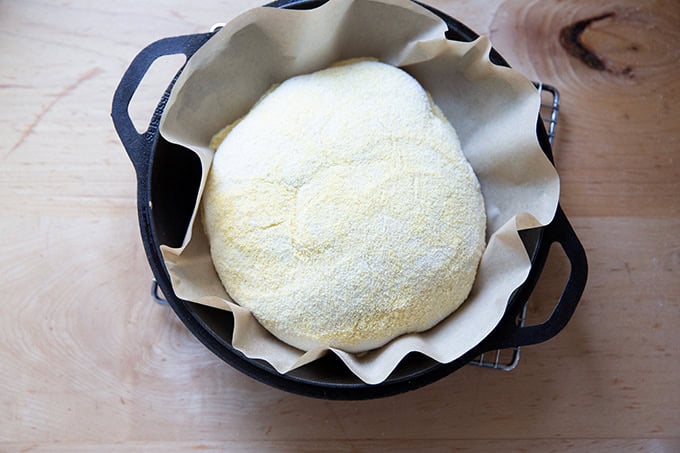
Cover the pot and transfer to the oven for 30 minutes. Then remove the lid:
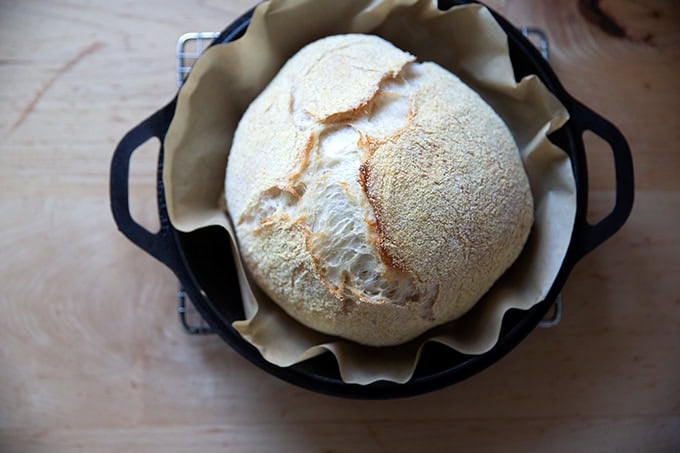
Return the pan to the oven for another 15 minutes or until browned to your liking:
Transfer bread to a cooling rack and let cool for at least 30 minutes before slicing.
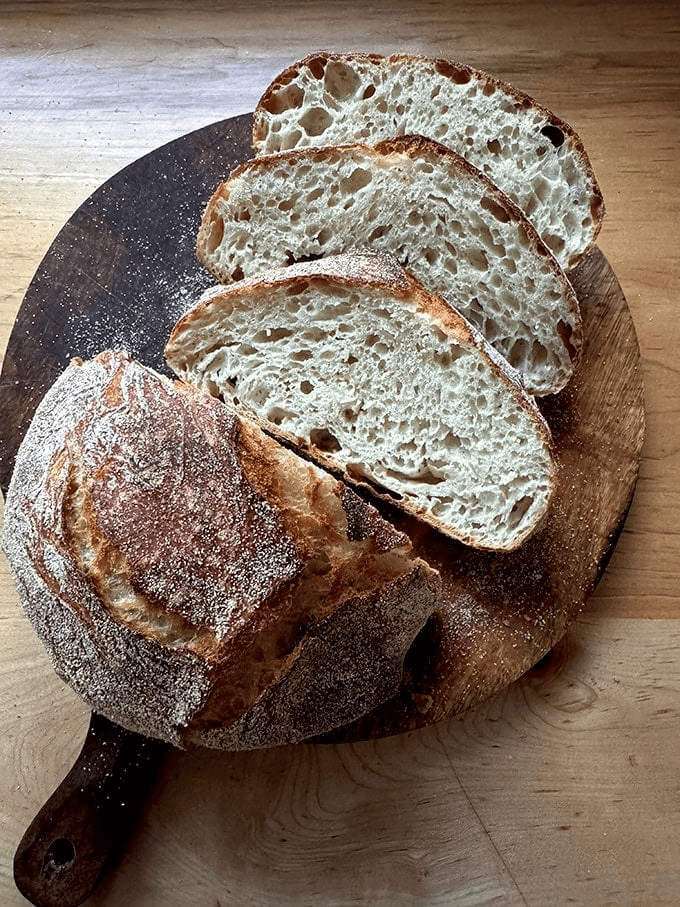
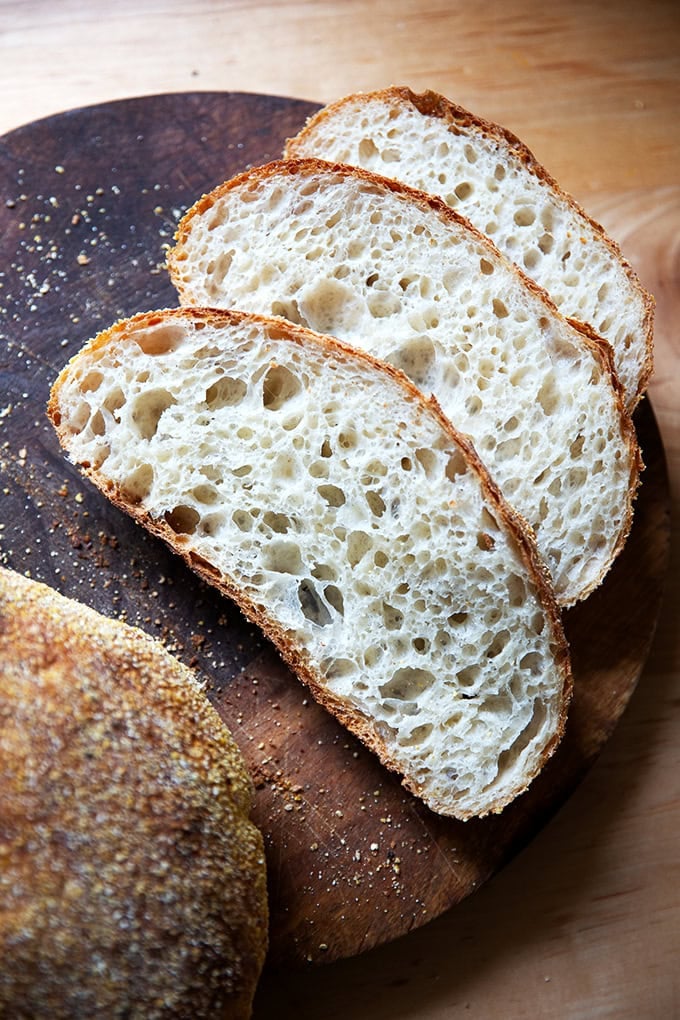
Look at that light airy crumb:
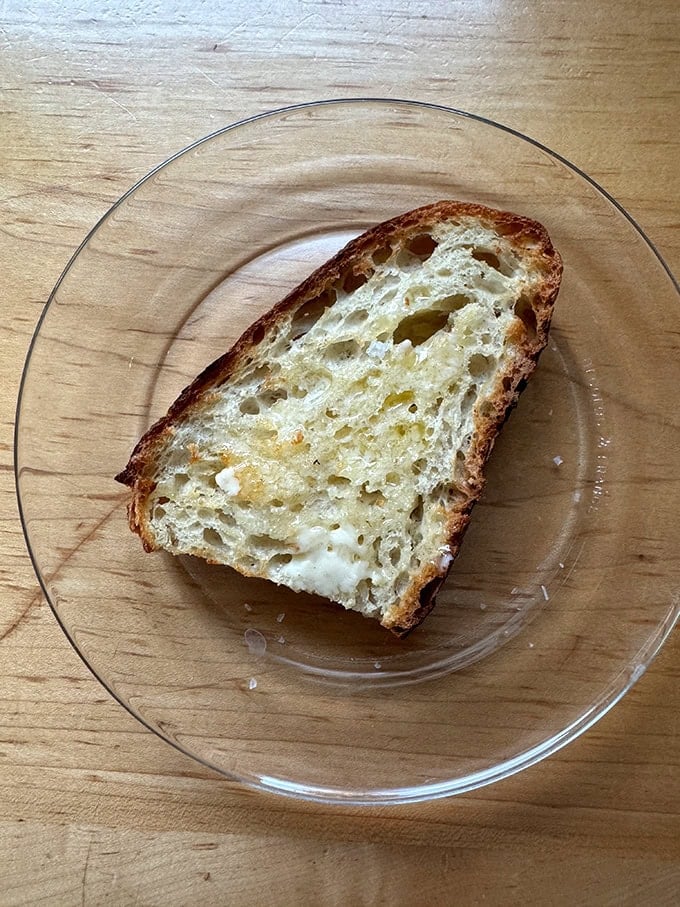
The no-knead loaf will feed a crowd but should you find yourself with leftovers, it makes delicious toast and freezes beautifully:
Jim Lahey’s No-Knead Bread
- Total Time: 22 hours
- Yield: 1 loaf 1x
Description
Crusty, airy, bakery-style bread in your home kitchen? Yes. You. Can. This dough takes 5 minutes to stir together, and from there, time does the work. If you love a rustic boule for dipping in your soup or toasting and slathering with butter and jam for breakfast, this recipe is for you.
Adapted from Mark Bittman’s “The Minimalist” column in The New York Times: Dining In November 8, 2006 / Recipe from Jim Lahey
Notes:
Flour/Salt: I’ve adjusted the recipe by adding a touch more salt than suggested in the article and converting the recipe to grams. The key here is to use roughly an 80% hydration dough, so regardless of how much flour you use, be sure the water amount is roughly 80% the amount of flour. Similarly, the salt should be roughly 2 to 3 % the weight of the flour, which for this recipe is 7 to 11 grams.
Time: Be sure to read the recipe through entirely before endeavoring to make this bread: you need 12-18 hours initially in rising time and 2 more hours subsequently for a second rise.
Equipment: You’ll need a lidded vessel to bake this loaf. I use my 5-qt Lodge Double Dutch Oven for this one. Parchment paper is helpful as well for transferring the dough from the towel to the preheated Dutch oven.
Ingredients
- 385 grams (about 3 cups) bread flour, plus more for dusting
- 1 gram (¼ teaspoon) instant yeast
- 11 grams (about 2 teaspoons) kosher salt
- 308 grams (about 1 5/8 cups) water
- Cornmeal, wheat bran, or oat bran as needed
Instructions
- In a large bowl, combine the flour, yeast, and salt. Add the water, and stir until blended. The dough will be sticky. Cover the bowl with plastic wrap and let rest for 12-18 hours at room temperature. (Note: Optional Step: If time permits, 15 to 20 minutes after you cover the bowl, perform one set of stretches and folds: simply grab an edge of the dough using a wet hand and stretch it up and in. Repeat this 8 to 10 times, grabbing a different edge each time. I find performing a set of stretches and folds gives my dough the teensiest bit more strength and ultimately a bit more loft. See photos in the post above.)
- After the 12 to 18 hours, or when the surface of the dough is dotted with bubbles, lightly flour a work surface and place the dough on it. Sprinkle a little more flour on the dough and fold it over on itself once or twice. Cover loosely with plastic wrap and let rest for about 15 minutes.
- Meanwhile, lay a clean kitchen towel (not terry cloth) on a counter or tabletop in a draft-free area. Generously coat it with cornmeal, wheat bran, oat bran, or any combination of the three. After the 15 minutes, using as much flour as necessary to keep the dough from sticking to your fingers and the work surface, quickly shape the dough into a ball and place seam side down in the center of the prepared towel. Dust with more cornmeal, wheat bran, or oat bran. If the towel is large enough, fold the sides up over the bread so that it is completely covered. Otherwise, cover it with another towel. Let rise for another 2 hours. (I like to set my towel-wrapped dough into a bowl or banneton to provide a little more support during these 2 hours.)
- Forty-five minutes before the dough is ready, preheat the oven to 450°F. Place a 6- to 8-quart heavy-covered pot (I use this Lodge Double Dutch Oven) in the oven while it heats. When the dough is ready, carefully remove the pot from the oven. Slide your hand under the towel and turn the dough over into the pot, seam side up. This is tricky — I find that parchment paper helps: open your towel, lay a sheet of parchment paper over the dough, place your hand on the parchment paper and carefully flip the dough over so that the seam side is up and the dough is resting on the parchment paper. Use the overhanging parts of the parchment paper as handles, then lay the bread, parchment paper and all, into the Dutch oven.
- Cover with the lid and bake for 30 minutes. Remove the lid and bake for another 10 to 15 minutes or until it sounds hollow when tapped. Remove from oven, and turn out onto a cooling rack.
- Prep Time: 5 minutes
- Cook Time: 45 minutes
- Category: Bread
- Method: Dutch Oven
- Cuisine: American
This post may contain affiliate links. Please read my disclosure policy.


194 Comments on “Jim Lahey’s No-Knead Bread”
Hi Alexandra,
I made the bread according to your instructions, but my dough was a bit wetter than yours. It came out okay, just slightly moist. What do you think I did wrong? Was I supposed to leave it in the oven longer? I waited longer than 30 minutes before cutting it.
Thank you!
Hi! Did you use a scale to measure? What type of flour did you use? Do you live in a humid environment?
I used a cup of whole wheat flour for one cup of bread flour, used a heavy stainless steel pot and ultimately had to put the dough in the fridge for the 2nd rise but it came out delicious and crusty. Thanks!
Great to hear, Monica! Thanks for writing and sharing these notes 🙂
As always, you take an excellent recipe and make it even more splendid! I find something about doing the stretches and folds to be so satisfying as the glob of dough becomes springy and elastic and lovely to the touch. The crumb really does improve with the stretches, and for such little effort, there’s a very nice payback. And, when you start to experiment with various flours, stone-milled, especially, but also flours from non-commercial farms as you advocate, the flavor improves as well. I think I’m a bit of a flour fanatic these days, cradling by new flour arrivals like a newborn. When I make too much bread, neighbors could not be happier!
You usually perform more than 1 set of stretch and fold on your breads. Would that work on the Jim Lahey bread also? So should I do 1 set of stretch and fold or up to 4 times. What’s your thought on how many times and how far apart.
Hi! I do more than one set of stretches and folds for my sourdough bread recipes, but I don’t think doing more than one set here is necessary — with the 18 hour rise, plenty more gluten and strength will develop. There is no harm, of course, in adding another set, but I don’t think you’ll see that much difference here between doing one set and 4 sets.
Hi Ali,
What size round parchment paper are you using in the Lodge Dutch oven?
Hi! 12 inches: https://amzn.to/4jgjop7
Came out perfect!
Question – could I let it sit longer than 18 hours? For example, make the dough at 8am and bake the next day, well over 24 hours?
P.S. you taught me how to make sourdough <3
So nice to hear this, Audrea 🙂
Yes, I think you could. I would be sure to use 1/4 teaspoon or even a scant 1/4 teaspoon, and cold water and store the bread in a cool spot (like your basement or another cool spot).
I have definitely let this dough rise for close to 24 hours before shaping and letting it sit for another 2-3 hours.
Quick question – could one refrigerate the dough for 24 hours once the dough is made and stretched?
Then how long should it sit to come up to room temp before doing the shaping and baking?
Definitely! Upon removing from the fridge, I would shape it immediately into the round, then I would let it rest at room temperature for 2-3 hours before baking it.
I ended up keeping it in the fridge for 24 hours, I did end up leaving on the counter for 3 or so hours before shaping it. Just finished baking it off, WOW. delicious. Great recipe – will redo – thinking I will do exactly as you do and make it in the evening and then bake it off in the am.
Great to hear, Jen! Yeah, I do the overnight rise often. Know that it reheats very well, so if you bake it off in the morning, if you reheat it @ 350ºF for 15 minutes, it will taste freshly baked.
Loved the base of this recipe – tried a change: added 100 g ripe sourdough starter (subtracting 50 g from both water and bread flour) – let it sit for 12 hours….beautiful action. Shaped into a 9×5 loaf pan – sit for 2 hours…baked with lid on (another loaf pan) at 425 degrees for 20 minutes, removed lid and baked an additional 30…. turned out wonderful!
Fun! Love the sound of this. Thanks so much for writing and sharing your notes 🙂
So easy and delicious! I’ve been making your mother’s peasant bread for awhile, but have been wanting to try this recipe. Finally did and it’s my new favorite. I used wheat germ instead of the cornmeal and it gave the bread a toasted wheat flavor.
Thanks for all your great recipes.
‘
Great to hear, Lori! Thanks so much for writing and sharing these notes 🙂
Hi Alexandra, this looks great but I don’t have a Dutch oven and I make my bread in conventional British oblong tins, using a no-knead method. Would this rec ipework as well if baked in tins?
Many thanks.
Barbara
Yes, it should be fine! Are you using a 9×5-inch loaf pan? Or is the oblong tin lidded?
Hi Alexandra. It’s a 9x 5 loaf pan with no lid. Do hope it will work. I’ll try it at the weekend and let you know, for future reference.
Thanks
Barbara
I think it should work really well! It’s possible you might need to scale it up. For instance, I use 500 grams of flour in this sandwich bread recipe that I bake in a 9×5-inch loaf pan.
I find that using a three quart pot gives the bread a higher rise.
That makes sense. Does the loaf expand to touch the sides, or is there still space once it has sprung to its full volume?
Yes it expands to the sides then rises higher. Better loaf in my opinion.
Great recipe.
Nice, great to hear 🙂
My bread does seem somewhat wet, no matter what I do,
I always follow the exact recipe.
Are you located here or abroad? Are you using a scale to measure? And what type of flour are you using?
I live in Boston, MA, I weigh the flour, I use all purpose king Arthur Flour.
OK, a few thoughts: when you run out of your ap flour, try using bread flour. Or, with your next loaf using ap flour, you could hold back 25 grams of water and see if that helps. But if you are happy with the end result, don’t change a thing — this is a wet dough and that’s part of the reason it works so well.
Would there be a way to adapt this for making bread rolls?
I think you could, but I worry about the process being potentially frustrating because the dough is so wet… I think shaping the rolls will be tricky. The other tricky step is the baking: would you preheat a Dutch oven and try to carefully lower the rolls into the hot DO? Or would you bake them in a baking dish? I think a baking dish would be easier, but they might not have the same crust as the Jim Lahey Dutch oven bread.
Thank you for your reply. I might try experimenting and will let you know how it goes!
Ali, I do not have a stand mixer and don’t plan on getting one. I’m wondering if you could apply this stretch and fold for most bread recipes. In other words, do you think one could substitute stretches and folds instead of kneading (hand or mixer) for any bread recipe? What would be the considerations and are there any caveats? I have your blog bookmarked and it’s the first place I go for recipes and inspiration!🥰
Thank you Mary Ann 🙂 You are too kind. Yes, I do think adding one set of stretches and folds, 30-60 minutes after you mix your dough could replace all kneading in most bread recipes. I do think this works best when you use a smaller amount of yeast (1/2 teaspoon or so) and plan for a longer, slower rise, because time allows gluten to develop as well. Hope that helps!
This recipe is SO brilliant-works every time and is just delicious.
Great to hear, Moira!
Have you ever tried a recipe like this with adding a bit of sourdough starter? I’m wondering if that’s a possibility to give it a bit of a sourdough kick? How much would you adjust the proportions ?
I haven’t with this recipe but I have with many recipes. For this amount of flour, I might try 75 grams starter. I’d subtract roughly 37 grams each flour and water from the initial recipe. That said, if the dough feels too wet upon mixing, sprinkle in some more flour until it forms a ball.
Amazing! I can’t recommend it enough!
The long rise delivered an incredible depth of flavour.
I added dried rosemary. Instead of shaping it as a boule, after the first rise, I folded it onto itself and placed it in an oiled 9×13 inch pyrex pan and let it rise for about 3 hrs, stretched and dimpled it and then baked at 200° for 35 min resulting into a very very delicious focaccia bread.
I’m already planning on doubling the recipe next time insha’Allah. Should I double the yeast as well?
Thanks Alex!
Great to hear, Halla! No need to double the yeast 🙂
Turned out perfect the first time. Thanks for the detailed instructions.
Great to hear, Cynthia! Thanks for writing 🙂
This bread is marvelous and a crowd pleaser. Easy peasy and fun to make! I decorate the top with purple onion, cherry tomatoes, olives, rosemary, sweet peppers. I’ve been using 3 cups white flour and 1 cup whole wheat flour – add a dab more warm water to accommodate the whole wheat. Thank you, Ali, for a great recipe!
Great to hear, Dianna! Thanks so much for writing and sharing your notes. To clarify: are you making the Lahey bread (this post) with those decorations or this focaccia?
Hi Alexandra,
I made this bead 3 x times this week for the first time (Friday, Saturday and Sunday).
It turned out fine all 3 times and the flavor and texture is amazing, The only problem is – that the bread crust is crunchy and hard when taken out of the oven but by the time it cools (Approx 1 hr later), the crust goes soft.
Do you happen to know why this is happening?
I make your sour dough bread all the time and the crust has never goes soft for this me when i use this recipe.
I live in Melbourne Australia.
-Susan
Hmmm… not sure! I do think this is a thinner crust then my sourdough breads, but I have not experienced what you have in terms of the crust going soft. I will say if you pop the loaf in the oven at 350ºF for 15 minutes, it will crisp right back up sooooo beautifully. I’ve been make this bread a lot recently, freezing it, letting it thaw at room temperature, then reheating as described, and it tastes like freshly baked bread.
If I wanted to try and make this as a rye loaf, could I substitute 1 of the cups of regular flour for the rye flour? Would the water amount change too? I might experiment and see how it turns out! Love your recipes! Thank you!
I think you could! The loaf will likely not be as light and airy, but it will still be tasty. It is so hard to know how to adjust the water until you’ve made the recipe once. If, however, you are mixing the dough, and it feels really really thick and dry, add more water until it resembles the dough in the photos. Please report back if you give it a go!
That makes sense! Thank you! I’ll see how it turns out 🙂
I did it! Soooo good!! I’ll be making it again this way! 🙂
Hooray! Great to hear, Jess. Thanks so much for circling back 🙂
Love this recipe. I recently tried it with 20% buckwheat flour and the rest king Arthur bread flour. The loaf came out flat. Every time I try to make a whole wheat version substituting 20% by weight it doesn’t come out as high (flat bread). Any recommendations to change the flour and still have lift? Thanks!
Hi Nino,
What about trying some stone-milled flour? Buckwheat flour is gluten free, so that’s probably why it’s coming out flat. But if you subbed out 20% of the bread flour for 20% stone-milled flour, I think you’d get excellent results. I love Cairnspring Mills, Anson Mills, Red Tail Grains for freshly milled, stone-milled flours. (You can read more about the difference between stone-milled flour and commercial whole wheat flour here: Easy Sourdough Bread (Whole Wheat-ish)
I, and my family, love this bread! My question is adding jalapenos and cheese. Can this be done with this bread, or is the dough “too loose” to spread out like you do in the sourdough olive/rosemary loaf? Also, which is better to add: fresh or canned jalapenos?
Thanks so much for all of your amazing recipes and books!
Hi! I think you could add them with the flour — toss them right in. I like using fresh jalapeños when I add them to bread dough. I would also go light on the add-ins: maybe no more than a cup of cheese and 1/2 cup of jalapenos?
Thanks for the response. So…do not add the jalapenos or cheese as you do for the oliver/rosemary loaf? I may slice up some Serranos, too! Thanks again!
Janeen
I think with this recipe, which is slightly higher hydration, the other method will be too problematic… you of course can try, but I worry it might be frustrating. I think adding the add-ins at the beginning will work.
I made a loaf with your first suggestions and it was fantastic!! Next time, I will rough chop the jalapenos and add a bit more of them. The bread was moist and very flavorful! Made some toast from it this morning and it was delicious! Thanks again!
Great to hear, Janeen! Thanks so much for writing and sharing this 🙂
Fabulous bread! A little squished in my 2 litre (quart) dutch oven the first time so trying it in my 3 quart one next. In the UK and I don’t use cornmeal that often. I used pinhead oatmeal instead which gave it a nice crunch and just plain (all purpose) flour.
Thanks for your great recipes Ali. Hungry household here and we go through lots of your peasant bread and focaccia every week. This loaf is a super add to the team.
I do use organic bread flour for sourdough loaves. Would it make a difference for this one?
Thanks again!
So nice to read this, Ann! Thanks so much for writing. Organic bread flour will be lovely here! Go for it. When I test recipes, I use King Arthur bread and all-purpose flour, which are readily available over here, but when I bake on my own, I use all sorts of flour, from Central Milling, another American company, to Petra, an Italian company, to Cotswald Crunch, a British flour I am in love with!
Thank you so much for this recipe! The result I’ve gotten with your tweaks is wonderful. I’ve probably made this a dozen times or so, and I have one question about freezing the loaf. How would you store it in the freezer? Do you put it back into the oven from frozen in order to reheat and crisp up?
Great to hear, Nieka! Thanks so much for writing and sharing this 🙂 In the freezer, I store it in a ziptop bag, like this one: 2-gallon bag I like to thaw the bread at room temperature — just pull it out the morning you are serving it. Re-heat @ 350ºF for 15-20 minutes 🙂
Hi! I just love all of your recipes. They are always a hit with friends and family!
One question for the water – what temperature should I use? Cold? Room temp? 95 degrees?
Thank you, Ann! Means a lot. For this recipe, because it’s such a long slow rise, really any temperature is fine (as long as its not too hot to kill the yeast). The reason is that the water will quickly get to the ambient temperature of the room, and for this recipe, it’s really time that does the work — again, the long slow rise. For my mother’s peasant bread recipe and for other similar recipes, I call for lukewarm water to give the yeast a jumpstart because the first rise is just a couple of hours — for those shorter rises, lukewarm water is more important; for longer rises, cold water straight from the tap is fine! Hope that makes sense.
Has anyone tried doubling this recipe? For the time involved I’m thinking it might be nice to get 2 loaves out of it, but understand sometimes doubling is double trouble!
Hi Mary! It doubles well. Ideally you are using a scale to measure everything 🙂
This bread looks amazing! Thanks for sharing. Is there any chance I can incorporate some of our sourdough starter into this recipe?
Sure! If it’s a 100% hydration starter, just swap out an equal amount of flour and water (total) for the total amount of starter you use. To clarify: if you use 100 grams of starter, swap out 50 grams each flour and water.
Can I make this without a Dutch oven? I don’t have one.
Hi! Do you have a baking steel or a pizza stone? And a metal bowl you could turn over the loaf and place on the baking steel/stone?
Do you think the addition of some shredded cheese would make this dough too heavy to perform well?
No, I think some shredded cheese would be lovely!
Thanks for your encouragement! I added dried oregano and shredded gouda to the dough and it came out perfectly. And so fragrant when toasted.
Great to hear, Susan! Thanks for writing. Sounds lovely!
I use your peasant bread recipe measurements (stone ground whole wheat, bread flour, rye flour and adjust the water as needed). My dough goes into the fridge overnight. The stretched dough adjusts to room temp, goes unceremoniously on parchment into my lodge dutch oven the next morning and comes out with a rise and crusty.
Most likely not as nice as yours, however it is quick.
May be sometimes someone else needs a good bread quick?
I have a small NYC oven and make sure my parchment does not stick out of the pot to prevent an oven fire when the bread bakes with lid off.
Love your website!
Amazing! Love the sound of this. So, do you mix the dough and stick it in the fridge immediately? And before you bake it, do you deflate it/shape it into a ball? Love the sound of the method. Thank you for writing and for your kind words 🙂
Yes! I mix the dough sometimes in the evening, cover my bowl with a wet kitchen towel and immediately stick the covered bowl into the fridge. As soon as I get up I remove the covered bowl and only after my coffee the dough gets attention. I deflate the dough.
I stretch the dough at least 10x. Again I cheat and use a large stainless steel serving spoon to do the stretches. After the stretches I plop the dough as shapely as possible onto my parchment. The rest is per your recipe. My dough is often on the high hydration side.
I had a burning parchment in the oven and therefore I am only using larger rounds for easy plopping!
OK! Got it. Thank you for taking the time to circle back and share your method and notes. Sounds easy and delicious.